
Owner's Manual
Page 2
and Canada models) 2 En Front panel A B C MAIN ZONE ON/OFF MASTER ON OFF INPUT AUDIO SELECT SPEAKERS A B SILENT CINEMA YPAO MULTI ZONE STRAIGHT TUNING MODE MEMORY EFFECT DISPLAY MAN'L/AUTO BAND PRESET/TUNING EDIT SEARCH MODE ZONE ON/OFF ... 4 L AUDIO R OPTICAL PROGRAM PUSH ENTER HDMI IN MENU TONE CONTROL USB PHONES OPTIMIZER MIC VIDEO AUX PURE DIRECT VOLUME D F G HIJ KL E M N AUDIO SELECT SPEAKERS A B SILENT CINEMA YPAO MULTI ZONE STRAIGHT TUNING MODE MEMORY EFFECT DISPLAY MAN'L/AUTO BAND PRESET/TUNING EDIT SEARCH MODE ZONE ON/OFF ZONE REC OUT...
and Canada models) 2 En Front panel A B C MAIN ZONE ON/OFF MASTER ON OFF INPUT AUDIO SELECT SPEAKERS A B SILENT CINEMA YPAO MULTI ZONE STRAIGHT TUNING MODE MEMORY EFFECT DISPLAY MAN'L/AUTO BAND PRESET/TUNING EDIT SEARCH MODE ZONE ON/OFF ... 4 L AUDIO R OPTICAL PROGRAM PUSH ENTER HDMI IN MENU TONE CONTROL USB PHONES OPTIMIZER MIC VIDEO AUX PURE DIRECT VOLUME D F G HIJ KL E M N AUDIO SELECT SPEAKERS A B SILENT CINEMA YPAO MULTI ZONE STRAIGHT TUNING MODE MEMORY EFFECT DISPLAY MAN'L/AUTO BAND PRESET/TUNING EDIT SEARCH MODE ZONE ON/OFF ZONE REC OUT...

Owner's Manual
Page 6
... playback 63 For compression artifacts (Compressed Music Enhancer mode 63 Surround decoder mode 63 THX Surround mode 63 Using sound field programs without surround speakers (Virtual CINEMA DSP 64 Enjoying multi-channel sources and sound field programs with bookmarks...... 83 Using a USB storage device or a USB portable... features 80 Navigating the network and USB menus 80 Remote control operation 81 Using a PC server or Yamaha MCX-2000 82 Installing Windows Media Player 11 on the Yamaha MCX-2000 82 Using the Internet Radio 83 Storing your PC 82 Registering this unit by using the...
... playback 63 For compression artifacts (Compressed Music Enhancer mode 63 Surround decoder mode 63 THX Surround mode 63 Using sound field programs without surround speakers (Virtual CINEMA DSP 64 Enjoying multi-channel sources and sound field programs with bookmarks...... 83 Using a USB storage device or a USB portable... features 80 Navigating the network and USB menus 80 Remote control operation 81 Using a PC server or Yamaha MCX-2000 82 Installing Windows Media Player 11 on the Yamaha MCX-2000 82 Using the Internet Radio 83 Storing your PC 82 Registering this unit by using the...

Owner's Manual
Page 7
...in the simplified remote control ...........132 Contents Using multi-zone configuration 133 Step1: Planning the multi-zone system 134 Step2: Connecting the speakers, external amplifiers, and/or other components 122 Selecting a component to the zone component video signals 137 Using REMOTE IN/OUT and TRIGGER... OUT jacks for Zone 2, Zone 3, and Zone 4 138 Step3: Setting the zone parameter 139 Assigning the zone speakers 139 Controlling Zone 2, Zone 3, or Zone 4 139 Basic operation 139 Selecting the input source Zone 2, Zone 3, or Zone 4 140 Adjusting the...
...in the simplified remote control ...........132 Contents Using multi-zone configuration 133 Step1: Planning the multi-zone system 134 Step2: Connecting the speakers, external amplifiers, and/or other components 122 Selecting a component to the zone component video signals 137 Using REMOTE IN/OUT and TRIGGER... OUT jacks for Zone 2, Zone 3, and Zone 4 138 Step3: Setting the zone parameter 139 Assigning the zone speakers 139 Controlling Zone 2, Zone 3, or Zone 4 139 Basic operation 139 Selecting the input source Zone 2, Zone 3, or Zone 4 140 Adjusting the...

Owner's Manual
Page 9
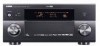
Introduction Introduction Features 10 Getting started 11 Supplied accessories ...11 Using the remote control ...12 Opening and closing the front panel door 12 Quick start guide 13 Preparation: Check the items 13 Step 1: Set up your speakers ...14 Step 2: Connect your Blu-ray Disc/HD DVD player and other components 16 Step 3: Turn on the power and start playback 17 What do you want to do with this unit 18
Introduction Introduction Features 10 Getting started 11 Supplied accessories ...11 Using the remote control ...12 Opening and closing the front panel door 12 Quick start guide 13 Preparation: Check the items 13 Step 1: Set up your speakers ...14 Step 2: Connect your Blu-ray Disc/HD DVD player and other components 16 Step 3: Turn on the power and start playback 17 What do you want to do with this unit 18

Owner's Manual
Page 10
... portable audio player Web control feature ◆ Web control capability of this unit by using a Web browser ☞ P. 120 Automatic speaker setup features ◆ Advanced YPAO (Yamaha Parametric Room Acoustic Optimizer) for automatic speaker setup ☞ P. 46 ◆ Specialized parametric equalizer for the standing wave reduction ☞ P. 48 ◆ Multiple point measurement feature...
... portable audio player Web control feature ◆ Web control capability of this unit by using a Web browser ☞ P. 120 Automatic speaker setup features ◆ Advanced YPAO (Yamaha Parametric Room Acoustic Optimizer) for automatic speaker setup ☞ P. 46 ◆ Specialized parametric equalizer for the standing wave reduction ☞ P. 48 ◆ Multiple point measurement feature...

Owner's Manual
Page 12
... remote control transmits a directional infrared ray. Infrared window (1) Outputs infrared control signals. Remote control sensor MAIN ZONE ON/OFF MASTER ON OFF INPUT AUDIO SELECT SPEAKERS A B SILENT CINEMA YPAO MULTI ZONE STRAIGHT TUNING MODE MEMORY EFFECT DISPLAY MAN'L/AUTO FM/AM PRESET/TUNING EDIT CATEGORY SEARCH MODE ZONE ON/OFF ZONE...
... remote control transmits a directional infrared ray. Infrared window (1) Outputs infrared control signals. Remote control sensor MAIN ZONE ON/OFF MASTER ON OFF INPUT AUDIO SELECT SPEAKERS A B SILENT CINEMA YPAO MULTI ZONE STRAIGHT TUNING MODE MEMORY EFFECT DISPLAY MAN'L/AUTO FM/AM PRESET/TUNING EDIT CATEGORY SEARCH MODE ZONE ON/OFF ZONE...
Owner's Manual
Page 13
... 21 to enjoy Blu-ray Disc/HD DVD movie playback in the package of this unit. ❏ Speakers ❏ Front speaker x 2 ❏ Center speaker x 1 ❏ Surround speaker x 4 ❏ Front presence speaker x 2 ❏ Rear presence speaker x 2 Select magnetically shielded speakers. Left front presence Right front presence Front right Right subwoofer Surround right Front left Center Left subwoofer Surround...
... 21 to enjoy Blu-ray Disc/HD DVD movie playback in the package of this unit. ❏ Speakers ❏ Front speaker x 2 ❏ Center speaker x 1 ❏ Surround speaker x 4 ❏ Front presence speaker x 2 ❏ Rear presence speaker x 2 Select magnetically shielded speakers. Left front presence Right front presence Front right Right subwoofer Surround right Front left Center Left subwoofer Surround...

Owner's Manual
Page 14
... speaker Right rear presence speaker Loosen Insert Tighten Surround right speaker Surround back right speaker Front right speaker Center speaker For other . 4 Do not let the bare speaker wires touch any metal part of the speaker cables together to prevent short circuits. 3 Do not let the bare speaker wires touch each other speaker ... presence left Rear presence right Subwoofer Subwoofer left right 7.2/7.1 6.2/6.1 5.2/5.1 3.2/3.1 2.2/2.1 14 En Quick start guide Step 1: Set up your speakers Place your speakers in the room and connect them to connect less than 11...
... speaker Right rear presence speaker Loosen Insert Tighten Surround right speaker Surround back right speaker Front right speaker Center speaker For other . 4 Do not let the bare speaker wires touch any metal part of the speaker cables together to prevent short circuits. 3 Do not let the bare speaker wires touch each other speaker ... presence left Rear presence right Subwoofer Subwoofer left right 7.2/7.1 6.2/6.1 5.2/5.1 3.2/3.1 2.2/2.1 14 En Quick start guide Step 1: Set up your speakers Place your speakers in the room and connect them to connect less than 11...

Owner's Manual
Page 15
Note Check the impedance of "SPEAKER IMP." If the impedance of your speaker is 6-ohm, change the setting of the speaker you are connecting. in "Advanced setup" (see page 142). Introduction 0 10 Subwoofer cable Left subwoofer 0 10 Right subwoofer Subwoofer cable (U.S.A. Surround left speaker Surround back left speaker Front left channel (L), right channel (R), "+" (red line) and "-" (white line) properly. model) Quick start guide Left rear Left front presence speaker presence speaker Be sure to connect the left speaker 15 En
Note Check the impedance of "SPEAKER IMP." If the impedance of your speaker is 6-ohm, change the setting of the speaker you are connecting. in "Advanced setup" (see page 142). Introduction 0 10 Subwoofer cable Left subwoofer 0 10 Right subwoofer Subwoofer cable (U.S.A. Surround left speaker Surround back left speaker Front left channel (L), right channel (R), "+" (red line) and "-" (white line) properly. model) Quick start guide Left rear Left front presence speaker presence speaker Be sure to connect the left speaker 15 En
Owner's Manual
Page 16
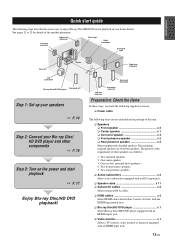
.... Video monitor AV receiver HDMI input jack HDMI cable HDMI OUT 1 jack To the AC wall outlet General connection information • General information on jacks and cable plugs ☞ P. 29 • General information on HDMI ☞ P. 29 • Speaker impedance setting &#... Connecting an external amplifier ☞ P. 36 • Connecting a DVD player via multi-channel analog audio connection ☞ P. 37 • Connecting a Yamaha iPod universal dock ☞ P. 38 • Using the REMOTE IN/OUT jacks ☞ P. 38 • Using the TRIGGER OUT jacks ☞ P....
.... Video monitor AV receiver HDMI input jack HDMI cable HDMI OUT 1 jack To the AC wall outlet General connection information • General information on jacks and cable plugs ☞ P. 29 • General information on HDMI ☞ P. 29 • Speaker impedance setting &#... Connecting an external amplifier ☞ P. 36 • Connecting a DVD player via multi-channel analog audio connection ☞ P. 37 • Connecting a Yamaha iPod universal dock ☞ P. 38 • Using the REMOTE IN/OUT jacks ☞ P. 38 • Using the TRIGGER OUT jacks ☞ P....

Owner's Manual
Page 17
... Adjust the volume level. Is Blu-ray Disc/HD DVD player connected correctly?  Check the connection of the video monitor. If the speakers are some troubles with playback, check the settings as follows. You can also use the automatic setup feature. see page 142). ■ After using...monitor. Introduction Step 3: Turn on , it takes approximately 20 seconds until this unit produces sounds, and while "Please wait" appears in order to receive infrared signals from the standby mode, press AMAIN ZONE ON/OFF on the front panel (or EPOWER on pages 146 to 153 for details: -...
... Adjust the volume level. Is Blu-ray Disc/HD DVD player connected correctly?  Check the connection of the video monitor. If the speakers are some troubles with playback, check the settings as follows. You can also use the automatic setup feature. see page 142). ■ After using...monitor. Introduction Step 3: Turn on , it takes approximately 20 seconds until this unit produces sounds, and while "Please wait" appears in order to receive infrared signals from the standby mode, press AMAIN ZONE ON/OFF on the front panel (or EPOWER on pages 146 to 153 for details: -...

Owner's Manual
Page 18
...programs ☞ P. 58 • Using the Pure Direct mode for high fidelity sound ☞ P. 65 • Adjusting the tonal quality of the speakers ☞ P. 65 • Customizing the sound field programs ☞ P. 86 Additional features • Setting the remote control ☞ P. 121 ... by using the parametric equalizer ☞ P. 104 • Adjusting the audio and video synchronization ☞ P. 105 • Muting the selected speaker channel ☞ P. 106 • Setting the parameters related to default values ☞ P. 154 18 En Using various input sources •...
...programs ☞ P. 58 • Using the Pure Direct mode for high fidelity sound ☞ P. 65 • Adjusting the tonal quality of the speakers ☞ P. 65 • Customizing the sound field programs ☞ P. 86 Additional features • Setting the remote control ☞ P. 121 ... by using the parametric equalizer ☞ P. 104 • Adjusting the audio and video synchronization ☞ P. 105 • Muting the selected speaker channel ☞ P. 106 • Setting the parameters related to default values ☞ P. 154 18 En Using various input sources •...

Owner's Manual
Page 19
Preparation Preparation Connections 20 Rear panel ...20 Placing speakers ...21 Connecting speakers ...23 Using subwoofers ...26 Using presence speakers ...27 Connecting the speaker cable 28 Information on jacks and cable plugs 29 Information on HDMI™ ...29 Audio and video signal flow 30 Connecting ...40 Connecting the FM and AM antennas 41 Connecting the power cable 42 Setting the speaker impedance and language 43 Turning this unit on and off 43 Front panel display ...44 Optimizing the speaker setting for your listening room (YPAO) ...46 Before starting the automatic setup 46 ...
Preparation Preparation Connections 20 Rear panel ...20 Placing speakers ...21 Connecting speakers ...23 Using subwoofers ...26 Using presence speakers ...27 Connecting the speaker cable 28 Information on jacks and cable plugs 29 Information on HDMI™ ...29 Audio and video signal flow 30 Connecting ...40 Connecting the FM and AM antennas 41 Connecting the power cable 42 Setting the speaker impedance and language 43 Turning this unit on and off 43 Front panel display ...44 Optimizing the speaker setting for your listening room (YPAO) ...46 Before starting the automatic setup 46 ...

Owner's Manual
Page 20
... OUT GND 5 AC OUTLETS SWITCHED BD/ HD DVD 6 DVD 7 AC IN DTV 8 COAXIAL DIGITAL IN ANTENNA-2 GND AM FM SPEAKERS + L REAR PRESENCE /ZONE FRONT PRESENCE /ZONE SURROUND (SINGLE) SUR. Consult your dealer for custom installation. BACK/ BI-AMP B...OPTICAL SB (8CH) SURROUND SUBWOOFER ZONE 2 ZONE 3 ZONE 4 FRONT SURROUND CENTER (REAR) SUBWOOFER SUR. Connections Connections Rear panel 1 23 4 5 6 7 8 SPEAKERS + R REAR PRESENCE /ZONE FRONT PRESENCE /ZONE SURROUND SUR. and Canada models only) 8 ANTENNA terminals 9 TRIGGER OUT jack REMOTE IN/OUT jacks 0 COMPONENT VIDEO MONITOR...
... OUT GND 5 AC OUTLETS SWITCHED BD/ HD DVD 6 DVD 7 AC IN DTV 8 COAXIAL DIGITAL IN ANTENNA-2 GND AM FM SPEAKERS + L REAR PRESENCE /ZONE FRONT PRESENCE /ZONE SURROUND (SINGLE) SUR. Consult your dealer for custom installation. BACK/ BI-AMP B...OPTICAL SB (8CH) SURROUND SUBWOOFER ZONE 2 ZONE 3 ZONE 4 FRONT SURROUND CENTER (REAR) SUBWOOFER SUR. Connections Connections Rear panel 1 23 4 5 6 7 8 SPEAKERS + R REAR PRESENCE /ZONE FRONT PRESENCE /ZONE SURROUND SUR. and Canada models only) 8 ANTENNA terminals 9 TRIGGER OUT jack REMOTE IN/OUT jacks 0 COMPONENT VIDEO MONITOR...

Owner's Manual
Page 21
...right FPL/FPR: Front presence left/right RPL/RPR: Rear presence left/right LSW/RSW: Left/right subwoofer Front left and right speakers The surround speakers are used for details. Left and right subwoofers See page 26 for the center channel sounds (dialog, vocals, etc.). FL C...realistic front-to enjoy the CINEMA DSP and multi-channel audio sources. ■ 11.2/11.1 -channel speaker layout 11.2/11.1-channel speaker layout is for details. Center speaker The center speaker is highly recommended for playback the sound of high definition audio formats (Dolby TrueHD, DTS-HD Master Audio...
...right FPL/FPR: Front presence left/right RPL/RPR: Rear presence left/right LSW/RSW: Left/right subwoofer Front left and right speakers The surround speakers are used for details. Left and right subwoofers See page 26 for the center channel sounds (dialog, vocals, etc.). FL C...realistic front-to enjoy the CINEMA DSP and multi-channel audio sources. ■ 11.2/11.1 -channel speaker layout 11.2/11.1-channel speaker layout is for details. Center speaker The center speaker is highly recommended for playback the sound of high definition audio formats (Dolby TrueHD, DTS-HD Master Audio...

Owner's Manual
Page 22
... unbroken sound field behind the listening position, place the surround left and right channel signals are the same as those for the 11.2/11.1-channel speaker layout (see page 21). Use the automatic setup feature (see page 46) or set to -back transitions. The surround back left and right... C SR LSW SL C FL FR 30˚ SL 60˚ SL 80˚ SBL SR SR SBR 30 cm (12 in the 11.2/11.1-channel speaker layout. y You can enjoy multi-channel sources with the placement in ) or more realistic front-to "None" (see page 100). For other than the...
... unbroken sound field behind the listening position, place the surround left and right channel signals are the same as those for the 11.2/11.1-channel speaker layout (see page 21). Use the automatic setup feature (see page 46) or set to -back transitions. The surround back left and right... C SR LSW SL C FL FR 30˚ SL 60˚ SL 80˚ SBL SR SR SBR 30 cm (12 in the 11.2/11.1-channel speaker layout. y You can enjoy multi-channel sources with the placement in ) or more realistic front-to "None" (see page 100). For other than the...

Owner's Manual
Page 23
... unit (see page 139). Notes • A speaker cord is turned off (see page 143). ■ For the 11.2/11.1 (or 9.2/9.1) -channel speaker setting Right front presence speaker Right rear presence speaker Left rear presence speaker Left front presence speaker SPEAKERS + R REAR PRESENCE /ZONE FRONT PRESENCE /ZONE SURROUND... the "-" (white line) terminals. • You can also use 6-ohm speakers, be sure to connect the left speaker speaker 23 En to the "+" (red line) terminals of this unit and your speaker. Connect the striped (grooved, etc.) cable to "6ΩMIN" before using ...
... unit (see page 139). Notes • A speaker cord is turned off (see page 143). ■ For the 11.2/11.1 (or 9.2/9.1) -channel speaker setting Right front presence speaker Right rear presence speaker Left rear presence speaker Left front presence speaker SPEAKERS + R REAR PRESENCE /ZONE FRONT PRESENCE /ZONE SURROUND... the "-" (white line) terminals. • You can also use 6-ohm speakers, be sure to connect the left speaker speaker 23 En to the "+" (red line) terminals of this unit and your speaker. Connect the striped (grooved, etc.) cable to "6ΩMIN" before using ...

Owner's Manual
Page 24
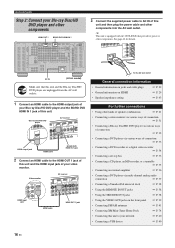
Connections ■ For the 7.2/7.1 (or 6.2/6.1) -channel speaker setting SPEAKERS + R SURROUND SUR. BACK/ BI-AMP B FRONT B/ ZONE EXTRA SP A FRONT A Center speaker Surround right Surround back speaker right speaker Front right speaker Front left speaker Surround back Surround left left speaker * speaker * If you use a single surround back speaker, connect the speaker to the SUR.BACK/BI-AMP (SINGLE) speaker terminal. 24 En BACK/ BI-AMP B FRONT B/ ZONE EXTRA SP A FRONT A CENTER FRONT B speakers (U.S.A. model) SPEAKERS + L SURROUND (SINGLE) SUR.
Connections ■ For the 7.2/7.1 (or 6.2/6.1) -channel speaker setting SPEAKERS + R SURROUND SUR. BACK/ BI-AMP B FRONT B/ ZONE EXTRA SP A FRONT A Center speaker Surround right Surround back speaker right speaker Front right speaker Front left speaker Surround back Surround left left speaker * speaker * If you use a single surround back speaker, connect the speaker to the SUR.BACK/BI-AMP (SINGLE) speaker terminal. 24 En BACK/ BI-AMP B FRONT B/ ZONE EXTRA SP A FRONT A CENTER FRONT B speakers (U.S.A. model) SPEAKERS + L SURROUND (SINGLE) SUR.

Owner's Manual
Page 25
model) SPEAKERS + L SURROUND B FRONT B/ ZONE EXTRA SP A FRONT A Surround right speaker Front right speaker Center speaker Front left speaker Surround left speaker 25 En Preparation ■ For the 5.2/5.1 -channel speaker setting Connections SPEAKERS + R SURROUND B FRONT B/ ZONE EXTRA SP A FRONT A CENTER FRONT B speakers (U.S.A.
model) SPEAKERS + L SURROUND B FRONT B/ ZONE EXTRA SP A FRONT A Surround right speaker Front right speaker Center speaker Front left speaker Surround left speaker 25 En Preparation ■ For the 5.2/5.1 -channel speaker setting Connections SPEAKERS + R SURROUND B FRONT B/ ZONE EXTRA SP A FRONT A CENTER FRONT B speakers (U.S.A.

Owner's Manual
Page 26
... left/right C: Center SL/SR: Surround left/right SBL/SBR: Surround back left/right FSW/RSW: Front/rear subwoofer SL SR SBL SBR Speaker indications FL/FR: Front left/right C: Center SL/SR: Surround left/right SBL/SBR: Surround back left/right SW: Subwoofer ■ Connecting...single subwoofer Set "Configuration" in digital audio signals. model) 26 En You can use of subwoofers with built-in amplifiers, such as the Yamaha Active Servo Processing Subwoofer System, is effective not only for reinforcing bass frequencies from any or all channels, but also for reproducing the high ...
... left/right C: Center SL/SR: Surround left/right SBL/SBR: Surround back left/right FSW/RSW: Front/rear subwoofer SL SR SBL SBR Speaker indications FL/FR: Front left/right C: Center SL/SR: Surround left/right SBL/SBR: Surround back left/right SW: Subwoofer ■ Connecting...single subwoofer Set "Configuration" in digital audio signals. model) 26 En You can use of subwoofers with built-in amplifiers, such as the Yamaha Active Servo Processing Subwoofer System, is effective not only for reinforcing bass frequencies from any or all channels, but also for reproducing the high ...


