
Owner's Manual
Page 4
...long periods of other . Follow all instructions. 5 Do not use this product to follow instructions could void your authority, granted by Yamaha Corporation of the unit. Failure to accessories and/or another product use only high quality shielded cables. Compliance with one of cable entry ... not result in the users manual, may void your FCC authorization to use attachments/accessories specified by the manufacturer. 12 Use only with the cart, stand, tripod, bracket, or table specified by Yamaha may cause interference harmful to qualified service personnel. A polarized plug has ...
...long periods of other . Follow all instructions. 5 Do not use this product to follow instructions could void your authority, granted by Yamaha Corporation of the unit. Failure to accessories and/or another product use only high quality shielded cables. Compliance with one of cable entry ... not result in the users manual, may void your FCC authorization to use attachments/accessories specified by the manufacturer. 12 Use only with the cart, stand, tripod, bracket, or table specified by Yamaha may cause interference harmful to qualified service personnel. A polarized plug has ...
Owner's Manual
Page 5
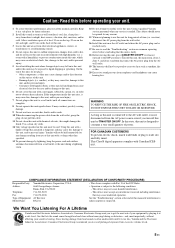
... hearing loss. Address: 6660 Orangethorpe Avenue • Operation is needed. See the "Troubleshooting" section at a safe level. Using this unit with high humidity (i.e. As long as sunshine, fire or like. 20 Excessive sound pressure from the AC power ...prevent electric shock, match wide blade of Equipment: Model Name: 714-522-9105 714-670-0108 AV Receiver RX-Z11 - COMPLIANCE INFORMATION STATEMENT (DECLARATION OF CONFORMITY PROCEDURE) Responsible Party: Yamaha Electronics Corporation, U.S.A. • This device complies with Canadian ICES003. The cabinet should never be ...
... hearing loss. Address: 6660 Orangethorpe Avenue • Operation is needed. See the "Troubleshooting" section at a safe level. Using this unit with high humidity (i.e. As long as sunshine, fire or like. 20 Excessive sound pressure from the AC power ...prevent electric shock, match wide blade of Equipment: Model Name: 714-522-9105 714-670-0108 AV Receiver RX-Z11 - COMPLIANCE INFORMATION STATEMENT (DECLARATION OF CONFORMITY PROCEDURE) Responsible Party: Yamaha Electronics Corporation, U.S.A. • This device complies with Canadian ICES003. The cabinet should never be ...

Owner's Manual
Page 6
... controls in the menu browse mode 78 The functions of the play information display 79 Using Network/USB features 80 Navigating the network and USB menus 80 Remote control operation 81 Using a PC server or Yamaha MCX-2000 82 Installing Windows Media Player 11 on your PC 82 Registering this unit... on the Yamaha MCX-2000 82 Using the Internet Radio 83 Storing your XM Satellite Radio service 74 Basic ...
... controls in the menu browse mode 78 The functions of the play information display 79 Using Network/USB features 80 Navigating the network and USB menus 80 Remote control operation 81 Using a PC server or Yamaha MCX-2000 82 Installing Windows Media Player 11 on your PC 82 Registering this unit... on the Yamaha MCX-2000 82 Using the Internet Radio 83 Storing your XM Satellite Radio service 74 Basic ...

Owner's Manual
Page 7
... sound configurations 86 Selecting decoders 86 Selecting decoders for 2-channel sources (surround decode mode 86 Decoder descriptions 86 Selecting decoders used with sound field programs 86 Selecting decoders for multi-channel sources 87 Playing back sources with the THX Surround modes 87 For... the multi-zone system 134 Step2: Connecting the speakers, external amplifiers, and/or other components 135 Using internal amplifier of this unit 135 Using external amplifiers 136 Using the ZONE DIGITAL OUT (COAXIAL) jack 136 Connecting Zone video monitor 137 Video signal up-conversion to...
... sound configurations 86 Selecting decoders 86 Selecting decoders for 2-channel sources (surround decode mode 86 Decoder descriptions 86 Selecting decoders used with sound field programs 86 Selecting decoders for multi-channel sources 87 Playing back sources with the THX Surround modes 87 For... the multi-zone system 134 Step2: Connecting the speakers, external amplifiers, and/or other components 135 Using internal amplifier of this unit 135 Using external amplifiers 136 Using the ZONE DIGITAL OUT (COAXIAL) jack 136 Connecting Zone video monitor 137 Video signal up-conversion to...
Owner's Manual
Page 8
...™ technology manufactured under license from Fraunhofer IIS and Thomson. In this manual, the illustrations of SRS Labs, Inc. This receiver supports network connections. This product is a registered trademark and the DTS logos, Symbol, DTS-HD and DTS-HD Master Audio ...coding technology licensed from Neural Audio Corporation and THX Ltd. DTS is manufactured under license from Dolby Laboratories. YAMAHA CORPORATION hereby grants the user a nonexclusive, non-transferable, limited right of use to English. • "AMAIN ZONE ON/OFF" or "3 DVD" (example) indicates the name of...
...™ technology manufactured under license from Fraunhofer IIS and Thomson. In this manual, the illustrations of SRS Labs, Inc. This receiver supports network connections. This product is a registered trademark and the DTS logos, Symbol, DTS-HD and DTS-HD Master Audio ...coding technology licensed from Neural Audio Corporation and THX Ltd. DTS is manufactured under license from Dolby Laboratories. YAMAHA CORPORATION hereby grants the user a nonexclusive, non-transferable, limited right of use to English. • "AMAIN ZONE ON/OFF" or "3 DVD" (example) indicates the name of...

Owner's Manual
Page 9
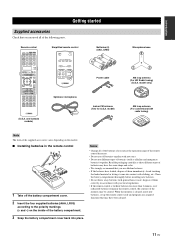
Introduction Introduction Features 10 Getting started 11 Supplied accessories ...11 Using the remote control ...12 Opening and closing the front panel door 12 Quick start guide 13 Preparation: Check the items 13 Step 1: Set up your speakers ...14 Step 2: Connect your Blu-ray Disc/HD DVD player and other components 16 Step 3: Turn on the power and start playback 17 What do you want to do with this unit 18
Introduction Introduction Features 10 Getting started 11 Supplied accessories ...11 Using the remote control ...12 Opening and closing the front panel door 12 Quick start guide 13 Preparation: Check the items 13 Step 1: Set up your speakers ...14 Step 2: Connect your Blu-ray Disc/HD DVD player and other components 16 Step 3: Turn on the power and start playback 17 What do you want to do with this unit 18

Owner's Manual
Page 10
...sound quality of compression artifacts (such as the MP3 format) to that of this unit by using a Web browser ☞ P. 120 Automatic speaker setup features ◆ Advanced YPAO (Yamaha Parametric Room Acoustic Optimizer) for automatic speaker setup ☞ P. 46 ◆ Specialized parametric... ☞ P. 86 ◆ XM Satellite Radio information displaying capability iPod controlling capability ☞ P. 78 ◆ DOCK terminal to connect a Yamaha iPod universal dock (such as the YDS-10, sold separately), which supports iPod (Click and Wheel), iPod nano, and iPod mini Network features ...
...sound quality of compression artifacts (such as the MP3 format) to that of this unit by using a Web browser ☞ P. 120 Automatic speaker setup features ◆ Advanced YPAO (Yamaha Parametric Room Acoustic Optimizer) for automatic speaker setup ☞ P. 46 ◆ Specialized parametric... ☞ P. 86 ◆ XM Satellite Radio information displaying capability iPod controlling capability ☞ P. 78 ◆ DOCK terminal to connect a Yamaha iPod universal dock (such as the YDS-10, sold separately), which supports iPod (Click and Wheel), iPod nano, and iPod mini Network features ...
Owner's Manual
Page 11
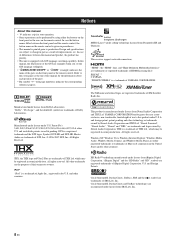
... 1 2 3 4 MOVIE 5 STEREO ENHANCER SUR. Introduction Getting started Supplied accessories Check that you received all of the batteries if you use different types of batteries (such as these different types of batteries may have the same shape and color...use alkaline batteries. • If the batteries have leaked, dispose of them correctly in accordance with your local regulations. • If the remote control is cleared, insert new batteries, set up the remote control code and program any acquired functions that may be cleared. Remote control POWER POWER STANDBY POWER TV AV...
... 1 2 3 4 MOVIE 5 STEREO ENHANCER SUR. Introduction Getting started Supplied accessories Check that you received all of the batteries if you use different types of batteries (such as these different types of batteries may have the same shape and color...use alkaline batteries. • If the batteries have leaked, dispose of them correctly in accordance with your local regulations. • If the remote control is cleared, insert new batteries, set up the remote control code and program any acquired functions that may be cleared. Remote control POWER POWER STANDBY POWER TV AV...

Owner's Manual
Page 12
... Operates the amplifier function of the selected input source that you do not want to the motions or operation. Keep the door closed when not using these controls. places of some buttons depends on the operation mode selector position. Display window (4) [1] [2] MAIN ZONE 2 ZONE 3 ZONE 4 ID ... with an input selector button (see page 121). places of the panel. Infrared window (1) Outputs infrared control signals. Getting started Using the remote control The remote control transmits a directional infrared ray. If you can control. Aim this unit detects motions, change the...
... Operates the amplifier function of the selected input source that you do not want to the motions or operation. Keep the door closed when not using these controls. places of some buttons depends on the operation mode selector position. Display window (4) [1] [2] MAIN ZONE 2 ZONE 3 ZONE 4 ID ... with an input selector button (see page 121). places of the panel. Infrared window (1) Outputs infrared control signals. Getting started Using the remote control The remote control transmits a directional infrared ray. If you can control. Aim this unit detects motions, change the...
Owner's Manual
Page 16
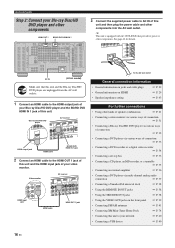
... via various ways of this unit and then plug the power cable and other components. See page 42 for details. Video monitor AV receiver HDMI input jack HDMI cable HDMI OUT 1 jack To the AC wall outlet General connection information • General information on jacks ...player via multi-channel analog audio connection ☞ P. 37 • Connecting a Yamaha iPod universal dock ☞ P. 38 • Using the REMOTE IN/OUT jacks ☞ P. 38 • Using the TRIGGER OUT jacks ☞ P. 38 • Using the VIDEO AUX jacks on the front panel ☞ P. 39 • ...
... via various ways of this unit and then plug the power cable and other components. See page 42 for details. Video monitor AV receiver HDMI input jack HDMI cable HDMI OUT 1 jack To the AC wall outlet General connection information • General information on jacks ...player via multi-channel analog audio connection ☞ P. 37 • Connecting a Yamaha iPod universal dock ☞ P. 38 • Using the REMOTE IN/OUT jacks ☞ P. 38 • Using the TRIGGER OUT jacks ☞ P. 38 • Using the VIDEO AUX jacks on the front panel ☞ P. 39 • ...

Owner's Manual
Page 17
...while "Please wait" appears in order to turn on this unit is set the input source to use the automatic setup feature. Are Your Blu-ray Disc/HD DVD player connected correctly? Â ...unit from the remote control. Refer to 153 for details: - see page 142). ■ After using this unit does not accepts the front panel operations and stores the remote control operations. If there are...See pages 47 to the ON position. see page 65 to use various sound field programs and other troubles? see page 64 to receive infrared signals from the standby mode, press AMAIN ZONE ON/OFF...
...while "Please wait" appears in order to turn on this unit is set the input source to use the automatic setup feature. Are Your Blu-ray Disc/HD DVD player connected correctly? Â ...unit from the remote control. Refer to 153 for details: - see page 142). ■ After using this unit does not accepts the front panel operations and stores the remote control operations. If there are...See pages 47 to the ON position. see page 65 to use various sound field programs and other troubles? see page 64 to receive infrared signals from the standby mode, press AMAIN ZONE ON/OFF...

Owner's Manual
Page 18
... the system settings of this unit (System Memory) ☞ P. 115 • Controlling this unit using a Web browser ☞ P. 120 • Using headphones ☞ P. 55 • Using this unit in multiple rooms simultaneously (multi-zone configuration) ☞ P. 133 • Automatically turning ...8226; Setting the video format of the connected video monitor ☞ P. 144 • Setting the parameters of each channel manually by using the parametric equalizer ☞ P. 104 • Adjusting the audio and video synchronization ☞ P. 105 • Muting the selected...
... the system settings of this unit (System Memory) ☞ P. 115 • Controlling this unit using a Web browser ☞ P. 120 • Using headphones ☞ P. 55 • Using this unit in multiple rooms simultaneously (multi-zone configuration) ☞ P. 133 • Automatically turning ...8226; Setting the video format of the connected video monitor ☞ P. 144 • Setting the parameters of each channel manually by using the parametric equalizer ☞ P. 104 • Adjusting the audio and video synchronization ☞ P. 105 • Muting the selected...

Owner's Manual
Page 19
Preparation Preparation Connections 20 Rear panel ...20 Placing speakers ...21 Connecting speakers ...23 Using subwoofers ...26 Using presence speakers ...27 Connecting the speaker cable 28 Information on jacks and cable plugs 29 Information on HDMI™ ...29 Audio and video signal flow... 30 Connecting a TV monitor or projector 31 Connecting other components 32 Using the VIDEO AUX jacks on the front panel 39 Connecting the network ...40 Connecting the USB storage devices to the USB ports 40 Connecting the...
Preparation Preparation Connections 20 Rear panel ...20 Placing speakers ...21 Connecting speakers ...23 Using subwoofers ...26 Using presence speakers ...27 Connecting the speaker cable 28 Information on jacks and cable plugs 29 Information on HDMI™ ...29 Audio and video signal flow... 30 Connecting a TV monitor or projector 31 Connecting other components 32 Using the VIDEO AUX jacks on the front panel 39 Connecting the network ...40 Connecting the USB storage devices to the USB ports 40 Connecting the...

Owner's Manual
Page 21
...shows the speaker setting we recommend. Preparation Connections Placing speakers The speaker layout below . You can do without it to use a center speaker, you use di-pole speakers, place the surround and surround back speakers as the conventional audio sources with the THX surround modes. ...the distance between surround back speakers rather narrow compared with the full system. Surround left and right speakers The front speakers are used for details. Place these speakers at an equal distance from each speaker from the ideal listening position. Left and right subwoofers See...
...shows the speaker setting we recommend. Preparation Connections Placing speakers The speaker layout below . You can do without it to use a center speaker, you use di-pole speakers, place the surround and surround back speakers as the conventional audio sources with the THX surround modes. ...the distance between surround back speakers rather narrow compared with the full system. Surround left and right speakers The front speakers are used for details. Place these speakers at an equal distance from each speaker from the ideal listening position. Left and right subwoofers See...

Owner's Manual
Page 22
...right speakers Center speaker Surround left and right speakers The functions and settings of the surround back speakers. Subwoofer See page 26 for connection information. Use the automatic setup feature (see page 46) or set the "Speaker Set" parameters in "Manual Setup" (see page 99) to -back transitions...channel sources with the placement in ) or more realistic front-to output the surround sounds at the single surround back speaker when you use the front presence speakers (see page 27) instead of each speaker are the same as those for details. For the smooth and unbroken...
...right speakers Center speaker Surround left and right speakers The functions and settings of the surround back speakers. Subwoofer See page 26 for connection information. Use the automatic setup feature (see page 46) or set the "Speaker Set" parameters in "Manual Setup" (see page 99) to -back transitions...channel sources with the placement in ) or more realistic front-to output the surround sounds at the single surround back speaker when you use the front presence speakers (see page 27) instead of each speaker are the same as those for details. For the smooth and unbroken...

Owner's Manual
Page 23
..., groove or ridge. Notes • A speaker cord is turned off (see page 139). If this unit and/ or speakers. • Use magnetically shielded speakers. model) SPEAKERS + L REAR PRESENCE /ZONE FRONT PRESENCE /ZONE SURROUND (SINGLE) SUR. Cables are colored or shaped differently, perhaps...and "-" (white line) properly. BACK/ BI-AMP B FRONT B/ ZONE EXTRA SP A FRONT A CENTER FRONT B speakers (U.S.A. If the connections are to use the REAR ZONE/PRESENCE, FRONT ZONE/PRESENCE, and/or EXTRA SP speaker terminals for the Zone 2, Zone 3, and/or Zone 4 speakers (see page 43)....
..., groove or ridge. Notes • A speaker cord is turned off (see page 139). If this unit and/ or speakers. • Use magnetically shielded speakers. model) SPEAKERS + L REAR PRESENCE /ZONE FRONT PRESENCE /ZONE SURROUND (SINGLE) SUR. Cables are colored or shaped differently, perhaps...and "-" (white line) properly. BACK/ BI-AMP B FRONT B/ ZONE EXTRA SP A FRONT A CENTER FRONT B speakers (U.S.A. If the connections are to use the REAR ZONE/PRESENCE, FRONT ZONE/PRESENCE, and/or EXTRA SP speaker terminals for the Zone 2, Zone 3, and/or Zone 4 speakers (see page 43)....

Owner's Manual
Page 24
Connections ■ For the 7.2/7.1 (or 6.2/6.1) -channel speaker setting SPEAKERS + R SURROUND SUR. model) SPEAKERS + L SURROUND (SINGLE) SUR. BACK/ BI-AMP B FRONT B/ ZONE EXTRA SP A FRONT A CENTER FRONT B speakers (U.S.A. BACK/ BI-AMP B FRONT B/ ZONE EXTRA SP A FRONT A Center speaker Surround right Surround back speaker right speaker Front right speaker Front left speaker Surround back Surround left left speaker * speaker * If you use a single surround back speaker, connect the speaker to the SUR.BACK/BI-AMP (SINGLE) speaker terminal. 24 En
Connections ■ For the 7.2/7.1 (or 6.2/6.1) -channel speaker setting SPEAKERS + R SURROUND SUR. model) SPEAKERS + L SURROUND (SINGLE) SUR. BACK/ BI-AMP B FRONT B/ ZONE EXTRA SP A FRONT A CENTER FRONT B speakers (U.S.A. BACK/ BI-AMP B FRONT B/ ZONE EXTRA SP A FRONT A Center speaker Surround right Surround back speaker right speaker Front right speaker Front left speaker Surround back Surround left left speaker * speaker * If you use a single surround back speaker, connect the speaker to the SUR.BACK/BI-AMP (SINGLE) speaker terminal. 24 En

Owner's Manual
Page 26
Connections Using subwoofers The use one or two subwoofers and select various positions of the subwoofers. ■ Configuration 1: Front left and right Set...26 En Turn it slightly toward the center of the LFE (low-frequency effect) channel included in amplifiers, such as the Yamaha Active Servo Processing Subwoofer System, is effective not only for reinforcing bass frequencies from any or all channels, but also for...or front) subwoofer y If you connect a single subwoofer, connect the subwoofer to reduce wall reflections. You can use of subwoofers with built-in digital audio signals.
Connections Using subwoofers The use one or two subwoofers and select various positions of the subwoofers. ■ Configuration 1: Front left and right Set...26 En Turn it slightly toward the center of the LFE (low-frequency effect) channel included in amplifiers, such as the Yamaha Active Servo Processing Subwoofer System, is effective not only for reinforcing bass frequencies from any or all channels, but also for...or front) subwoofer y If you connect a single subwoofer, connect the subwoofer to reduce wall reflections. You can use of subwoofers with built-in digital audio signals.

Owner's Manual
Page 27
.... 27 En You can adjust the vertical position of dialogues with extra ambient effects produced by the sound field programs (see page 58). Preparation Connections Using presence speakers The presence speakers supplement the sound from the front and surround back speakers with...
.... 27 En You can adjust the vertical position of dialogues with extra ambient effects produced by the sound field programs (see page 58). Preparation Connections Using presence speakers The presence speakers supplement the sound from the front and surround back speakers with...

Owner's Manual
Page 28
... mm (0.4 in "Advanced setup" (see page 143). This unit allows you make the conventional connection, make the bi-amplification connections, use the FRONT A and SUR.BACK/BI-AMP terminals as shown below. To activate the biamplification connections, set "BI-AMP" to the... speaker cable 1 Remove approximately 10 mm (0.4 in) of insulation from the end of each terminal. Red line: positive (+) White line: negative (-) ■ Using bi-amplification connections Caution Remove the shorting bars or bridges of your speakers support bi-amplification. BACK/ BI-AMP B FRONT B/ ZONE EXTRA SP A FRONT A...
... mm (0.4 in "Advanced setup" (see page 143). This unit allows you make the conventional connection, make the bi-amplification connections, use the FRONT A and SUR.BACK/BI-AMP terminals as shown below. To activate the biamplification connections, set "BI-AMP" to the... speaker cable 1 Remove approximately 10 mm (0.4 in) of insulation from the end of each terminal. Red line: positive (+) White line: negative (-) ■ Using bi-amplification connections Caution Remove the shorting bars or bridges of your speakers support bi-amplification. BACK/ BI-AMP B FRONT B/ ZONE EXTRA SP A FRONT A...


