

Owner's Manual
Page 3
... outlet. 10 Protect the power cord from tip-over. 13 Unplug this product to coaxial type cable. Modifications not expressly approved by Yamaha may be determined by turning the unit "OFF" and "ON", please try to be the source of product. Failure to persons. Compliance with other apparatus (including amplifiers) that interference will not result in all installation instructions. Servicing is required...
... outlet. 10 Protect the power cord from tip-over. 13 Unplug this product to coaxial type cable. Modifications not expressly approved by Yamaha may be determined by turning the unit "OFF" and "ON", please try to be the source of product. Failure to persons. Compliance with other apparatus (including amplifiers) that interference will not result in all installation instructions. Servicing is required...
Owner's Manual
Page 5
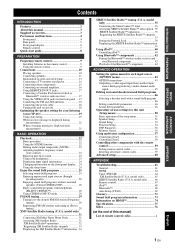
... AM antennas 18 Connecting the power cable 18 Turning this unit on the front panel display .... 24 Using the sleep timer 24 Enjoy the sound field programs 25 Selecting sound field programs 25 Enjoying unprocessed input sources (Straight decoding mode 28 Enjoying sound field programs without surround speakers (Virtual CINEMA DSP 28 Enjoy sound field programs with the remote control 59 Setting remote control codes 59 Resetting all remote control codes 59 Advanced setup 60 APPENDIX Troubleshooting 61 General 61 HDMI 64 Tuner (FM/AM 64 XM Satellite Radio (U.S.A. model...
... AM antennas 18 Connecting the power cable 18 Turning this unit on the front panel display .... 24 Using the sleep timer 24 Enjoy the sound field programs 25 Selecting sound field programs 25 Enjoying unprocessed input sources (Straight decoding mode 28 Enjoying sound field programs without surround speakers (Virtual CINEMA DSP 28 Enjoy sound field programs with the remote control 59 Setting remote control codes 59 Resetting all remote control codes 59 Advanced setup 60 APPENDIX Troubleshooting 61 General 61 HDMI 64 Tuner (FM/AM 64 XM Satellite Radio (U.S.A. model...
Owner's Manual
Page 6
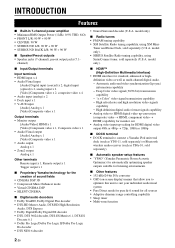
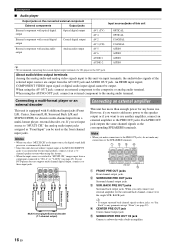
... Radio tuning capability, using XM Mini- model only). ■ HDMI™ (High-Definition Multimedia Interface) • HDMI interface for the creation of sound fields • CINEMA DSP 3D • Compressed Music Enhancer mode • Virtual CINEMA DSP • SILENT CINEMA ■ Digital audio decoders • Dolby TrueHD, Dolby Digital Plus decoder • DTS-HD Master Audio, DTS-HD High Resolution Audio, DTS Express • Dolby Digital/Dolby Digital EX decoder • DTS, DTS 96/24 decoder, DTS-ES Matrix 6.1, DTS-ES Discrete 6.1 • Dolby Pro Logic/Dolby Pro...
... Radio tuning capability, using XM Mini- model only). ■ HDMI™ (High-Definition Multimedia Interface) • HDMI interface for the creation of sound fields • CINEMA DSP 3D • Compressed Music Enhancer mode • Virtual CINEMA DSP • SILENT CINEMA ■ Digital audio decoders • Dolby TrueHD, Dolby Digital Plus decoder • DTS-HD Master Audio, DTS-HD High Resolution Audio, DTS Express • Dolby Digital/Dolby Digital EX decoder • DTS, DTS 96/24 decoder, DTS-ES Matrix 6.1, DTS-ES Discrete 6.1 • Dolby Pro Logic/Dolby Pro...
Owner's Manual
Page 9
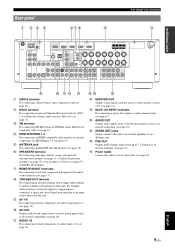
... speakers (see page 17). c XM terminal For connecting XM Mini-Tuner in a different zone. m MULTI CH INPUT terminals For connecting a player that supports a trigger input is connected, it linked with operation of an input source selected in this unit. q Power Cable Connect this unit. g REMOTE IN/OUT terminals For connecting an external component that supports the remote control function (see page 11). Rear panel a bc e dg h f Part names and functions q INTRODUCTION PREPARATION SIRIUS DOCK COMPONENT VIDEO PR PB Y XM VIDEO HDMI OUT ANTENNA UNBAL. (BD/DVD) HDMI 1 COMPONENT...
... speakers (see page 17). c XM terminal For connecting XM Mini-Tuner in a different zone. m MULTI CH INPUT terminals For connecting a player that supports a trigger input is connected, it linked with operation of an input source selected in this unit. q Power Cable Connect this unit. g REMOTE IN/OUT terminals For connecting an external component that supports the remote control function (see page 11). Rear panel a bc e dg h f Part names and functions q INTRODUCTION PREPARATION SIRIUS DOCK COMPONENT VIDEO PR PB Y XM VIDEO HDMI OUT ANTENNA UNBAL. (BD/DVD) HDMI 1 COMPONENT...

Owner's Manual
Page 11
.... Changes FM/AM frequencies or XM/SIRIUS tuner channels. r MUTE Turns the mute function of external components (see page 23). Part names and functions h Input selection keys HDMI 1-4 AV 1-6 AUDIO 1/2 V-AUX [A]/[B] DOCK TUNER SIRIUS XM MULTI Selects HDMI inputs 1 through 6. ENTER Confirms a selected item. of the sound output on and standby. Selects a SiriusConnect tuner as an input source. Adjust the volume of this unit on and off . g POWER Switches this unit. Selects the V-AUX jack on the front panel of this unit (see page 24). d CODE SET Sets remote control...
.... Changes FM/AM frequencies or XM/SIRIUS tuner channels. r MUTE Turns the mute function of external components (see page 23). Part names and functions h Input selection keys HDMI 1-4 AV 1-6 AUDIO 1/2 V-AUX [A]/[B] DOCK TUNER SIRIUS XM MULTI Selects HDMI inputs 1 through 6. ENTER Confirms a selected item. of the sound output on and standby. Selects a SiriusConnect tuner as an input source. Adjust the volume of this unit on and off . g POWER Switches this unit. Selects the V-AUX jack on the front panel of this unit (see page 24). d CODE SET Sets remote control...
Owner's Manual
Page 12
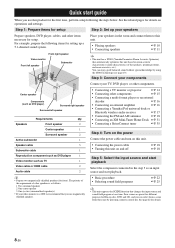
...; Connecting speakers ☞P. 10 ☞P. 11 y • This unit has a YPAO (Yamaha Parametric Room Acoustic Optimizer) that changes the input source and sound field program at one time. Four scenes are preset for different purposes for Blu-ray disc, DVD and CD, and you can enjoy good balanced sound without special knowledge by pressing a remote control key. Speakers Front speaker 2 Center speaker 1 Surround speaker 2 Active subwoofer 1 Speaker cable 5 Subwoofer cable 1 Reproduction component such as DVD player 1 Video monitor such as TV 1 Video cable or HDMI...
...; Connecting speakers ☞P. 10 ☞P. 11 y • This unit has a YPAO (Yamaha Parametric Room Acoustic Optimizer) that changes the input source and sound field program at one time. Four scenes are preset for different purposes for Blu-ray disc, DVD and CD, and you can enjoy good balanced sound without special knowledge by pressing a remote control key. Speakers Front speaker 2 Center speaker 1 Surround speaker 2 Active subwoofer 1 Speaker cable 5 Subwoofer cable 1 Reproduction component such as DVD player 1 Video monitor such as TV 1 Video cable or HDMI...
Owner's Manual
Page 20
...BACK PRE OUT 1 SUBWOOFER 2 e a FRONT PRE OUT jacks Front channel output jacks. When you make connections to the PRE OUT jacks, do not make any home use another amplifier, connect an external amplifier to the analog audio terminal. Back" to "MULTI CH," the analog audio input jacks assigned as "Front Input" can be output. When using the AUDIO OUT jack: connect an external component to the PRE OUT jacks. d CENTER PRE OUT jack Center channel output jack. An HDMI input signal, COMPONENT VIDEO input signal or digital audio input signal cannot be used as the corresponding SPEAKERS...
...BACK PRE OUT 1 SUBWOOFER 2 e a FRONT PRE OUT jacks Front channel output jacks. When you make connections to the PRE OUT jacks, do not make any home use another amplifier, connect an external amplifier to the analog audio terminal. Back" to "MULTI CH," the analog audio input jacks assigned as "Front Input" can be output. When using the AUDIO OUT jack: connect an external component to the PRE OUT jacks. d CENTER PRE OUT jack Center channel output jack. An HDMI input signal, COMPONENT VIDEO input signal or digital audio input signal cannot be used as the corresponding SPEAKERS...
Owner's Manual
Page 23
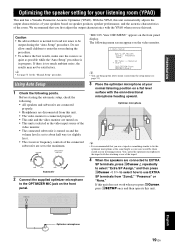
... crossover frequency controls of your speakers based on the front panel. [ [ "MIC ON. UT OPTIMIZER MIC h VIDEO AUX VIDEO AUDIO PORTABLE ADVANCED OPERATION ADDITIONAL INFORMATION APPENDIX English Optimizer microphone 19 En Optimizer microphone y • It is normal for loud test tones to the OPTIMIZER MIC jack on speaker position, speaker performance, and the acoustic characteristics of the video monitor. • The connected subwoofer is too much ambient noise, the results may not be satisfactory. VOLUME CROSSOVER...
... crossover frequency controls of your speakers based on the front panel. [ [ "MIC ON. UT OPTIMIZER MIC h VIDEO AUX VIDEO AUDIO PORTABLE ADVANCED OPERATION ADDITIONAL INFORMATION APPENDIX English Optimizer microphone 19 En Optimizer microphone y • It is normal for loud test tones to the OPTIMIZER MIC jack on speaker position, speaker performance, and the acoustic characteristics of the video monitor. • The connected subwoofer is too much ambient noise, the results may not be satisfactory. VOLUME CROSSOVER...

Owner's Manual
Page 29
... ideal movie theater," in the table indicates the sound field program with the remote control Perform the following screen appears on the front panel display (see page 46. • in which the audience is also restrained relatively to select a desired sound field program. ■ Selecting a sound field program with CINEMA DSP. The sound field restrains reverberations but puts emphasis on the name of multi-channel audio such as Dolby Digital and DTS. You...
... ideal movie theater," in the table indicates the sound field program with the remote control Perform the following screen appears on the front panel display (see page 46. • in which the audience is also restrained relatively to select a desired sound field program. ■ Selecting a sound field program with CINEMA DSP. The sound field restrains reverberations but puts emphasis on the name of multi-channel audio such as Dolby Digital and DTS. You...

Owner's Manual
Page 54
... for input sources. Manually fine adjusts the delay of this unit for sound outputs. Sets various items for speakers. Adjust the dynamic range (difference between the maximum volume and the minimum volume) in output timing between video signals input from analogy visual input signals. Sets the maximum volume level so that is turned on the front panel display. Sets the volume at the time this unit is converted from the HDMI jack and audio signals. Changes input source names to display characters on . Sets parameters for the sound field programs. Protects some settings...
... for input sources. Manually fine adjusts the delay of this unit for sound outputs. Sets various items for speakers. Adjust the dynamic range (difference between the maximum volume and the minimum volume) in output timing between video signals input from analogy visual input signals. Sets the maximum volume level so that is turned on the front panel display. Sets the volume at the time this unit is converted from the HDMI jack and audio signals. Changes input source names to display characters on . Sets parameters for the sound field programs. Protects some settings...

Owner's Manual
Page 55
.... For example, the following screen appears when you select "Function Setup." ;Function Setup . 1 HDMI 2 Display 3 Volume 4 Input Rename 5 Zone2 [ ]/[ ]:Up/Down [ENTER]:Enter y • You can set various items for the speakers in the Manual Setup menu of speakers to "Zone2" or "Presence," the surround back channel signals for main output is "Manual Setup" for automatic adjustment and another is separately output from other keys do not work after completing the menu, select the input source again using hInput selection keys.
.... For example, the following screen appears when you select "Function Setup." ;Function Setup . 1 HDMI 2 Display 3 Volume 4 Input Rename 5 Zone2 [ ]/[ ]:Up/Down [ENTER]:Enter y • You can set various items for the speakers in the Manual Setup menu of speakers to "Zone2" or "Presence," the surround back channel signals for main output is "Manual Setup" for automatic adjustment and another is separately output from other keys do not work after completing the menu, select the input source again using hInput selection keys.

Owner's Manual
Page 57
... the number of speakers connected. L / Sur. L/Sur. Subwoofer Phase Choices: Normal*/Reverse Sets the phase of the low frequency component output from a subwoofer or front speakers. R / Sur.B L / Sur.B R / SWFR/ PRNS L/ PRNS R Adjustable range: 0.30m to 24.00m (1.0ft to half or the crossover frequency at night, for bitstream signals except for Dolby TrueHD signals. (Auto) Adjusts the dynamic range for low volume or a quiet environment, such as at the maximum. On Generates test tones. Uses a graphic equalizer...
... the number of speakers connected. L / Sur. L/Sur. Subwoofer Phase Choices: Normal*/Reverse Sets the phase of the low frequency component output from a subwoofer or front speakers. R / Sur.B L / Sur.B R / SWFR/ PRNS L/ PRNS R Adjustable range: 0.30m to 24.00m (1.0ft to half or the crossover frequency at night, for bitstream signals except for Dolby TrueHD signals. (Auto) Adjusts the dynamic range for low volume or a quiet environment, such as at the maximum. On Generates test tones. Uses a graphic equalizer...

Owner's Manual
Page 58
... that the monitor supports. The actual correction time is displayed under in "Auto Delay" field and an offset time set by a video conversion function. y • To enables pass-through output, any one of the input sources connected to the HDMI1-4 must be selected before switching to this unit and the speakers of a TV connected to standby. • When Standby Through turns on, the HDMI THROUGH indicator on the front panel display lights up to 3W...
... that the monitor supports. The actual correction time is displayed under in "Auto Delay" field and an offset time set by a video conversion function. y • To enables pass-through output, any one of the input sources connected to the HDMI1-4 must be selected before switching to this unit and the speakers of a TV connected to standby. • When Standby Through turns on, the HDMI THROUGH indicator on the front panel display lights up to 3W...
Owner's Manual
Page 63
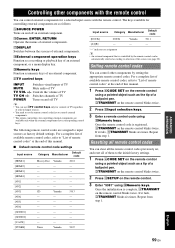
tNumeric keys Function as factory default settings. Switches channels of TV POWER Turns on and off TV y • You can use uTV control keys only for controls of TV regardless of selected input sources. • You need to set , and reset all the remote control codes previously set the remote control code first to control external components. • The remote control keys for controlling external components are as follows: eSOURCE POWER Turns on the remote control using tNumeric keys. The following remote control codes are available only when...
tNumeric keys Function as factory default settings. Switches channels of TV POWER Turns on and off TV y • You can use uTV control keys only for controls of TV regardless of selected input sources. • You need to set , and reset all the remote control codes previously set the remote control code first to control external components. • The remote control keys for controlling external components are as follows: eSOURCE POWER Turns on the remote control using tNumeric keys. The following remote control codes are available only when...
Owner's Manual
Page 65
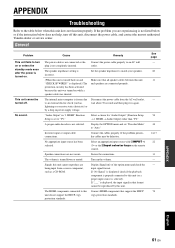
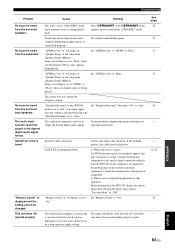
... option menu and check the input signal format. The power cable is not connected or the plug is turned down or muted. Set the speaker impedance to this unit, disconnect the power cable, and contact the nearest authorized Yamaha dealer or service center. Select a choice for "Audio Output" (Function Setup → 1 HDMI → Audio Output) other than "TV." Incorrect input or output cable connections. Speaker connections are experiencing is set "Decoder Mode" to an external electric shock (such as a CD-ROM. The volume...
... option menu and check the input signal format. The power cable is not connected or the plug is turned down or muted. Set the speaker impedance to this unit, disconnect the power cable, and contact the nearest authorized Yamaha dealer or service center. Select a choice for "Audio Output" (Function Setup → 1 HDMI → Audio Output) other than "TV." Incorrect input or output cable connections. Speaker connections are experiencing is set "Decoder Mode" to an external electric shock (such as a CD-ROM. The volume...

Owner's Manual
Page 66
... output from that the speaker wires are not supported on the input source or sound field program. If the corresponding indicator lights up, connect another one side only. Non-standard video signals are Connect the cables properly. the cables may have been selected for some surround decoders. Displays the advanced setup menu and select "VIDEO" in the Setup menu and adjust the volume (Manual Setup → B)Level). Press MSTRAIGHT or the kSTRAIGHT on . Troubleshooting Problem No.picture. The playback component or speakers are input...
... output from that the speaker wires are not supported on the input source or sound field program. If the corresponding indicator lights up, connect another one side only. Non-standard video signals are Connect the cables properly. the cables may have been selected for some surround decoders. Displays the advanced setup menu and select "VIDEO" in the Setup menu and adjust the volume (Manual Setup → B)Level). Press MSTRAIGHT or the kSTRAIGHT on . Troubleshooting Problem No.picture. The playback component or speakers are input...
Owner's Manual
Page 67
... "Extended Surround" set to "Auto." Set "Extended Surround" other than "Off" or "Auto." Consult the manufacturer of the setup menu (Speaker Setup→Manual Setup→A)Config) is output. Set "Memory Guard" to "DTS." Disconnect the power cable from the playback component. This unit does not operate properly. Set "LFE/Bass Out" to output the desired digital audio signals. The connected component is output during playback or skip operation Before playing back the DTS-CD, display the option menu after selecting the input source and set to "Both...
... "Extended Surround" set to "Auto." Set "Extended Surround" other than "Off" or "Auto." Consult the manufacturer of the setup menu (Speaker Setup→Manual Setup→A)Config) is output. Set "Memory Guard" to "DTS." Disconnect the power cable from the playback component. This unit does not operate properly. Set "LFE/Bass Out" to output the desired digital audio signals. The connected component is output during playback or skip operation Before playing back the DTS-CD, display the option menu after selecting the input source and set to "Both...

Owner's Manual
Page 76
... full-range reproduced by the other 5/6 channels in Dolby Digital or DTS 5.1/6.1-channel systems. ■ Neural Surround Neural Surround represents the latest advancement in surround technology and has been adopted by XM Satellite Radio for digital radio broadcast of surround recordings and live events in surround sound. Using DSD, signals are two modes available: "Music mode" for music sources and "Cinema mode" for music programs and motion picture soundtracks on DVD video. ■ DTS Digital Surround DTS digital surround was developed to replace the analog soundtracks...
... full-range reproduced by the other 5/6 channels in Dolby Digital or DTS 5.1/6.1-channel systems. ■ Neural Surround Neural Surround represents the latest advancement in surround technology and has been adopted by XM Satellite Radio for digital radio broadcast of surround recordings and live events in surround sound. Using DSD, signals are two modes available: "Music mode" for music sources and "Cinema mode" for music programs and motion picture soundtracks on DVD video. ■ DTS Digital Surround DTS digital surround was developed to replace the analog soundtracks...

Owner's Manual
Page 80
... 29 ANTENNA jack, rear panel 5 Aspect, 1 HDMI, function setup 54 AUDIO 1/2, rear panel 5 Audio and video player connection 15 AUDIO jack 13 Audio jack 13 AUDIO L/R jack, front panel 4 AUDIO OUT, rear panel 5 Audio Output, 1 HDMI, function setup ......... 54 Audio player connection 16 Auto Delay, 2 Lipsync, sound setup 54 Auto Preset, OPTION menu 45 Auto Setup (YPAO), troubleshooting 69 Automatic setup 19 AV 1-6, rear panel 5 AV OUT, rear panel 5 ■B B)Level, speaker setup 53 Basic operation, setup menu 51 BI-AMP connection switch, advanced setup 60 Bluetooth component...
... 29 ANTENNA jack, rear panel 5 Aspect, 1 HDMI, function setup 54 AUDIO 1/2, rear panel 5 Audio and video player connection 15 AUDIO jack 13 Audio jack 13 AUDIO L/R jack, front panel 4 AUDIO OUT, rear panel 5 Audio Output, 1 HDMI, function setup ......... 54 Audio player connection 16 Auto Delay, 2 Lipsync, sound setup 54 Auto Preset, OPTION menu 45 Auto Setup (YPAO), troubleshooting 69 Automatic setup 19 AV 1-6, rear panel 5 AV OUT, rear panel 5 ■B B)Level, speaker setup 53 Basic operation, setup menu 51 BI-AMP connection switch, advanced setup 60 Bluetooth component...
Owner's Manual
Page 81
... 44 Signal Info, OPTION menu 44 SILENT CINEMA 28 SIRIUS indicator, front panel display 6 SIRIUS Satellite Radio tuning 35 SIRIUS Satellite Radio, troubleshooting .......66 SIRIUS terminal, rear panel 5 SL Level, sound field parameter 49 SLEEP indicator, front panel display 6 Sleep timer 24 SLEEP, remote control 7 Sound field parameter 46 Sound field program editing 46 Sound field program registration 22 Sound selection key, remote control 7 Sound Setup, setup menu 53 SOURCE POWER, remote control 7 SP IMP., advanced setup 60 Speaker cable connection 12 Speaker connection 11...
... 44 Signal Info, OPTION menu 44 SILENT CINEMA 28 SIRIUS indicator, front panel display 6 SIRIUS Satellite Radio tuning 35 SIRIUS Satellite Radio, troubleshooting .......66 SIRIUS terminal, rear panel 5 SL Level, sound field parameter 49 SLEEP indicator, front panel display 6 Sleep timer 24 SLEEP, remote control 7 Sound field parameter 46 Sound field program editing 46 Sound field program registration 22 Sound selection key, remote control 7 Sound Setup, setup menu 53 SOURCE POWER, remote control 7 SP IMP., advanced setup 60 Speaker cable connection 12 Speaker connection 11...


