MCXSP10 Manual
Page 4
... wall outlet during an electrical storm. FOR CANADIAN CUSTOMERS To prevent electric shock, match wide blade of at a safe level. YAMAHA and the Electronic Industries Association's Consumer Electronics Group want you to this unit away from other than specified is faulty. 17 Before... the space below. a room with chemical solvents; this unit with a humidifier) to prevent condensation inside this unit rises, it is connected to set for any reasons. 15 When not planning to this unit. 6 Do not cover this unit with a newspaper, tablecloth, curtain, etc. Retain ...
... wall outlet during an electrical storm. FOR CANADIAN CUSTOMERS To prevent electric shock, match wide blade of at a safe level. YAMAHA and the Electronic Industries Association's Consumer Electronics Group want you to this unit away from other than specified is faulty. 17 Before... the space below. a room with chemical solvents; this unit with a humidifier) to prevent condensation inside this unit rises, it is connected to set for any reasons. 15 When not planning to this unit. 6 Do not cover this unit with a newspaper, tablecloth, curtain, etc. Retain ...
MCXSP10 Manual
Page 5
...video components 16 Connecting audio components 19 Connecting the FM and AM antennas 21 Connecting the power supply cord 22 Speaker impedance setting 23 Turning on the power 23 AUTO SETUP 24 Introduction 24 Optimizer microphone setup 24 Starting the setup 25 BASIC OPERATION ... 39 Selecting preset stations 41 Exchanging preset stations 42 XM Satellite Radio TUNING 44 What is a sound field 81 Changing parameter settings 81 SOUND FIELD PARAMETER DESCRIPTIONS 83 TROUBLESHOOTING 88 RESETTING THE FACTORY PRESETS ........93 GLOSSARY 94 Audio formats 94 Sound field programs 95...
...video components 16 Connecting audio components 19 Connecting the FM and AM antennas 21 Connecting the power supply cord 22 Speaker impedance setting 23 Turning on the power 23 AUTO SETUP 24 Introduction 24 Optimizer microphone setup 24 Starting the setup 25 BASIC OPERATION ... 39 Selecting preset stations 41 Exchanging preset stations 42 XM Satellite Radio TUNING 44 What is a sound field 81 Changing parameter settings 81 SOUND FIELD PARAMETER DESCRIPTIONS 83 TROUBLESHOOTING 88 RESETTING THE FACTORY PRESETS ........93 GLOSSARY 94 Audio formats 94 Sound field programs 95...
MCXSP10 Manual
Page 6
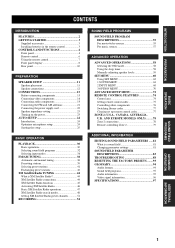
... Ω) Front: 95 W + 95 W Center: 95 W Surround: 95 W + 95 W Surround back: 95 W + 95 W Sound field features ◆ Proprietary YAMAHA technology for the creation of sound fields ◆ Dolby Digital/Dolby Digital EX decoder ◆ DTS/DTS-ES Matrix 6.1, Discrete 6.1, DTS Neo:6, DTS 96/24...XM Connect and Play digital antenna accessory", sold separately) Other features ◆ YPAO: YAMAHA Parametric Room Acoustic Optimizer for automatic speaker setup ◆ 192-kHz/24-bit D/A converter ◆ A SET MENU that provides you with items for optimizing this unit for your audio/video system &#...
... Ω) Front: 95 W + 95 W Center: 95 W Surround: 95 W + 95 W Surround back: 95 W + 95 W Sound field features ◆ Proprietary YAMAHA technology for the creation of sound fields ◆ Dolby Digital/Dolby Digital EX decoder ◆ DTS/DTS-ES Matrix 6.1, Discrete 6.1, DTS Neo:6, DTS 96/24...XM Connect and Play digital antenna accessory", sold separately) Other features ◆ YPAO: YAMAHA Parametric Room Acoustic Optimizer for automatic speaker setup ◆ 192-kHz/24-bit D/A converter ◆ A SET MENU that provides you with items for optimizing this unit for your audio/video system &#...

MCXSP10 Manual
Page 7
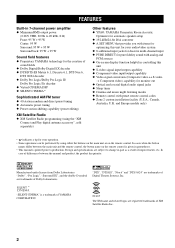
...carefully as alkaline and manganese batteries) together. If the remote control is cleared, insert new batteries, set up the remote control code and program any acquired functions that you received all of the batteries if you notice the following parts. DISPLAY ON SCREEN AUDIO Indoor FM antenna .... Notes on the inside of the battery compartment. 3 Slide the cover back until it come into place. 3 Remote control CODE SET TRANSMIT POWER TV POWER AV STANDBY CD MD/CD-R TUNER SYSTEM POWER SLEEP DVD DTV/CBL V-AUX MULTI CH IN VCR 1 DVR/VCR2 AMP Batteries (4) ...
...carefully as alkaline and manganese batteries) together. If the remote control is cleared, insert new batteries, set up the remote control code and program any acquired functions that you received all of the batteries if you notice the following parts. DISPLAY ON SCREEN AUDIO Indoor FM antenna .... Notes on the inside of the battery compartment. 3 Slide the cover back until it come into place. 3 Remote control CODE SET TRANSMIT POWER TV POWER AV STANDBY CD MD/CD-R TUNER SYSTEM POWER SLEEP DVD DTV/CBL V-AUX MULTI CH IN VCR 1 DVR/VCR2 AMP Batteries (4) ...
MCXSP10 Manual
Page 8
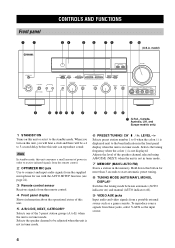
... (AUTO/MAN'L MONO), DISPLAY* Switches the tuning mode between automatic (AUTO indicator on this unit consumes a small amount of power in order to receive infrared-signals from the remote control. 2 OPTIMIZER MIC jack Use to connect and input audio signals from a portable external source such as the input source.... 4 Note In standby mode, this unit or sets it to the band indication in the front panel display when the unit is in tuner mode. 6 PRESET/TUNING/ CH* l / h, LEVEL -/+ ...
... (AUTO/MAN'L MONO), DISPLAY* Switches the tuning mode between automatic (AUTO indicator on this unit consumes a small amount of power in order to receive infrared-signals from the remote control. 2 OPTIMIZER MIC jack Use to connect and input audio signals from a portable external source such as the input source.... 4 Note In standby mode, this unit or sets it to the band indication in the front panel display when the unit is in tuner mode. 6 PRESET/TUNING/ CH* l / h, LEVEL -/+ ...
MCXSP10 Manual
Page 9
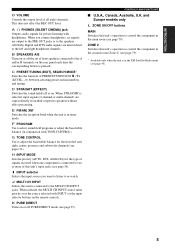
...terminals on the rear panel each time the corresponding button is connected to two or more of front speakers connected to the speakers. H INPUT MODE Sets the priority (AUTO, DTS, ANALOG) for the front left and right headphone channels. CONTROLS AND FUNCTIONS ■ U.S.A., Canada, Australia, U.K. ...All Dolby Digital and DTS audio signals are mixed down to adjust the bass/treble balance for the type of signals received when one component is pressed. and Europe models only L ZONE ON/OFF buttons MAIN Switches this unit's operation to select sound field ...
...terminals on the rear panel each time the corresponding button is connected to two or more of front speakers connected to the speakers. H INPUT MODE Sets the priority (AUTO, DTS, ANALOG) for the front left and right headphone channels. CONTROLS AND FUNCTIONS ■ U.S.A., Canada, Australia, U.K. ...All Dolby Digital and DTS audio signals are mixed down to adjust the bass/treble balance for the type of signals received when one component is pressed. and Europe models only L ZONE ON/OFF buttons MAIN Switches this unit's operation to select sound field ...
MCXSP10 Manual
Page 10
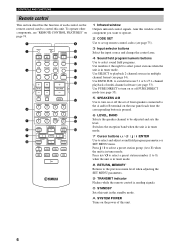
... ENT. DISPLAY ON SCREEN AUDIO F G H I 1 Infrared window Outputs infrared control signals. A SYSTEM POWER Turns on page 74. 1 2 3 CODE SET TRANSMIT POWER TV POWER AV STANDBY CD MD/CD-R TUNER SYSTEM POWER SLEEP DVD DTV/CBL V-AUX MULTI CH IN VCR 1 DVR/VCR2 AMP TV VOL TV CH... 2 ENTERTAIN 3 MOVIE 4 STANDARD SELECT EXTD SUR. To operate other components, see "REMOTE CONTROL FEATURES" on the power of this unit. EFFECT SET MENU MENU SRCH MODE ENTER A-E/CAT. Aim this unit in multiple channel format (see page 33). Use SELECT to playback 2-channel sources in the ...
... ENT. DISPLAY ON SCREEN AUDIO F G H I 1 Infrared window Outputs infrared control signals. A SYSTEM POWER Turns on page 74. 1 2 3 CODE SET TRANSMIT POWER TV POWER AV STANDBY CD MD/CD-R TUNER SYSTEM POWER SLEEP DVD DTV/CBL V-AUX MULTI CH IN VCR 1 DVR/VCR2 AMP TV VOL TV CH... 2 ENTERTAIN 3 MOVIE 4 STANDARD SELECT EXTD SUR. To operate other components, see "REMOTE CONTROL FEATURES" on the power of this unit. EFFECT SET MENU MENU SRCH MODE ENTER A-E/CAT. Aim this unit in multiple channel format (see page 33). Use SELECT to playback 2-channel sources in the ...
MCXSP10 Manual
Page 11
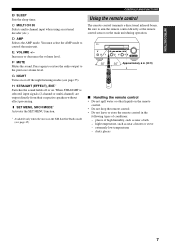
...VIDEO VIDEO AUX VIDEO L AUDIO R OPTICAL 30 30 CODE SET TRANSMIT SYSTEM POWER POWER STANDBY POWER TV AV CD MD/CD-R TUNER SLEEP DVD DTV/CBL V-AUX ...MULTI CH IN VCR 1 DVR/VCR2 AMP TV VOL TV CH VOLUME TV MUTE TV INPUT MUTE STEREO MUSIC ENTERTAIN MOVIE 1 2 3 4 STANDARD SELECT EXTD SUR. LEVEL TITLE BAND PRESET/CH EFFECT SET...FUNCTIONS Using the remote control The remote control transmits a directional infrared beam. INTRODUCTION B SLEEP Sets the sleep timer. H STRAIGHT (EFFECT), ENT.* Switches the sound fields off the night ...
...VIDEO VIDEO AUX VIDEO L AUDIO R OPTICAL 30 30 CODE SET TRANSMIT SYSTEM POWER POWER STANDBY POWER TV AV CD MD/CD-R TUNER SLEEP DVD DTV/CBL V-AUX ...MULTI CH IN VCR 1 DVR/VCR2 AMP TV VOL TV CH VOLUME TV MUTE TV INPUT MUTE STEREO MUSIC ENTERTAIN MOVIE 1 2 3 4 STANDARD SELECT EXTD SUR. LEVEL TITLE BAND PRESET/CH EFFECT SET...FUNCTIONS Using the remote control The remote control transmits a directional infrared beam. INTRODUCTION B SLEEP Sets the sleep timer. H STRAIGHT (EFFECT), ENT.* Switches the sound fields off the night ...
MCXSP10 Manual
Page 12
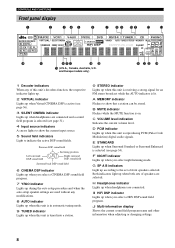
D PCM indicator Lights up when this unit is receiving a strong signal for an FM stereo broadcast while the ...page 34). J Multi-information display Shows the current sound field program name and other information when adjusting or changing settings. 8 B MUTE indicator Flashes while the MUTE function is selected (see page 31). 4 Input source indicators A...fields. A MEMORY indicator Flashes to show the current input source. 5 Sound field indicators Light to the set of speakers are connected and a sound field program is reproducing PCM (Pulse Code Modulation) digital audio signals...
D PCM indicator Lights up when this unit is receiving a strong signal for an FM stereo broadcast while the ...page 34). J Multi-information display Shows the current sound field program name and other information when adjusting or changing settings. 8 B MUTE indicator Flashes while the MUTE function is selected (see page 31). 4 Input source indicators A...fields. A MEMORY indicator Flashes to show the current input source. 5 Sound field indicators Light to the set of speakers are connected and a sound field program is reproducing PCM (Pulse Code Modulation) digital audio signals...
MCXSP10 Manual
Page 15
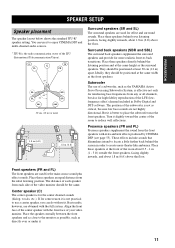
... as directly over or under it to -back transitions. Subwoofer The use it . 11 Place the speaker centrally between the front speakers and as the YAMAHA Active Servo Processing Subwoofer System, is not practical to place the subwoofer near the front speakers. Place these speakers at least 30 cm (12 in... behind the screen in ) or more theater-like ambience. PREPARATION SPEAKER SETUP SPEAKER SETUP Speaker placement The speaker layout below shows the standard ITU-R* speaker setting.
... as directly over or under it to -back transitions. Subwoofer The use it . 11 Place the speaker centrally between the front speakers and as the YAMAHA Active Servo Processing Subwoofer System, is not practical to place the subwoofer near the front speakers. Place these speakers at least 30 cm (12 in... behind the screen in ) or more theater-like ambience. PREPARATION SPEAKER SETUP SPEAKER SETUP Speaker placement The speaker layout below shows the standard ITU-R* speaker setting.

MCXSP10 Manual
Page 16
... incorrect, the sound will use banana plugs with a stripe, groove or ridges. If the connections are faulty, no sound will be sure to set this unit's speaker impedance setting to secure the wire. ■ Banana plug connections (With the exception of U.K., Europe and Asia models) First, tighten the knob and then insert...
... incorrect, the sound will use banana plugs with a stripe, groove or ridges. If the connections are faulty, no sound will be sure to set this unit's speaker impedance setting to secure the wire. ■ Banana plug connections (With the exception of U.K., Europe and Asia models) First, tighten the knob and then insert...
MCXSP10 Manual
Page 19
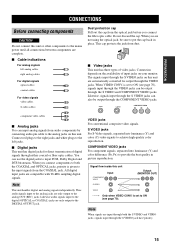
...(C) video signals to the DIGITAL OUTPUT jack. Note This unit handles digital and analog signals independently. Do not discard the cap. is set to provide the best quality in place. All digital input jacks are not using the optical jack, be sure to the input signals from... audio components by connecting audio pin cable to the analog jacks on this unit are input through both the COAXIAL and OPTICAL jacks, priority is set to the left analog cables L right analog cables R For digital signals optical cables O coaxial cables C For video signals video cables V S-...
...(C) video signals to the DIGITAL OUTPUT jack. Note This unit handles digital and analog signals independently. Do not discard the cap. is set to provide the best quality in place. All digital input jacks are not using the optical jack, be sure to the input signals from... audio components by connecting audio pin cable to the analog jacks on this unit are input through both the COAXIAL and OPTICAL jacks, priority is set to the left analog cables L right analog cables R For digital signals optical cables O coaxial cables C For video signals video cables V S-...

MCXSP10 Manual
Page 20
... DVD COAXIAL DIGITAL INPUT VIDEO S VIDEO MONITOR OUT (U.S.A. model) 16 For example, if you connect your video source component are automatically converted to OFF. is set to composite signals in this unit.) Coaxial out Optical out DVD player Video out C O Audio out RL V S PR PB Y COMPONENT VIDEO PR PB Y ... video monitor to this unit using a VIDEO connection, connect your video source components to this unit if VIDEO CONV. (see page 70) is set to OFF, S-video signals input from your video monitor to this unit using the VIDEO connections. (Even when VIDEO CONV.
... DVD COAXIAL DIGITAL INPUT VIDEO S VIDEO MONITOR OUT (U.S.A. model) 16 For example, if you connect your video source component are automatically converted to OFF. is set to composite signals in this unit.) Coaxial out Optical out DVD player Video out C O Audio out RL V S PR PB Y COMPONENT VIDEO PR PB Y ... video monitor to this unit using a VIDEO connection, connect your video source components to this unit if VIDEO CONV. (see page 70) is set to OFF, S-video signals input from your video monitor to this unit using the VIDEO connections. (Even when VIDEO CONV.

MCXSP10 Manual
Page 22
... to connect your video source components in the same way you connect your video monitor to this unit if VIDEO CONV. (see page 70) is set to OFF. For example, if you must make the same type of video connections (i.e., S-video) between each component. When recording you connect your video source... MONITOR OUT (U.S.A. S VIDEO VIDEO AUX VIDEO L AUDIO R OPTICAL S V L R O Optical out Audio out R Audio out L Video out S-video out 18 Game console or video camera is set to OFF, S-video signals input from your video monitor to the MONITOR OUT jacks.
... to connect your video source components in the same way you connect your video monitor to this unit if VIDEO CONV. (see page 70) is set to OFF. For example, if you must make the same type of video connections (i.e., S-video) between each component. When recording you connect your video source... MONITOR OUT (U.S.A. S VIDEO VIDEO AUX VIDEO L AUDIO R OPTICAL S V L R O Optical out Audio out R Audio out L Video out S-video out 18 Game console or video camera is set to OFF, S-video signals input from your video monitor to the MONITOR OUT jacks.
MCXSP10 Manual
Page 24
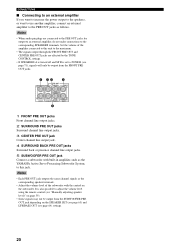
... (see "Manually adjusting speaker levels" on page 59). • Some signals may not be output from the SUBWOOFER PRE OUT jack depending on the SPEAKER SET (see page 63) and LFE/BASS OUT (see page 71), signals will only be output from the FRONT PRE OUT jacks. 1 23 4 PRE OUT...subwoofer. Notes • Each PRE OUT jack outputs the same channel signals as follows. It is set to ZONE B (see page 64) settings. 20 Set the volume of the subwoofer with built-in amplifier, such as the YAMAHA Active Servo Processing Subwoofer System, to this unit to the maximum. • The signals output ...
... (see "Manually adjusting speaker levels" on page 59). • Some signals may not be output from the SUBWOOFER PRE OUT jack depending on the SPEAKER SET (see page 63) and LFE/BASS OUT (see page 71), signals will only be output from the FRONT PRE OUT jacks. 1 23 4 PRE OUT...subwoofer. Notes • Each PRE OUT jack outputs the same channel signals as follows. It is set to ZONE B (see page 64) settings. 20 Set the volume of the subwoofer with built-in amplifier, such as the YAMAHA Active Servo Processing Subwoofer System, to this unit to the maximum. • The signals output ...

MCXSP10 Manual
Page 25
... frequency step according to insert the AM loop antenna lead wires into moist earth. ■ Connecting the AM loop antenna 1 Set up the AM loop antenna, then connect it to the terminals on this unit. 2 Press and hold the tab to the frequency spacing ...AM indoor antennas are included with this unit. • A properly installed outdoor antenna provides clearer reception than an indoor one. Consult the nearest authorized YAMAHA dealer or service center about outdoor antennas. If you experience poor reception quality, an outdoor antenna may improve the quality. A good earth ground is ...
... frequency step according to insert the AM loop antenna lead wires into moist earth. ■ Connecting the AM loop antenna 1 Set up the AM loop antenna, then connect it to the terminals on this unit. 2 Press and hold the tab to the frequency spacing ...AM indoor antennas are included with this unit. • A properly installed outdoor antenna provides clearer reception than an indoor one. Consult the nearest authorized YAMAHA dealer or service center about outdoor antennas. If you experience poor reception quality, an outdoor antenna may improve the quality. A good earth ground is ...
MCXSP10 Manual
Page 26
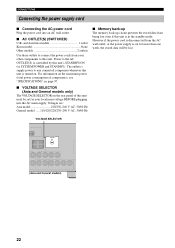
... power cord is disconnected from the AC wall outlet, or the power supply is cut for more than one week, the stored data will be set for your other components to this unit is in the standby mode. The outlet(s) supply power to the AC OUTLET(S) is turned on the rear...
... power cord is disconnected from the AC wall outlet, or the power supply is cut for more than one week, the stored data will be set for your other components to this unit is in the standby mode. The outlet(s) supply power to the AC OUTLET(S) is turned on the rear...
MCXSP10 Manual
Page 27
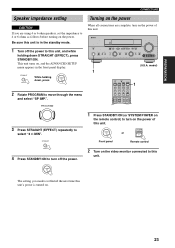
...holding down , press STANDBY /ON 2 Rotate PROGRAM to this unit, and while holding down STRAIGHT (EFFECT), press STANDBY/ON. model) 1 CODE SET TRANSMIT POWER TV POWER AV STANDBY CD MD/CD-R TUNER SYSTEM POWER SLEEP DVD DTV/CBL V-AUX MULTI CH IN VCR 1 DVR/VCR2 AMP 1 TV VOL TV CH...Press STRAIGHT (EFFECT) repeatedly to turn on the power of this unit. Be sure this unit is turned on. 23 PREPARATION CONNECTIONS Speaker impedance setting CAUTION If you made is reflected the next time this unit's power is in the front panel display. This unit turns on, and the ...
...holding down , press STANDBY /ON 2 Rotate PROGRAM to this unit, and while holding down STRAIGHT (EFFECT), press STANDBY/ON. model) 1 CODE SET TRANSMIT POWER TV POWER AV STANDBY CD MD/CD-R TUNER SYSTEM POWER SLEEP DVD DTV/CBL V-AUX MULTI CH IN VCR 1 DVR/VCR2 AMP 1 TV VOL TV CH...Press STRAIGHT (EFFECT) repeatedly to turn on the power of this unit. Be sure this unit is turned on. 23 PREPARATION CONNECTIONS Speaker impedance setting CAUTION If you made is reflected the next time this unit's power is in the front panel display. This unit turns on, and the ...
MCXSP10 Manual
Page 28
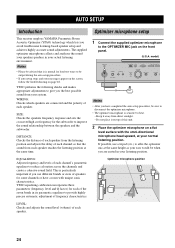
AUTO SETUP AUTO SETUP Introduction This receiver employs YAMAHA Parametric Room Acoustic Optimizer (YPAO) technology which speakers are seated in your actual listening environment. SIZE: Checks the speakers frequency response and sets the crossover/high cut frequency for loud test tones to heat. - Keep it is sensitive to be when you have a room with...
AUTO SETUP AUTO SETUP Introduction This receiver employs YAMAHA Parametric Room Acoustic Optimizer (YPAO) technology which speakers are seated in your actual listening environment. SIZE: Checks the speakers frequency response and sets the crossover/high cut frequency for loud test tones to heat. - Keep it is sensitive to be when you have a room with...

MCXSP10 Manual
Page 29
...MAX 50Hz 150Hz Subwoofer 1 Switch on this unit and your subwoofer has adjustable volume and crossover/high cut frequency to select the desired setting. 1 AUTO:MENU . Make sure the OSD is too much ambient noise, the results may not be satisfactory. START Automatic processing ...during the auto setup procedure (YPAO). EQUALIZING . y If your video monitor. ENTER A-E/CAT. ENTER A-E/CAT. To reload the last auto setup (YPAO) settings to override any other SET MENU items (see page 60). 4 Press u / d to select AUTO SETUP, then press ENTER. 5 Press u / d to select SETUP, then ...
...MAX 50Hz 150Hz Subwoofer 1 Switch on this unit and your subwoofer has adjustable volume and crossover/high cut frequency to select the desired setting. 1 AUTO:MENU . Make sure the OSD is too much ambient noise, the results may not be satisfactory. START Automatic processing ...during the auto setup procedure (YPAO). EQUALIZING . y If your video monitor. ENTER A-E/CAT. ENTER A-E/CAT. To reload the last auto setup (YPAO) settings to override any other SET MENU items (see page 60). 4 Press u / d to select AUTO SETUP, then press ENTER. 5 Press u / d to select SETUP, then ...


