
Owners Manual
Page 1
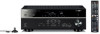
AV Receiver Owner's Manual English Read the supplied booklet "Safety Brochure" before using the unit.
AV Receiver Owner's Manual English Read the supplied booklet "Safety Brochure" before using the unit.

Owners Manual
Page 2
CONTENTS Accessories 4 FEATURES 5 What you can do with the unit 5 Part names and functions 7 Front panel 7 Front display (indicators 8 Rear panel 9 Remote control 10 PREPARATIONS 11 General setup procedure 11 1 Placing speakers 12 2 Connecting speakers 15 5.1-channel system 15 7.1-channel system 15 Connecting front speakers that support bi-amp connections 16 Connecting Zone B speakers 16 Input/output jacks and cables 17 3 Connecting a TV 18 4 Connecting playback devices 23 Connecting video devices (such as BD/DVD players 23 Connecting audio devices (such as CD players ...
CONTENTS Accessories 4 FEATURES 5 What you can do with the unit 5 Part names and functions 7 Front panel 7 Front display (indicators 8 Rear panel 9 Remote control 10 PREPARATIONS 11 General setup procedure 11 1 Placing speakers 12 2 Connecting speakers 15 5.1-channel system 15 7.1-channel system 15 Connecting front speakers that support bi-amp connections 16 Connecting Zone B speakers 16 Input/output jacks and cables 17 3 Connecting a TV 18 4 Connecting playback devices 23 Connecting video devices (such as BD/DVD players 23 Connecting audio devices (such as CD players ...
Owners Manual
Page 3
...Playing back iTunes/iPod music via a network (AirPlay 58 Playback of iTunes/iPod music contents 58 Playing back music in multiple rooms (RX-V573 only 60 Preparing Zone B 60 Configuring playback settings for different playback sources (Option menu 62 Option menu items 62 CONFIGURATIONS 66 ...and network 90 Remote control 91 Error indications on the front display 92 Glossary 93 Audio information 93 HDMI and video information 94 Yamaha technologies 95 Video signal flow 96 Information on HDMI 96 HDMI Control 96 HDMI signal compatibility 98 Reference diagram (rear panel 99...
...Playing back iTunes/iPod music via a network (AirPlay 58 Playback of iTunes/iPod music contents 58 Playing back music in multiple rooms (RX-V573 only 60 Preparing Zone B 60 Configuring playback settings for different playback sources (Option menu 62 Option menu items 62 CONFIGURATIONS 66 ...and network 90 Remote control 91 Error indications on the front display 92 Glossary 93 Audio information 93 HDMI and video information 94 Yamaha technologies 95 Video signal flow 96 Information on HDMI 96 HDMI Control 96 HDMI signal compatibility 98 Reference diagram (rear panel 99...
Owners Manual
Page 4
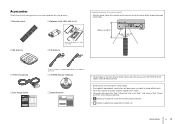
... is supplied depending on the unit and remain within the operating range shown below. Accessories En 4 Accessories Check that the following accessories are of the RX-V573 (U.S.A. model), unless otherwise specified. • Some features are not available in this manual are supplied with the product. … Remote control … Batteries (AAA...
... is supplied depending on the unit and remain within the operating range shown below. Accessories En 4 Accessories Check that the following accessories are of the RX-V573 (U.S.A. model), unless otherwise specified. • Some features are not available in this manual are supplied with the product. … Remote control … Batteries (AAA...
Owners Manual
Page 5
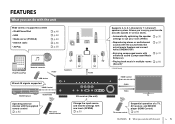
... ➤ What you can do with the unit En 5 p.56 . p.82 The unit's remote control Change the input source and favorite settings with . p.60 (Zone B)* * RX-V573 only HDMI Control Audio Video TV TV remote control Sequential operation of supported content • iPod/iPhone/iPad • USB • Media server (PC...
... ➤ What you can do with the unit En 5 p.56 . p.82 The unit's remote control Change the input source and favorite settings with . p.60 (Zone B)* * RX-V573 only HDMI Control Audio Video TV TV remote control Sequential operation of supported content • iPod/iPhone/iPad • USB • Media server (PC...
Owners Manual
Page 6
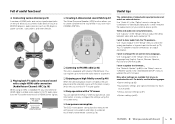
Useful tips The combination of signals input into the unit (p.72). Use "Audio In" in the "Option" menu to change the on-screen menu language... Your TV speakers may be selected as presets. ❑ Enjoying pure high fidelity sound (p.40) When the direct playback mode is equipped with a built-in the "Setup" menu to hear audio from English, French, German, Spanish, Russian and Chinese (p.29). I want to change the combination of video/audio input jacks so that let you to enjoy Hi-Fi sound quality. ❑ Easy operation with the unit En 6 Full of useful functions! ❑ ...
Useful tips The combination of signals input into the unit (p.72). Use "Audio In" in the "Option" menu to change the on-screen menu language... Your TV speakers may be selected as presets. ❑ Enjoying pure high fidelity sound (p.40) When the direct playback mode is equipped with a built-in the "Setup" menu to hear audio from English, French, German, Spanish, Russian and Chinese (p.29). I want to change the combination of video/audio input jacks so that let you to enjoy Hi-Fi sound quality. ❑ Easy operation with the unit En 6 Full of useful functions! ❑ ...
Owners Manual
Page 7
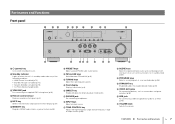
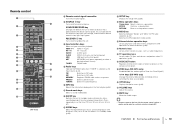
H VIDEO AUX jacks For connecting devices, such as preset stations (p.43). C DE F G HI 7 PRESET keys Select a preset FM/AM radio station (p.44). 8 FM and AM keys Switch between FM and AM (p.42). 9 TUNING keys Select the radio frequency (p.42). 0 Front display Displays information (p.8). J E SCENE keys Select the registered input source and sound program with one touch. F PROGRAM keys Select a sound program or a surround decoder (p.36). G STRAIGHT key Enables/disables the straight decode mode (p.39). I USB jack For connecting a USB storage device (p.50) or an iPod (p.46)....
H VIDEO AUX jacks For connecting devices, such as preset stations (p.43). C DE F G HI 7 PRESET keys Select a preset FM/AM radio station (p.44). 8 FM and AM keys Switch between FM and AM (p.42). 9 TUNING keys Select the radio frequency (p.42). 0 Front display Displays information (p.8). J E SCENE keys Select the registered input source and sound program with one touch. F PROGRAM keys Select a sound program or a surround decoder (p.36). G STRAIGHT key Enables/disables the straight decode mode (p.39). I USB jack For connecting a USB storage device (p.50) or an iPod (p.46)....
Owners Manual
Page 8
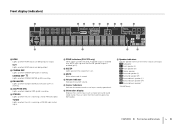
... A Front speaker (L) S Front speaker (R) D Center speaker F Surround speaker (L) G Surround speaker (R) H Surround back speaker (L)* J Surround back speaker (R)* K Surround back speaker* * RX-V573 only FEATURES ➤ Part names and functions En 8 TUNED Lights up when the unit is receiving an FM/AM radio station signal. 6 ZONE indicators... (RX-V573 only) "SP A" lights up when the Zone A speaker output is enabled and "SP B" lights up when the Zone B speaker ...
... A Front speaker (L) S Front speaker (R) D Center speaker F Surround speaker (L) G Surround speaker (R) H Surround back speaker (L)* J Surround back speaker (R)* K Surround back speaker* * RX-V573 only FEATURES ➤ Part names and functions En 8 TUNED Lights up when the unit is receiving an FM/AM radio station signal. 6 ZONE indicators... (RX-V573 only) "SP A" lights up when the Zone A speaker output is enabled and "SP B" lights up when the Zone B speaker ...
Owners Manual
Page 9
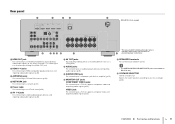
...). 8 AUDIO jacks For connecting to an audio playback device and inputting audio signals (p.25). 9 SUBWOOFER jack For connecting to a subwoofer (with built-in white on RX-V573 only. model) OPTICAL AV 1 COAXIAL AV 2 COAXIAL AV 3 OPTICAL ( TV ) AV 4 AV 5 AV 6 AV OUT SUBWOOFER AUDIO 6 789 : A 1 HDMI OUT jack For connecting to... 4 PR PB Y COMPONENT VIDEO VIDEO ANTENNA AM FM COMPONENT VIDEO PR PB Y MONITOR OUT NETWORK FRONT CENTER SPEAKERS SURROUND SURROUND BACK/BI AMP /ZONE B SINGLE 5 (RX-V573 U.S.A.
...). 8 AUDIO jacks For connecting to an audio playback device and inputting audio signals (p.25). 9 SUBWOOFER jack For connecting to a subwoofer (with built-in white on RX-V573 only. model) OPTICAL AV 1 COAXIAL AV 2 COAXIAL AV 3 OPTICAL ( TV ) AV 4 AV 5 AV 6 AV OUT SUBWOOFER AUDIO 6 789 : A 1 HDMI OUT jack For connecting to... 4 PR PB Y COMPONENT VIDEO VIDEO ANTENNA AM FM COMPONENT VIDEO PR PB Y MONITOR OUT NETWORK FRONT CENTER SPEAKERS SURROUND SURROUND BACK/BI AMP /ZONE B SINGLE 5 (RX-V573 U.S.A.
Owners Manual
Page 10
... unit to standby mode automatically after a specified period of external devices on the remote control (p.82). ENTER Confirms a selected item. I (RX-V573) 1 Remote control signal transmitter Transmits infrared signals. 2 SOURCE z key Turns on the unit when it is operated with the remote ...H VOLUME keys Adjust the volume. PRESET Select a preset station. F ZONE keys (RX-V573 only) Enable/disable the audio output to Zone A or Zone B (p.61). ★/★★ keys (RX-V473 only) Change the external device to select a desired network source) TUNER FM/AM radio...
... unit to standby mode automatically after a specified period of external devices on the remote control (p.82). ENTER Confirms a selected item. I (RX-V573) 1 Remote control signal transmitter Transmits infrared signals. 2 SOURCE z key Turns on the unit when it is operated with the remote ...H VOLUME keys Adjust the volume. PRESET Select a preset station. F ZONE keys (RX-V573 only) Enable/disable the audio output to Zone A or Zone B (p.61). ★/★★ keys (RX-V473 only) Change the external device to select a desired network source) TUNER FM/AM radio...
Owners Manual
Page 11
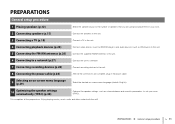
This completes all the connections are using and place them in your room. 2 Connecting speakers (p.15) Connect the speakers to the unit. 3 Connecting a TV (p.18) Connect a TV to the unit. 4 Connecting playback devices (p.23) Connect video devices (such as BD/DVD players) and audio devices (such as CD players) to the unit. 5 Connecting the FM/AM antennas (p.26) Connect the supplied FM/AM antennas to the unit. 6 Connecting to a network (p.27) Connect the unit to a network. 7 Connecting recording devices (p.28) Connect recording devices to suit your room (YPAO). PREPARATIONS ...
This completes all the connections are using and place them in your room. 2 Connecting speakers (p.15) Connect the speakers to the unit. 3 Connecting a TV (p.18) Connect a TV to the unit. 4 Connecting playback devices (p.23) Connect video devices (such as BD/DVD players) and audio devices (such as CD players) to the unit. 5 Connecting the FM/AM antennas (p.26) Connect the supplied FM/AM antennas to the unit. 6 Connecting to a network (p.27) Connect the unit to a network. 7 Connecting recording devices (p.28) Connect recording devices to suit your room (YPAO). PREPARATIONS ...
Owners Manual
Page 12
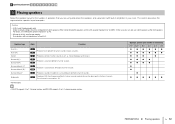
...; ● ● ● ● ● ● ● ● ● ● ● ● ● ● ● • RX-V573 supports 2- 1 Speaker placement 2 3 4 5 6 7 8 9 10 1 Placing speakers Select the speaker layout for the number of speakers that you can also use ...(stereo sounds). 2 3 Produces center channel sounds (such as "0.1". to 5.1-channel speaker system. to 7.1-channel system, and RX-V473 supports 2- This section describes the representative speaker layout examples. Caution • (U.S.A. When connecting 6-ohm speakers, set the unit's...
...; ● ● ● ● ● ● ● ● ● ● ● ● ● ● ● • RX-V573 supports 2- 1 Speaker placement 2 3 4 5 6 7 8 9 10 1 Placing speakers Select the speaker layout for the number of speakers that you can also use ...(stereo sounds). 2 3 Produces center channel sounds (such as "0.1". to 5.1-channel speaker system. to 7.1-channel system, and RX-V473 supports 2- This section describes the representative speaker layout examples. Caution • (U.S.A. When connecting 6-ohm speakers, set the unit's...
Owners Manual
Page 13
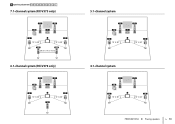
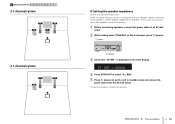
1 Speaker placement 2 3 4 5 6 7 8 9 10 7.1-channel system (RX-V573 only) 1 2 9 3 4 10° to 30° 5 10° to 30° 6 7 30 cm (1 ft) or more 6.1-channel system (RX-V573 only) 1 2 9 3 4 10° to 30° 8 5 10° to 30° 5.1-channel system 1 2 9 3 4 10° to 30° 5 10° to 30° 4.1-channel system 1 9 4 10° to 30° 2 5 10° to 30° PREPARATIONS ➤ Placing speakers En 13
1 Speaker placement 2 3 4 5 6 7 8 9 10 7.1-channel system (RX-V573 only) 1 2 9 3 4 10° to 30° 5 10° to 30° 6 7 30 cm (1 ft) or more 6.1-channel system (RX-V573 only) 1 2 9 3 4 10° to 30° 8 5 10° to 30° 5.1-channel system 1 2 9 3 4 10° to 30° 5 10° to 30° 4.1-channel system 1 9 4 10° to 30° 2 5 10° to 30° PREPARATIONS ➤ Placing speakers En 13
Owners Manual
Page 14
When connecting 6-ohm speakers, set the unit to "6 Ω MIN". In this case, you can also use 4-ohm speakers as the front speakers. 1 Before connecting speakers, connect the power cable to connect the speakers. SP IMP. 8 MIN 4 Press STRAIGHT to select "6 Ω MIN". 5 Press z (power) to set the speaker impedance to standby mode and remove the power cable from the AC wall outlet. You are now ready to an AC wall outlet. 2 While holding down STRAIGHT on the front display. PREPARATIONS ➤ Placing speakers En 14 z (power) STRAIGHT 3 Check that "SP IMP." and Canada ...
When connecting 6-ohm speakers, set the unit to "6 Ω MIN". In this case, you can also use 4-ohm speakers as the front speakers. 1 Before connecting speakers, connect the power cable to connect the speakers. SP IMP. 8 MIN 4 Press STRAIGHT to select "6 Ω MIN". 5 Press z (power) to set the speaker impedance to standby mode and remove the power cable from the AC wall outlet. You are now ready to an AC wall outlet. 2 While holding down STRAIGHT on the front display. PREPARATIONS ➤ Placing speakers En 14 z (power) STRAIGHT 3 Check that "SP IMP." and Canada ...
Owners Manual
Page 15
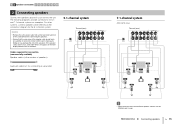
... required for connecting a subwoofer) 5.1-channel system PB Y OR OUT The unit (rear) FRONT CENTER SPEAKERS SURROUND SURROUND BACK/BI AMP /ZONE B SINGLE SUBWOOFER 1 2 9 3 4 5 7.1-channel system (RX-V573 only) PB Y OR OUT The unit (rear) FRONT CENTER SPEAKERS SURROUND SURROUND BACK/BI AMP /ZONE B SINGLE SUBWOOFER 1 2 9 3 4 6 5 7 • When using only one another...
... required for connecting a subwoofer) 5.1-channel system PB Y OR OUT The unit (rear) FRONT CENTER SPEAKERS SURROUND SURROUND BACK/BI AMP /ZONE B SINGLE SUBWOOFER 1 2 9 3 4 5 7.1-channel system (RX-V573 only) PB Y OR OUT The unit (rear) FRONT CENTER SPEAKERS SURROUND SURROUND BACK/BI AMP /ZONE B SINGLE SUBWOOFER 1 2 9 3 4 6 5 7 • When using only one another...
Owners Manual
Page 16
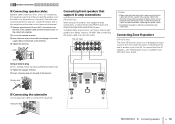
... of the cable firmly together. Audio pin cable Y MONITOR OUT AV6 AV OUT AUDIO SUBWOOFER Connecting front speakers that support bi-amp connections (RX-V573 only) When using front speakers that support bi-amp connections, connect them to the instruction manual of the speakers for the positive (+) terminal... prevent confusion, connect the black wire to connect the subwoofer. To connect the Zone B speakers, see "Playing back music in multiple rooms (RX-V573 only)" (p.60). PREPARATIONS ➤ Connecting speakers En 16 c Insert the bare wires of the cable into the end of the unit ...
... of the cable firmly together. Audio pin cable Y MONITOR OUT AV6 AV OUT AUDIO SUBWOOFER Connecting front speakers that support bi-amp connections (RX-V573 only) When using front speakers that support bi-amp connections, connect them to the instruction manual of the speakers for the positive (+) terminal... prevent confusion, connect the black wire to connect the subwoofer. To connect the Zone B speakers, see "Playing back music in multiple rooms (RX-V573 only)" (p.60). PREPARATIONS ➤ Connecting speakers En 16 c Insert the bare wires of the cable into the end of the unit ...
Owners Manual
Page 17
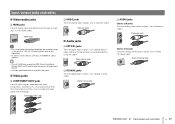
Use a digital coaxial cable. Use a stereo mini-plug cable. Input/output jacks and cables ■ Video/audio jacks ❑ HDMI jacks Transmit digital video and digital sound through output) features. • Use high speed HDMI cables to enjoy 3D or 4K videos. ■ Video jacks ❑ COMPONENT VIDEO jacks Transmit video signals separated into three components: luminance (Y), chrominance blue (PB), and chrominance red (PR). Use an HDMI cable. Component video cable ❑ VIDEO jacks Transmit analog video signals. Remove the tip protector (if available) before using a cable ...
Use a digital coaxial cable. Use a stereo mini-plug cable. Input/output jacks and cables ■ Video/audio jacks ❑ HDMI jacks Transmit digital video and digital sound through output) features. • Use high speed HDMI cables to enjoy 3D or 4K videos. ■ Video jacks ❑ COMPONENT VIDEO jacks Transmit video signals separated into three components: luminance (Y), chrominance blue (PB), and chrominance red (PR). Use an HDMI cable. Component video cable ❑ VIDEO jacks Transmit analog video signals. Remove the tip protector (if available) before using a cable ...
Owners Manual
Page 18
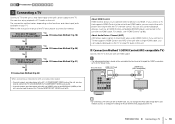
You can also enjoy playback of the unit with the menu displayed on the TV. About HDMI Control HDMI Control allows you to the unit with an HDMI cable, you can control the unit's power and volume with the TV's remote control. If you connect a TV that supports HDMI Control to operate external devices via HDMI. The connection method varies depending on the functions and video input jacks available on your TV support Audio Return Channel (ARC)? For details, see "HDMI Control" (p.96). Yes ■ Connection Method 3 (p.21) No ■ Connection Method 4 (p.22) When ...
You can also enjoy playback of the unit with the menu displayed on the TV. About HDMI Control HDMI Control allows you to the unit with an HDMI cable, you can control the unit's power and volume with the TV's remote control. If you connect a TV that supports HDMI Control to operate external devices via HDMI. The connection method varies depending on the functions and video input jacks available on your TV support Audio Return Channel (ARC)? For details, see "HDMI Control" (p.96). Yes ■ Connection Method 3 (p.21) No ■ Connection Method 4 (p.22) When ...
Owners Manual
Page 19
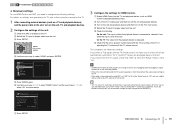
SETUP OPTION ENTER VOLUME RETURN DISPLAY SETUP Cursor keys ENTER TOP POP UP d Use the cursor keys to display video from the unit. b Turn off the TV's main power and then turn off and on the TV. • If the audio is selected. d Switch the TV input to select "HDMI" and press ENTER. It may solve the problem. • If the unit is not synchronized to the TV's power operations, check the priority of the audio output setting on (or unplugging and then plugging in the "Setup" menu to "Off" and use a digital optical cable to input TV audio to which the playback device is...
SETUP OPTION ENTER VOLUME RETURN DISPLAY SETUP Cursor keys ENTER TOP POP UP d Use the cursor keys to display video from the unit. b Turn off the TV's main power and then turn off and on the TV. • If the audio is selected. d Switch the TV input to select "HDMI" and press ENTER. It may solve the problem. • If the unit is not synchronized to the TV's power operations, check the priority of the audio output setting on (or unplugging and then plugging in the "Setup" menu to "Off" and use a digital optical cable to input TV audio to which the playback device is...
Owners Manual
Page 20
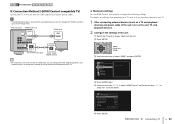
For details on settings and operating your TV, refer to the instruction manual for the TV. 1 After connecting external devices (such as shown below. a Switch the TV input to select "HDMI" and press ENTER. b Press SETUP. 1 2 3 TV connection 4 5 6 7 8 9 10 ■ Connection Method 2 (HDMI Control-compatible TV) Connect the TV to the unit with the menu displayed on the TV. ❑ Necessary settings To use HDMI Control, you have not changed the "HDMI" parameters (p.72) in the "Setup" menu. PREPARATIONS ➤ Connecting a TV En 20 SETUP OPTION ENTER VOLUME RETURN DISPLAY...
For details on settings and operating your TV, refer to the instruction manual for the TV. 1 After connecting external devices (such as shown below. a Switch the TV input to select "HDMI" and press ENTER. b Press SETUP. 1 2 3 TV connection 4 5 6 7 8 9 10 ■ Connection Method 2 (HDMI Control-compatible TV) Connect the TV to the unit with the menu displayed on the TV. ❑ Necessary settings To use HDMI Control, you have not changed the "HDMI" parameters (p.72) in the "Setup" menu. PREPARATIONS ➤ Connecting a TV En 20 SETUP OPTION ENTER VOLUME RETURN DISPLAY...
