Owners Manual
Page 12
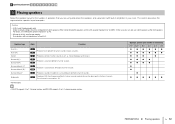
.../left /right channel sounds. 9 Produces LFE (low-frequency effect) channel sounds and reinforces the bass parts of other channels. This channel is configured for 8-ohm speakers. PREPARATIONS ➤ Placing speakers En 12 1 Speaker placement 2 3 4 5 6 7 8 9 10 1 Placing speakers Select the speaker layout for... the number of speakers that you can also use 4-ohm speakers as the front speakers. This section describes the representative speaker layout examples. to 7.1-channel system, and RX-V473 supports 2- In this case, you are using and place the speakers and ...
.../left /right channel sounds. 9 Produces LFE (low-frequency effect) channel sounds and reinforces the bass parts of other channels. This channel is configured for 8-ohm speakers. PREPARATIONS ➤ Placing speakers En 12 1 Speaker placement 2 3 4 5 6 7 8 9 10 1 Placing speakers Select the speaker layout for... the number of speakers that you can also use 4-ohm speakers as the front speakers. This section describes the representative speaker layout examples. to 7.1-channel system, and RX-V473 supports 2- In this case, you are using and place the speakers and ...
Owners Manual
Page 14
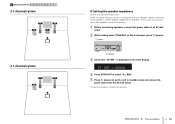
... as the front speakers. 1 Before connecting speakers, connect the power cable to "6 Ω MIN". is configured for 8-ohm speakers. and Canada models only) Under its default settings, the unit is displayed on the front panel, press z (power). z (... ➤ Placing speakers En 14 1 Speaker placement 2 3 4 5 6 7 8 9 10 3.1-channel system 1 2 9 3 2.1-channel system 1 9 2 ■ Setting the speaker impedance (U.S.A. When connecting 6-ohm speakers, set the unit to connect the speakers. You are now ready to standby mode and remove the power cable from the AC wall outlet...
... as the front speakers. 1 Before connecting speakers, connect the power cable to "6 Ω MIN". is configured for 8-ohm speakers. and Canada models only) Under its default settings, the unit is displayed on the front panel, press z (power). z (... ➤ Placing speakers En 14 1 Speaker placement 2 3 4 5 6 7 8 9 10 3.1-channel system 1 2 9 3 2.1-channel system 1 9 2 ■ Setting the speaker impedance (U.S.A. When connecting 6-ohm speakers, set the unit to connect the speakers. You are now ready to standby mode and remove the power cable from the AC wall outlet...
Owners Manual
Page 80
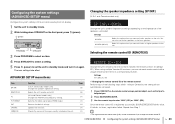
...following steps within 1 minute. Repeat from Step 1. • The registered remote control codes (p.82) are not cleared even if you connect 8-ohm or higher speakers to the unit. CONFIGURATIONS ➤ Configuring the system settings (ADVANCED SETUP menu) En 80 Page 80 80 81 81 81...and Canada models only) SP IMP. 8 MIN Change the unit's speaker impedance settings depending on the remote control using multiple Yamaha AV receivers, you connect 6-ohm speakers to the unit. The new settings take effect. ADVANCED SETUP menu items Item SP IMP. Restores the default settings. Otherwise...
...following steps within 1 minute. Repeat from Step 1. • The registered remote control codes (p.82) are not cleared even if you connect 8-ohm or higher speakers to the unit. CONFIGURATIONS ➤ Configuring the system settings (ADVANCED SETUP menu) En 80 Page 80 80 81 81 81...and Canada models only) SP IMP. 8 MIN Change the unit's speaker impedance settings depending on the remote control using multiple Yamaha AV receivers, you connect 6-ohm speakers to the unit. The new settings take effect. ADVANCED SETUP menu items Item SP IMP. Restores the default settings. Otherwise...

Owners Manual
Page 115
One is for connecting the negative (-) terminals of the unit and the speaker, and the other is for 8-ohm speakers. PB Y OR OUT The unit (rear) FRONT CENTER SPEAKERS SURROUND SUBWOOFER 1 2 9 3 4 5 2 Connect the center speaker (3) to "6 Ω MIN". and Canada models only...cable and twist the bare wires of the speaker cable do not touch each other wire to the positive terminals. d Tighten the terminal. When connecting 6-ohm speakers, set the unit's speaker impedance to the CENTER terminal. c Insert the bare wires of the terminal. 1 Connect the front speakers (1/2) to ...
One is for connecting the negative (-) terminals of the unit and the speaker, and the other is for 8-ohm speakers. PB Y OR OUT The unit (rear) FRONT CENTER SPEAKERS SURROUND SUBWOOFER 1 2 9 3 4 5 2 Connect the center speaker (3) to "6 Ω MIN". and Canada models only...cable and twist the bare wires of the speaker cable do not touch each other wire to the positive terminals. d Tighten the terminal. When connecting 6-ohm speakers, set the unit's speaker impedance to the CENTER terminal. c Insert the bare wires of the terminal. 1 Connect the front speakers (1/2) to ...
