Owner's Manual
Page 4
... a wall outlet or the unit during a lightning storm. 14 Do not attempt to consume a very small quantity of the unit. Contact qualified Yamaha service personnel when any reasons. 15 When not planning to this unit for your unit. 1 To assure the finest performance, please read the "... BEFORE plugging into the AC wall outlet. vacation), disconnect the AC power plug from the wall outlet. 19 VOLTAGE SELECTOR (Asia and General models only) The VOLTAGE SELECTOR on the rear of power. IMPORTANT Please record the serial number of this unit may overheat, possibly causing damage....
... a wall outlet or the unit during a lightning storm. 14 Do not attempt to consume a very small quantity of the unit. Contact qualified Yamaha service personnel when any reasons. 15 When not planning to this unit for your unit. 1 To assure the finest performance, please read the "... BEFORE plugging into the AC wall outlet. vacation), disconnect the AC power plug from the wall outlet. 19 VOLTAGE SELECTOR (Asia and General models only) The VOLTAGE SELECTOR on the rear of power. IMPORTANT Please record the serial number of this unit may overheat, possibly causing damage....

Owner's Manual
Page 5
... control ii List of the parts on the front panel or the remote control. and Canada models only 13 Information on jacks and cable plugs 14 Connecting video components 15 Connecting audio components 17 Connecting a Yamaha iPod universal dock 18 Using the VIDEO AUX jacks on the front panel .... 18 Connecting the...
... control ii List of the parts on the front panel or the remote control. and Canada models only 13 Information on jacks and cable plugs 14 Connecting video components 15 Connecting audio components 17 Connecting a Yamaha iPod universal dock 18 Using the VIDEO AUX jacks on the front panel .... 18 Connecting the...

Owner's Manual
Page 6
... the Electronic Industries Association's Consumer Electronics Group want you to optimize this unit to improve the sound quality of YAMAHA CORPORATION. and Canada models only) ◆ XM Satellite Radio tuning capability (using the "XM MiniTuner Dock" sold separately) ◆ Neural Surround decoder to play back the XM HD content ...
... the Electronic Industries Association's Consumer Electronics Group want you to optimize this unit to improve the sound quality of YAMAHA CORPORATION. and Canada models only) ◆ XM Satellite Radio tuning capability (using the "XM MiniTuner Dock" sold separately) ◆ Neural Surround decoder to play back the XM HD content ...
Owner's Manual
Page 7
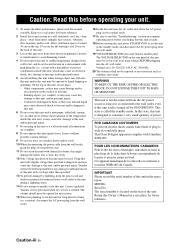
...material or letting it come into place. Remote control CODE SET TRANSMIT POWER TV POWER AV STANDBY POWER CD DVD DOCK V-AUX MD CD-R CBL DTV MULTI CH IN AUDIO... set up the remote control code. Notes • Change all of the batteries if you received all of the battery compartment. 3 Snap the battery compartment cover back into contact with general house... control 13 2 Note The form of the supplied accessories varies depending on the models. ■ VOLTAGE SELECTOR (Asia and General models only) Caution The VOLTAGE SELECTOR on the inside of the following conditions: - ...
...material or letting it come into place. Remote control CODE SET TRANSMIT POWER TV POWER AV STANDBY POWER CD DVD DOCK V-AUX MD CD-R CBL DTV MULTI CH IN AUDIO... set up the remote control code. Notes • Change all of the batteries if you received all of the battery compartment. 3 Snap the battery compartment cover back into contact with general house... control 13 2 Note The form of the supplied accessories varies depending on the models. ■ VOLTAGE SELECTOR (Asia and General models only) Caution The VOLTAGE SELECTOR on the inside of the following conditions: - ...
Owner's Manual
Page 11
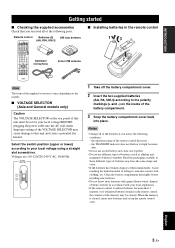
...8226; Connecting a CD player and an MD recorder ☞ P. 17 • Connecting a DVD player via analog multi-channel audio connection ☞ P. 17 • Connecting a Yamaha iPod universal dock ☞ P. 18 • Using the VIDEO AUX jacks on the front panel ☞ P. 18 • Connecting an outdoor FM/AM antenna ☞...Tuner Dock ☞ P. 41 English 7 En y This unit is equipped with AC OUTLET(S) for the power supply of the other components (except Korea model). INTRODUCTION 4 Connect the FM and AM antennas to AM and GND terminal. 5 Connect the power plug of this unit.
...8226; Connecting a CD player and an MD recorder ☞ P. 17 • Connecting a DVD player via analog multi-channel audio connection ☞ P. 17 • Connecting a Yamaha iPod universal dock ☞ P. 18 • Using the VIDEO AUX jacks on the front panel ☞ P. 18 • Connecting an outdoor FM/AM antenna ☞...Tuner Dock ☞ P. 41 English 7 En y This unit is equipped with AC OUTLET(S) for the power supply of the other components (except Korea model). INTRODUCTION 4 Connect the FM and AM antennas to AM and GND terminal. 5 Connect the power plug of this unit.
Owner's Manual
Page 14
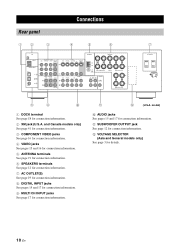
... See pages 15 and 17 for connection information. and Canada models only) See page 41 for connection information. 3 COMPONENT VIDEO jacks See page 16 for connection information. 4 VIDEO jacks See pages 15 and 16 for ... INPUT jacks See pages 15 and 17 for connection information. 9 MULTI CH INPUT jacks See page 17 for connection information. B VOLTAGE SELECTOR (Asia and General models only) See page 3 for connection information. 2 XM jack (U.S.A. A B (U.S.A. R SURROUND L CENTER R FRONT B L IN MD/ OUT (PLAY) CD-R (REC) OUTPUT SUB WOOFER R FRONT A L 7 AC OUTLETS 8 9 0 1 DOCK...
... See pages 15 and 17 for connection information. and Canada models only) See page 41 for connection information. 3 COMPONENT VIDEO jacks See page 16 for connection information. 4 VIDEO jacks See pages 15 and 16 for ... INPUT jacks See pages 15 and 17 for connection information. 9 MULTI CH INPUT jacks See page 17 for connection information. B VOLTAGE SELECTOR (Asia and General models only) See page 3 for connection information. 2 XM jack (U.S.A. A B (U.S.A. R SURROUND L CENTER R FRONT B L IN MD/ OUT (PLAY) CD-R (REC) OUTPUT SUB WOOFER R FRONT A L 7 AC OUTLETS 8 9 0 1 DOCK...
Owner's Manual
Page 16
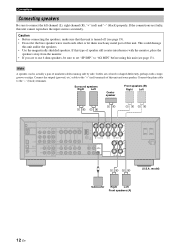
... R FRONT B L IN MD/ OUT (PLAY) CD-R (REC) OUTPUT SUB WOOFER R FRONT A L AC OUTLETS (U.S.A. If this unit. Note A speaker cord is turned off (see page 13). model) Subwoofer Right Left Front speakers (A) 12 En Connect the plain cable to connect the left channel (L), right channel (R), "+" (red) and "-" (black) properly. Surround speakers Right...
... R FRONT B L IN MD/ OUT (PLAY) CD-R (REC) OUTPUT SUB WOOFER R FRONT A L AC OUTLETS (U.S.A. If this unit. Note A speaker cord is turned off (see page 13). model) Subwoofer Right Left Front speakers (A) 12 En Connect the plain cable to connect the left channel (L), right channel (R), "+" (red) and "-" (black) properly. Surround speakers Right...

Owner's Manual
Page 17
...of this unit is reflected next time you are colored or shaped differently, perhaps with a stripe, groove or ridges. and Canada models only) Caution If you turn on , an the advanced setup menu appears in the front panel display. Connections Setting the speaker ...1 3 Red: positive (+) Black: negative (-) 3 Press APROGRAM l / h repeatedly to select "SP IMP.". Connecting the banana plug (except Korea and Asia models) The banana plug is actually a pair of insulated cables running side by side. PREPARATION ■ Before connecting to the SPEAKERS terminal A speaker cord is a ...
...of this unit is reflected next time you are colored or shaped differently, perhaps with a stripe, groove or ridges. and Canada models only) Caution If you turn on , an the advanced setup menu appears in the front panel display. Connections Setting the speaker ...1 3 Red: positive (+) Black: negative (-) 3 Press APROGRAM l / h repeatedly to select "SP IMP.". Connecting the banana plug (except Korea and Asia models) The banana plug is actually a pair of insulated cables running side by side. PREPARATION ■ Before connecting to the SPEAKERS terminal A speaker cord is a ...
Owner's Manual
Page 22
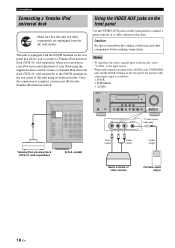
... connection is equipped with the DOCK terminal on the rear panel of this unit and other components before making connections. PORTABLE 3. model) Game console or video camera Portable audio player 18 En Using the VIDEO AUX jacks on the front panel Use the VIDEO ...VOLUME VIDEO VIDEO AUX L AUDIO R PORTABLE VIDEO VIDEO AUX L AUDIO R PORTABLE 3.5 mm stereo mini plug V L R Video output Audio output Audio output Yamaha iPod universal dock (YDS-10, sold separately) (U.S.A. This unit is complete, station your iPod using its dedicated cable. Caution Be sure to turn down the...
... connection is equipped with the DOCK terminal on the rear panel of this unit and other components before making connections. PORTABLE 3. model) Game console or video camera Portable audio player 18 En Using the VIDEO AUX jacks on the front panel Use the VIDEO ...VOLUME VIDEO VIDEO AUX L AUDIO R PORTABLE VIDEO VIDEO AUX L AUDIO R PORTABLE 3.5 mm stereo mini plug V L R Video output Audio output Audio output Yamaha iPod universal dock (YDS-10, sold separately) (U.S.A. This unit is complete, station your iPod using its dedicated cable. Caution Be sure to turn down the...

Owner's Manual
Page 23
...OUTLET(S) (SWITCHED) Australia model 1 outlet Korea model None Other models 2 outlets Use these antennas should always be placed away from the remote control. Power to this unit. • A properly installed outdoor antenna provides clearer reception than an indoor one. Connect each antenna correctly to receive infrared signals from this unit... a 5 to 10 m (16 to 32 ft) of power in order to the designated terminals. Consult the nearest authorized Yamaha dealer or service center about outdoor antennas. • The AM loop antenna should provide sufficient signal strength.
...OUTLET(S) (SWITCHED) Australia model 1 outlet Korea model None Other models 2 outlets Use these antennas should always be placed away from the remote control. Power to this unit. • A properly installed outdoor antenna provides clearer reception than an indoor one. Connect each antenna correctly to receive infrared signals from this unit... a 5 to 10 m (16 to 32 ft) of power in order to the designated terminals. Consult the nearest authorized Yamaha dealer or service center about outdoor antennas. • The AM loop antenna should provide sufficient signal strength.

Owner's Manual
Page 49
... the XM Satellite Radio information (such as described above. ■ Displaying the XM Satellite Radio information in the OSD Press 7DISPLAY (or ODISPLAY). and Canada models only)" section in "Troubleshooting" on page 68 for the currently selected channel in the front panel display or in "OPTION MENU" (see page 57). •...
... the XM Satellite Radio information (such as described above. ■ Displaying the XM Satellite Radio information in the OSD Press 7DISPLAY (or ODISPLAY). and Canada models only)" section in "Troubleshooting" on page 68 for the currently selected channel in the front panel display or in "OPTION MENU" (see page 57). •...
Owner's Manual
Page 50
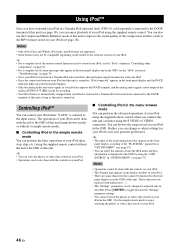
...iPod (Click and Wheel), iPod nano, and iPod mini are supported. • Some features may not be compatible depending on your iPod. • The Yamaha logo appears in the display window of your iPod. • There are replaced with underscores "_". • The "Settings" parameters can select the amount of...changed or adjusted only in the OSD of your iPod using the supplied remote control. Further, you connect this unit is stationed in a Yamaha iPod universal dock, this unit begins signal transmission with the controls on the model or the software version of your iPod. 46 En
...iPod (Click and Wheel), iPod nano, and iPod mini are supported. • Some features may not be compatible depending on your iPod. • The Yamaha logo appears in the display window of your iPod. • There are replaced with underscores "_". • The "Settings" parameters can select the amount of...changed or adjusted only in the OSD of your iPod using the supplied remote control. Further, you connect this unit is stationed in a Yamaha iPod universal dock, this unit begins signal transmission with the controls on the model or the software version of your iPod. 46 En
Owner's Manual
Page 54
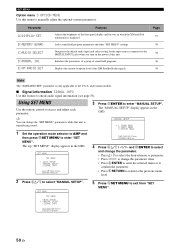
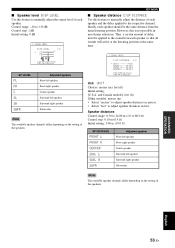
... the operation mode selector to AMP and then press NSET MENU to enter "SET MENU". Parameter A)DISPLAY SET B)MEMORY GUARD C)AUDIO SELECT D)PARAM. and Canada models. ■ Signal information SIGNAL INFO Use this unit. INI E)XM RADIO SET Features Adjusts the brightness of the front panel display and the way in...
... the operation mode selector to AMP and then press NSET MENU to enter "SET MENU". Parameter A)DISPLAY SET B)MEMORY GUARD C)AUDIO SELECT D)PARAM. and Canada models. ■ Signal information SIGNAL INFO Use this unit. INI E)XM RADIO SET Features Adjusts the brightness of the front panel display and the way in...
Owner's Manual
Page 57
... SUR. Ideally, each speaker so that all sounds will arrive at the listening position at the same time. 1 SOUND MENU C)SP DISTANCE 1/2 . and Canada models]: feet (ft) [Other models]: meters (m) • Select "meters" to adjust speaker distances in most home situations. L SUR. FL FR C [ ]/[ ]:Up/Down [p]/[[]:Adjust SP LEVEL FL FR C SL...
... SUR. Ideally, each speaker so that all sounds will arrive at the listening position at the same time. 1 SOUND MENU C)SP DISTANCE 1/2 . and Canada models]: feet (ft) [Other models]: meters (m) • Select "meters" to adjust speaker distances in most home situations. L SUR. FL FR C [ ]/[ ]:Up/Down [p]/[[]:Adjust SP LEVEL FL FR C SL...

Owner's Manual
Page 62
... field program parameters - SCENE template parameters Note When "MEMORY GUARD" is set to "ON", you cannot select and adjust any other system settings. and Canada models only) 3 OPTION MENU E)XM RADIO SET XM ANTENNA;;;95% [ENTER]:Return [p]/[[]:Select • Select "AUTO" if you want this unit to automatically detect the type...
... field program parameters - SCENE template parameters Note When "MEMORY GUARD" is set to "ON", you cannot select and adjust any other system settings. and Canada models only) 3 OPTION MENU E)XM RADIO SET XM ANTENNA;;;95% [ENTER]:Return [p]/[[]:Select • Select "AUTO" if you want this unit to automatically detect the type...

Owner's Manual
Page 68
... in the front panel display. 4 Press BSTRAIGHT repeatedly to change the selected parameter setting. 5 Press 1STANDBY/ON to turn on this unit. and Canada models only) Use this feature to set this unit to the standby mode. 2 Press and hold 0TONE CONTROL and then press 1STANDBY/ON to confirm your... front panel to the standby mode. y The settings you made while you turn on this unit. ■ Tuner frequency step TU (Asia and General models only) Use this unit operates. The name of this unit to set the speaker impedance of this unit so that it matches that are using...
... in the front panel display. 4 Press BSTRAIGHT repeatedly to change the selected parameter setting. 5 Press 1STANDBY/ON to turn on this unit. and Canada models only) Use this feature to set this unit to the standby mode. 2 Press and hold 0TONE CONTROL and then press 1STANDBY/ON to confirm your... front panel to the standby mode. y The settings you made while you turn on this unit. ■ Tuner frequency step TU (Asia and General models only) Use this unit operates. The name of this unit to set the speaker impedance of this unit so that it matches that are using...
Owner's Manual
Page 72
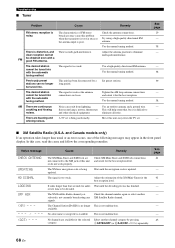
... it is weak or the antenna connections are buzzing and whining noises. See page 19 - 38 - - 38 39 - 38 - - ■ XM Satellite Radio (U.S.A. and Canada models only) If an operation takes longer than four seconds for the best reception. Adjust the orientation of this unit away from lightning, fluorescent lamps, motors...
... it is weak or the antenna connections are buzzing and whining noises. See page 19 - 38 - - 38 39 - 38 - - ■ XM Satellite Radio (U.S.A. and Canada models only) If an operation takes longer than four seconds for the best reception. Adjust the orientation of this unit away from lightning, fluorescent lamps, motors...

Owner's Manual
Page 75
... cancel the initialization procedure at the end of this unit to turn on this unit. Set the operation mode selector correctly. The batteries are some models that do not respond to reset all the parameters of this unit including the "SET MENU" parameters. However, the advanced setup menu parameters will not...
... cancel the initialization procedure at the end of this unit to turn on this unit. Set the operation mode selector correctly. The batteries are some models that do not respond to reset all the parameters of this unit including the "SET MENU" parameters. However, the advanced setup menu parameters will not...

Owner's Manual
Page 78
... (unbalanced 75 Ω AM SECTION • Tuning Range [U.S.A. L.P.F. (Subwoofer 24 dB/oct. and Canada models 87.5 to 107.9 MHz [Asia and General models] ....... 87.5/87.50 to 108.0/108.00 MHz [Other models 87.50 to 108.00 MHz • 50 dB Quieting Sensitivity (IHF, 100% mod.) Mono 2.8 &#...17 lbs 14 oz) * Specifications are subject to 1611 kHz GENERAL • Power Supply [U.S.A. and Canada models 530 to 1710 kHz [Asia and General models 530/531 to 1710/1611 kHz [Other models 531 to change without notice. 74 En VIDEO SECTION • Video Signal Type (Gray back) [U.S.A., Canada...
... (unbalanced 75 Ω AM SECTION • Tuning Range [U.S.A. L.P.F. (Subwoofer 24 dB/oct. and Canada models 87.5 to 107.9 MHz [Asia and General models] ....... 87.5/87.50 to 108.0/108.00 MHz [Other models 87.50 to 108.00 MHz • 50 dB Quieting Sensitivity (IHF, 100% mod.) Mono 2.8 &#...17 lbs 14 oz) * Specifications are subject to 1611 kHz GENERAL • Power Supply [U.S.A. and Canada models 530 to 1710 kHz [Asia and General models 530/531 to 1710/1611 kHz [Other models 531 to change without notice. 74 En VIDEO SECTION • Video Signal Type (Gray back) [U.S.A., Canada...


