MCXSP10 Manual
Page 14
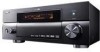
... select a CINEMA DSP sound field program. 8 YPAO indicator Lights up during the auto setup procedure and when the auto setup speaker settings are connected. 10 A HD Radio indicator (U.S.A. B VOLUME level indicator Indicates the volume... an i.LINK component is connected, but this unit is active (see page 37). Presence DSP sound field Listening position Left surround DSP sound field Right surround DSP sound field .... 4 VIRTUAL indicator Lights up when this unit is receiving a stereo signal for details. 2 HDMI indicator Lights up when an HDMI component is connected, ...
... select a CINEMA DSP sound field program. 8 YPAO indicator Lights up during the auto setup procedure and when the auto setup speaker settings are connected. 10 A HD Radio indicator (U.S.A. B VOLUME level indicator Indicates the volume... an i.LINK component is connected, but this unit is active (see page 37). Presence DSP sound field Listening position Left surround DSP sound field Right surround DSP sound field .... 4 VIRTUAL indicator Lights up when this unit is receiving a stereo signal for details. 2 HDMI indicator Lights up when an HDMI component is connected, ...

MCXSP10 Manual
Page 15
...selected, or when bi-wiring. N HiFi DSP indicator Lights up according to the set of speakers are connected and a sound field program is tuned into a station. U Presence and surround back speaker indicators Indicate the connection of current digital input signal. INTRODUCTION K SP A B indicators Light... other information when adjusting or changing settings. T Input channel indicators Indicate the channel components of presence and/or surround back speakers when using the Auto Setup setting (page 27) or Speaker Level setting (page 65). S LFE indicator Lights up when a DTS 96/24 signal is...
...selected, or when bi-wiring. N HiFi DSP indicator Lights up according to the set of speakers are connected and a sound field program is tuned into a station. U Presence and surround back speaker indicators Indicate the connection of current digital input signal. INTRODUCTION K SP A B indicators Light... other information when adjusting or changing settings. T Input channel indicators Indicate the channel components of presence and/or surround back speakers when using the Auto Setup setting (page 27) or Speaker Level setting (page 65). S LFE indicator Lights up when a DTS 96/24 signal is...

MCXSP10 Manual
Page 17
... as the YAMAHA Active Servo Processing Subwoofer System, is for more theater-like ambience. Place these speakers behind the screen in Dolby Digital and DTS software. Place these speakers an equal ...Presence speakers supplement the sound from any or all channels, but also for the main source sound plus effect sounds. The position of a subwoofer, such as the front speakers. These effects include sounds that filmmakers intend to locate a little farther back behind your video monitor. You can do not output sound simultaneously. PREPARATION SPEAKER SETUP + SPEAKER SETUP Speaker...
... as the YAMAHA Active Servo Processing Subwoofer System, is for more theater-like ambience. Place these speakers behind the screen in Dolby Digital and DTS software. Place these speakers an equal ...Presence speakers supplement the sound from any or all channels, but also for the main source sound plus effect sounds. The position of a subwoofer, such as the front speakers. These effects include sounds that filmmakers intend to locate a little farther back behind your video monitor. You can do not output sound simultaneously. PREPARATION SPEAKER SETUP + SPEAKER SETUP Speaker...

MCXSP10 Manual
Page 19
... the power source. • Do not let the bare speaker wires touch each terminal. (With the exception of each terminal. Speaker terminal wrench 5 4 3 Red: positive (+) Black: negative (-) ■ Connecting to PRESENCE/ZONE 2 or PRESENCE speaker terminals 13 2 1 Open the tab. 2 Insert one bare... pair of each terminal. 3 Return the tab to 6 ohms before using (see page 26). PREPARATION SPEAKER SETUP Speaker connections Be sure to the "+" (red) terminals on this unit and your speaker. Connect the striped (grooved, etc.) cable to connect the left channel (L), right channel (R), "+" ...
... the power source. • Do not let the bare speaker wires touch each terminal. (With the exception of each terminal. Speaker terminal wrench 5 4 3 Red: positive (+) Black: negative (-) ■ Connecting to PRESENCE/ZONE 2 or PRESENCE speaker terminals 13 2 1 Open the tab. 2 Insert one bare... pair of each terminal. 3 Return the tab to 6 ohms before using (see page 26). PREPARATION SPEAKER SETUP Speaker connections Be sure to the "+" (red) terminals on this unit and your speaker. Connect the striped (grooved, etc.) cable to connect the left channel (L), right channel (R), "+" ...

MCXSP10 Manual
Page 20
SINGLE (SB) +L R L + +L - R L SURROUND BACK/PRESENCE PRE OUT SURROUND BACK SINGLE SPEAKERS PRESENCE/ZONE 2 (U.S.A. L CENTER R+ - - SPEAKER SETUP 9 10 4 2 3 8 1 7 5 6 Speaker layout Front speakers (A) Right Left Subwoofer with built-in Dolby Digital EX and DTS-ES software and only operate when the Dolby Digital EX, DTS-ES or Dolby Pro Logic x decoder is turned on. • The presence speakers output ambient effects created...
SINGLE (SB) +L R L + +L - R L SURROUND BACK/PRESENCE PRE OUT SURROUND BACK SINGLE SPEAKERS PRESENCE/ZONE 2 (U.S.A. L CENTER R+ - - SPEAKER SETUP 9 10 4 2 3 8 1 7 5 6 Speaker layout Front speakers (A) Right Left Subwoofer with built-in Dolby Digital EX and DTS-ES software and only operate when the Dolby Digital EX, DTS-ES or Dolby Pro Logic x decoder is turned on. • The presence speakers output ambient effects created...

MCXSP10 Manual
Page 21
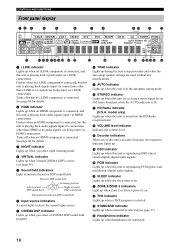
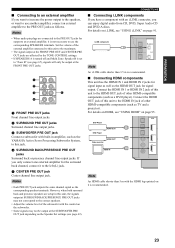
... a center speaker to these terminals. ■ SURROUND terminals Connect surround speakers to these terminals. ■ SUBWOOFER jack Connect a subwoofer with a built-in amplifier, such as the YAMAHA Active Servo ...speaker systems to these terminals to two separate speaker systems simultaneously. Note The Canada model cannot output to connect Zone 2 speakers (see page 83). If you use only one speaker system, connect it to the left (L) terminals. ■ PRESENCE terminals Connect presence speakers to these terminals. If you only connect one speaker system. SPEAKER SETUP...
... a center speaker to these terminals. ■ SURROUND terminals Connect surround speakers to these terminals. ■ SUBWOOFER jack Connect a subwoofer with a built-in amplifier, such as the YAMAHA Active Servo ...speaker systems to these terminals to two separate speaker systems simultaneously. Note The Canada model cannot output to connect Zone 2 speakers (see page 83). If you use only one speaker system, connect it to the left (L) terminals. ■ PRESENCE terminals Connect presence speakers to these terminals. If you only connect one speaker system. SPEAKER SETUP...
MCXSP10 Manual
Page 27
... • Each PRE OUT jack outputs the same channel signal as the HDMI OUT jack for signal output. However, when both surround back and presence speakers are setup in amplifier, such as follows. For details on i.LINK, see "USING i.LINK" on page 95. PREPARATION ■ Connecting to an external ... external amplifier to the PRE OUT jacks as the YAMAHA Active Servo Processing Subwoofer System, to use the corresponding SPEAKERS terminals. Connect the HDMI IN 1 or HDMI IN 2 jack of this unit, the signals output at SURROUND BACK/PRESENCE PRE OUT jacks may not be output at the ...
... • Each PRE OUT jack outputs the same channel signal as the HDMI OUT jack for signal output. However, when both surround back and presence speakers are setup in amplifier, such as follows. For details on i.LINK, see "USING i.LINK" on page 95. PREPARATION ■ Connecting to an external ... external amplifier to the PRE OUT jacks as the YAMAHA Active Servo Processing Subwoofer System, to use the corresponding SPEAKERS terminals. Connect the HDMI IN 1 or HDMI IN 2 jack of this unit, the signals output at SURROUND BACK/PRESENCE PRE OUT jacks may not be output at the ...

MCXSP10 Manual
Page 35
... Front SP E02:No Sur. SP E03:No Pres. Only one presence channel signal is detected. • Check the surround speaker connections. Only one surround channel signal is detected. • Check the presence speaker connections. The optimizer microphone was changed during the auto setup procedure. • Connect the supplied optimizer microphone to the OPTIMIZER MIC...
... Front SP E02:No Sur. SP E03:No Pres. Only one presence channel signal is detected. • Check the surround speaker connections. Only one surround channel signal is detected. • Check the presence speaker connections. The optimizer microphone was changed during the auto setup procedure. • Connect the supplied optimizer microphone to the OPTIMIZER MIC...

MCXSP10 Manual
Page 58
... settings Use the remote control to access and adjust each parameter. (Speaker set to "On". Test Tone Speaker Set Speaker Distance Speaker Level Front Center Surround 5 Press EXIT. If you want to change parameter settings.) Manual Setup > Basic > Speaker Set > 1 ++ TV VOL CH -- + VOL - AMP SOURCE...• The available parameters may be displayed on the remote control. Presence Bass Out Bass Cross Over SWFR Phase 40Hz 60Hz 80Hz (THX) 90Hz 100Hz Stereo/Surround Input Select Manual Setup Auto Setup System Memory Sound Basic Option 2 Press k / n repeatedly to select...
... settings Use the remote control to access and adjust each parameter. (Speaker set to "On". Test Tone Speaker Set Speaker Distance Speaker Level Front Center Surround 5 Press EXIT. If you want to change parameter settings.) Manual Setup > Basic > Speaker Set > 1 ++ TV VOL CH -- + VOL - AMP SOURCE...• The available parameters may be displayed on the remote control. Presence Bass Out Bass Cross Over SWFR Phase 40Hz 60Hz 80Hz (THX) 90Hz 100Hz Stereo/Surround Input Select Manual Setup Auto Setup System Memory Sound Basic Option 2 Press k / n repeatedly to select...

MCXSP10 Manual
Page 63
Manual Setup > Sound > Parametric EQ > LFE Level Dynamic Range Parametric EQ Tone Control Audio Option Test Tone Front L Front R 1 Press k / n to select Test Tone or the speaker you want to reset all PEQ parameter settings for the selected speaker, select RESET and... quality of the surround back left speaker. • Surround Back R adjusts the tonal quality of the surround back right speaker. • Presence L adjusts the tonal quality of the presence left speaker. • Presence R adjusts the tonal quality of the presence right speaker. ADVANCED OPERATION 59 Test Tone Front...
Manual Setup > Sound > Parametric EQ > LFE Level Dynamic Range Parametric EQ Tone Control Audio Option Test Tone Front L Front R 1 Press k / n to select Test Tone or the speaker you want to reset all PEQ parameter settings for the selected speaker, select RESET and... quality of the surround back left speaker. • Surround Back R adjusts the tonal quality of the surround back right speaker. • Presence L adjusts the tonal quality of the presence left speaker. • Presence R adjusts the tonal quality of the presence right speaker. ADVANCED OPERATION 59 Test Tone Front...

MCXSP10 Manual
Page 65
... Select (Presence/surround back speaker selection) Surround back and presence speakers do not output sound simultaneously. Presence channel signals will be output from surround speakers. • Select "Surround Back" to use presence speakers even when surround back channel signals are set up basic system parameters. 1 Set AMP/SOURCE/TV to set automatically when you run auto setup. The signals...
... Select (Presence/surround back speaker selection) Surround back and presence speakers do not output sound simultaneously. Presence channel signals will be output from surround speakers. • Select "Surround Back" to use presence speakers even when surround back channel signals are set up basic system parameters. 1 Set AMP/SOURCE/TV to set automatically when you run auto setup. The signals...

MCXSP10 Manual
Page 66
... the center channel to the speakers selected with the bass sounds from your speakers, you do not have large surround left and right speakers or if a rear subwoofer is directed to the surround speakers. This sets the unit to your preference. Manual Setup > Basic > Speaker Set > Choices: Front, Center, Surround, Surround Back, Presence, Bass Out, Bass Cross...
... the center channel to the speakers selected with the bass sounds from your speakers, you do not have large surround left and right speakers or if a rear subwoofer is directed to the surround speakers. This sets the unit to your preference. Manual Setup > Basic > Speaker Set > Choices: Front, Center, Surround, Surround Back, Presence, Bass Out, Bass Cross...

MCXSP10 Manual
Page 68
...SWFR Phase (Subwoofer Phase) If bass sounds are only using one surround back speaker, connect it to the SURROUND BACK (SINGLE) jack, and adjust the distance in Surround Back L. Manual Setup > Basic > Speaker Distance > Speaker distances Choices: 0.30 to 24.00 m (1.0 to 80.0 ft) Initial... back left speaker. • Surround Back R adjusts the distance of the surround back right speaker. • Presence L adjusts the distance of the presence left speaker. • Presence R adjusts the distance of the presence right speaker. • Subwoofer adjusts the distance of each speaker so that ...
...SWFR Phase (Subwoofer Phase) If bass sounds are only using one surround back speaker, connect it to the SURROUND BACK (SINGLE) jack, and adjust the distance in Surround Back L. Manual Setup > Basic > Speaker Distance > Speaker distances Choices: 0.30 to 24.00 m (1.0 to 80.0 ft) Initial... back left speaker. • Surround Back R adjusts the distance of the surround back right speaker. • Presence L adjusts the distance of the presence left speaker. • Presence R adjusts the distance of the presence right speaker. • Subwoofer adjusts the distance of each speaker so that ...

MCXSP10 Manual
Page 69
... "over 4ft" if the distance between the two surround back speakers is also available in Speaker Set (see page 88). SYSTEM OPTIONS ■ THX Set (THX settings) Use to manually adjust the THX settings. Manual Setup > Basic > Speaker Level Speaker Set Speaker Distance Speaker Level THX Set Presence R Subwoofer Front L Front R Center Choices: -10.0 dB to +10.0 dB...
... "over 4ft" if the distance between the two surround back speakers is also available in Speaker Set (see page 88). SYSTEM OPTIONS ■ THX Set (THX settings) Use to manually adjust the THX settings. Manual Setup > Basic > Speaker Level Speaker Set Speaker Distance Speaker Level THX Set Presence R Subwoofer Front L Front R Center Choices: -10.0 dB to +10.0 dB...

MCXSP10 Manual
Page 71
... your Zone 2 speakers directly to this unit's PRESENCE/ZONE 2 speaker terminals. • Select "None" if you want to the SPEAKERS B terminals. on the remote control. ADVANCED OPERATION 67 Notes • When "Internal" is selected, the presence speaker setting automatically switches to...OUTPUT volume simultaneously using VOL +/- Manual Setup > Option > Multi Zone > Choices: Speaker B, Zone2 Amplifier, Zone2 Volume, Zone3 Volume Display Multi Zone Sur.Initialize Audio Select Speaker B Zone2 Amplifier Zone2 Volume Zone3 Volume Speaker B (Speaker B) Use this feature to select the...
... your Zone 2 speakers directly to this unit's PRESENCE/ZONE 2 speaker terminals. • Select "None" if you want to the SPEAKERS B terminals. on the remote control. ADVANCED OPERATION 67 Notes • When "Internal" is selected, the presence speaker setting automatically switches to...OUTPUT volume simultaneously using VOL +/- Manual Setup > Option > Multi Zone > Choices: Speaker B, Zone2 Amplifier, Zone2 Volume, Zone3 Volume Display Multi Zone Sur.Initialize Audio Select Speaker B Zone2 Amplifier Zone2 Volume Zone3 Volume Speaker B (Speaker B) Use this feature to select the...

MCXSP10 Manual
Page 92
...Selects the output mode suitable for each speaker, the speakers for low-frequency signal output, and the cross over frequency. • Corresponds to Speaker Set in the GUI menu (see page 62). • Adjusts the delay time of each speaker. • Corresponds to Speaker Distance in the GUI menu (see ...menu (see page 65). 88 FRONT PANEL DISPLAY MENUS ■ MANUAL SETUP 1 BASIC MENU Item A)SPEAKER SET B)SP DISTANCE C)SP LEVEL D)TEST TONE Sub-items FRONT;;;;SMALL CENTER;;;;;SML SURR LR;;;;SML SURR B;;;SMLx2 PRESENCE;;NONE BASS OUT;;SWFR CrossOver;80Hz SWFR PHASE;NRM UNIT;;;;meters FRONT ...
...Selects the output mode suitable for each speaker, the speakers for low-frequency signal output, and the cross over frequency. • Corresponds to Speaker Set in the GUI menu (see page 62). • Adjusts the delay time of each speaker. • Corresponds to Speaker Distance in the GUI menu (see ...menu (see page 65). 88 FRONT PANEL DISPLAY MENUS ■ MANUAL SETUP 1 BASIC MENU Item A)SPEAKER SET B)SP DISTANCE C)SP LEVEL D)TEST TONE Sub-items FRONT;;;;SMALL CENTER;;;;;SML SURR LR;;;;SML SURR B;;;SMLx2 PRESENCE;;NONE BASS OUT;;SWFR CrossOver;80Hz SWFR PHASE;NRM UNIT;;;;meters FRONT ...


