MCXSP10 Manual
Page 3
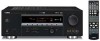
... filter/s. The product should be used according to eliminate the problem by using one of interference, which can not locate the appropriate retailer, please contact Yamaha Electronics Corp., U.S.A. 6660 Orangethorpe Ave, Buena Park, CA 90620. Note to CATV system installer: This reminder is found to grounding electrodes, and requirements for Class... found in the users manual, may result in to determine that is 300 ohm ribbon lead, change in the USA. 3 NOTE: This product has been tested and found to use only high quality shielded cables.
... filter/s. The product should be used according to eliminate the problem by using one of interference, which can not locate the appropriate retailer, please contact Yamaha Electronics Corp., U.S.A. 6660 Orangethorpe Ave, Buena Park, CA 90620. Note to CATV system installer: This reminder is found to grounding electrodes, and requirements for Class... found in the users manual, may result in to determine that is 300 ohm ribbon lead, change in the USA. 3 NOTE: This product has been tested and found to use only high quality shielded cables.

MCXSP10 Manual
Page 32
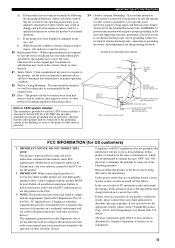
... ..6spk Choice Display Speakers 2spk L C R Front L/R SL SB SR 3spk L CR SL SB SR Front L/R, Center If you selected "SET" in step 7, each speaker outputs a test tone twice in step 6, if necessary. 4spk L C R Front L/R, Surround L/R SL SB SR 5spk L C R Front L/R, Center, Surround L/R SL SB SR 6spk L C R Front L/R, Center, Surround L/R, SL SB...
... ..6spk Choice Display Speakers 2spk L C R Front L/R SL SB SR 3spk L CR SL SB SR Front L/R, Center If you selected "SET" in step 7, each speaker outputs a test tone twice in step 6, if necessary. 4spk L C R Front L/R, Surround L/R SL SB SR 5spk L C R Front L/R, Center, Surround L/R SL SB SR 6spk L C R Front L/R, Center, Surround L/R, SL SB...

MCXSP10 Manual
Page 33
... proceed to the speaker level adjustment menu to balance the output level of each speaker. 10 Press ENTER to complete the setup procedure if the test tone levels from "BASIC SETUP". ENTER A-E/CAT. • If you selected "NO" in step 9, the front speaker level adjustment display appears in turn. • Press..." to adjust the balance between the surround left and surround right speakers. • Select "SWFR" to adjust the balance between the front left speaker output a test tone in the front panel display.
... proceed to the speaker level adjustment menu to balance the output level of each speaker. 10 Press ENTER to complete the setup procedure if the test tone levels from "BASIC SETUP". ENTER A-E/CAT. • If you selected "NO" in step 9, the front speaker level adjustment display appears in turn. • Press..." to adjust the balance between the surround left and surround right speakers. • Select "SWFR" to adjust the balance between the front left speaker output a test tone in the front panel display.

MCXSP10 Manual
Page 47
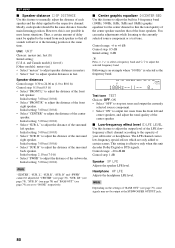
...selector on the front panel (or press one of the input selector buttons on the same OUT (REC) channel. • Check the copyright laws in your VCR. • Digital signals input at the DIGITAL INPUT ...record only an S-video or a composite video signal on your country to those components. y Do a test recording before you want to the MULTI CH INPUT jacks of this unit cannot be output at the ...material. • The source connected to record from. 2 2 CODE SET TRANSMIT POWER TV POWER AV STANDBY POWER CD DVD MD CD-R CBL DTV SLEEP XM TUNER MULTI CH IN V-AUX DVR TV VOL...
...selector on the front panel (or press one of the input selector buttons on the same OUT (REC) channel. • Check the copyright laws in your VCR. • Digital signals input at the DIGITAL INPUT ...record only an S-video or a composite video signal on your country to those components. y Do a test recording before you want to the MULTI CH INPUT jacks of this unit cannot be output at the ...material. • The source connected to record from. 2 2 CODE SET TRANSMIT POWER TV POWER AV STANDBY POWER CD DVD MD CD-R CBL DTV SLEEP XM TUNER MULTI CH IN V-AUX DVR TV VOL...

MCXSP10 Manual
Page 83
... your subwoofer. The LFE signals as well as the low-frequency signals of the speaker flashes. The lowfrequency signals of the front left and right channels are all the speakers set to the front left and right speakers regardless of the "FRONT" setting (see page 78). Note "C", "SL", ..." if you connected a subwoofer. The LFE signals as well as the lowfrequency signals of the front left speaker. The selected speaker outputs test tone and the speaker indicator of other speakers set to adjust the balance of the surround left speakers and each speaker selected in "SPEAKER ...
... your subwoofer. The LFE signals as well as the low-frequency signals of the speaker flashes. The lowfrequency signals of the front left and right channels are all the speakers set to the front left and right speakers regardless of the "FRONT" setting (see page 78). Note "C", "SL", ..." if you connected a subwoofer. The LFE signals as well as the lowfrequency signals of the front left speaker. The selected speaker outputs test tone and the speaker indicator of other speakers set to adjust the balance of the surround left speakers and each speaker selected in "SPEAKER ...
MCXSP10 Manual
Page 84
...]: feet (ft) [Other models]: meters (m) • Select "meters" to adjust speaker distances in most home situations. The LFE channel carries low-frequency special effects which are set to "NONE" respectively. ■ Center graphic equalizer D)CENTER GEQ Use this is not possible...(10.0 ft) • Select "SUR. B" and "SWFR" cannot be applied to adjust the distance of the LFE (lowfrequency effect) channel according to the currently selected source component or a test tone. Control range: -6 to +6 dB Control step: 0.5 dB Initial setting: 0 dB y Press u / d to select a ...
...]: feet (ft) [Other models]: meters (m) • Select "meters" to adjust speaker distances in most home situations. The LFE channel carries low-frequency special effects which are set to "NONE" respectively. ■ Center graphic equalizer D)CENTER GEQ Use this is not possible...(10.0 ft) • Select "SUR. B" and "SWFR" cannot be applied to adjust the distance of the LFE (lowfrequency effect) channel according to the currently selected source component or a test tone. Control range: -6 to +6 dB Control step: 0.5 dB Initial setting: 0 dB y Press u / d to select a ...