MCXSP10 Manual
Page 5
...Adjusting the speaker level 35 Selecting the Compressed Music Enhancer mode 36 Selecting the MULTI CH INPUT component......... 37 Enjoying multi-channel sources in 2-channel stereo 37 Enjoying unprocessed input sources 37 Enjoying pure hi-fi stereo sound 38 Displaying the input source information 38 Playing ...speaker layouts 71 ADVANCED OPERATION SET MENU 74 Using SET MENU 76 1 SOUND MENU 78 2 INPUT MENU 81 3 OPTION MENU 83 ADVANCED SETUP 84 REMOTE CONTROL FEATURES 86 Controlling this unit, a TV, or other components 86 Setting remote control codes 88 Setting library codes 89 ...
...Adjusting the speaker level 35 Selecting the Compressed Music Enhancer mode 36 Selecting the MULTI CH INPUT component......... 37 Enjoying multi-channel sources in 2-channel stereo 37 Enjoying unprocessed input sources 37 Enjoying pure hi-fi stereo sound 38 Displaying the input source information 38 Playing ...speaker layouts 71 ADVANCED OPERATION SET MENU 74 Using SET MENU 76 1 SOUND MENU 78 2 INPUT MENU 81 3 OPTION MENU 83 ADVANCED SETUP 84 REMOTE CONTROL FEATURES 86 Controlling this unit, a TV, or other components 86 Setting remote control codes 88 Setting library codes 89 ...

MCXSP10 Manual
Page 29
This unit turns on, and the advanced setup menu appears in the front panel display. STRAIGHT EFFECT SP IMP.-6 MIN 5 Press STANDBY/ON on the front panel to save the new setting and ...
This unit turns on, and the advanced setup menu appears in the front panel display. STRAIGHT EFFECT SP IMP.-6 MIN 5 Press STANDBY/ON on the front panel to save the new setting and ...
MCXSP10 Manual
Page 31
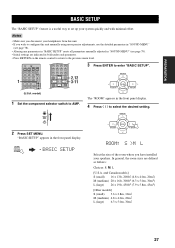
... SETUP" appears in bold under each parameter. • Press RETURN on the remote control to return to the previous menu level. 1 CODE SET TRANSMIT POWER TV POWER AV STANDBY POWER CD DVD MD CD-R CBL DTV SLEEP XM TUNER MULTI CH IN V-AUX...) 26 x 19ft, 450ft2 (7.9 x 5.8m, 45m2) [Other models] S (small) 3.6 x 2.8m, 10m2 M (medium) 4.8 x 4.0m, 20m2 L (large) 6.3 x 5.0m, 30m2 27 PREPARATION BASIC SETUP BASIC SETUP The "BASIC SETUP" feature is a useful way to set up your speakers. PRESET/CH A-E/CAT. ENTER A-E/CAT. RETURN XM MEMORY REC ENTER A-E/CAT. AMP SOURCE TV 2 Press...
... SETUP" appears in bold under each parameter. • Press RETURN on the remote control to return to the previous menu level. 1 CODE SET TRANSMIT POWER TV POWER AV STANDBY POWER CD DVD MD CD-R CBL DTV SLEEP XM TUNER MULTI CH IN V-AUX...) 26 x 19ft, 450ft2 (7.9 x 5.8m, 45m2) [Other models] S (small) 3.6 x 2.8m, 10m2 M (medium) 4.8 x 4.0m, 20m2 L (large) 6.3 x 5.0m, 30m2 27 PREPARATION BASIC SETUP BASIC SETUP The "BASIC SETUP" feature is a useful way to set up your speakers. PRESET/CH A-E/CAT. ENTER A-E/CAT. RETURN XM MEMORY REC ENTER A-E/CAT. AMP SOURCE TV 2 Press...

MCXSP10 Manual
Page 32
A-E/CAT. ENTER A-E/CAT. PRESET/CH PRESET/CH A-E/CAT. ENTER A-E/CAT. ENTER A-E/CAT. BASIC SETUP 5 Press d to select "SUBWOOFER" and then j / i to select the desired setting. A-E/CAT. SUBWOOFER .. PRESET/CH PRESET/CH A-E/CAT. appears in step 6, if necessary. ... then j / i to select the desired setting. PRESET/CH A-E/CAT. A-E/CAT. ENTER A-E/CAT. y You can also press SET MENU to cancel the setup procedure. 8 Press ENTER to confirm your system. 6 Press d to select "SPEAKERS" and then j / i to select the number of speakers connected to cancel the...
A-E/CAT. ENTER A-E/CAT. PRESET/CH PRESET/CH A-E/CAT. ENTER A-E/CAT. ENTER A-E/CAT. BASIC SETUP 5 Press d to select "SUBWOOFER" and then j / i to select the desired setting. A-E/CAT. SUBWOOFER .. PRESET/CH PRESET/CH A-E/CAT. appears in step 6, if necessary. ... then j / i to select the desired setting. PRESET/CH A-E/CAT. A-E/CAT. ENTER A-E/CAT. y You can also press SET MENU to cancel the setup procedure. 8 Press ENTER to confirm your system. 6 Press d to select "SPEAKERS" and then j / i to select the number of speakers connected to cancel the...

MCXSP10 Manual
Page 33
.... • Press i to increase the value. • Press j to adjust the balance. A-E/CAT. ENTER A-E/CAT. SET MENU MENU SRCH MODE 29 BASIC SETUP 11 Press d / u to select a speaker and then j / i to decrease the value. The selected speaker and the front left speaker or the surround ...proceed to the speaker level adjustment menu to balance the output level of each speaker. 10 Press ENTER to complete the setup procedure if the test tone levels from "BASIC SETUP". PRESET/CH A-E/CAT. A-E/CAT. FR ----||---- • Select "FR" to adjust the balance between the front left ...
.... • Press i to increase the value. • Press j to adjust the balance. A-E/CAT. ENTER A-E/CAT. SET MENU MENU SRCH MODE 29 BASIC SETUP 11 Press d / u to select a speaker and then j / i to decrease the value. The selected speaker and the front left speaker or the surround ...proceed to the speaker level adjustment menu to balance the output level of each speaker. 10 Press ENTER to complete the setup procedure if the test tone levels from "BASIC SETUP". PRESET/CH A-E/CAT. A-E/CAT. FR ----||---- • Select "FR" to adjust the balance between the front left ...

MCXSP10 Manual
Page 39
.... 3 Press ENTER on the remote control when you can also be performed using the control buttons on the front panel repeatedly to select the speaker channel whose output level you want to adjust. y Once you press LEVEL on the remote control to adjust the speaker output level. • Press i to... increase the value. • Press j to +10 dB PRESET/CH A-E/CAT. Note This operation will override the level adjustments made in "BASIC SETUP" (see page 27) and "SP LEVEL" (see page 79). EFFECT SET MENU MENU SRCH MODE ENTER A-E/CAT. Control range: -10 dB to decrease the value...
.... 3 Press ENTER on the remote control when you can also be performed using the control buttons on the front panel repeatedly to select the speaker channel whose output level you want to adjust. y Once you press LEVEL on the remote control to adjust the speaker output level. • Press i to... increase the value. • Press j to +10 dB PRESET/CH A-E/CAT. Note This operation will override the level adjustments made in "BASIC SETUP" (see page 27) and "SP LEVEL" (see page 79). EFFECT SET MENU MENU SRCH MODE ENTER A-E/CAT. Control range: -10 dB to decrease the value...

MCXSP10 Manual
Page 78
Adjusts the output level of the LFE channel for low-frequency signal output, and the crossover frequency. Page 78 79 80 80 80 81 81 Input menu 2 INPUT MENU Use this unit according ... in bold under each parameter) to reflect the needs of your listening environment. ■ BASIC SETUP BASIC SETUP Use this feature to set up your system quickly and with minimal effort (see page 27). ■ MANUAL SETUP MANUAL SETUP Use this unit operates. RANGE G)AUDIO SET Features Selects the size of each speaker. Adjusts...
Adjusts the output level of the LFE channel for low-frequency signal output, and the crossover frequency. Page 78 79 80 80 80 81 81 Input menu 2 INPUT MENU Use this unit according ... in bold under each parameter) to reflect the needs of your listening environment. ■ BASIC SETUP BASIC SETUP Use this feature to set up your system quickly and with minimal effort (see page 27). ■ MANUAL SETUP MANUAL SETUP Use this unit operates. RANGE G)AUDIO SET Features Selects the size of each speaker. Adjusts...

MCXSP10 Manual
Page 80
... MENU 2 INPUT MENU 3 OPTION MENU 76 "BASIC SETUP" appears in the front panel display. 2 Press u / d to select and enter the desired menu. A-E/CAT. TV CD DVD AV MD CD-R CBL DTV SLEEP XM TUNER MULTI CH IN V-AUX DVR TV VOL TV CH AMP VOLUME SOURCE TV 1... ENTERTAIN MOVIE 2 3 4 STANDARD SELECT EXTD SUR. PRESET/CH A-E/CAT. ENTER A-E/CAT. 1 SOUND MENU 4 Press u / d repeatedly and then press ENTER to select "MANUAL SETUP" and then press ENTER. EFFECT SET MENU MENU SRCH MODE A-E/CAT. PRESET/CH A-E/CAT. SET MENU Using SET MENU Use the remote control to enter...
... MENU 2 INPUT MENU 3 OPTION MENU 76 "BASIC SETUP" appears in the front panel display. 2 Press u / d to select and enter the desired menu. A-E/CAT. TV CD DVD AV MD CD-R CBL DTV SLEEP XM TUNER MULTI CH IN V-AUX DVR TV VOL TV CH AMP VOLUME SOURCE TV 1... ENTERTAIN MOVIE 2 3 4 STANDARD SELECT EXTD SUR. PRESET/CH A-E/CAT. ENTER A-E/CAT. 1 SOUND MENU 4 Press u / d repeatedly and then press ENTER to select "MANUAL SETUP" and then press ENTER. EFFECT SET MENU MENU SRCH MODE A-E/CAT. PRESET/CH A-E/CAT. SET MENU Using SET MENU Use the remote control to enter...

MCXSP10 Manual
Page 88
... page 26). • Only STANDBY/ON, STRAIGHT (EFFECT) and the PROGRAM l / h buttons are effective while you are using the advanced setup menu. • All the other operations cannot be made are displayed in the front panel display. STANDBY /ON y The settings you made while... you turn on this unit operates. STRAIGHT EFFECT While holding down STANDBY /ON 4 Press STRAIGHT (EFFECT) on , and the advanced setup menu appears in the front panel display. Currently selected parameter Currently selected parameter setting STANDBY /ON SP IMP.-8 MIN 2 Press and hold STRAIGHT...
... page 26). • Only STANDBY/ON, STRAIGHT (EFFECT) and the PROGRAM l / h buttons are effective while you are using the advanced setup menu. • All the other operations cannot be made are displayed in the front panel display. STANDBY /ON y The settings you made while... you turn on this unit operates. STRAIGHT EFFECT While holding down STANDBY /ON 4 Press STRAIGHT (EFFECT) on , and the advanced setup menu appears in the front panel display. Currently selected parameter Currently selected parameter setting STANDBY /ON SP IMP.-8 MIN 2 Press and hold STRAIGHT...

MCXSP10 Manual
Page 89
... 6 Ω or higher. * The Canada model cannot use two sets (A and B), the impedance of each speaker must be 8 Ω or higher. ADVANCED SETUP ■ Remote control AMP ID REMOTE AMP Use this unit including the "SET MENU" parameters. Note You need to set the tuner frequency step according... the speaker impedance to "81919". is set to reset the parameters of your area. ■ Speaker impedance SP IMP. However, the advanced setup menu parameters will not be 12 Ω or higher. Note You need to set the corresponding remote control XM library code for all the ...
... 6 Ω or higher. * The Canada model cannot use two sets (A and B), the impedance of each speaker must be 8 Ω or higher. ADVANCED SETUP ■ Remote control AMP ID REMOTE AMP Use this unit including the "SET MENU" parameters. Note You need to set the tuner frequency step according... the speaker impedance to "81919". is set to reset the parameters of your area. ■ Speaker impedance SP IMP. However, the advanced setup menu parameters will not be 12 Ω or higher. Note You need to set the corresponding remote control XM library code for all the ...

MCXSP10 Manual
Page 92
...has more than one code, try setting other components by setting the appropriate remote control code for each input source. DVR DVR YAMAHA - - - - If this happens, repeat the setup procedure. • If you want to "LIST OF REMOTE CONTROL CODES" at the end of this manual. REMOTE CONTROL ...FEATURES Setting remote control codes You can control your TV and other YAMAHA remote control codes. 1 Press one . • If you do not press...
...has more than one code, try setting other components by setting the appropriate remote control code for each input source. DVR DVR YAMAHA - - - - If this happens, repeat the setup procedure. • If you want to "LIST OF REMOTE CONTROL CODES" at the end of this manual. REMOTE CONTROL ...FEATURES Setting remote control codes You can control your TV and other YAMAHA remote control codes. 1 Press one . • If you do not press...

MCXSP10 Manual
Page 93
...default code. 81917 To operate this unit in the advanced setup (see page 85) Notes • You need to set the corresponding remote control TUNER ID of this unit separately. 2 Press CODE SET using multiple YAMAHA receivers/amplifiers, you may be able to operate the other components... components simultaneously with the default code setting. In this case, set one of the alternative codes to operate this unit using multiple YAMAHA receivers/amplifiers, you want to use . 1 Press TUNER to select and operate the desired component with the supplied remote control simultaneously....
...default code. 81917 To operate this unit in the advanced setup (see page 85) Notes • You need to set the corresponding remote control TUNER ID of this unit separately. 2 Press CODE SET using multiple YAMAHA receivers/amplifiers, you may be able to operate the other components... components simultaneously with the default code setting. In this case, set one of the alternative codes to operate this unit using multiple YAMAHA receivers/amplifiers, you want to use . 1 Press TUNER to select and operate the desired component with the supplied remote control simultaneously....

MCXSP10 Manual
Page 94
... you may be able to the initial factory settings. The TRANSMIT indicator on the remote control flashes twice. 2 Press CODE SET using multiple YAMAHA receivers/amplifiers, you want to use. 1 Press XM to select "XM" as the input source. In this unit separately. 90 In this ...unit in the advanced setup(see page 85). • When using a ballpoint pen or a similar object. REMOTE CONTROL FEATURES ■ Setting remote control XM ID library codes (U.S.A. DIRECT ST. 5...
... you may be able to the initial factory settings. The TRANSMIT indicator on the remote control flashes twice. 2 Press CODE SET using multiple YAMAHA receivers/amplifiers, you want to use. 1 Press XM to select "XM" as the input source. In this unit separately. 90 In this ...unit in the advanced setup(see page 85). • When using a ballpoint pen or a similar object. REMOTE CONTROL FEATURES ■ Setting remote control XM ID library codes (U.S.A. DIRECT ST. 5...

MCXSP10 Manual
Page 95
.... STANDBY /ON ADVANCED OPERATION 91 model) 3 Press the PROGRAM l / h buttons on the VOLUME front panel to turn on , and the advanced setup menu appears in the front panel display. This unit turns on this unit. STANDBY /ON STRAIGHT EFFECT 2 Press and hold STRAIGHT (EFFECT) on this ...unit. However, the advanced setup menu parameters will not be initialized. • The initial factory settings are activated next time you turn on the front panel and then press ...
.... STANDBY /ON ADVANCED OPERATION 91 model) 3 Press the PROGRAM l / h buttons on the VOLUME front panel to turn on , and the advanced setup menu appears in the front panel display. This unit turns on this unit. STANDBY /ON STRAIGHT EFFECT 2 Press and hold STRAIGHT (EFFECT) on this ...unit. However, the advanced setup menu parameters will not be initialized. • The initial factory settings are activated next time you turn on the front panel and then press ...

