Owner's Manual
Page 5
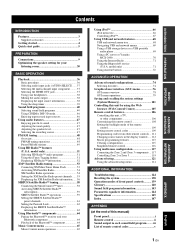
... and Zone 3 components ... 117 Controlling Zone 2 or Zone 3 119 Advanced setup 121 Using the advanced setup menu 121 ADDITIONAL INFORMATION Troubleshooting 124 Resetting the system 138 Operation modes of front ...and network features 68 USB and network menu tree 68 Navigating USB and network menus 69 Using a USB storage device or a USB portable audio player 69 Using a PC server or Yamaha ...Radio™ information 63 Using Bluetooth™ components 64 Pairing the Bluetooth™ receiver and your headphones 38 Muting the audio output 38 Displaying the input source information 38...
... and Zone 3 components ... 117 Controlling Zone 2 or Zone 3 119 Advanced setup 121 Using the advanced setup menu 121 ADDITIONAL INFORMATION Troubleshooting 124 Resetting the system 138 Operation modes of front ...and network features 68 USB and network menu tree 68 Navigating USB and network menus 69 Using a USB storage device or a USB portable audio player 69 Using a PC server or Yamaha ...Radio™ information 63 Using Bluetooth™ components 64 Pairing the Bluetooth™ receiver and your headphones 38 Muting the audio output 38 Displaying the input source information 38...
Owner's Manual
Page 6
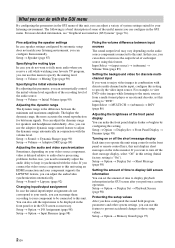
Fine adjusting the speaker settings In case speaker settings configured by configuring this unit. Setup → Speaker (page 87) Specifying the muting type In case you do not want to fully mute audio when you receive a call while watching your needs, you can rearrange them manually. You can ...automatically control the initial volume level regardless of the recording level of the audio source. Also, you can configure in the GUI menu. Setup → Sound → Dynamic ...
Fine adjusting the speaker settings In case speaker settings configured by configuring this unit. Setup → Speaker (page 87) Specifying the muting type In case you do not want to fully mute audio when you receive a call while watching your needs, you can rearrange them manually. You can ...automatically control the initial volume level regardless of the recording level of the audio source. Also, you can configure in the GUI menu. Setup → Sound → Dynamic ...
Owner's Manual
Page 7
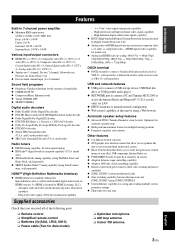
... signal (30/36 bit) transmission capability Supplied accessories Check that allows you received all sources ◆ Adaptive dynamic range controlling capability ◆ Adaptive DSP effect...tuning capability (using a Web browser Automatic speaker setup features ◆ Advanced YPAO (Yamaha Parametric room Acoustic Optimizer) for automatic speaker setup ◆ Multi-point measurement feature for multiple...9670; DHCP automatic or manual network configuration ◆ Web control capability of this unit by using SiriusConnect tuner, sold separately) USB and network features ◆ USB port ...
... signal (30/36 bit) transmission capability Supplied accessories Check that allows you received all sources ◆ Adaptive dynamic range controlling capability ◆ Adaptive DSP effect...tuning capability (using a Web browser Automatic speaker setup features ◆ Advanced YPAO (Yamaha Parametric room Acoustic Optimizer) for automatic speaker setup ◆ Multi-point measurement feature for multiple...9670; DHCP automatic or manual network configuration ◆ Web control capability of this unit by using SiriusConnect tuner, sold separately) USB and network features ◆ USB port ...

Owner's Manual
Page 15
... compared with extra ambient effects produced by configuring the "Surround Back" setting (page 88). But it is not practical to -back transitions. Use the automatic setup feature (page 30) or set "Front Presence" to "Yes" (page 88). 0.5 to 1 m (1 to 3 ft) 0.5 to 1 m (1 to place the subwoofer ... especially for some reason it is effective not only for reinforcing bass frequencies from the front speakers with the placement in amplifier, such as the Yamaha Active Servo Processing Subwoofer System, is better to 3 ft) PL PR 1.8 m (6 ft) FL FR 1.8 m (6 ft) C English 11 En For...
... compared with extra ambient effects produced by configuring the "Surround Back" setting (page 88). But it is not practical to -back transitions. Use the automatic setup feature (page 30) or set "Front Presence" to "Yes" (page 88). 0.5 to 1 m (1 to 3 ft) 0.5 to 1 m (1 to place the subwoofer ... especially for some reason it is effective not only for reinforcing bass frequencies from the front speakers with the placement in amplifier, such as the Yamaha Active Servo Processing Subwoofer System, is better to 3 ft) PL PR 1.8 m (6 ft) FL FR 1.8 m (6 ft) C English 11 En For...
Owner's Manual
Page 30
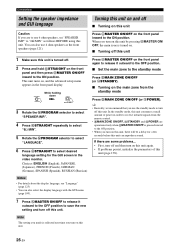
This unit turns on, and the advanced setup menu appears in the video monitor. In the standby mode, this unit. Notes • For details about the display language, see "Language" (page 123) • ... MPROGRAM selector to select "LANGUAGE". 6 Press NSTRAIGHT to turn on this unit again. • If problems persist, initialize the parameters of power in order to receive infrared signals from the standby mode Press BMAIN ZONE ON/OFF (or EPOWER). Connections Setting the speaker impedance and GUI language Turning this unit on...
This unit turns on, and the advanced setup menu appears in the video monitor. In the standby mode, this unit. Notes • For details about the display language, see "Language" (page 123) • ... MPROGRAM selector to select "LANGUAGE". 6 Press NSTRAIGHT to turn on this unit again. • If problems persist, initialize the parameters of power in order to receive infrared signals from the standby mode Press BMAIN ZONE ON/OFF (or EPOWER). Connections Setting the speaker impedance and GUI language Turning this unit on...
Owner's Manual
Page 31
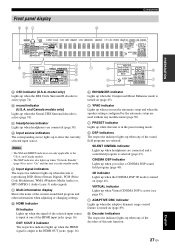
...when you select a CINEMA DSP sound field program (page 40). 3D indicator Lights up when you run the automatic setup and when the speaker settings configured by the automatic setup are connected and a sound field program is output at one of the sound field programs are only applicable to ... i YPAO indicator Lights up when the CINEMA DSP 3D mode is turned on (page 46). e Input signal indicators The respective indicator lights up when "Network Standby" (page 96) is set to "On" and this unit is in the preset tuning mode. and Canada models. • The NET indicator also...
...when you select a CINEMA DSP sound field program (page 40). 3D indicator Lights up when you run the automatic setup and when the speaker settings configured by the automatic setup are connected and a sound field program is output at one of the sound field programs are only applicable to ... i YPAO indicator Lights up when the CINEMA DSP 3D mode is turned on (page 46). e Input signal indicators The respective indicator lights up when "Network Standby" (page 96) is set to "On" and this unit is in the preset tuning mode. and Canada models. • The NET indicator also...
Owner's Manual
Page 32
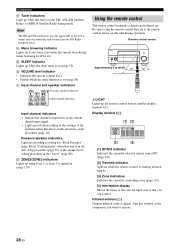
.... 28 En Aim this window at the remote control sensor on (page 119). Connections n Tuner indicators Light up when this unit is in the automatic setup procedure (page 30). o Menu browsing indicator Lights up the remote control buttons and the display window (4). Display window (4) [1] [2] MAIN ID 1 ID 2 ... etc. q VOLUME level indicator • Indicates the current volume level. • Flashes while the mute function is in the auto setup procedure (page 30) or the speaker level setting procedure in "Configuration" when this unit is on (page 38). Presence speaker indicators ...
.... 28 En Aim this window at the remote control sensor on (page 119). Connections n Tuner indicators Light up when this unit is in the automatic setup procedure (page 30). o Menu browsing indicator Lights up the remote control buttons and the display window (4). Display window (4) [1] [2] MAIN ID 1 ID 2 ... etc. q VOLUME level indicator • Indicates the current volume level. • Flashes while the mute function is in the auto setup procedure (page 30) or the speaker level setting procedure in "Configuration" when this unit is on (page 38). Presence speaker indicators ...

Owner's Manual
Page 34
... microphone heading upward. 30 En This unit is too much ambient noise, the results may not be optimized by the automatic setup. AUDIO SELECT/ REC OUT MENU TONE CONTROL ENTER PRESET/TUNING/CH MEMORY SEARCH MODE STEREO/ MONO CATEGORY STRAIGHT EFFECT YPAO SILENT... controls of the following screen appears in your listening room This unit employs the YPAO (Yamaha Parametric room Acoustic Optimizer) technology which lets you avoid troublesome listening-based speaker setup and achieves highly accurate sound adjustments automatically. Note "View GUI Menu" appears if the GUI...
... microphone heading upward. 30 En This unit is too much ambient noise, the results may not be optimized by the automatic setup. AUDIO SELECT/ REC OUT MENU TONE CONTROL ENTER PRESET/TUNING/CH MEMORY SEARCH MODE STEREO/ MONO CATEGORY STRAIGHT EFFECT YPAO SILENT... controls of the following screen appears in your listening room This unit employs the YPAO (Yamaha Parametric room Acoustic Optimizer) technology which lets you avoid troublesome listening-based speaker setup and achieves highly accurate sound adjustments automatically. Note "View GUI Menu" appears if the GUI...

Owner's Manual
Page 35
... Check the boxes for one listening position. For more accurate measurements, we recommended that you do not perform any operation on this setting to select "Setup Menu" and then press 9h. You can use a tripod (etc.) to step 6. This unit starts to be when you get out of ...select the parameters to count down from each speaker. English 31 En Loud test tones are output. Once all items are seated in "Quick automatic setup" (page 30). 2 Press IMENU on the video monitor and then follow steps 1 and 2 in your listening room 4 Disconnect the optimizer microphone...
... Check the boxes for one listening position. For more accurate measurements, we recommended that you do not perform any operation on this setting to select "Setup Menu" and then press 9h. You can use a tripod (etc.) to step 6. This unit starts to be when you get out of ...select the parameters to count down from each speaker. English 31 En Loud test tones are output. Once all items are seated in "Quick automatic setup" (page 30). 2 Press IMENU on the video monitor and then follow steps 1 and 2 in your listening room 4 Disconnect the optimizer microphone...

Owner's Manual
Page 36
... channel. Equalizing Level Result Measurement Completed Sucessful Detail:[ ] Exit:ENTER Note If an error or warning message appears, see "Automatic setup" (page 113). • To view the details on each channel. Before proceeding next operation Once you perform the next operation,..." (page 32). 32 En Equalizing (Speaker equalizing) Parametric equalizer adjusts the level of error (or warning). During the automatic setup procedure, do not perform any operation on the type of the specified frequency bands. For more accurate measurements, we recommended that ...
... channel. Equalizing Level Result Measurement Completed Sucessful Detail:[ ] Exit:ENTER Note If an error or warning message appears, see "Automatic setup" (page 113). • To view the details on each channel. Before proceeding next operation Once you perform the next operation,..." (page 32). 32 En Equalizing (Speaker equalizing) Parametric equalizer adjusts the level of error (or warning). During the automatic setup procedure, do not perform any operation on the type of the specified frequency bands. For more accurate measurements, we recommended that ...

Owner's Manual
Page 37
... to count down from each speaker during the measurement. 9 Press 9ENTER to start the measurement immediately, press 9ENTER again. • To cancel the automatic setup and return to the previous screen, press 0RETURN. When you do not need to select the parameters to be optimized, press 9k / n to select ...the parameter and then press 9ENTER to check or uncheck the box. During the automatic setup procedure, do not select the parameters to be optimized by the initial factory settings. 8 Press 9l to return to the previous menu level and...
... to count down from each speaker during the measurement. 9 Press 9ENTER to start the measurement immediately, press 9ENTER again. • To cancel the automatic setup and return to the previous screen, press 0RETURN. When you do not need to select the parameters to be optimized, press 9k / n to select ...the parameter and then press 9ENTER to check or uncheck the box. During the automatic setup procedure, do not select the parameters to be optimized by the initial factory settings. 8 Press 9l to return to the previous menu level and...

Owner's Manual
Page 38
...the second listening position and then press 9ENTER to start the measurement. If you want to review the result of the automatic setup. Reviewing and reloading the automatic setup parameters Use this feature to check the setting. 34 En y If the menu directory other than "Top Menu" (page ...you have made the measurement at the remaining listening positions, "Measurement Completed Successful" appears. 12 Follow steps 7 to 9 in "Basic automatic setup" (page 31) to FAMP and then press IMENU. The GUI menu appears in case you have configured manually are not satisfied with the speaker...
...the second listening position and then press 9ENTER to start the measurement. If you want to review the result of the automatic setup. Reviewing and reloading the automatic setup parameters Use this feature to check the setting. 34 En y If the menu directory other than "Top Menu" (page ...you have made the measurement at the remaining listening positions, "Measurement Completed Successful" appears. 12 Follow steps 7 to 9 in "Basic automatic setup" (page 31) to FAMP and then press IMENU. The GUI menu appears in case you have configured manually are not satisfied with the speaker...

Owner's Manual
Page 39
... when the polarity of the each connected speaker output level. Press 9h repeatedly to switch the unit to recalibrate your listening environment, run the automatic setup again to display the value of the connected speaker is normal. - Select "Natural" to the corresponding speaker channel. "NRM" appears when the polarity of each...
... when the polarity of the each connected speaker output level. Press 9h repeatedly to switch the unit to recalibrate your listening environment, run the automatic setup again to display the value of the connected speaker is normal. - Select "Natural" to the corresponding speaker channel. "NRM" appears when the polarity of each...

Owner's Manual
Page 51
... and hold DREC OUT until "REC OUT" appears in the PURE DIRECT mode. The LPURE DIRECT button on or off . This is in the automatic setup (page 30) and "Level" (page 89). 1 Press CLEVEL and then 9k / n repeatedly to select the speaker you want to adjust the high-frequency response (TREBLE...
... and hold DREC OUT until "REC OUT" appears in the PURE DIRECT mode. The LPURE DIRECT button on or off . This is in the automatic setup (page 30) and "Level" (page 89). 1 Press CLEVEL and then 9k / n repeatedly to select the speaker you want to adjust the high-frequency response (TREBLE...

Owner's Manual
Page 72
...), MP3, MPEG-4 AAC, and WMA files saved on your USB storage device, USB portable audio player, PC and Yamaha MCX-2000 or access the Internet Radio. USB and network menu tree The following diagram shows the construction of the connected USB component. *2Only the available PC servers and MCX-... Content menu operations" (page 65). You can search contents by category provided by Rhapsody®. 68 En For information on your region. *4The account setup screen appears if you to technical reference books, if needed. • Some WAV, MP3, MPEG-4 AAC, and WMA files may not be playable or...
...), MP3, MPEG-4 AAC, and WMA files saved on your USB storage device, USB portable audio player, PC and Yamaha MCX-2000 or access the Internet Radio. USB and network menu tree The following diagram shows the construction of the connected USB component. *2Only the available PC servers and MCX-... Content menu operations" (page 65). You can search contents by category provided by Rhapsody®. 68 En For information on your region. *4The account setup screen appears if you to technical reference books, if needed. • Some WAV, MP3, MPEG-4 AAC, and WMA files may not be playable or...

Owner's Manual
Page 74
..."), the automatic configuration is pre-installed (except some settings of Windows Media Player 11 to the instruction manual of MCX-2000) and then select "NETWORK" in "ADVANCED SETUP" on this unit. • "MusicCAST" appears in some locations. • You can be for the first time. • (PC only) You ...an asterisk (*) have not been converted to your PC With Windows Media Player 11, you set the "Receive PCM Stream" setting of Windows Media Player 11. Refer to the attached documents of your Yamaha MCX-2000 (shown as the last 5 digits of the MAC address of this unit. • ...
..."), the automatic configuration is pre-installed (except some settings of Windows Media Player 11 to the instruction manual of MCX-2000) and then select "NETWORK" in "ADVANCED SETUP" on this unit. • "MusicCAST" appears in some locations. • You can be for the first time. • (PC only) You ...an asterisk (*) have not been converted to your PC With Windows Media Player 11, you set the "Receive PCM Stream" setting of Windows Media Player 11. Refer to the attached documents of your Yamaha MCX-2000 (shown as the last 5 digits of the MAC address of this unit. • ...
Owner's Manual
Page 75
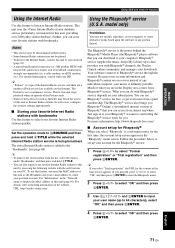
...your e-mail address to the "Bookmarks" list (page 68). y • "Podcast" is infinitely portable. The Podcast is added to create your network (page 23). • A narrowband Internet connection (i.e. 56K modem, ISDN) will not provide satisfactory results, and a broadband connection is strongly recommended (i.e....continuous service. To use Rhapsody® service for free, or get even more information, http://www.rhapsody-free.com/. ■ Account setup for the content of what you select "Trial registration", the URL for Rhapsody® When you . Rhapsody® service supplies the ...
...your e-mail address to the "Bookmarks" list (page 68). y • "Podcast" is infinitely portable. The Podcast is added to create your network (page 23). • A narrowband Internet connection (i.e. 56K modem, ISDN) will not provide satisfactory results, and a broadband connection is strongly recommended (i.e....continuous service. To use Rhapsody® service for free, or get even more information, http://www.rhapsody-free.com/. ■ Account setup for the content of what you select "Trial registration", the URL for Rhapsody® When you . Rhapsody® service supplies the ...

Owner's Manual
Page 76
...2 to 5 in addition to "Play Control" and "Play Style" (page 69). y "Show trial info" appears only when you are also available in "Account setup for each sub input source. ■ Assigning the items to the numeric button (1-8) (B) 1 Select a desired content you want to assign to a numeric button (1-8) ...album currently selected to "My Library". Add Album to My Library Select this unit automatically selects an empty preset number. Using USB and network features 5 Use 9k / n / l / h and 9ENTER to input your account or checking trial information 1 In the top "Rhapsody" menu screen...
...2 to 5 in addition to "Play Control" and "Play Style" (page 69). y "Show trial info" appears only when you are also available in "Account setup for each sub input source. ■ Assigning the items to the numeric button (1-8) (B) 1 Select a desired content you want to assign to a numeric button (1-8) ...album currently selected to "My Library". Add Album to My Library Select this unit automatically selects an empty preset number. Using USB and network features 5 Use 9k / n / l / h and 9ENTER to input your account or checking trial information 1 In the top "Rhapsody" menu screen...

Owner's Manual
Page 80
model only) Auto Setup (page 30) Speaker (page 87) Configuration Front Center Surround Surround Back Front Presence Subwoofer Distance Level Test Tone Volume (page 89) Adaptive DRC Adaptive DSP ... Canada models only) XM (U.S.A. Graphical user interface (GUI) menu ■ GUI menu tree Stereo/Surround (page 80) Input Select (page 85) Music Content (page 87) Setup SIRIUS SATELLITE RADIO (U.S.A. and Canada models only) TUNER MULTI CH PHONO CD TV MD/CD-R BD/HD DVD DVD CBL/SAT DVR VCR VIDEO AUX...
model only) Auto Setup (page 30) Speaker (page 87) Configuration Front Center Surround Surround Back Front Presence Subwoofer Distance Level Test Tone Volume (page 89) Adaptive DRC Adaptive DSP ... Canada models only) XM (U.S.A. Graphical user interface (GUI) menu ■ GUI menu tree Stereo/Surround (page 80) Input Select (page 85) Music Content (page 87) Setup SIRIUS SATELLITE RADIO (U.S.A. and Canada models only) TUNER MULTI CH PHONO CD TV MD/CD-R BD/HD DVD DVD CBL/SAT DVR VCR VIDEO AUX...

Owner's Manual
Page 82
... this unit. System Memory (System memory menu) See page 101 for details. Network (Network menu) See page 95 for details. Multi Zone (Multi-zone menu) See page 96 for details. model only) (page 87). ■ Setup (Setup menu) Use this unit (page 100). 78 En Sound (Sound menu) See...interface (GUI) menu that appears in the front panel display or in the GUI menu. Input Select Music Content Setup Language Stereo/Surround Sound Video HDMI System Memory Network ■ Stereo/Surround (Stereo/Surround menu) Use this feature to select the sound field programs and customize the program...
... this unit. System Memory (System memory menu) See page 101 for details. Network (Network menu) See page 95 for details. Multi Zone (Multi-zone menu) See page 96 for details. model only) (page 87). ■ Setup (Setup menu) Use this unit (page 100). 78 En Sound (Sound menu) See...interface (GUI) menu that appears in the front panel display or in the GUI menu. Input Select Music Content Setup Language Stereo/Surround Sound Video HDMI System Memory Network ■ Stereo/Surround (Stereo/Surround menu) Use this feature to select the sound field programs and customize the program...

