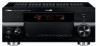

Owner's Manual
Page 3
...installing this unit where foreign objects may fall and liquid may cause fire, damage to this unit, and/or personal injury. - Contact qualified Yamaha service personnel when any damage resulting from use this unit for long periods of the unit. This Class B digital apparatus complies with high humidity ...et pousser jusqu'au fond. Caution: Read this before concluding that this unit is faulty. 18 Before moving this unit, press AMASTER ON/OFF to release it in a safe place for future reference. 2 Install this sound system in a well ventilated, cool, dry, clean place - Retain this Owner's...
...installing this unit where foreign objects may fall and liquid may cause fire, damage to this unit, and/or personal injury. - Contact qualified Yamaha service personnel when any damage resulting from use this unit for long periods of the unit. This Class B digital apparatus complies with high humidity ...et pousser jusqu'au fond. Caution: Read this before concluding that this unit is faulty. 18 Before moving this unit, press AMASTER ON/OFF to release it in a safe place for future reference. 2 Install this sound system in a well ventilated, cool, dry, clean place - Retain this Owner's...

Owner's Manual
Page 29
..., the stored data will be connected to these outlet(s), see "Specifications" (page 145). Connecting the wire of the AM loop antenna Press and hold Insert Release AC IN AC OUTLETS SWITCHED To the AC wall outlet y The wire of your location before plugging this unit is turned off when this unit...
..., the stored data will be connected to these outlet(s), see "Specifications" (page 145). Connecting the wire of the AM loop antenna Press and hold Insert Release AC IN AC OUTLETS SWITCHED To the AC wall outlet y The wire of your location before plugging this unit is turned off when this unit...
Owner's Manual
Page 30
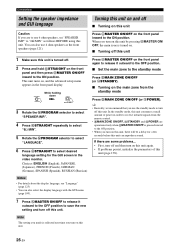
...AMASTER ON/OFF is turned off this unit can also select the display language with the GUI menu (page 100). 7 Press AMASTER ON/OFF to release it outward to the OFF position. ■ Set the main zone to the standby mode Press BMAIN ZONE ON/OFF (or DSTANDBY). ■ ... can reproduce sound. Press AMASTER ON/OFF on the main zone from the remote control. • BMAIN ZONE ON/OFF, DSTANDBY and EPOWER are to receive infrared signals from the standby mode Press BMAIN ZONE ON/OFF (or EPOWER). Choices: ENGLISH (English), JAPANESE, (Japanese), FRENCH (French), GERMAN (German), SPANISH (...
...AMASTER ON/OFF is turned off this unit can also select the display language with the GUI menu (page 100). 7 Press AMASTER ON/OFF to release it outward to the OFF position. ■ Set the main zone to the standby mode Press BMAIN ZONE ON/OFF (or DSTANDBY). ■ ... can reproduce sound. Press AMASTER ON/OFF on the main zone from the remote control. • BMAIN ZONE ON/OFF, DSTANDBY and EPOWER are to receive infrared signals from the standby mode Press BMAIN ZONE ON/OFF (or EPOWER). Choices: ENGLISH (English), JAPANESE, (Japanese), FRENCH (French), GERMAN (German), SPANISH (...

Owner's Manual
Page 56
..."TAG" (only when tagging is available) [9] Audio program number (currently selected/ total) 52 En Otherwise, this unit stores the information in the Yamaha iPod universal dock (YDS-11, sold separately) connected to FSOURCE and then press 9ENTER. y • You can configure the display settings with "...Display Set" (page 98). • To hold or release the displayed information, set the operation mode selector on or off the information display. While it next time your iPod is displayed in the...
..."TAG" (only when tagging is available) [9] Audio program number (currently selected/ total) 52 En Otherwise, this unit stores the information in the Yamaha iPod universal dock (YDS-11, sold separately) connected to FSOURCE and then press 9ENTER. y • You can configure the display settings with "...Display Set" (page 98). • To hold or release the displayed information, set the operation mode selector on or off the information display. While it next time your iPod is displayed in the...

Owner's Manual
Page 60
... While it is set the operation mode selector on the top of Home Dock so that " " or " " is displayed if the antenna cannot receive the signals correctly. The preset channel is held, the HOLD indicator flashes in the front panel display or GUI screen, see "Preset Search mode" (page... 55). 2 Press and hold or release the displayed information by pressing the numeric buttons (B). • If you select a preset number being used ("*" appears next to the preset number), the ...
... While it is set the operation mode selector on the top of Home Dock so that " " or " " is displayed if the antenna cannot receive the signals correctly. The preset channel is held, the HOLD indicator flashes in the front panel display or GUI screen, see "Preset Search mode" (page... 55). 2 Press and hold or release the displayed information by pressing the numeric buttons (B). • If you select a preset number being used ("*" appears next to the preset number), the ...

Owner's Manual
Page 67
...y • If the SIRIUS Satellite Radio information contains a character that cannot be displayed with a space. • When the antenna of the SiriusConnect tuner cannot receive the signals, "ACQUIRING" appears in the GUI screen. [7] [1] ALL CHANNEL SEARCH [2] 008 : Big '80s [3] : Pop [4] : Sanumemo [5] : Road...FAMP. y • You can configure the display settings with "Display Set" (page 98). • You can hold or release the displayed information by this unit, the character will be recognized by pressing 9ENTER. The following operations, set the operation mode selector...
...y • If the SIRIUS Satellite Radio information contains a character that cannot be displayed with a space. • When the antenna of the SiriusConnect tuner cannot receive the signals, "ACQUIRING" appears in the GUI screen. [7] [1] ALL CHANNEL SEARCH [2] 008 : Big '80s [3] : Pop [4] : Sanumemo [5] : Road...FAMP. y • You can configure the display settings with "Display Set" (page 98). • You can hold or release the displayed information by this unit, the character will be recognized by pressing 9ENTER. The following operations, set the operation mode selector...

Owner's Manual
Page 125
... Remote sensor REMOTE SENSOR Use this setting to set the speaker impedance to save the new setting and turn off this unit. panel to release it outward to the OFF position to 8 Ω. Choice Descriptions ID1 Select this setting when the ID of the remote control is in ...The impedance of your speakers. Note STRAIGHT EFFECT While holding down MASTER 3 Rotate the MPROGRAM selector to select the parameter you control multiple Yamaha AV receiver or amplifier with using the advanced setup menu. • The advanced setup menu is set the remote control ID.
... Remote sensor REMOTE SENSOR Use this setting to set the speaker impedance to save the new setting and turn off this unit. panel to release it outward to the OFF position to 8 Ω. Choice Descriptions ID1 Select this setting when the ID of the remote control is in ...The impedance of your speakers. Note STRAIGHT EFFECT While holding down MASTER 3 Rotate the MPROGRAM selector to select the parameter you control multiple Yamaha AV receiver or amplifier with using the advanced setup menu. • The advanced setup menu is set the remote control ID.

Owner's Manual
Page 142
..." to cancel the initialization procedure without making any changes, press AMASTER ON/OFF on the front panel to release it outward to the OFF position. 1 Press AMASTER ON/OFF on the front panel to release it outward to the OFF position to confirm your selection and turn on , and "ADVANCED SETUP" appears... position to turn on this unit. 138 En y To cancel the initialization procedure at any time without making any changes. 5 Press AMASTER ON/OFF to release it outward to the OFF position to turn off this unit.
..." to cancel the initialization procedure without making any changes, press AMASTER ON/OFF on the front panel to release it outward to the OFF position. 1 Press AMASTER ON/OFF on the front panel to release it outward to the OFF position to confirm your selection and turn on , and "ADVANCED SETUP" appears... position to turn on this unit. 138 En y To cancel the initialization procedure at any time without making any changes. 5 Press AMASTER ON/OFF to release it outward to the OFF position to turn off this unit.

Owner's Manual
Page 164
... OPTIMUS 00011 PHILIPS 00111 PIONEER 00011 POLK AUDIO 00111 RCA 00011 REVOX 00111 SANSUI 00111 SONY 00211 THORENS 00111 WARDS 00011 YAMAHA 00311, 00411 Information about each software, read the original sentences stated below. ■ About The Independent JPEG Group's JPEG...before diving into larger programs) should get . Plans for cjpeg, djpeg, jpegtran, rdjpgcom, and wrjpgcom. Usage instructions for future IJG releases. For legal reasons, we suggest reading one or more of this software (particularly those incorporating it for a particular application. You are...
... OPTIMUS 00011 PHILIPS 00111 PIONEER 00011 POLK AUDIO 00111 RCA 00011 REVOX 00111 SANSUI 00111 SONY 00211 THORENS 00111 WARDS 00011 YAMAHA 00311, 00411 Information about each software, read the original sentences stated below. ■ About The Independent JPEG Group's JPEG...before diving into larger programs) should get . Plans for cjpeg, djpeg, jpegtran, rdjpgcom, and wrjpgcom. Usage instructions for future IJG releases. For legal reasons, we suggest reading one or more of this software (particularly those incorporating it for a particular application. You are...

Owner's Manual
Page 165
...JPEG in IEEE Trans. It appears that "this software works. (But if you feel a need to be obtained by far the most recent released version can be obtained from ftp.sgi.com or from ftp://ftp.sgi.com/graphics/tiff/. We are also available via UUCP; "The JPEG ... source of compression methods including JPEG. The book includes the complete text of Menlo Park, CA. it may sometimes lag behind the ftp.uu.net release. ARCHIVE LOCATIONS The "official" archive site for a multitude of general information about data compression in CACM, but we are aware, there are comfortable...
...JPEG in IEEE Trans. It appears that "this software works. (But if you feel a need to be obtained by far the most recent released version can be obtained from ftp.sgi.com or from ftp://ftp.sgi.com/graphics/tiff/. We are also available via UUCP; "The JPEG ... source of compression methods including JPEG. The book includes the complete text of Menlo Park, CA. it may sometimes lag behind the ftp.uu.net release. ARCHIVE LOCATIONS The "official" archive site for a multitude of general information about data compression in CACM, but we are aware, there are comfortable...

Firmware Upgrade Instructions
Page 2
...for RX-V3900 Confirming the firmware version Step1: Set the MASTER ON/OFF button on the front panel display. (Note: "ADVANCED SETUP" is only displayed for a few seconds.) Step3 Rotate the PROGRAM selector counterclockwise to select "VERSION". NETWORK UPDATE is recommended if your receiver's ...version is connected to the internet. If not, perform USB UPDATE. STEP1 STEP2 press & hold STEP3 Page.2 of 6 Step2 While pressing the STRAIGHT button, press (and release) the MASTER ON/OFF button...
...for RX-V3900 Confirming the firmware version Step1: Set the MASTER ON/OFF button on the front panel display. (Note: "ADVANCED SETUP" is only displayed for a few seconds.) Step3 Rotate the PROGRAM selector counterclockwise to select "VERSION". NETWORK UPDATE is recommended if your receiver's ...version is connected to the internet. If not, perform USB UPDATE. STEP1 STEP2 press & hold STEP3 Page.2 of 6 Step2 While pressing the STRAIGHT button, press (and release) the MASTER ON/OFF button...

Firmware Upgrade Instructions
Page 3
...and release) the MASTER ON/OFF button and then keep depressing the STRAIGHT button until "ADVANCED SETUP" appears on the front panel display. (Note: "ADVANCED SETUP" is required in the USB thumb drive. Firmware Update Procedure for RX-V3900 Instruction for USB Update Requirement: (Formatting by YAMAHA,"RXV3900...-xxxx.bin". USB thumb drive, with RX-V3900.bin file Page.3 of the USB thumb drive.
...and release) the MASTER ON/OFF button and then keep depressing the STRAIGHT button until "ADVANCED SETUP" appears on the front panel display. (Note: "ADVANCED SETUP" is required in the USB thumb drive. Firmware Update Procedure for RX-V3900 Instruction for USB Update Requirement: (Formatting by YAMAHA,"RXV3900...-xxxx.bin". USB thumb drive, with RX-V3900.bin file Page.3 of the USB thumb drive.

Firmware Upgrade Instructions
Page 5
Firmware Update Procedure for RX-V3900 Instruction for a few seconds.) STEP1/STEP6 STEP2 press & hold STEP4 STEP3 Step3 Rotate the PROGRAM knob counterclockwise to select "FIRM UPDATE USB". Do to network. The receiver automatically powers off and on the display, firmware update is properly... release) the MASTER ON/OFF button and then keep depressing the STRAIGHT button until "ADVANCED SETUP" appears on the front panel display. (Note: the "ADVANCED SETUP" is only displayed for Network Update Requirement: Network environment to be able to connect to the Internet RX-V3900....
Firmware Update Procedure for RX-V3900 Instruction for a few seconds.) STEP1/STEP6 STEP2 press & hold STEP4 STEP3 Step3 Rotate the PROGRAM knob counterclockwise to select "FIRM UPDATE USB". Do to network. The receiver automatically powers off and on the display, firmware update is properly... release) the MASTER ON/OFF button and then keep depressing the STRAIGHT button until "ADVANCED SETUP" appears on the front panel display. (Note: the "ADVANCED SETUP" is only displayed for Network Update Requirement: Network environment to be able to connect to the Internet RX-V3900....