

RX-V383/HTR-3071 Quick Start Guide
Page 3
...and/or another product use of America A/V Division 6600 Orangethorpe Avenue, Buena Park, CA 90620 714-522-9011 AV Receiver RX-V383, HTR-3071 This device complies with any interference, including interference that may cause interference harmful to provide reasonable protection against ...lead-in the users manual, may cause undesired operation of this product is connected. - Cable/s supplied with the limits for compliance could void your authority, granted by Yamaha Corporation of radio or TV interference, relocate/reorient the antenna. If this device. Reorient or relocate the...
...and/or another product use of America A/V Division 6600 Orangethorpe Avenue, Buena Park, CA 90620 714-522-9011 AV Receiver RX-V383, HTR-3071 This device complies with any interference, including interference that may cause interference harmful to provide reasonable protection against ...lead-in the users manual, may cause undesired operation of this product is connected. - Cable/s supplied with the limits for compliance could void your authority, granted by Yamaha Corporation of radio or TV interference, relocate/reorient the antenna. If this device. Reorient or relocate the...
RX-V383/HTR-3071 Quick Start Guide
Page 5
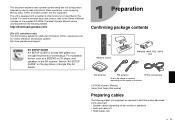
...antenna YPAO microphone One of purchase. This document explains basic speaker system setup and unit configuration, followed by step-by-step instructions. http://download.yamaha.com/ [For U.S. CD-ROM (Owner's Manual) Quick Start Guide (this booklet) Preparing cables The following website. Search "AV SETUP GUIDE"... downloaded from the following cables (not supplied) are also explained. The unit is an app that guides you through the process of connecting a TV or playback device, such as a BD/DVD or CD player, and speakers to the Owner's Manual included on the number of other...
...antenna YPAO microphone One of purchase. This document explains basic speaker system setup and unit configuration, followed by step-by-step instructions. http://download.yamaha.com/ [For U.S. CD-ROM (Owner's Manual) Quick Start Guide (this booklet) Preparing cables The following website. Search "AV SETUP GUIDE"... downloaded from the following cables (not supplied) are also explained. The unit is an app that guides you through the process of connecting a TV or playback device, such as a BD/DVD or CD player, and speakers to the Owner's Manual included on the number of other...
RX-V383/HTR-3071 Quick Start Guide
Page 8
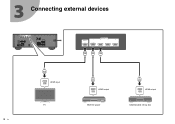
3 Connecting external devices 8 En HDMI HDMI input HDMI TV HDMI (HDCP2.2) HDMI OUT 1 2 3 4 ARC (BD/DVD) HDCP2.2 HDMI HDMI HDMI HDMI HDMI output HDMI BD/DVD player HDMI HDMI HDMI output Satellite/cable set top box
3 Connecting external devices 8 En HDMI HDMI input HDMI TV HDMI (HDCP2.2) HDMI OUT 1 2 3 4 ARC (BD/DVD) HDCP2.2 HDMI HDMI HDMI HDMI HDMI output HDMI BD/DVD player HDMI HDMI HDMI output Satellite/cable set top box
RX-V383/HTR-3071 Quick Start Guide
Page 10
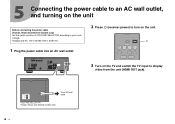
...220V240V VOLTAGE SELECTOR (Taiwan, Brazil and General models only) To an AC wall outlet 10 En 5 Connecting the power cable to an AC wall outlet, and turning on the unit Before connecting the power cable (Taiwan, Brazil and General models only) Set the switch position of VOLTAGE SELECTOR ...according to display video from the unit (HDMI OUT jack). BD DVD SLEEP SCENE TV CD RADIO STRAIGHT ENHANCER BASS PROGRAM z 3 Turn...
...220V240V VOLTAGE SELECTOR (Taiwan, Brazil and General models only) To an AC wall outlet 10 En 5 Connecting the power cable to an AC wall outlet, and turning on the unit Before connecting the power cable (Taiwan, Brazil and General models only) Set the switch position of VOLTAGE SELECTOR ...according to display video from the unit (HDMI OUT jack). BD DVD SLEEP SCENE TV CD RADIO STRAIGHT ENHANCER BASS PROGRAM z 3 Turn...

RX-V383/HTR-3071 Quick Start Guide
Page 12
... Note Place the YPAO microphone at your listening position and connect it to maximum. You can use of the speaker settings. 12 En It takes about 3 minutes to half. The screen below appears on the TV. The screen below appears on the TV when the measurement finishes. We recommend the use the tripod...
... Note Place the YPAO microphone at your listening position and connect it to maximum. You can use of the speaker settings. 12 En It takes about 3 minutes to half. The screen below appears on the TV. The screen below appears on the TV when the measurement finishes. We recommend the use the tripod...
RX-V383/HTR-3071 Quick Start Guide
Page 14
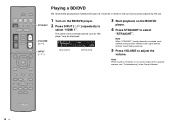
... When "STRAIGHT" (straight decode) is output from a specific speaker, see "Troubleshooting" in the Owner's Manual. BD DVD SLEEP SCENE TV CD RADIO STRAIGHT ENHANCER BASS PROGRAM FM/AM INPUT USB BLUETOOTH VOLUME MUTE SETUP ENTER OPTION RETURN TOP MENU HOME DISPLAY POP-UP/MENU Playing...select "HDMI 1". STRAIGHT VOLUME ( / ) INPUT (q/w) 1 Turn on the BD/DVD player. 4 Press STRAIGHT to adjust the volume. The name of the connected device such as "BD player" may be displayed. Note When sound is not heard, or no sound is enabled, each speaker produces each channel audio...
... When "STRAIGHT" (straight decode) is output from a specific speaker, see "Troubleshooting" in the Owner's Manual. BD DVD SLEEP SCENE TV CD RADIO STRAIGHT ENHANCER BASS PROGRAM FM/AM INPUT USB BLUETOOTH VOLUME MUTE SETUP ENTER OPTION RETURN TOP MENU HOME DISPLAY POP-UP/MENU Playing...select "HDMI 1". STRAIGHT VOLUME ( / ) INPUT (q/w) 1 Turn on the BD/DVD player. 4 Press STRAIGHT to adjust the volume. The name of the connected device such as "BD player" may be displayed. Note When sound is not heard, or no sound is enabled, each speaker produces each channel audio...
RX-V383/HTR-3071 Quick Start Guide
Page 16
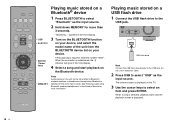
... will glow in the front display. 4 Select a song and start playback on the TV. 3 Use the cursor keys to select an item and press ENTER. RADIO STRAIGHT AUX USB AUDIO USB flash drive Note Connect the USB flash drive directly to select "USB" as the input source. The browse screen... is selected as the input source. 2 Hold down MEMORY for more than 3 seconds. BD DVD SLEEP SCENE TV CD RADIO STRAIGHT ENHANCER BASS PROGRAM FM/AM ...
... will glow in the front display. 4 Select a song and start playback on the TV. 3 Use the cursor keys to select an item and press ENTER. RADIO STRAIGHT AUX USB AUDIO USB flash drive Note Connect the USB flash drive directly to select "USB" as the input source. The browse screen... is selected as the input source. 2 Hold down MEMORY for more than 3 seconds. BD DVD SLEEP SCENE TV CD RADIO STRAIGHT ENHANCER BASS PROGRAM FM/AM ...

RX-V383 Owner s Manual
Page 2
......14 Setting the speaker impedance...15 2 Connecting speakers 16 Connecting speaker cables...17 Connecting the subwoofer (with built-in amplifier 17 3 Connecting a TV/playback devices 18 Input/output jacks and cables...18 Connecting a TV...19 Connecting video devices (such as BD/DVD players 20 Connecting audio devices (such as CD players)...22 Connecting to the jack on the front panel...
......14 Setting the speaker impedance...15 2 Connecting speakers 16 Connecting speaker cables...17 Connecting the subwoofer (with built-in amplifier 17 3 Connecting a TV/playback devices 18 Input/output jacks and cables...18 Connecting a TV...19 Connecting video devices (such as BD/DVD players 20 Connecting audio devices (such as CD players)...22 Connecting to the jack on the front panel...

RX-V383 Owner s Manual
Page 5
...enabled, you can reduce the unit's power consumption. • "ECO Mode" (p.61) Sequential operation of a TV, AV receiver, and BD/DVD player (HDMI Control) When the unit is connected to an HDMI Control-compatible TV and BD/DVD player with each HDMI cable, you can control the unit (such as power and... volume) and BD/DVD player with TV remote control operations. • "HDMI Control" (p.80) Supports Bluetooth&#...
...enabled, you can reduce the unit's power consumption. • "ECO Mode" (p.61) Sequential operation of a TV, AV receiver, and BD/DVD player (HDMI Control) When the unit is connected to an HDMI Control-compatible TV and BD/DVD player with each HDMI cable, you can control the unit (such as power and... volume) and BD/DVD player with TV remote control operations. • "HDMI Control" (p.80) Supports Bluetooth&#...

RX-V383 Owner s Manual
Page 6
... tuner. This app guides you through the various settings such as speaker connections, TV and source device connections. For details, search for tablets only. Functions: 1) Connection support guide - Various setup assistance with cable connections between AV Receiver and source devices as well as AV Receiver setup. ...need one HDMI cable to enable video output to the TV, audio input from the TV, and the transmission of the unit is as follows. n Application for connections and operations of HDMI Control signals. • "Connecting a TV" (p.19) Surround playback with 5 speakers placed in...
... tuner. This app guides you through the various settings such as speaker connections, TV and source device connections. For details, search for tablets only. Functions: 1) Connection support guide - Various setup assistance with cable connections between AV Receiver and source devices as well as AV Receiver setup. ...need one HDMI cable to enable video output to the TV, audio input from the TV, and the transmission of the unit is as follows. n Application for connections and operations of HDMI Control signals. • "Connecting a TV" (p.19) Surround playback with 5 speakers placed in...

RX-V383 Owner s Manual
Page 7
Front panel 1 23 45 6 7 8 90 YPAO MIC PHONES SILENT CINEMA INFO MEMORY (PAIRING) PRESET FM AM TUNING INPUT BD DVD SCENE TV CD TONE CONTROL PROGRAM RADIO STRAIGHT AUX AUDIO USB VOLUME A 1 z (power) key Turns on the front display (p.30). 6 MEMORY (...source. Starts pairing with one touch. Also, turns on the unit when it is in Bluetooth Standby enable condition (p.64). 3 YPAO MIC jack For connecting the supplied YPAO microphone (p.25). 4 Remote control sensor Receives remote control signals (p.4). 5 INFO key Selects the information displayed on /off (standby) the...
Front panel 1 23 45 6 7 8 90 YPAO MIC PHONES SILENT CINEMA INFO MEMORY (PAIRING) PRESET FM AM TUNING INPUT BD DVD SCENE TV CD TONE CONTROL PROGRAM RADIO STRAIGHT AUX AUDIO USB VOLUME A 1 z (power) key Turns on the front display (p.30). 6 MEMORY (...source. Starts pairing with one touch. Also, turns on the unit when it is in Bluetooth Standby enable condition (p.64). 3 YPAO MIC jack For connecting the supplied YPAO microphone (p.25). 4 Remote control sensor Receives remote control signals (p.4). 5 INFO key Selects the information displayed on /off (standby) the...

RX-V383 Owner s Manual
Page 9
... only) Selects the switch position according to an HDMI-compatible TV and outputting video/audio signals (p.18). When using ARC, TV audio signal can also be input through the HDMI OUT jack. 2 HDMI 1-4 jacks For connecting to HDMI-compatible playback devices and inputting video/audio signals ... 3 ANTENNA jacks For connecting to FM and AM antennas (p.23). 4 Power cable For connecting to an AC wall outlet (p.23). 5 AV jacks AUDIO jacks For connecting to video/audio playback devices and inputting video/audio signals (p.20). 6 MONITOR OUT jacks For connecting to a TV and outputting video signals ...
... only) Selects the switch position according to an HDMI-compatible TV and outputting video/audio signals (p.18). When using ARC, TV audio signal can also be input through the HDMI OUT jack. 2 HDMI 1-4 jacks For connecting to HDMI-compatible playback devices and inputting video/audio signals ... 3 ANTENNA jacks For connecting to FM and AM antennas (p.23). 4 Power cable For connecting to an AC wall outlet (p.23). 5 AV jacks AUDIO jacks For connecting to video/audio playback devices and inputting video/audio signals (p.20). 6 MONITOR OUT jacks For connecting to a TV and outputting video signals ...

RX-V383 Owner s Manual
Page 11
PREPARATIONS General setup procedure 1 Placing speakers...(p.12) 2 Connecting speakers...(p.16) 3 Connecting a TV/playback devices p.18) 4 Connecting the FM/AM antennas...(p.23) 5 Connecting the power cable...(p.23) 6 Selecting an on-screen menu language p.24) 7 Optimizing the speaker settings automatically (YPAO p.25) This completes all the preparations. Enjoy playing movies, music, radio and other content with the unit! 11 En
PREPARATIONS General setup procedure 1 Placing speakers...(p.12) 2 Connecting speakers...(p.16) 3 Connecting a TV/playback devices p.18) 4 Connecting the FM/AM antennas...(p.23) 5 Connecting the power cable...(p.23) 6 Selecting an on-screen menu language p.24) 7 Optimizing the speaker settings automatically (YPAO p.25) This completes all the preparations. Enjoy playing movies, music, radio and other content with the unit! 11 En
RX-V383 Owner s Manual
Page 18
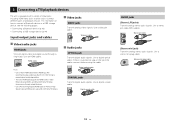
...signals. We recommend using the cable. If there is equipped with a variety of input jacks including HDMI input jacks to allow you to connect different types of the cable, remove it before using a cable less than 5.0 m (16.4 ft) long to prevent signal quality ... pin cable. Use a stereo pin cable (RCA cable). 3 Connecting a TV/playback devices The unit is a protective cap on how to connect a Bluetooth device or a USB storage device, see the following pages. • Connecting a Bluetooth device (p.42) • Connecting a USB storage device (p.44) Input/output jacks and cables ...
...signals. We recommend using the cable. If there is equipped with a variety of input jacks including HDMI input jacks to allow you to connect different types of the cable, remove it before using a cable less than 5.0 m (16.4 ft) long to prevent signal quality ... pin cable. Use a stereo pin cable (RCA cable). 3 Connecting a TV/playback devices The unit is a protective cap on how to connect a Bluetooth device or a USB storage device, see the following pages. • Connecting a Bluetooth device (p.42) • Connecting a USB storage device (p.44) Input/output jacks and cables ...
RX-V383 Owner s Manual
Page 19
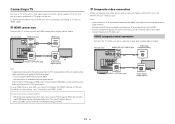
...need to configure the HDMI settings on the unit. If your TV is not needed in the following cases: - n Composite video connection When connecting any video device with a video pin cable, connect the TV to the unit. ▪ When using ARC, connect a TV with an HDMI cable that supports ARC. To use HDMI ...Control and ARC, you need to the unit with an HDMI cable and a digital optical cable. Connecting a TV Connect a TV to the unit so that supports HDMI Control to the unit with an HDMI cable, you can control the unit's power and volume with...
...need to configure the HDMI settings on the unit. If your TV is not needed in the following cases: - n Composite video connection When connecting any video device with a video pin cable, connect the TV to the unit. ▪ When using ARC, connect a TV with an HDMI cable that supports ARC. To use HDMI ...Control and ARC, you need to the unit with an HDMI cable and a digital optical cable. Connecting a TV Connect a TV to the unit so that supports HDMI Control to the unit with an HDMI cable, you can control the unit's power and volume with...
RX-V383 Owner s Manual
Page 20
... device Video Audio Digital coaxial Composite video Analog stereo Digital optical Input jacks on the unit AV 1 (VIDEO + COAXIAL) AV 2-3 (VIDEO + AUDIO) You need to connect your TV to the unit with an HDMI cable. The unit (rear) AV 1-3 (VIDEO) jacks VIDEO V Video output (composite video) VIDEO V COAXIAL C L L R R Video device C L R ... the HDMI OUT jack of video/audio input jacks (p.21). Note To watch videos input to the HDMI 1-4 jacks, you need to connect your TV to change its combination according to the output jacks of your video device, choose one of the following...
... device Video Audio Digital coaxial Composite video Analog stereo Digital optical Input jacks on the unit AV 1 (VIDEO + COAXIAL) AV 2-3 (VIDEO + AUDIO) You need to connect your TV to the unit with an HDMI cable. The unit (rear) AV 1-3 (VIDEO) jacks VIDEO V Video output (composite video) VIDEO V COAXIAL C L L R R Video device C L R ... the HDMI OUT jack of video/audio input jacks (p.21). Note To watch videos input to the HDMI 1-4 jacks, you need to connect your TV to change its combination according to the output jacks of your video device, choose one of the following...
RX-V383 Owner s Manual
Page 21
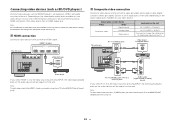
...input jacks If the combination of video/audio input jacks available on the unit does not match your device. BD DVD SLEEP SCENE TV CD RADIO STRAIGHT ENHANCER BASS PROGRAM FM/AM INPUT USB BLUETOOTH VOLUME MUTE SETUP ENTER OPTION RETURN TOP MENU DISPLAY HOME POP-UP/MENU...that has the following video/audio output jacks. LINK MASTER STEREO TUNED ZONE SLEEP PARTY 2 A 3 B OUT 2 Hi-Res ENHANCER YPAO VOL. If you have connected a video device to AV 2 (VIDEO) and AUDIO 1 (OPTICAL) jack of your video device, change its combination according to select "Audio In" and press ...
...input jacks If the combination of video/audio input jacks available on the unit does not match your device. BD DVD SLEEP SCENE TV CD RADIO STRAIGHT ENHANCER BASS PROGRAM FM/AM INPUT USB BLUETOOTH VOLUME MUTE SETUP ENTER OPTION RETURN TOP MENU DISPLAY HOME POP-UP/MENU...that has the following video/audio output jacks. LINK MASTER STEREO TUNED ZONE SLEEP PARTY 2 A 3 B OUT 2 Hi-Res ENHANCER YPAO VOL. If you have connected a video device to AV 2 (VIDEO) and AUDIO 1 (OPTICAL) jack of your video device, change its combination according to select "Audio In" and press ...

RX-V383 Owner s Manual
Page 22
...optical Digital coaxial Analog stereo Audio input jacks on the unit AUDIO 1 (OPTICAL) AUDIO 2 (COAXIAL) AV 1 (COAXIAL) AV 2-3 (AUDIO) The unit (rear) OPTICAL (TV) O COAXIAL C L L R R O OPTICAL C COAXIAL L L R R Audio device AV 1-3 jacks AUDIO 1-2 jacks Audio output (either digital optical, digital coaxial, ... on the front panel to temporarily connect devices such as portable audio players to connect a USB storage device, see "Connecting a USB storage device" (p.44). 22 En Connecting to the unit. Connecting audio devices (such as CD players) Connect audio devices such as CD players...
...optical Digital coaxial Analog stereo Audio input jacks on the unit AUDIO 1 (OPTICAL) AUDIO 2 (COAXIAL) AV 1 (COAXIAL) AV 2-3 (AUDIO) The unit (rear) OPTICAL (TV) O COAXIAL C L L R R O OPTICAL C COAXIAL L L R R Audio device AV 1-3 jacks AUDIO 1-2 jacks Audio output (either digital optical, digital coaxial, ... on the front panel to temporarily connect devices such as portable audio players to connect a USB storage device, see "Connecting a USB storage device" (p.44). 22 En Connecting to the unit. Connecting audio devices (such as CD players) Connect audio devices such as CD players...

RX-V383 Owner s Manual
Page 24
... provided in English only. 5 Use the cursor keys to the unit via HDMI. Note The information on the TV and switch the TV input to display video from the menu, press SETUP. If not, carry out operations while viewing the front display. 3 Press SETUP. 4 Use the cursor keys ... on-screen menu language Select the desired on-screen menu language. 1 Press z (receiver power) to turn on the unit. 2 Turn on the front display is connected to select the desired language. 24 En
... provided in English only. 5 Use the cursor keys to the unit via HDMI. Note The information on the TV and switch the TV input to display video from the menu, press SETUP. If not, carry out operations while viewing the front display. 3 Press SETUP. 4 Use the cursor keys ... on-screen menu language Select the desired on-screen menu language. 1 Press z (receiver power) to turn on the unit. 2 Turn on the front display is connected to select the desired language. 24 En
RX-V383 Owner s Manual
Page 25
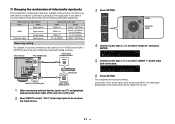
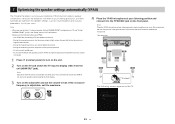
... En 7 Optimizing the speaker settings automatically (YPAO) The Yamaha Parametric room Acoustic Optimizer (YPAO) function detects speaker connections, measures the distances from the unit (HDMI OUT jack). If the crossover frequency is connected to suit your TV is adjustable, set it to the unit. - During... (same height as a microphone stand. Use YPAO after connecting a TV and speakers to the YPAO MIC jack on the TV and switch the TV input to stabilize the microphone. Do not connect headphones. - Note Operations with TV screen are output at your ears). If not, carry...
... En 7 Optimizing the speaker settings automatically (YPAO) The Yamaha Parametric room Acoustic Optimizer (YPAO) function detects speaker connections, measures the distances from the unit (HDMI OUT jack). If the crossover frequency is connected to suit your TV is adjustable, set it to the unit. - During... (same height as a microphone stand. Use YPAO after connecting a TV and speakers to the YPAO MIC jack on the TV and switch the TV input to stabilize the microphone. Do not connect headphones. - Note Operations with TV screen are output at your ears). If not, carry...


