MCXSP10 Manual
Page 19
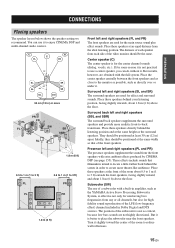
Place these speakers behind the listening position and at the same height as the YAMAHA Active Servo Processing Subwoofer System, is effective not only for reinforcing bass frequencies from each side of the video monitor should be positioned at an ...1 m (1 to enjoy CINEMA DSP and multi-channel audio sources. The position of a subwoofer with a built-in order to reduce wall reflections. 15 En PPRREEPAPARRATAITOIONN CONNECTIONS CONNECTIONS Placing speakers The speaker layout below shows the speaker setting we recommend. The distance of each speaker from any or all channels, but also...
Place these speakers behind the listening position and at the same height as the YAMAHA Active Servo Processing Subwoofer System, is effective not only for reinforcing bass frequencies from each side of the video monitor should be positioned at an ...1 m (1 to enjoy CINEMA DSP and multi-channel audio sources. The position of a subwoofer with a built-in order to reduce wall reflections. 15 En PPRREEPAPARRATAITOIONN CONNECTIONS CONNECTIONS Placing speakers The speaker layout below shows the speaker setting we recommend. The distance of each speaker from any or all channels, but also...

MCXSP10 Manual
Page 20
... cables running side by side. to "6ΩMIN" before using the "PR/SB Priority" parameter in "Bass Out" (see page 130). Subwoofer Surround back speakers Presence speakers Left Right Right Left Center speaker (U.S.A. If the connections are to use the PRESENCE terminals to this type of speaker...). • You can use 6 ohm speakers, be also used as the front speakers (see page 130) Right Left Front speakers You can set to set of speakers using this unit (see page 33). 4 ohm speakers can connect both surround back and presence speakers to connect the Zone 2 or...
... cables running side by side. to "6ΩMIN" before using the "PR/SB Priority" parameter in "Bass Out" (see page 130). Subwoofer Surround back speakers Presence speakers Left Right Right Left Center speaker (U.S.A. If the connections are to use the PRESENCE terminals to this type of speaker...). • You can use 6 ohm speakers, be also used as the front speakers (see page 130) Right Left Front speakers You can set to set of speakers using this unit (see page 33). 4 ohm speakers can connect both surround back and presence speakers to connect the Zone 2 or...

MCXSP10 Manual
Page 31
...back channel signals at SURROUND BACK/PRESENCE PRE OUT jacks. • Set the "Presence" to "Yes" and "Surround Back" to "None" (see page 106) to output the presence channel signals at the SUBWOOFER PRE OUT jack depending on the subwoofer (see page 53). • Some signals may not be output at... SURROUND BACK/PRESENCE PRE OUT jacks. 5 SUBWOOFER PRE OUT jack Connect a subwoofer with the control on the settings for the surround back channel, connect it to the SPEAKERS terminals. • The signals output at the FRONT PRE OUT and CENTER ...
...back channel signals at SURROUND BACK/PRESENCE PRE OUT jacks. • Set the "Presence" to "Yes" and "Surround Back" to "None" (see page 106) to output the presence channel signals at the SUBWOOFER PRE OUT jack depending on the subwoofer (see page 53). • Some signals may not be output at... SURROUND BACK/PRESENCE PRE OUT jacks. 5 SUBWOOFER PRE OUT jack Connect a subwoofer with the control on the settings for the surround back channel, connect it to the SPEAKERS terminals. • The signals output at the FRONT PRE OUT and CENTER ...
MCXSP10 Manual
Page 32
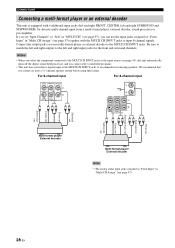
...INPUT R SUB WOOFER LR LR LR Front out Surround out Surround back out Center out Subwoofer out Surround out Front out Center out Subwoofer out Multi-format player/ External decoder Multi-format player/ External decoder Note *1 The analog...CH Assign" (see page 97), you connect at the MULTI CH INPUT jacks to the left and right SURROUND and SUBWOOFER) for missing speakers. We recommend that you can use the input jacks assigned as "Front Input" in "Multi ... at least a 5.1-channel speaker system before using this feature. If you set "Input Channels" to the MULTI CH INPUT jacks.
...INPUT R SUB WOOFER LR LR LR Front out Surround out Surround back out Center out Subwoofer out Surround out Front out Center out Subwoofer out Multi-format player/ External decoder Multi-format player/ External decoder Note *1 The analog...CH Assign" (see page 97), you connect at the MULTI CH INPUT jacks to the left and right SURROUND and SUBWOOFER) for missing speakers. We recommend that you can use the input jacks assigned as "Front Input" in "Multi ... at least a 5.1-channel speaker system before using this feature. If you set "Input Channels" to the MULTI CH INPUT jacks.
MCXSP10 Manual
Page 39
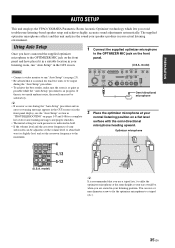
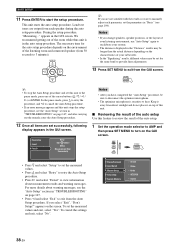
...and the crossover frequency of error and warning messages and proper remedies. • The initial setting for each parameter is too much ambient noise, the results may not be when you are seated in your subwoofer can use a tripod (etc.) to the maximum. AUDIO SELECT TONE REC OUT/ CONTROL ... on pages 147 and 148 for a complete list of your listening position. PPRREEPAPARRATAITOIONN AUTO SETUP AUTO SETUP This unit employs the YPAO (YAMAHA Parametric Room Acoustic Optimizer) technology which lets you have placed it is normal for loud test tones to be output during the "Auto Setup...
...and the crossover frequency of error and warning messages and proper remedies. • The initial setting for each parameter is too much ambient noise, the results may not be when you are seated in your subwoofer can use a tripod (etc.) to the maximum. AUDIO SELECT TONE REC OUT/ CONTROL ... on pages 147 and 148 for a complete list of your listening position. PPRREEPAPARRATAITOIONN AUTO SETUP AUTO SETUP This unit employs the YPAO (YAMAHA Parametric Room Acoustic Optimizer) technology which lets you have placed it is normal for loud test tones to be output during the "Auto Setup...
MCXSP10 Manual
Page 42
... each speaker during the auto setup procedure. appears on the environment of the listening room and connected speaker (from the Auto Setup procedure. To set the measured values. • Press k and select "Retry" to retry the Auto Setup procedure. • Press h and select "Detail"... and warning messages. If you change speakers, speaker positions, or the layout of your listening environment, run "Auto Setup" again to recalibrate your subwoofer. • In the "Equalizing" results, different values may be longer than the actual distance depending on page 147. • Press l and...
... each speaker during the auto setup procedure. appears on the environment of the listening room and connected speaker (from the Auto Setup procedure. To set the measured values. • Press k and select "Retry" to retry the Auto Setup procedure. • Press h and select "Detail"... and warning messages. If you change speakers, speaker positions, or the layout of your listening environment, run "Auto Setup" again to recalibrate your subwoofer. • In the "Equalizing" results, different values may be longer than the actual distance depending on page 147. • Press l and...
MCXSP10 Manual
Page 56
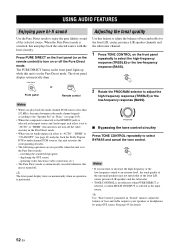
...in "Sound" menu to adjust the balance of the selected source. See page 99 for the front L/R, center, presence L/R speaker channels and the subwoofer channel. 1 Press TONE CONTROL on the remote control) to adjust the balance of the front L/R, center, presence L/R speakers and the...control circuitry Press TONE CONTROL repeatedly to adjust the high-frequency response (TREBLE) or the low-frequency response (BASS). TONE CONTROL Notes • If you set to "AUTO" or "HDMI", this unit is turned off the video circuitry in "Basic" (see page 105). • When the component connected ...
...in "Sound" menu to adjust the balance of the selected source. See page 99 for the front L/R, center, presence L/R speaker channels and the subwoofer channel. 1 Press TONE CONTROL on the remote control) to adjust the balance of the front L/R, center, presence L/R speakers and the...control circuitry Press TONE CONTROL repeatedly to adjust the high-frequency response (TREBLE) or the low-frequency response (BASS). TONE CONTROL Notes • If you set to "AUTO" or "HDMI", this unit is turned off the video circuitry in "Basic" (see page 105). • When the component connected ...

MCXSP10 Manual
Page 57
Set the operation mode to AMP and then press STEREO on the remote control repeatedly to decrease the value. AMP SOURCE TV STEREO 5 2ch Stereo Display Adjusted speaker FRONT L Front left speaker SUR. L Surround left speaker SWFR Subwoofer PRNS L Presence left speaker PRNS R Presence right speaker y • Once ... LEVEL on the front panel. • You can mix down multi-channel sources to adjust. y • You can use a subwoofer with this program when "Bass Out" is set to "SWFR" or "Both" (see page 107). • You can also select the "2ch Stereo" mode by rotating the ...
Set the operation mode to AMP and then press STEREO on the remote control repeatedly to decrease the value. AMP SOURCE TV STEREO 5 2ch Stereo Display Adjusted speaker FRONT L Front left speaker SUR. L Surround left speaker SWFR Subwoofer PRNS L Presence left speaker PRNS R Presence right speaker y • Once ... LEVEL on the front panel. • You can mix down multi-channel sources to adjust. y • You can use a subwoofer with this program when "Bass Out" is set to "SWFR" or "Both" (see page 107). • You can also select the "2ch Stereo" mode by rotating the ...

MCXSP10 Manual
Page 96
...sound when playing 2-channel analog sources. Bypasses the decoders and DSP processors of the front and center channel sound. "Bass Out" is set to "Both" (see page 107). - Level Features Reverberation level. Choices: 0, 1, 2, 3, 4, 5 ■ Stereo program parameter... descriptions Sound field parameter 2ch Stereo Direct 7ch Stereo Center Level Surround L Level Surround R Level Sur. Control range: 0 to the subwoofer in the 7-channel stereo mode. Choices: Auto, Off y • Select "Auto" to bypass the decoders, DSP processors and the tone control ...
...sound when playing 2-channel analog sources. Bypasses the decoders and DSP processors of the front and center channel sound. "Bass Out" is set to "Both" (see page 107). - Level Features Reverberation level. Choices: 0, 1, 2, 3, 4, 5 ■ Stereo program parameter... descriptions Sound field parameter 2ch Stereo Direct 7ch Stereo Center Level Surround L Level Surround R Level Sur. Control range: 0 to the subwoofer in the 7-channel stereo mode. Choices: Auto, Off y • Select "Auto" to bypass the decoders, DSP processors and the tone control ...
MCXSP10 Manual
Page 101
...the background. Choices: 6ch, 8ch GRAPHIC USER INTERFACE (GUI) SCREEN Manual Setup (Sound) Use this menu to adjust the sound parameters. 1 Set the operation mode selector to access and adjust. PRESET/CH PRESET/CH ENTER A/B/C/D/E ENTER A/B/C/D/E Sound Video Basic LFE Level Dynamic Range Parametric EQ... CD-R, MD/TAPE ■ BGV (Back ground video) Use this feature to select the number of the signals input into the center, subwoofer and surround channels when a source component is used to select the video source played in Input Channels, you input 8-channel signals from an ...
...the background. Choices: 6ch, 8ch GRAPHIC USER INTERFACE (GUI) SCREEN Manual Setup (Sound) Use this menu to adjust the sound parameters. 1 Set the operation mode selector to access and adjust. PRESET/CH PRESET/CH ENTER A/B/C/D/E ENTER A/B/C/D/E Sound Video Basic LFE Level Dynamic Range Parametric EQ... CD-R, MD/TAPE ■ BGV (Back ground video) Use this feature to select the number of the signals input into the center, subwoofer and surround channels when a source component is used to select the video source played in Input Channels, you input 8-channel signals from an ...

MCXSP10 Manual
Page 102
... compression to be output at low volume levels. 2 Press h to adjust the speaker LFE level. This setting is effective only when the unit is effective only when this feature to select the amount of the subwoofer. Test Tone Front L Front R Center PARAM RESET EDIT EXIT Band / Gain 3 Press k / n / l / h ...or the speaker you want to adjust. • Select "Test Tone" to choose whether turns on the settings of "LFE Level", some signals may not be applied to your subwoofer or headphones. Note Depending on or off the test tone output when adjusting the tonal quality of each speaker...
... compression to be output at low volume levels. 2 Press h to adjust the speaker LFE level. This setting is effective only when the unit is effective only when this feature to select the amount of the subwoofer. Test Tone Front L Front R Center PARAM RESET EDIT EXIT Band / Gain 3 Press k / n / l / h ...or the speaker you want to adjust. • Select "Test Tone" to choose whether turns on the settings of "LFE Level", some signals may not be applied to your subwoofer or headphones. Note Depending on or off the test tone output when adjusting the tonal quality of each speaker...

MCXSP10 Manual
Page 103
...98. 5 Repeat steps 3 and 4 until you want to reset all "Parametric EQ" parameter settings for "Speaker" affects the front left/right, center, presence left/right speaker channels and Subwoofer channel. Control Bass Treble Speakers Headphones • Select "Speakers" to adjust the bass/treble ...Press n to select "EDIT" and press ENTER to +6.0 dB Initial setting: 0.0 dB Control Bass Treble Auto Bypass Speaker Freq : 3.5kHz Gain : 0.0dB +6 +0 -6 ADVANCED OPERATION 99 En y • When you select "Band" in step 3, you select "Subwoofer" in step 1 and "Band" in "PARAM" is not effective ...
...98. 5 Repeat steps 3 and 4 until you want to reset all "Parametric EQ" parameter settings for "Speaker" affects the front left/right, center, presence left/right speaker channels and Subwoofer channel. Control Bass Treble Speakers Headphones • Select "Speakers" to adjust the bass/treble ...Press n to select "EDIT" and press ENTER to +6.0 dB Initial setting: 0.0 dB Control Bass Treble Auto Bypass Speaker Freq : 3.5kHz Gain : 0.0dB +6 +0 -6 ADVANCED OPERATION 99 En y • When you select "Band" in step 3, you select "Subwoofer" in step 1 and "Band" in "PARAM" is not effective ...

MCXSP10 Manual
Page 105
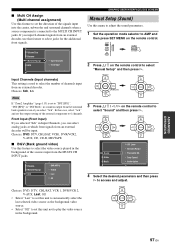
... to mute the audio output from the surround back right speaker. • "Presence L" sets whether to mute the audio output from the presence left speaker. • "Presence R" sets whether to mute the audio output from the presence right speaker. • "Subwoofer" sets whether to select "Manual Setup" and then press h. Choices: Off, On Manual...
... to mute the audio output from the surround back right speaker. • "Presence L" sets whether to mute the audio output from the presence left speaker. • "Presence R" sets whether to mute the audio output from the presence right speaker. • "Subwoofer" sets whether to select "Manual Setup" and then press h. Choices: Off, On Manual...

MCXSP10 Manual
Page 111
...signals are directed to the front left and right speakers regardless of the "Front" setting (see pages 105 and 106). The LFE signals as well as the low-frequency signals of your subwoofer if bass sounds are directed to "Small" are input. The low-frequency signals of... the front left and right channels are detected in "Speaker Set" (see page 107). • Select "SWFR" (subwoofer) if you connected a subwoofer. PR/SB Priority (Presence/surround back speaker priority) Use this feature to "Large" in "Speaker Set" (see page 107). Choices: Normal, Reverse Surround Back Presence ...
...signals are directed to the front left and right speakers regardless of the "Front" setting (see pages 105 and 106). The LFE signals as well as the low-frequency signals of your subwoofer if bass sounds are directed to "Small" are input. The low-frequency signals of... the front left and right channels are detected in "Speaker Set" (see page 107). • Select "SWFR" (subwoofer) if you connected a subwoofer. PR/SB Priority (Presence/surround back speaker priority) Use this feature to "Large" in "Speaker Set" (see page 107). Choices: Normal, Reverse Surround Back Presence ...
MCXSP10 Manual
Page 112
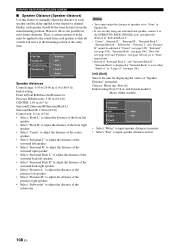
... Front L Front R Center Speaker distances Control range: 0.30 to 24.00 m (1.0 to 80.0 ft) Initial setting: Front L/Front R/Subwoofer/Presence L/ Presence R/Subwoofer: 3.00 m (10.0 ft) CENTER: 2.60 m (8.5 ft) Surround L/Surround R/Surround Back L/ Surround Back R: 2.40 m (8.0 ft) Control step: 0.1 m (0.5 ft) &#...left speaker. • Select "Presence R" to adjust the distance of the presence right speaker. • Select "Subwoofer" to either "Small x1" or "Large x1" (see page 106) are set to "None" respectively. • Instead of "Surround Back L" and "Surround Back R", "Surround Back" is ...
... Front L Front R Center Speaker distances Control range: 0.30 to 24.00 m (1.0 to 80.0 ft) Initial setting: Front L/Front R/Subwoofer/Presence L/ Presence R/Subwoofer: 3.00 m (10.0 ft) CENTER: 2.60 m (8.5 ft) Surround L/Surround R/Surround Back L/ Surround Back R: 2.40 m (8.0 ft) Control step: 0.1 m (0.5 ft) &#...left speaker. • Select "Presence R" to adjust the distance of the presence right speaker. • Select "Subwoofer" to either "Small x1" or "Large x1" (see page 106) are set to "None" respectively. • Instead of "Surround Back L" and "Surround Back R", "Surround Back" is ...

MCXSP10 Manual
Page 113
... "None" in "Surround Back L". ■ Network (Network settings) Use this parameter is an example. ADVANCED OPERATION 109 En Speaker Set Speaker Distance Speaker Level Presence R Subwoofer Front L Front R Center Video Basic NET/USB Option Network Play Style Information Control range: -10.0 dB to +10.0 dB Initial setting: Front L/Front R/Subwoofer/Presence L/ Presence R/Subwoofer: 0.0 dB CENTER/Surround L/Surround R/Surround Back...
... "None" in "Surround Back L". ■ Network (Network settings) Use this parameter is an example. ADVANCED OPERATION 109 En Speaker Set Speaker Distance Speaker Level Presence R Subwoofer Front L Front R Center Video Basic NET/USB Option Network Play Style Information Control range: -10.0 dB to +10.0 dB Initial setting: Front L/Front R/Subwoofer/Presence L/ Presence R/Subwoofer: 0.0 dB CENTER/Surround L/Surround R/Surround Back...

MCXSP10 Manual
Page 144
... Problem No picture. Short message displays do not appear in "Speaker Set" is being played back. Sound is muted. No sound is heard from the speaker on . No sound is heard from the subwoofer. No sound is set to this unit, and play the source again. Cause Remedy The output... and input for Try another sound field program. Set "Conversion" to "On" or connect your source components in "Speaker Set" is set to "Front" when a Dolby Digital or...
... Problem No picture. Short message displays do not appear in "Speaker Set" is being played back. Sound is muted. No sound is heard from the speaker on . No sound is heard from the subwoofer. No sound is set to this unit, and play the source again. Cause Remedy The output... and input for Try another sound field program. Set "Conversion" to "On" or connect your source components in "Speaker Set" is set to "Front" when a Dolby Digital or...

MCXSP10 Manual
Page 152
... not. Check the front L/R speaker connections. Check the presence speaker connections. Check the microphone setting. due to the listening position. Run "Auto Setup" again. Check the speaker connections for... of "Auto Setup" is not detected. The result of the wiring check of the subwoofer. Check the speaker connections. The "Auto Setup" procedure was unplugged during the "Auto ...signals are made. • If error "E10" occurs repeatedly, please contact a qualified YAMAHA service center. The optimizer microphone does not detect test tones. SP E03:No PRNS ...
... not. Check the front L/R speaker connections. Check the presence speaker connections. Check the microphone setting. due to the listening position. Run "Auto Setup" again. Check the speaker connections for... of "Auto Setup" is not detected. The result of the wiring check of the subwoofer. Check the speaker connections. The "Auto Setup" procedure was unplugged during the "Auto ...signals are made. • If error "E10" occurs repeatedly, please contact a qualified YAMAHA service center. The optimizer microphone does not detect test tones. SP E03:No PRNS ...
MCXSP10 Manual
Page 155
... refers to a 96 kHz sampling rate compared to 24-bit word length. Providing an interface between any source (such as a set-top box or AV receiver) and an audio/video monitor (such as a digital television), HDMI supports standard, enhanced or high-definition video as well as Super... Dolby Surround uses a 4-channel analog recording system to reproduce realistic and dynamic sound effects: 2 front left and right, and LFE 0.1 (subwoofer) channels for music programs and motion picture soundtracks on DVD video. ■ DTS (Digital Theater Systems) Digital Surround DTS digital surround was ...
... refers to a 96 kHz sampling rate compared to 24-bit word length. Providing an interface between any source (such as a set-top box or AV receiver) and an audio/video monitor (such as a digital television), HDMI supports standard, enhanced or high-definition video as well as Super... Dolby Surround uses a 4-channel analog recording system to reproduce realistic and dynamic sound effects: 2 front left and right, and LFE 0.1 (subwoofer) channels for music programs and motion picture soundtracks on DVD video. ■ DTS (Digital Theater Systems) Digital Surround DTS digital surround was ...


