
MCXSP10 Manual
Page 6
... ...... 72 Displaying the XM Satellite Radio information...... 73 USING iPod 75 Controlling iPod 75 USING NETWORK/USB FEATURES 77 Navigating the network and USB menus 77 Using a PC server or YAMAHA MCX-2000 ......... 79 Using the Internet Radio 80 Using a USB memory device or a USB... GRAPHIC USER INTERFACE (GUI) SCREEN 87 Stereo/Surround (Stereo/Surround menu 88 Input Select 94 Manual Setup (Sound 97 Manual Setup (Video 101 Manual Setup (Basic 104 Manual Setup (NET/USB 109 Manual Setup (Option 111 System Memory 115 Signal Info. (Input signal information 116 Language 117 2 En
... ...... 72 Displaying the XM Satellite Radio information...... 73 USING iPod 75 Controlling iPod 75 USING NETWORK/USB FEATURES 77 Navigating the network and USB menus 77 Using a PC server or YAMAHA MCX-2000 ......... 79 Using the Internet Radio 80 Using a USB memory device or a USB... GRAPHIC USER INTERFACE (GUI) SCREEN 87 Stereo/Surround (Stereo/Surround menu 88 Input Select 94 Manual Setup (Sound 97 Manual Setup (Video 101 Manual Setup (Basic 104 Manual Setup (NET/USB 109 Manual Setup (Option 111 System Memory 115 Signal Info. (Input signal information 116 Language 117 2 En
MCXSP10 Manual
Page 7
... features 124 Clearing configurations 127 USING MULTI-ZONE CONFIGURATION .. 130 Connecting the Zone 2 and Zone 3 components ... 130 Controlling Zone 2 or Zone 3 131 ADVANCED SETUP 134 Using ADVANCED SETUP 134 Setting remote control ID 137 ADDITIONAL INFORMATION TROUBLESHOOTING 139 RESETTING THE SYSTEM 149 GLOSSARY 150 SOUND FIELD PROGRAM INFORMATION 153 PARAMETRIC EQUALIZER INFORMATION...
... features 124 Clearing configurations 127 USING MULTI-ZONE CONFIGURATION .. 130 Connecting the Zone 2 and Zone 3 components ... 130 Controlling Zone 2 or Zone 3 131 ADVANCED SETUP 134 Using ADVANCED SETUP 134 Setting remote control ID 137 ADDITIONAL INFORMATION TROUBLESHOOTING 139 RESETTING THE SYSTEM 149 GLOSSARY 150 SOUND FIELD PROGRAM INFORMATION 153 PARAMETRIC EQUALIZER INFORMATION...
MCXSP10 Manual
Page 8
...which supports iPod (Click and Wheel), iPod nano, and iPod mini Network features ◆ NETWORK port to connect a PC and YAMAHA MCX-2000 or access the Internet Radio via a LAN ◆ DHCP automatic or manual network configuration USB features ◆ USB port to connect a USB memory device... or a USB portable audio player Other features ◆ YPAO (YAMAHA Parametric Room Acoustic Optimizer) for automatic speaker setup ◆ 192-kHz/24-bit D/A converter ◆...
...which supports iPod (Click and Wheel), iPod nano, and iPod mini Network features ◆ NETWORK port to connect a PC and YAMAHA MCX-2000 or access the Internet Radio via a LAN ◆ DHCP automatic or manual network configuration USB features ◆ USB port to connect a USB memory device... or a USB portable audio player Other features ◆ YPAO (YAMAHA Parametric Room Acoustic Optimizer) for automatic speaker setup ◆ 192-kHz/24-bit D/A converter ◆...
MCXSP10 Manual
Page 11
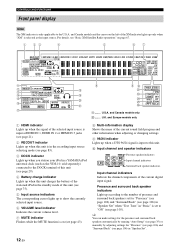
...only or sets it to the ON position. While the indicator is pressed inward to the standby mode (see page 35). A Remote control sensor Receives signals from a portable external source such as the input source. F PHONES jack Outputs audio signals for approximately 5 seconds. To open the door... CONTROLS AND FUNCTIONS D PROGRAM selector • Selects sound field programs (see page 46). • Adjusts the bass/treble balance in the "Auto Setup" procedure (see page 131). Keep the door closed when not using these jacks, select "V-AUX" as a game console or a video camera (see ...
...only or sets it to the ON position. While the indicator is pressed inward to the standby mode (see page 35). A Remote control sensor Receives signals from a portable external source such as the input source. F PHONES jack Outputs audio signals for approximately 5 seconds. To open the door... CONTROLS AND FUNCTIONS D PROGRAM selector • Selects sound field programs (see page 46). • Adjusts the bass/treble balance in the "Auto Setup" procedure (see page 131). Keep the door closed when not using these jacks, select "V-AUX" as a game console or a video camera (see ...
MCXSP10 Manual
Page 16
... 96/24 signal is in the recording input source selecting mode (see page 83). 3 DOCK indicator Lights up when you station your iPod in a YAMAHA iPod universal dock (such as the input source. U.K. y You can make settings for the presence and surround back speakers automatically by running "Auto... Setup" (see page 35) or manually by adjusting settings for "Presence" (see page 106) and "Surround Back" (see page 106) in "Speaker Set" when "Test...
... 96/24 signal is in the recording input source selecting mode (see page 83). 3 DOCK indicator Lights up when you station your iPod in a YAMAHA iPod universal dock (such as the input source. U.K. y You can make settings for the presence and surround back speakers automatically by running "Auto... Setup" (see page 35) or manually by adjusting settings for "Presence" (see page 106) and "Surround Back" (see page 106) in "Speaker Set" when "Test...

MCXSP10 Manual
Page 17
...speaker settings set in the PTY SEEK mode. 13 En K DTS decoder indicators The respective indicator lights up when this unit is being received. STEREO indicator Lights up when the EON data service is reproducing DSD (Direct Stream Digital), PCM (Pulse Code Modulation), WMA (Windows ...Data System display mode. P Radio Data System indicators (U.K. E ENHANCER indicator Lights up when this unit is receiving a strong signal for the Radio Data System stations in "Auto Setup" are used without any of this unit function. L Tuner indicators Lights up when the Compressed Music Enhancer ...
...speaker settings set in the PTY SEEK mode. 13 En K DTS decoder indicators The respective indicator lights up when this unit is being received. STEREO indicator Lights up when the EON data service is reproducing DSD (Direct Stream Digital), PCM (Pulse Code Modulation), WMA (Windows ...Data System display mode. P Radio Data System indicators (U.K. E ENHANCER indicator Lights up when this unit is receiving a strong signal for the Radio Data System stations in "Auto Setup" are used without any of this unit function. L Tuner indicators Lights up when the Compressed Music Enhancer ...

MCXSP10 Manual
Page 23
... Front speakers Shorting bars or bridges Shorting bars or bridges Right Left Front speakers Note Remove the shorting bars or bridges to "ON" in "ADVANCED SETUP" (see page 136).
... Front speakers Shorting bars or bridges Shorting bars or bridges Right Left Front speakers Note Remove the shorting bars or bridges to "ON" in "ADVANCED SETUP" (see page 136).

MCXSP10 Manual
Page 37
... and then press MASTER ON/OFF inward to the ON position to "6ΩMIN" as the front speakers. (U.S.A. This unit turns on, and the advanced setup menu appears in the front panel display. STRAIGHT EFFECT MAIN ZONE ON/OFF ON OFF MASTER INPUT AUDIO SELECT TONE REC OUT/ CONTROL ZONE2 A/B/C/D/E PRESET...
... and then press MASTER ON/OFF inward to the ON position to "6ΩMIN" as the front speakers. (U.S.A. This unit turns on, and the advanced setup menu appears in the front panel display. STRAIGHT EFFECT MAIN ZONE ON/OFF ON OFF MASTER INPUT AUDIO SELECT TONE REC OUT/ CONTROL ZONE2 A/B/C/D/E PRESET...
MCXSP10 Manual
Page 39
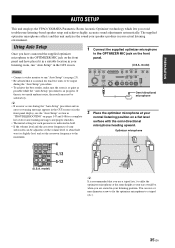
...your actual listening environment. You can be satisfactory. Optimizer microphone ++ TV VOL CH -- + VOLUME - PPRREEPAPARRATAITOIONN AUTO SETUP AUTO SETUP This unit employs the YPAO (YAMAHA Parametric Room Acoustic Optimizer) technology which lets you are seated in your listening position. y • If an error ...occurs during the "Auto Setup" procedure. • To achieve the best results, make sure the room is in your normal...
...your actual listening environment. You can be satisfactory. Optimizer microphone ++ TV VOL CH -- + VOLUME - PPRREEPAPARRATAITOIONN AUTO SETUP AUTO SETUP This unit employs the YPAO (YAMAHA Parametric Room Acoustic Optimizer) technology which lets you are seated in your listening position. y • If an error ...occurs during the "Auto Setup" procedure. • To achieve the best results, make sure the room is in your normal...
MCXSP10 Manual
Page 40
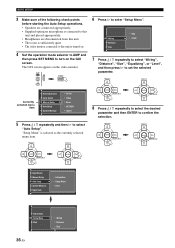
.../USB Option 5 Press k / n repeatedly and then h to set the selected parameter. The GUI screen appears on the GUI screen. "Setup Menu" is turned on. 6 Press h to enter "Setup Menu". AMP SOURCE TV SET MENU MENU SRCH MODE 7 Press k / n repeatedly to select "Wiring", "Distance", "Size", "Equalizing", ...or "Level", and then press h to select "Auto Setup". Wiring Distance Size Skip Check 4 Set the operation mode selector to AMP and then press SET MENU to turn on the video monitor. PRESET/CH ...
.../USB Option 5 Press k / n repeatedly and then h to set the selected parameter. The GUI screen appears on the GUI screen. "Setup Menu" is turned on. 6 Press h to enter "Setup Menu". AMP SOURCE TV SET MENU MENU SRCH MODE 7 Press k / n repeatedly to select "Wiring", "Distance", "Size", "Equalizing", ...or "Level", and then press h to select "Auto Setup". Wiring Distance Size Skip Check 4 Set the operation mode selector to AMP and then press SET MENU to turn on the video monitor. PRESET/CH ...

MCXSP10 Manual
Page 41
... frequency response of all of much higher quality than your front speakers. Recommended if your front speakers are of your front speakers. Information Setup Menu Start Start: ENTER Choices: Check, Skip • Select "Check" to automatically check and adjust the item. • Select ... Skip Check Wiring Distance Size Equalizing Level Skip Check Distance Size Equalizing Level Skip Check: Natural Check: Flat Check: Front AUTO SETUP Equalizing (Parametric equalizer level) Adjusts the frequency and the parametric equalizer level of each speaker from your other speakers. • ...
... frequency response of all of much higher quality than your front speakers. Recommended if your front speakers are of your front speakers. Information Setup Menu Start Start: ENTER Choices: Check, Skip • Select "Check" to automatically check and adjust the item. • Select ... Skip Check Wiring Distance Size Equalizing Level Skip Check Distance Size Equalizing Level Skip Check: Natural Check: Flat Check: Front AUTO SETUP Equalizing (Parametric equalizer level) Adjusts the frequency and the parametric equalizer level of each speaker from your other speakers. • ...
MCXSP10 Manual
Page 42
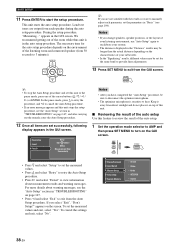
... select "Exit" to view information about warning messages, see page 104). AMP SOURCE TV SET MENU MENU SRCH MODE • Press n and select "Setup" to set this feature to review the result of the cursor buttons (k / n / l / h) or ENTER. For more details about measurement results... and warning messages. To set for the auto setup procedure depends on the environment of the listening room and connected speaker (from each parameter, set successfully, following display appears in the "Distance" results...
... select "Exit" to view information about warning messages, see page 104). AMP SOURCE TV SET MENU MENU SRCH MODE • Press n and select "Setup" to set this feature to review the result of the cursor buttons (k / n / l / h) or ENTER. For more details about measurement results... and warning messages. To set for the auto setup procedure depends on the environment of the listening room and connected speaker (from each parameter, set successfully, following display appears in the "Distance" results...

MCXSP10 Manual
Page 43
... the speaker distance from the listening position. The bass cross over frequency ("Cross") appears at the bottom of each connected speaker. Information Setup Menu Start Wiring Distance Size 4 Press h and then n repeatedly to reproduce the low-frequency signals effectively. Note "---" appears when no... speaker is connected to select "Auto Setup". NRM NRM S.Back NRM NRM PRNS NRM NRM SubWfr NRM Reload:ENTER AUTO SETUP Wiring (Speaker wiring) Displays the polarity of the menu area. • "LRG" appears when...
... the speaker distance from the listening position. The bass cross over frequency ("Cross") appears at the bottom of each connected speaker. Information Setup Menu Start Wiring Distance Size 4 Press h and then n repeatedly to reproduce the low-frequency signals effectively. Note "---" appears when no... speaker is connected to select "Auto Setup". NRM NRM S.Back NRM NRM PRNS NRM NRM SubWfr NRM Reload:ENTER AUTO SETUP Wiring (Speaker wiring) Displays the polarity of the menu area. • "LRG" appears when...

MCXSP10 Manual
Page 48
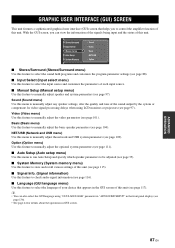
... 87). ■ Items in GUI screen Currently selected input source Currently selected menu item Currently selected decoder DVD Pro Logic Stereo/Surround Input Select Manual Setup Auto Setup System Memory Sound Video Basic NET/USB Option Sci-Fi Currently selected sound field program Menu area Manual... Setup -40.0dB Current menu directory Volume level (see page 41) y • Set the operation mode selector to AMP when you operate this unit by using ...
... 87). ■ Items in GUI screen Currently selected input source Currently selected menu item Currently selected decoder DVD Pro Logic Stereo/Surround Input Select Manual Setup Auto Setup System Memory Sound Video Basic NET/USB Option Sci-Fi Currently selected sound field program Menu area Manual... Setup -40.0dB Current menu directory Volume level (see page 41) y • Set the operation mode selector to AMP when you operate this unit by using ...

MCXSP10 Manual
Page 57
...). See page 88 for details. 2 Press l / h on the remote control, you want to adjust. Note This operation will override the level adjustments made in "Auto Setup" (see page 35) and "Speaker Level" (see page 107). • You can also select the "2ch Stereo" mode by rotating the PROGRAM selector on the...
...). See page 88 for details. 2 Press l / h on the remote control, you want to adjust. Note This operation will override the level adjustments made in "Auto Setup" (see page 35) and "Speaker Level" (see page 107). • You can also select the "2ch Stereo" mode by rotating the PROGRAM selector on the...

MCXSP10 Manual
Page 78
... Satellite Radio information screens for future reference. You can save up to display the XM Satellite Radio information in the front panel display in "Manual Setup" (see page 112). • If the XM Satellite Radio information contains a character that cannot be displayed with a space. XM Information All CH Search CH NUMBER...
... Satellite Radio information screens for future reference. You can save up to display the XM Satellite Radio information in the front panel display in "Manual Setup" (see page 112). • If the XM Satellite Radio information contains a character that cannot be displayed with a space. XM Information All CH Search CH NUMBER...
MCXSP10 Manual
Page 79
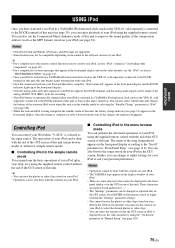
...8226; Once the connection between the "Settings" parameter settings. • You cannot browse the photos or video clips stored on your iPod is stationed in a YAMAHA iPod universal dock (such as the YDS-10, sold separately) connected to the DOCK terminal of your iPod are some characters that appear in the... charges the battery of the stationed iPod or not when this unit is in the standby mode by using the "On Screen" parameter in "Manual Setup" (see page 54). Notes • Operations cannot be also done with the controls on your iPod. ■ Controlling iPod in the GUI screen....
...8226; Once the connection between the "Settings" parameter settings. • You cannot browse the photos or video clips stored on your iPod is stationed in a YAMAHA iPod universal dock (such as the YDS-10, sold separately) connected to the DOCK terminal of your iPod are some characters that appear in the... charges the battery of the stationed iPod or not when this unit is in the standby mode by using the "On Screen" parameter in "Manual Setup" (see page 54). Notes • Operations cannot be also done with the controls on your iPod. ■ Controlling iPod in the GUI screen....

MCXSP10 Manual
Page 84
...can use the "Manual Config" mode of your YAMAHA MCX-2000 (refer to the instruction manual of MCX-2000) and then set "N-RESET" in the advanced setup menu of this unit to Internet Radio stations. ... 5 digits of the MAC address of this unit, providing over this unit other than "View Play Info", "Receive PCM Stream" and "Edit Client title" are selected in the NET RADIO menu. • To listen to ...77). The Podcast is added to the server list on your ISP. USING NETWORK/USB FEATURES ■ Registering this unit on the YAMAHA MCX-2000 You must register this unit on the submenu of PC/MCX. ...
...can use the "Manual Config" mode of your YAMAHA MCX-2000 (refer to the instruction manual of MCX-2000) and then set "N-RESET" in the advanced setup menu of this unit to Internet Radio stations. ... 5 digits of the MAC address of this unit, providing over this unit other than "View Play Info", "Receive PCM Stream" and "Edit Client title" are selected in the NET RADIO menu. • To listen to ...77). The Podcast is added to the server list on your ISP. USING NETWORK/USB FEATURES ■ Registering this unit on the YAMAHA MCX-2000 You must register this unit on the submenu of PC/MCX. ...
MCXSP10 Manual
Page 91
... interface (GUI) screen that appears in the GUI screen of this feature to manually adjust the video parameters (see page 101). NET/USB (Network and USB menu) Use this feature to manually adjust speaker and system parameters (see page 136). • See page 44 for details about... Setup Auto Setup System Memory Sound Video Basic NET/USB Option ■ Stereo/Surround (Stereo/Surround menu) Use this feature to select the sound field programs and customize the program parameter settings (see page 88). ■ Input Select (Input select menu) Use this feature to manually adjust the network ...
... interface (GUI) screen that appears in the GUI screen of this feature to manually adjust the video parameters (see page 101). NET/USB (Network and USB menu) Use this feature to manually adjust speaker and system parameters (see page 136). • See page 44 for details about... Setup Auto Setup System Memory Sound Video Basic NET/USB Option ■ Stereo/Surround (Stereo/Surround menu) Use this feature to select the sound field programs and customize the program parameter settings (see page 88). ■ Input Select (Input select menu) Use this feature to manually adjust the network ...

MCXSP10 Manual
Page 92
.../CH PRESET/CH ENTER or A/B/C/D/E ENTER A/B/C/D/E ENTER A/B/C/D/E ENTER A/B/C/D/E 88 En PRESET/CH PRESET/CH ENTER A/B/C/D/E ENTER A/B/C/D/E Input Assign Support Audio Stereo/Surround Input Select Manual Setup Dimmer CLASSICAL LIVE/CLUB ENTERTAINMENT 7 Press ENTER or k / n to confirm the setting of the selected sound field program to the default values. GRAPHIC USER INTERFACE...
.../CH PRESET/CH ENTER or A/B/C/D/E ENTER A/B/C/D/E ENTER A/B/C/D/E ENTER A/B/C/D/E 88 En PRESET/CH PRESET/CH ENTER A/B/C/D/E ENTER A/B/C/D/E Input Assign Support Audio Stereo/Surround Input Select Manual Setup Dimmer CLASSICAL LIVE/CLUB ENTERTAINMENT 7 Press ENTER or k / n to confirm the setting of the selected sound field program to the default values. GRAPHIC USER INTERFACE...

