MCXSP10 Manual
Page 17
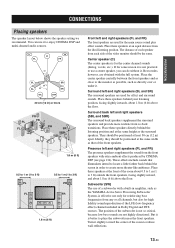
... as the surround speakers. Ideally, they should be positioned at the same width as directly over or under it to place the subwoofer near the front speakers. Place these speakers behind the screen in ) apart. PREPARATION CONNECTIONS CONNECTIONS Placing speakers The speaker layout below ... for reinforcing bass frequencies from the ideal listening position. Place the center speaker centrally between the front speakers and as the YAMAHA Active Servo Processing Subwoofer System, is for the main source sound plus effect sounds. The position of the room to the monitor as possible,...
... as the surround speakers. Ideally, they should be positioned at the same width as directly over or under it to place the subwoofer near the front speakers. Place these speakers behind the screen in ) apart. PREPARATION CONNECTIONS CONNECTIONS Placing speakers The speaker layout below ... for reinforcing bass frequencies from the ideal listening position. Place the center speaker centrally between the front speakers and as the YAMAHA Active Servo Processing Subwoofer System, is for the main source sound plus effect sounds. The position of the room to the monitor as possible,...

MCXSP10 Manual
Page 18
...; Use magnetically shielded speakers. Connect the plain cable to the "-" (black) terminals. • The low-frequency signals of other or do not output sound simultaneously. Subwoofer Surround back speakers Presence speakers Left Right Right Left Center speaker (U.S.A. Cables are colored or shaped differently, perhaps with the monitor, place the speakers away...
...; Use magnetically shielded speakers. Connect the plain cable to the "-" (black) terminals. • The low-frequency signals of other or do not output sound simultaneously. Subwoofer Surround back speakers Presence speakers Left Right Right Left Center speaker (U.S.A. Cables are colored or shaped differently, perhaps with the monitor, place the speakers away...

MCXSP10 Manual
Page 19
... wrench. 15 En CONNECTIONS ■ Connecting the speaker cable 1 Remove approximately 10 mm (0.4 in amplifier (such as the YAMAHA Active Servo Processing Subwoofer System) to secure the wire using the supplied speaker terminal wrench. PREPARATION FRONT terminals Connect front left and right speakers to ... positive (+) Black: negative (-) 3 Insert one bare wire into the hole on the side of the cable together to these terminals. SUBWOOFER jack Connect a subwoofer with a built-in ) of insulation from the end of each speaker cable and then twist the exposed wires of each terminal. 4 ...
... wrench. 15 En CONNECTIONS ■ Connecting the speaker cable 1 Remove approximately 10 mm (0.4 in amplifier (such as the YAMAHA Active Servo Processing Subwoofer System) to secure the wire using the supplied speaker terminal wrench. PREPARATION FRONT terminals Connect front left and right speakers to ... positive (+) Black: negative (-) 3 Insert one bare wire into the hole on the side of the cable together to these terminals. SUBWOOFER jack Connect a subwoofer with a built-in ) of insulation from the end of each speaker cable and then twist the exposed wires of each terminal. 4 ...

MCXSP10 Manual
Page 29
... the same channel signals as the corresponding SPEAKERS terminals. • Adjust the volume level of the subwoofer with the control on the subwoofer (see page 51). • Some signals may not be output at the SUBWOOFER PRE OUT jack depending on the settings for any home use another amplifier, connect an external amplifier... jacks. • Set the "PRESENCE SP" to "YES" and "SB L/R SP" to output the surround back channel signals at SURROUND BACK/PRESENCE PRE OUT jacks. 5 SUBWOOFER PRE OUT jack Connect a subwoofer with a built-in amplifier.
... the same channel signals as the corresponding SPEAKERS terminals. • Adjust the volume level of the subwoofer with the control on the subwoofer (see page 51). • Some signals may not be output at the SUBWOOFER PRE OUT jack depending on the settings for any home use another amplifier, connect an external amplifier... jacks. • Set the "PRESENCE SP" to "YES" and "SB L/R SP" to output the surround back channel signals at SURROUND BACK/PRESENCE PRE OUT jacks. 5 SUBWOOFER PRE OUT jack Connect a subwoofer with a built-in amplifier.
MCXSP10 Manual
Page 30
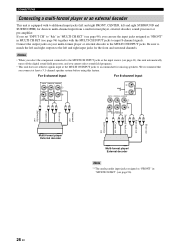
..., left and right input jacks for missing speakers. Be sure to match the left and right outputs to the left and right SURROUND and SUBWOOFER) for discrete multi-channel input from a multi-format player, external decoder, sound processor or pre-amplifier. Connect the output jacks on your multi... SUB WOOFER SB(8CH) MULTI CH INPUT R SUB LR LR LR Front out Surround out Surround back out Center out Subwoofer out Surround out Front out Center out Subwoofer out Multi-format player/ External decoder Multi-format player/ External decoder Note *1 The analog audio input jacks assigned as the...
..., left and right input jacks for missing speakers. Be sure to match the left and right outputs to the left and right SURROUND and SUBWOOFER) for discrete multi-channel input from a multi-format player, external decoder, sound processor or pre-amplifier. Connect the output jacks on your multi... SUB WOOFER SB(8CH) MULTI CH INPUT R SUB LR LR LR Front out Surround out Surround back out Center out Subwoofer out Surround out Front out Center out Subwoofer out Multi-format player/ External decoder Multi-format player/ External decoder Note *1 The analog audio input jacks assigned as the...

MCXSP10 Manual
Page 36
...A-E/CAT. RETURN XM MEMORY ENTER AUDIO PARAMETER STRAIGHT DISPLAY EFFECT (U.S.A. You can be when you have placed it is normal for a complete list of your subwoofer can use a tripod (etc.) to a tripod (etc.). 32 En Optimizer microphone ++ TV VOL CH -- + VOLUME - model) 4 4,14 3-13...possible while the "AUTO SETUP" procedure is in your actual listening environment. AUTO SETUP AUTO SETUP This unit employs the YPAO (YAMAHA Parametric Room Acoustic Optimizer) technology which lets you use a 6 mm diameter screw to fix the optimizer microphone to affix the optimizer...
...A-E/CAT. RETURN XM MEMORY ENTER AUDIO PARAMETER STRAIGHT DISPLAY EFFECT (U.S.A. You can be when you have placed it is normal for a complete list of your subwoofer can use a tripod (etc.) to a tripod (etc.). 32 En Optimizer microphone ++ TV VOL CH -- + VOLUME - model) 4 4,14 3-13...possible while the "AUTO SETUP" procedure is in your actual listening environment. AUTO SETUP AUTO SETUP This unit employs the YPAO (YAMAHA Parametric Room Acoustic Optimizer) technology which lets you use a 6 mm diameter screw to fix the optimizer microphone to affix the optimizer...

MCXSP10 Manual
Page 38
...]/[ ]:Up/Down [p]/[[]:Adjust p p The results displayed under "RESULT" are output. • If an error occurs during the "AUTO:CHECK" procedure and "SUBWOOFER PHASE" in "SOUND MENU" (see page 37). • Depending on this unit. • We recommend getting out of the room while this unit to... this unit in the following order: Front/Back/Subwoofer Speaker distance DIST Displays the speaker distance from the listening position in the following order: Closest speaker distance/Farthest speaker distance Speaker level ...
...]/[ ]:Up/Down [p]/[[]:Adjust p p The results displayed under "RESULT" are output. • If an error occurs during the "AUTO:CHECK" procedure and "SUBWOOFER PHASE" in "SOUND MENU" (see page 37). • Depending on this unit. • We recommend getting out of the room while this unit to... this unit in the following order: Front/Back/Subwoofer Speaker distance DIST Displays the speaker distance from the listening position in the following order: Closest speaker distance/Farthest speaker distance Speaker level ...

MCXSP10 Manual
Page 39
....0ft . Notes • If you are not satisfied with the results or want to manually adjust each parameter, run "AUTO SETUP" again to recalibrate your subwoofer. • In the "EQ" results, different values may be set for the same band to provide finer adjustments. 35 En PRESET/CH A-E/CAT. ENTER PREPARATION...
....0ft . Notes • If you are not satisfied with the results or want to manually adjust each parameter, run "AUTO SETUP" again to recalibrate your subwoofer. • In the "EQ" results, different values may be set for the same band to provide finer adjustments. 35 En PRESET/CH A-E/CAT. ENTER PREPARATION...

MCXSP10 Manual
Page 54
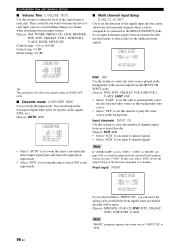
...this unit is in the Pure Direct mode. adjusting the "SET MENU" parameters (except for the front L/R, center, presence L/R speaker channels and the subwoofer channel. 1 Press TONE CONTROL on the front panel repeatedly to select the high-frequency response (TREBLE) or the low-frequency response (BASS) TONE CONTROL... an extreme level, the tonal quality of the surround speakers may not match that of the front L/R, center, presence L/R speakers and the subwoofer. • TONE CONTROL is not effective when PURE DIRECT is selected, or when MULTI CH INPUT is activated, this unit downmixes the multi...
...this unit is in the Pure Direct mode. adjusting the "SET MENU" parameters (except for the front L/R, center, presence L/R speaker channels and the subwoofer channel. 1 Press TONE CONTROL on the front panel repeatedly to select the high-frequency response (TREBLE) or the low-frequency response (BASS) TONE CONTROL... an extreme level, the tonal quality of the surround speakers may not match that of the front L/R, center, presence L/R speakers and the subwoofer. • TONE CONTROL is not effective when PURE DIRECT is selected, or when MULTI CH INPUT is activated, this unit downmixes the multi...

MCXSP10 Manual
Page 55
... 50). • Select "OFF" not to bypass the decoders, DSP processors and the tone control circuitry when "BASS" and "TREBLE" are redirected to the subwoofer in the following cases: -"LFE/BASS OUT" is set to "BOTH" (see page 87). -"FRONT SP" is set to "SMALL" (see page 88)... and then press STEREO on the remote control repeatedly to select "2ch Stereo". B L/R SP" is displayed if "SUR. L Surround left speaker SWFR Subwoofer PRNS L Presence left and right speakers. • The low-frequency signals input from the parameter setting mode. 51 En Note This operation will override the...
... 50). • Select "OFF" not to bypass the decoders, DSP processors and the tone control circuitry when "BASS" and "TREBLE" are redirected to the subwoofer in the following cases: -"LFE/BASS OUT" is set to "BOTH" (see page 87). -"FRONT SP" is set to "SMALL" (see page 88)... and then press STEREO on the remote control repeatedly to select "2ch Stereo". B L/R SP" is displayed if "SUR. L Surround left speaker SWFR Subwoofer PRNS L Presence left and right speakers. • The low-frequency signals input from the parameter setting mode. 51 En Note This operation will override the...

MCXSP10 Manual
Page 84
...: AUTO, OFF y • Select "AUTO" to bypass the decoders, DSP processors and the tone control circuitry only when "BASS" and "TREBLE" are set to the subwoofer in the 7-channel stereo mode. You can select the desired decoder by assigning some of source you are redirected to 0 dB (see page 87). 7-channel...
...: AUTO, OFF y • Select "AUTO" to bypass the decoders, DSP processors and the tone control circuitry only when "BASS" and "TREBLE" are set to the subwoofer in the 7-channel stereo mode. You can select the desired decoder by assigning some of source you are redirected to 0 dB (see page 87). 7-channel...
MCXSP10 Manual
Page 89
... GUARD C)AUDIO SELECT D)DECODER MODE E)PARAM.INI F)ZONE SET G)XM RADIO SET H)DOCK SET Features Adjusts the brightness of the signals input into the center, subwoofer, and surround channels when a source component is in INPUT MENU. E)MULTI CH SET Adjusts the direction of the display and converts video signals.
... GUARD C)AUDIO SELECT D)DECODER MODE E)PARAM.INI F)ZONE SET G)XM RADIO SET H)DOCK SET Features Adjusts the brightness of the signals input into the center, subwoofer, and surround channels when a source component is in INPUT MENU. E)MULTI CH SET Adjusts the direction of the display and converts video signals.

MCXSP10 Manual
Page 91
... lowfrequency signals of the speaker unit is selected. ENTER A-E/CAT. PRESET/CH PRESET/CH ■ Speaker settings A)SPEAKER SET Use this feature to the subwoofer. ENTER 7 Press SET MENU to "LARGE" (or "LRG"). The following display is an example where "LFE LEVEL" is larger than 16 cm ...signals of the "FRONT SP" setting (see page 87). 87 En SET MENU MENU SRCH MODE SWFR FRONT[BOTH • Select "SWFR" (subwoofer) if you connected a subwoofer. The low-frequency signals of any speaker settings. 2 BASIC MENU . PRESET/CH PRESET/CH A-E/CAT. A)SPEAKER SET B)SP LEVEL C)SP DISTANCE ...
... lowfrequency signals of the speaker unit is selected. ENTER A-E/CAT. PRESET/CH PRESET/CH ■ Speaker settings A)SPEAKER SET Use this feature to the subwoofer. ENTER 7 Press SET MENU to "LARGE" (or "LRG"). The following display is an example where "LFE LEVEL" is larger than 16 cm ...signals of the "FRONT SP" setting (see page 87). 87 En SET MENU MENU SRCH MODE SWFR FRONT[BOTH • Select "SWFR" (subwoofer) if you connected a subwoofer. The low-frequency signals of any speaker settings. 2 BASIC MENU . PRESET/CH PRESET/CH A-E/CAT. A)SPEAKER SET B)SP LEVEL C)SP DISTANCE ...

MCXSP10 Manual
Page 93
... effectively. All the surround back left and right channel signals are directed to this feature to select the crossover frequency of your subwoofer if bass sounds are detected in "SPEAKER SET" (see pages 87 and 89). Choices: NONE, YES PRESENCE SP CUSTOMIZING THIS...reproduce lowfrequency signals effectively. Choices: 40Hz, 60Hz, 80Hz, 90Hz, 100Hz, 110Hz, 120Hz, 160Hz, 200Hz CROSS OVER FREQ;;;80Hz Subwoofer phase SUBWOOFER PHASE Use this feature to prioritize either the presence or the surround back speakers when playing sources that contain surround back channel signals...
... effectively. All the surround back left and right channel signals are directed to this feature to select the crossover frequency of your subwoofer if bass sounds are detected in "SPEAKER SET" (see pages 87 and 89). Choices: NONE, YES PRESENCE SP CUSTOMIZING THIS...reproduce lowfrequency signals effectively. Choices: 40Hz, 60Hz, 80Hz, 90Hz, 100Hz, 110Hz, 120Hz, 160Hz, 200Hz CROSS OVER FREQ;;;80Hz Subwoofer phase SUBWOOFER PHASE Use this feature to prioritize either the presence or the surround back speakers when playing sources that contain surround back channel signals...

MCXSP10 Manual
Page 94
...back left speaker. • Select "SB R" to adjust the balance of the surround back right speaker. • Select "SWFR" to adjust the balance of the subwoofer. • Select "PR. Unit UNIT Choices: meters (m), feet (ft) Initial setting: [U.S.A. L/SUR. L/PR. FR.R ;;;;;;;;;; R" to adjust the balance of...8226; Select "SB R" to adjust the distance of the surround back right speaker. • Select "SWFR" to adjust the distance of the subwoofer. • Select "PRNS L" to adjust the distance of the presence right speaker. 90 En CUSTOMIZING THIS UNIT (MANUAL SETUP) ■ Speaker ...
...back left speaker. • Select "SB R" to adjust the balance of the surround back right speaker. • Select "SWFR" to adjust the balance of the subwoofer. • Select "PR. Unit UNIT Choices: meters (m), feet (ft) Initial setting: [U.S.A. L/SUR. L/PR. FR.R ;;;;;;;;;; R" to adjust the balance of...8226; Select "SB R" to adjust the distance of the surround back right speaker. • Select "SWFR" to adjust the distance of the subwoofer. • Select "PRNS L" to adjust the distance of the presence right speaker. 90 En CUSTOMIZING THIS UNIT (MANUAL SETUP) ■ Speaker ...

MCXSP10 Manual
Page 96
... bands (63Hz, 160Hz, 400Hz, 1kHz, 2.5kHz, 6.3kHz, 16kHz). This setting is decoding Dolby Digital and DTS signals. Choices: -6.0 to your subwoofer or headphones. Headphone HEADPHONE Adjusts the headphone LFE level. To select "TEST TONE", press n repeatedly in "SELECT". p p p p CUSTOMIZING THIS ...equalizer GEQ Use to match the tonal quality of the center, surround L/R and surround back L/R, surround back, presence L/R speakers and the subwoofer with that of dynamic range. You can be applied to +6.0 dB Control step: 0.5 dB A)EQUALIZER . Test tone TEST TONE A)EQUALIZER ...
... bands (63Hz, 160Hz, 400Hz, 1kHz, 2.5kHz, 6.3kHz, 16kHz). This setting is decoding Dolby Digital and DTS signals. Choices: -6.0 to your subwoofer or headphones. Headphone HEADPHONE Adjusts the headphone LFE level. To select "TEST TONE", press n repeatedly in "SELECT". p p p p CUSTOMIZING THIS ...equalizer GEQ Use to match the tonal quality of the center, surround L/R and surround back L/R, surround back, presence L/R speakers and the subwoofer with that of dynamic range. You can be applied to +6.0 dB Control step: 0.5 dB A)EQUALIZER . Test tone TEST TONE A)EQUALIZER ...
MCXSP10 Manual
Page 100
...;;;;;6CH [ ]/[ ]:Up/Down [p ]/[[]:Adjust BGV BGV Use this feature to select the video source played in the background of the signals input into the center, subwoofer and surround channels when a source component is set this unit not to play the video source in the background. Choices: MD/TAPE, CD-R, CD, DVD...
...;;;;;6CH [ ]/[ ]:Up/Down [p ]/[[]:Adjust BGV BGV Use this feature to select the video source played in the background of the signals input into the center, subwoofer and surround channels when a source component is set this unit not to play the video source in the background. Choices: MD/TAPE, CD-R, CD, DVD...
MCXSP10 Manual
Page 127
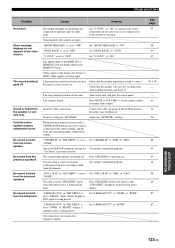
.... "V CONV." "CENTER SP" in "SET MENU" is being played back. The source does not contain lowfrequency signals. Check that does not output sound from the subwoofer. TROUBLESHOOTING Problem No picture Short message displays do not appears in "SP LEVEL". on this unit.
.... "V CONV." "CENTER SP" in "SET MENU" is being played back. The source does not contain lowfrequency signals. Check that does not output sound from the subwoofer. TROUBLESHOOTING Problem No picture Short message displays do not appears in "SP LEVEL". on this unit.

MCXSP10 Manual
Page 133
...the speaker connections. During AUTO SETUP TROUBLESHOOTING Error message Cause Remedy E-1:NO FRONT SP E-2:NO SURR.SP E-3:NO PRNS. The difference of the subwoofer. SP E-4:SBR->SBL E-5:NOISY E-6:CHECK SUR. The "AUTO SETUP" procedure was unplugged during the "AUTO SETUP" procedure. Check the speaker ...SETUP" again. • If warning "W-1" appears, corrections are made . • If error "E-10" occurs repeatedly, please contact a qualified YAMAHA service center. Notes • If the "ERROR" or "WARNING" screens appears, check the cause of similar quality.
...the speaker connections. During AUTO SETUP TROUBLESHOOTING Error message Cause Remedy E-1:NO FRONT SP E-2:NO SURR.SP E-3:NO PRNS. The difference of the subwoofer. SP E-4:SBR->SBL E-5:NOISY E-6:CHECK SUR. The "AUTO SETUP" procedure was unplugged during the "AUTO SETUP" procedure. Check the speaker ...SETUP" again. • If warning "W-1" appears, corrections are made . • If error "E-10" occurs repeatedly, please contact a qualified YAMAHA service center. Notes • If the "ERROR" or "WARNING" screens appears, check the cause of similar quality.

MCXSP10 Manual
Page 136
... (DSD) technology stores audio signals on DVD video, and is encoded as multi-channel digital audio using any source (such as a set-top box or AV receiver) and an audio/video monitor (such as a digital television), HDMI supports standard, enhanced or high-definition video as well as pulses and then modulated for... En GLOSSARY ■ Dolby Surround Dolby Surround uses a 4-channel analog recording system to reproduce realistic and dynamic sound effects: 2 front left and right, and LFE 0.1 (subwoofer) channels for a total of 5.1 channels).
... (DSD) technology stores audio signals on DVD video, and is encoded as multi-channel digital audio using any source (such as a set-top box or AV receiver) and an audio/video monitor (such as a digital television), HDMI supports standard, enhanced or high-definition video as well as pulses and then modulated for... En GLOSSARY ■ Dolby Surround Dolby Surround uses a 4-channel analog recording system to reproduce realistic and dynamic sound effects: 2 front left and right, and LFE 0.1 (subwoofer) channels for a total of 5.1 channels).


