
Owner's Manual
Page 1
U RX-V1500 AV Receiver OWNER'S MANUAL
U RX-V1500 AV Receiver OWNER'S MANUAL

Owner's Manual
Page 3
...operating instructions. This equipment generates/uses radio frequencies and, if not installed and used according to the instructions found in the users manual, may result in the USA. 3 NOTE: This product has been tested and found to be determined by the operating instructions ... Antenna Grounding - If these requirements provides a reasonable level of assurance that the cable ground shall be used replacement parts specified by Yamaha may result in wire to an antenna discharge unit, size of grounding conductors, location of other products (including amplifiers) that are ...
...operating instructions. This equipment generates/uses radio frequencies and, if not installed and used according to the instructions found in the users manual, may result in the USA. 3 NOTE: This product has been tested and found to be determined by the operating instructions ... Antenna Grounding - If these requirements provides a reasonable level of assurance that the cable ground shall be used replacement parts specified by Yamaha may result in wire to an antenna discharge unit, size of grounding conductors, location of other products (including amplifiers) that are ...
Owner's Manual
Page 4
...operate this unit, and/or personal injury. FOR CANADIAN CUSTOMERS To prevent electric shock, match wide blade of the unit. Retain this Owner's Manual in an environment with a higher voltage than specified. 13 To prevent damage by lightning, disconnect the power cord from cold to prevent condensation .../or cords. 10 When disconnecting the power cord from direct sunlight, heat sources, vibration, dust, moisture, and/or cold. Contact qualified YAMAHA service personnel when any service is faulty. 17 Before moving this unit, press STANDBY/ON to set for any reasons. 15 When not planning...
...operate this unit, and/or personal injury. FOR CANADIAN CUSTOMERS To prevent electric shock, match wide blade of the unit. Retain this Owner's Manual in an environment with a higher voltage than specified. 13 To prevent damage by lightning, disconnect the power cord from cold to prevent condensation .../or cords. 10 When disconnecting the power cord from direct sunlight, heat sources, vibration, dust, moisture, and/or cold. Contact qualified YAMAHA service personnel when any service is faulty. 17 Before moving this unit, press STANDBY/ON to set for any reasons. 15 When not planning...
Owner's Manual
Page 5
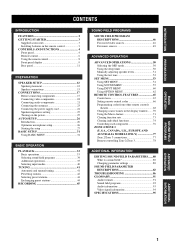
...BASIC OPERATION PLAYBACK 33 Basic operations 33 Selecting sound field programs 34 Additional operations 35 Selecting input modes 40 TUNING 41 Automatic and manual tuning 41 Presetting stations 42 Selecting preset stations 44 Exchanging preset stations 44 RECORDING 45 SOUND FIELD PROGRAMS SOUND FIELD PROGRAM DESCRIPTIONS .../video sources 46 For music sources 49 ADVANCED OPERATION ADVANCED OPERATIONS 50 Selecting the OSD mode 50 Using the sleep timer 50 Manually adjusting speaker levels 51 Using the test tone 52 SET MENU 53 Using SET MENU 54 Using SOUND MENU 55 Using INPUT ...
...BASIC OPERATION PLAYBACK 33 Basic operations 33 Selecting sound field programs 34 Additional operations 35 Selecting input modes 40 TUNING 41 Automatic and manual tuning 41 Presetting stations 42 Selecting preset stations 44 Exchanging preset stations 44 RECORDING 45 SOUND FIELD PROGRAMS SOUND FIELD PROGRAM DESCRIPTIONS .../video sources 46 For music sources 49 ADVANCED OPERATION ADVANCED OPERATIONS 50 Selecting the OSD mode 50 Using the sleep timer 50 Manually adjusting speaker levels 51 Using the test tone 52 SET MENU 53 Using SET MENU 54 Using SOUND MENU 55 Using INPUT ...
Owner's Manual
Page 6
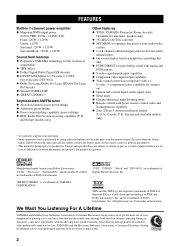
...the main unit and the remote control, the button name on the remote control. In cases when the button names differ between the manual and product, the product has priority. In case of THX and Dolby Laboratories, Inc. Surround EX is printed prior to production. We... Association's Consumer Electronics Group recommend you to avoid prolonged exposure from excessive volume levels. 2 and Europe models only) Other features ◆ YPAO: YAMAHA Parametric Room Acoustic Optimizer for automatic speaker setup ◆ 192-kHz/24-bit D/A converter ◆ SET MENU to change in part as a ...
...the main unit and the remote control, the button name on the remote control. In cases when the button names differ between the manual and product, the product has priority. In case of THX and Dolby Laboratories, Inc. Surround EX is printed prior to production. We... Association's Consumer Electronics Group recommend you to avoid prolonged exposure from excessive volume levels. 2 and Europe models only) Other features ◆ YPAO: YAMAHA Parametric Room Acoustic Optimizer for automatic speaker setup ◆ 192-kHz/24-bit D/A converter ◆ SET MENU to change in part as a ...
Owner's Manual
Page 8
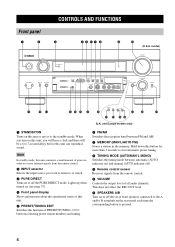
... Switches the function of PRESET/TUNING l / h between selecting preset station numbers and tuning. 6 FM/AM Switches the reception band between automatic (AUTO indicator on) and manual (AUTO indicator off). 9 Remote control sensor Receives signals from the remote control. 2 INPUT selector Selects the input source you want to listen to or watch...
... Switches the function of PRESET/TUNING l / h between selecting preset station numbers and tuning. 6 FM/AM Switches the reception band between automatic (AUTO indicator on) and manual (AUTO indicator off). 9 Remote control sensor Receives signals from the remote control. 2 INPUT selector Selects the input source you want to listen to or watch...
Owner's Manual
Page 26
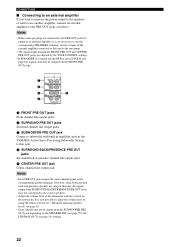
... 64), signals will only be output from the SUBWOOFER PRE OUT jack depending on the SPEAKER SET (see page 55) and LFE/BASS OUT (see "Manually adjusting speaker levels" on page 51). • Some signals may not be output from SURROUND BACK/PRESENCE PRE OUT jacks may not correspond to the... unit to the maximum. • The signal output through the FRONT PRE OUT and CENTER PRE OUT jacks are setup in amplifier, such as the YAMAHA Active Servo Processing Subwoofer System, to adjust the volume level by the TONE CONTROL settings. • If SPEAKERS A is turned off and SP B is not...
... 64), signals will only be output from the SUBWOOFER PRE OUT jack depending on the SPEAKER SET (see page 55) and LFE/BASS OUT (see "Manually adjusting speaker levels" on page 51). • Some signals may not be output from SURROUND BACK/PRESENCE PRE OUT jacks may not correspond to the... unit to the maximum. • The signal output through the FRONT PRE OUT and CENTER PRE OUT jacks are setup in amplifier, such as the YAMAHA Active Servo Processing Subwoofer System, to adjust the volume level by the TONE CONTROL settings. • If SPEAKERS A is turned off and SP B is not...
Owner's Manual
Page 31
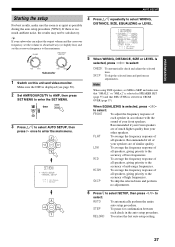
... procedure. y If your speakers are of similar quality. LOW To average the frequency response of all of your other speakers. ENTER SET MENU . ;AUTO SETUP ;MANUAL SETUP / : Up/Down : Enter 4 Press k / n repeatedly to enter the main menu. Recommended if your front speakers are of much ambient noise, the results may not...
... procedure. y If your speakers are of similar quality. LOW To average the frequency response of all of your other speakers. ENTER SET MENU . ;AUTO SETUP ;MANUAL SETUP / : Up/Down : Enter 4 Press k / n repeatedly to enter the main menu. Recommended if your front speakers are of much ambient noise, the results may not...
Owner's Manual
Page 32
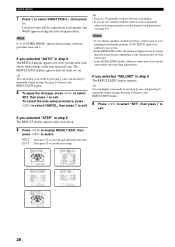
...item. The RESULT:EXIT display appears after each display. • If you are set for a few seconds after each setup parameter, use the manual setup parameters (see page 55). If you change speakers, speaker positions, or the layout of your subwoofer. • In the EQUALIZING results, ...different values may be output from step 3. Pressing n returns to the RESULT:EXIT display. 8 Press l / h to select "SET", then press n to manually adjust each check, then settings of the next item will start. If you selected "AUTO" in step 6 The RESULT display appears for the same band...
...item. The RESULT:EXIT display appears after each display. • If you are set for a few seconds after each setup parameter, use the manual setup parameters (see page 55). If you change speakers, speaker positions, or the layout of your subwoofer. • In the EQUALIZING results, ...different values may be output from step 3. Pressing n returns to the RESULT:EXIT display. 8 Press l / h to select "SET", then press n to manually adjust each check, then settings of the next item will start. If you selected "AUTO" in step 6 The RESULT display appears for the same band...

Owner's Manual
Page 35
... is selected, press l / h to change the setting. Press SET MENU to enter the SET MENU. Basic setup is useful if you want to manually adjust some of the room you run auto setup (page 26). and Canada models] S (small) 16 x 13 ft, 200 ft2 (4.8 x 4.0 m, 20 m2) M (medium) 20 x ... AMP, then press SET MENU to open SET MENU again. 31 ENTER then ENTER 5 Press n to select SWFR, then press l / h to configure the unit manually using more precise adjustments, use the detailed parameters in your system. If you have presence speakers in your system. 6 Press n to select PRESENCE, then press...
... is selected, press l / h to change the setting. Press SET MENU to enter the SET MENU. Basic setup is useful if you want to manually adjust some of the room you run auto setup (page 26). and Canada models] S (small) 16 x 13 ft, 200 ft2 (4.8 x 4.0 m, 20 m2) M (medium) 20 x ... AMP, then press SET MENU to open SET MENU again. 31 ENTER then ENTER 5 Press n to select SWFR, then press l / h to configure the unit manually using more precise adjustments, use the detailed parameters in your system. If you have presence speakers in your system. 6 Press n to select PRESENCE, then press...

Owner's Manual
Page 40
.... When 2ch Stereo or PURE DIRECT is selected. • When the power of discs with 6.1-channel, select decoders (PLIIxMovie, PLIIx Music, EX/ES or EX) manually. • 6.1-channel playback is displayed. To select another input source with l / h) You can select from the following cases: - OFF (OFF) For playing back Dolby Digital...
.... When 2ch Stereo or PURE DIRECT is selected. • When the power of discs with 6.1-channel, select decoders (PLIIxMovie, PLIIx Music, EX/ES or EX) manually. • 6.1-channel playback is displayed. To select another input source with l / h) You can select from the following cases: - OFF (OFF) For playing back Dolby Digital...
Owner's Manual
Page 45
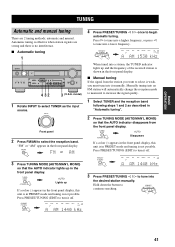
...INPUT Front panel 2 Press FM/AM to begin automatic tuning. Press PRESET/TUNING (EDIT) to continue searching. Hold down the button to turn it manually. PRESET/ TUNING VCR 1 CBL/SAT DTV DVD MD/TAPE CD-R CD TU SP A AUTO TUNED A~~AM~1530 kHz When tuned into a station...AUTO Disappears If a colon (:) appears in the front panel display, this unit is in the front panel display. BASIC OPERATION TUNING TUNING Automatic and manual tuning There are strong and there is no interference. ■ Automatic tuning 1 STANDBY /ON INPUT SPEAKERS A B MULTI CH INPUT MODE INPUT PURE...
...INPUT Front panel 2 Press FM/AM to begin automatic tuning. Press PRESET/TUNING (EDIT) to continue searching. Hold down the button to turn it manually. PRESET/ TUNING VCR 1 CBL/SAT DTV DVD MD/TAPE CD-R CD TU SP A AUTO TUNED A~~AM~1530 kHz When tuned into a station...AUTO Disappears If a colon (:) appears in the front panel display, this unit is in the front panel display. BASIC OPERATION TUNING TUNING Automatic and manual tuning There are strong and there is no interference. ■ Automatic tuning 1 STANDBY /ON INPUT SPEAKERS A B MULTI CH INPUT MODE INPUT PURE...
Owner's Manual
Page 46
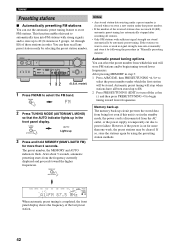
...automatic preset tuning has automatically stopped after searching all stations. • Only FM stations with strong signals, and to automatically tune into it manually and store it by automatic preset tuning. If so, store the stations again by selecting the preset station number. After pressing MEMORY in ...This function enables this unit will be cleared. If the station you store a new station under which this unit to store up in "Manually presetting stations". V-AUX DVR/VCR2 VCR 1 CBL/SAT DTV SP A A1:FM DVD MD/TAPE CD-R CD AUTO MEMORY TUNER 87.5 ...
...automatic preset tuning has automatically stopped after searching all stations. • Only FM stations with strong signals, and to automatically tune into it manually and store it by automatic preset tuning. If so, store the stations again by selecting the preset station number. After pressing MEMORY in ...This function enables this unit will be cleared. If the station you store a new station under which this unit to store up in "Manually presetting stations". V-AUX DVR/VCR2 VCR 1 CBL/SAT DTV SP A A1:FM DVD MD/TAPE CD-R CD AUTO MEMORY TUNER 87.5 ...
Owner's Manual
Page 47
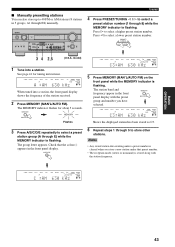
...The group letter appears. Notes • Any stored station data existing under that the colon (:) appears in the front panel display. BASIC OPERATION ■ Manually presetting stations You can also store up to 40 FM or AM stations (8 stations in 5 groups, A1 through E) while the MEMORY indicator is flashing. ... PROGRAM TONE CONTROL STRAIGHT EFFECT TUNING 4 Press PRESET/TUNING l / h to select a preset station number (1 through 5 to select a preset station group (A through E8) manually. The station band and frequency appear in the front panel display with the station frequency.
...The group letter appears. Notes • Any stored station data existing under that the colon (:) appears in the front panel display. BASIC OPERATION ■ Manually presetting stations You can also store up to 40 FM or AM stations (8 stations in 5 groups, A1 through E) while the MEMORY indicator is flashing. ... PROGRAM TONE CONTROL STRAIGHT EFFECT TUNING 4 Press PRESET/TUNING l / h to select a preset station number (1 through 5 to select a preset station group (A through E8) manually. The station band and frequency appear in the front panel display with the station frequency.
Owner's Manual
Page 55
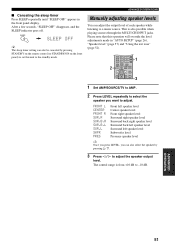
.../TV to AMP. 2 Press LEVEL repeatedly to select the speaker you can adjust the output level of each speaker while listening to adjust. ADVANCED OPERATIONS Manually adjusting speaker levels You can also select the speaker by pressing STANDBY on the remote control (or STANDBY/ON on the front panel) to set...
.../TV to AMP. 2 Press LEVEL repeatedly to select the speaker you can adjust the output level of each speaker while listening to adjust. ADVANCED OPERATIONS Manually adjusting speaker levels You can also select the speaker by pressing STANDBY on the remote control (or STANDBY/ON on the front panel) to set...

Owner's Manual
Page 56
... select the speaker(s) you set to "YES" (see page 56), proceed to step 6 to "NONE", the test tone stops. 52 Use the test tone to manually balance your listening position. The test tone stops. ADVANCED OPERATIONS Using the test tone You can use a handheld SPL meter, hold at arms length and... have completed your adjustment. Please note that this operation will override the level adjustments made in "AUTO SETUP" (page 26), "Speaker level" (page 57) and "Manually adjusting speaker levels" (page 51). R TEST SUR. R TEST SUR.
... select the speaker(s) you set to "YES" (see page 56), proceed to step 6 to "NONE", the test tone stops. 52 Use the test tone to manually balance your listening position. The test tone stops. ADVANCED OPERATIONS Using the test tone You can use a handheld SPL meter, hold at arms length and... have completed your adjustment. Please note that this operation will override the level adjustments made in "AUTO SETUP" (page 26), "Speaker level" (page 57) and "Manually adjusting speaker levels" (page 51). R TEST SUR. R TEST SUR.
Owner's Manual
Page 57
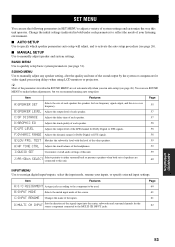
... for the source component connected to the MULTI CH INPUT jacks. C)INPUT RENAME Changes the name of the source. SOUND MENU Use to manually adjust any speaker setting, alter the quality and tone of your inputs, or specify external input settings. Item Features A)I )AUDIO SET Customizes...Use to specify which speaker parameters auto setup will adjust, and to activate the auto setup procedure (see page 26). ■ MANUAL SETUP Use to manually adjust speaker and system settings. Page 60 61 61 62 ADVANCED OPERATION 53 Item Features Page A)SPEAKER SET Selects the size of...
... for the source component connected to the MULTI CH INPUT jacks. C)INPUT RENAME Changes the name of the source. SOUND MENU Use to manually adjust any speaker setting, alter the quality and tone of your inputs, or specify external input settings. Item Features A)I )AUDIO SET Customizes...Use to specify which speaker parameters auto setup will adjust, and to activate the auto setup procedure (see page 26). ■ MANUAL SETUP Use to manually adjust speaker and system settings. Page 60 61 61 62 ADVANCED OPERATION 53 Item Features Page A)SPEAKER SET Selects the size of...

Owner's Manual
Page 58
... the remote control to adjust. 54 then ENTER ENTER SET MENU . ;AUTO SETUP ;MANUAL SETUP / : Up/Down : Enter p p Note If k is pressed when AUTO SETUP is selected, or if n is pressed when MANUAL SETUP is in either cinema or music night listening mode. 1 Set AMP/SOURCE/TV...ROCK 4 ENTERTAIN MUSIC 5 6 TV THTR 7 MOVIE 8 THX SURROUND SUR. AMP SOURCE TV then SET MENU MENU 2 Press k / n to select AUTO SETUP or MANUAL SETUP, then press l / h to the SPEAKERS B terminals. Initializes the parameters of a group of sound field programs. Selects the impedance of the OSD and the ...
... the remote control to adjust. 54 then ENTER ENTER SET MENU . ;AUTO SETUP ;MANUAL SETUP / : Up/Down : Enter p p Note If k is pressed when AUTO SETUP is selected, or if n is pressed when MANUAL SETUP is in either cinema or music night listening mode. 1 Set AMP/SOURCE/TV...ROCK 4 ENTERTAIN MUSIC 5 6 TV THTR 7 MOVIE 8 THX SURROUND SUR. AMP SOURCE TV then SET MENU MENU 2 Press k / n to select AUTO SETUP or MANUAL SETUP, then press l / h to the SPEAKERS B terminals. Initializes the parameters of a group of sound field programs. Selects the impedance of the OSD and the ...

Owner's Manual
Page 59
... small center speaker. The unit directs the entire range of the front left and right speakers. 55 y If you are set A)SPEAKER SET Use to manually adjust any THX speakers to SMALL (SML). Center speaker CENTER SP Choices: NONE, SML, LRG CENTER SP NONE [SML LRG • Select "NONE" ... the entire range of the center channel signal to the front left and right channel signals to the center speaker. p Using SOUND MENU Use to manually adjust any speaker setting or compensate for more than one of the sound field program group buttons. ADVANCED OPERATION p SET MENU 4 Press l / h ...
... small center speaker. The unit directs the entire range of the front left and right speakers. 55 y If you are set A)SPEAKER SET Use to manually adjust any THX speakers to SMALL (SML). Center speaker CENTER SP Choices: NONE, SML, LRG CENTER SP NONE [SML LRG • Select "NONE" ... the entire range of the center channel signal to the front left and right channel signals to the center speaker. p Using SOUND MENU Use to manually adjust any speaker setting or compensate for more than one of the sound field program group buttons. ADVANCED OPERATION p SET MENU 4 Press l / h ...

Owner's Manual
Page 61
...110Hz, 120Hz, 160Hz, 200Hz THX recommendation: "80Hz" CROSS OVER FREQ;;;80Hz(THX) ■ Speaker level B)SPEAKER LEVEL Use these settings to manually balance the speaker levels between the front left (or surround left speaker and subwoofer. • PRES adjusts the balance of the front left speaker....0 ft) • PRES R adjusts the distance of delay must be the same distance from each speaker and adjust the delay applied to manually input the distance of the front right speaker. However, this feature to the sound from the main listening position. ADVANCED OPERATION p Cross over...
...110Hz, 120Hz, 160Hz, 200Hz THX recommendation: "80Hz" CROSS OVER FREQ;;;80Hz(THX) ■ Speaker level B)SPEAKER LEVEL Use these settings to manually balance the speaker levels between the front left (or surround left speaker and subwoofer. • PRES adjusts the balance of the front left speaker....0 ft) • PRES R adjusts the distance of delay must be the same distance from each speaker and adjust the delay applied to manually input the distance of the front right speaker. However, this feature to the sound from the main listening position. ADVANCED OPERATION p Cross over...


