
Owners Manual
Page 3
... operation of other electronic devices. This equipment generates/uses radio frequencies and, if not installed and used . FCC CAUTION Change or modifications not expressly approved by the party responsible for US customers) 1 IMPORTANT NOTICE: DO NOT MODIFY THIS UNIT! Cable/s supplied with Part 15 of America or its subsidiaries. Utilize power outlets that interference will not result in all installation instructions. See user manual instructions...
... operation of other electronic devices. This equipment generates/uses radio frequencies and, if not installed and used . FCC CAUTION Change or modifications not expressly approved by the party responsible for US customers) 1 IMPORTANT NOTICE: DO NOT MODIFY THIS UNIT! Cable/s supplied with Part 15 of America or its subsidiaries. Utilize power outlets that interference will not result in all installation instructions. See user manual instructions...
Owners Manual
Page 4
... during operation. Yamaha will form when the surrounding temperature changes suddenly. vacation), disconnect the AC power plug from the AC power source even if you dispose of this unit with a humidifier) to prevent condensation inside this unit rises, it in a safe place for future reference. 2 Install this sound system in the owner's manual on switches, knobs and/or cords. 10 When disconnecting the power cable from direct...
... during operation. Yamaha will form when the surrounding temperature changes suddenly. vacation), disconnect the AC power plug from the AC power source even if you dispose of this unit with a humidifier) to prevent condensation inside this unit rises, it in a safe place for future reference. 2 Install this sound system in the owner's manual on switches, knobs and/or cords. 10 When disconnecting the power cable from direct...
Owners Manual
Page 5
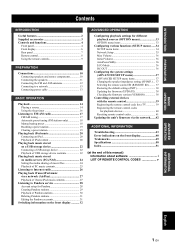
...and functions 4 Front panel 4 Front display 6 Rear panel 7 Remote control 8 Using the remote controls 9 PREPARATION Connections 10 Connecting speakers and source components 10 Connecting the speakers 11 Connecting the FM and AM antennas 12 Connecting to a network 13 Connecting power cable 13 BASIC OPERATION Playback 14 Playing a source 14 Using the sleep timer 16 Listening to FM/AM radio 17 FM/AM tuning 17 Automatic preset tuning (FM stations only 18 Manual tuning preset 18 Recalling a preset station 19 Clearing a preset station 19 Playing back iPod music 20 Connecting an...
...and functions 4 Front panel 4 Front display 6 Rear panel 7 Remote control 8 Using the remote controls 9 PREPARATION Connections 10 Connecting speakers and source components 10 Connecting the speakers 11 Connecting the FM and AM antennas 12 Connecting to a network 13 Connecting power cable 13 BASIC OPERATION Playback 14 Playing a source 14 Using the sleep timer 16 Listening to FM/AM radio 17 FM/AM tuning 17 Automatic preset tuning (FM stations only 18 Manual tuning preset 18 Recalling a preset station 19 Clearing a preset station 19 Playing back iPod music 20 Connecting an...
Owners Manual
Page 8
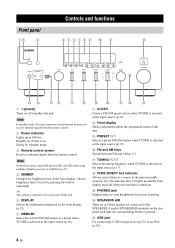
... lights up as the input source (p.17). D SPEAKERS A/B Turns on or off (standby) the unit. C PHONES jack Outputs audio to your headphones for private listening. Choose brightness from the remote control. A TUNING jj / ii Selects the tuning frequency when TUNER is selected as follows: Brightly lit: Power is on Dimly lit: Standby mode 3 Remote control sensor Receives infrared signals from 5 levels by pressing this button repeatedly. Controls and functions Controls and functions Front panel 12 3 456789 : A B CD EF 1 A (power) Turns on/off the speaker set connected...
... lights up as the input source (p.17). D SPEAKERS A/B Turns on or off (standby) the unit. C PHONES jack Outputs audio to your headphones for private listening. Choose brightness from the remote control. A TUNING jj / ii Selects the tuning frequency when TUNER is selected as follows: Brightly lit: Power is on Dimly lit: Standby mode 3 Remote control sensor Receives infrared signals from 5 levels by pressing this button repeatedly. Controls and functions Controls and functions Front panel 12 3 456789 : A B CD EF 1 A (power) Turns on/off the speaker set connected...
Owners Manual
Page 11
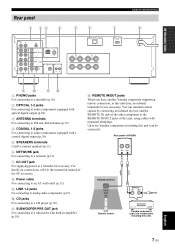
...can be connected. Rear panel 1 23 4 5 6 CCoonnttrroollss aanndd ffuunnccttiioonnss 7 8 INTRODUCTION 9: AB 1 PHONO jacks For connecting to a turntable (p.10). 2 OPTICAL 1-2 jacks For connecting to audio components equipped with optical digital output (p.10). 3 ANTENNA terminals For connecting to FM and AM antennas (p.12). 4 COAXIAL 1-2 jacks For connecting to audio components equipped with a coaxial digital output (p.10). 5 SPEAKERS terminals Used to connect speakers (p.11). 6 NETWORK jack For connecting to a network (p.13). 7 DC OUT jack For supplying power to a CD player...
...can be connected. Rear panel 1 23 4 5 6 CCoonnttrroollss aanndd ffuunnccttiioonnss 7 8 INTRODUCTION 9: AB 1 PHONO jacks For connecting to a turntable (p.10). 2 OPTICAL 1-2 jacks For connecting to audio components equipped with optical digital output (p.10). 3 ANTENNA terminals For connecting to FM and AM antennas (p.12). 4 COAXIAL 1-2 jacks For connecting to audio components equipped with a coaxial digital output (p.10). 5 SPEAKERS terminals Used to connect speakers (p.11). 6 NETWORK jack For connecting to a network (p.13). 7 DC OUT jack For supplying power to a CD player...
Owners Manual
Page 12
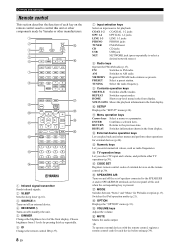
...E CODE SET Registers remote control codes of external devices on /off (standby) the unit. 5 DIMMER Changes the brightness level of the front display. H OPTION Displays the "OPTION" menu (p.33). PRESET Select a preset station. TUNING Select the radio frequency. 9 Contents operation keys SHUFFLE Switches shuffle modes. DISPLAY Switches information shown in the front display. F SPEAKERS A/B Turns on and off an external device. 4 RECEIVER A Turns on the remote control (p.39). Switches the iPod operation modes (p.21). REPEAT Switches repeat modes. HOME Shows top-level menu in...
...E CODE SET Registers remote control codes of external devices on /off (standby) the unit. 5 DIMMER Changes the brightness level of the front display. H OPTION Displays the "OPTION" menu (p.33). PRESET Select a preset station. TUNING Select the radio frequency. 9 Contents operation keys SHUFFLE Switches shuffle modes. DISPLAY Switches information shown in the front display. F SPEAKERS A/B Turns on and off an external device. 4 RECEIVER A Turns on the remote control (p.39). Switches the iPod operation modes (p.21). REPEAT Switches repeat modes. HOME Shows top-level menu in...
Owners Manual
Page 18
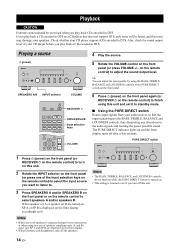
... DTS on a CD player that the input signals bypass the BASS, TREBLE, BALANCE and LOUDNESS controls, thus eliminating any alterations to the audio signals and creating the purest possible sound. PURE DIRECT switch 1 Press A (power) on the front panel (or RECEIVER A on the remote control to adjust the sound output level. Playing a source A (power) SPEAKERS A/B INPUT selector VOLUME SOURCE SLEEP CODE SET RECEIVER RECEIVER A SPEAKERS ID DIMMER A B COAX1 COAX2 OPT1 OPT2 LINE1 LINE2 LINE3 PHONO TUNER CD USB NET FM HOME AM PLAYING SETUP OPTION SPEAKERS A/B Input selection...
... DTS on a CD player that the input signals bypass the BASS, TREBLE, BALANCE and LOUDNESS controls, thus eliminating any alterations to the audio signals and creating the purest possible sound. PURE DIRECT switch 1 Press A (power) on the front panel (or RECEIVER A on the remote control to adjust the sound output level. Playing a source A (power) SPEAKERS A/B INPUT selector VOLUME SOURCE SLEEP CODE SET RECEIVER RECEIVER A SPEAKERS ID DIMMER A B COAX1 COAX2 OPT1 OPT2 LINE1 LINE2 LINE3 PHONO TUNER CD USB NET FM HOME AM PLAYING SETUP OPTION SPEAKERS A/B Input selection...

Owners Manual
Page 21
... PHONO TUNER CD USB NET FM AM PRESET TUNING MEMORY TUNING H / I : Increase/decrease the frequency. If a stereo broadcast is not good, set a frequency. TUNING H / I SHUFFLE REPEAT MODE HOME NOW PLAYING MODE • "Wrong Station!" Press H to tune in to a station in to a lower frequency. If a broadcast is being received, the "STEREO" indicator will also lit. 1 Press MODE repeatedly to select "Stereo" (automatic stereo mode) or "Mono" (monaural mode) when this unit is tuned in monaural sound. • When Stereo...
... PHONO TUNER CD USB NET FM AM PRESET TUNING MEMORY TUNING H / I : Increase/decrease the frequency. If a stereo broadcast is not good, set a frequency. TUNING H / I SHUFFLE REPEAT MODE HOME NOW PLAYING MODE • "Wrong Station!" Press H to tune in to a station in to a lower frequency. If a broadcast is being received, the "STEREO" indicator will also lit. 1 Press MODE repeatedly to select "Stereo" (automatic stereo mode) or "Mono" (monaural mode) when this unit is tuned in monaural sound. • When Stereo...

Owners Manual
Page 23
... remote control during normal tuning, a frequency is displayed. y You can recall preset stations that you enter a preset number to which no stations are registered. • You can directly select a preset number by pressing the numeric keys on the front panel. b Rotate SELECT/ENTER to select "Clear Preset" and press ENTER. "Wrong Num." TUNER LINE1 LINE2 LINE3 PHONO TUNER CD USB NET FM AM PRESET TUNING MEMORY PRESET F / G SHUFFLE REPEAT MODE HOME NOW PLAYING 1 2 3 4 5 6 7 8 9 0 +10 ENT TV TV INPUT...
... remote control during normal tuning, a frequency is displayed. y You can recall preset stations that you enter a preset number to which no stations are registered. • You can directly select a preset number by pressing the numeric keys on the front panel. b Rotate SELECT/ENTER to select "Clear Preset" and press ENTER. "Wrong Num." TUNER LINE1 LINE2 LINE3 PHONO TUNER CD USB NET FM AM PRESET TUNING MEMORY PRESET F / G SHUFFLE REPEAT MODE HOME NOW PLAYING 1 2 3 4 5 6 7 8 9 0 +10 ENT TV TV INPUT...

Owners Manual
Page 24
... AM PRESET TUNING MEMORY USB Connecting an iPod Connect your iPod to the unit with the USB cable supplied with the iPod. If "NET Standby" (p.35) in use. 2 Use the cursor keys to select an item and press ENTER. The unit (front) Cursor keys ENTER RETURN DISPLAY SHUFFLE REPEAT MODE HOME SETUP NOW PLAYING OPTION ENTER VOLUME DISPLAY RETURN TOP MENU DISC SKIP POP-UP MENU MUTE 1 2 3 4 SHUFFLE REPEAT MODE HOME NOW PLAYING External device operation...
... AM PRESET TUNING MEMORY USB Connecting an iPod Connect your iPod to the unit with the USB cable supplied with the iPod. If "NET Standby" (p.35) in use. 2 Use the cursor keys to select an item and press ENTER. The unit (front) Cursor keys ENTER RETURN DISPLAY SHUFFLE REPEAT MODE HOME SETUP NOW PLAYING OPTION ENTER VOLUME DISPLAY RETURN TOP MENU DISC SKIP POP-UP MENU MUTE 1 2 3 4 SHUFFLE REPEAT MODE HOME NOW PLAYING External device operation...

Owners Manual
Page 31
... "SETUP" menu. You can adjust the unit's volume from iTunes/iPod, set "Vol.Interlock" (p.33) in advance. iTunes (example) iPod (example) Use the following remote control keys to the unit in "Information" (p.35) in damage to "Off". BASIC OPERATION Playing back iTunes/iPod music via a network (AirPlay) Playing back iTunes/iPod music via a network (AirPlay) The AirPlay function allows you to play back iTunes/iPod music on the front display. If the volume...
... "SETUP" menu. You can adjust the unit's volume from iTunes/iPod, set "Vol.Interlock" (p.33) in advance. iTunes (example) iPod (example) Use the following remote control keys to the unit in "Information" (p.35) in damage to "Off". BASIC OPERATION Playing back iTunes/iPod music via a network (AirPlay) Playing back iTunes/iPod music via a network (AirPlay) The AirPlay function allows you to play back iTunes/iPod music on the front display. If the volume...
Owners Manual
Page 37
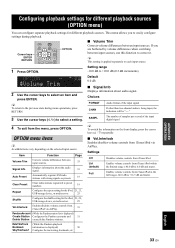
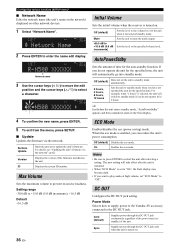
... between input sources. Setting range -10.0 dB to select an item and press ENTER. Default 0.0 dB ■ Signal Info Displays information about the audio signal. 33 Auto Preset Automatically registers FM radio stations with strong signals as presets. 18 Clear Preset Clear radio stations registered to easily configure settings during menu operations, press RETURN. Choices FORMAT CHAN Audio format of the input digital signal 4 To exit from iTunes/iPod in the full range (-80.0 dB to each input source. Volume Trim 2 Use...
... between input sources. Setting range -10.0 dB to select an item and press ENTER. Default 0.0 dB ■ Signal Info Displays information about the audio signal. 33 Auto Preset Automatically registers FM radio stations with strong signals as presets. 18 Clear Preset Clear radio stations registered to easily configure settings during menu operations, press RETURN. Choices FORMAT CHAN Audio format of the input digital signal 4 To exit from iTunes/iPod in the full range (-80.0 dB to each input source. Volume Trim 2 Use...
Owners Manual
Page 40
... play audio at high volume, set the unit to standby mode automatically. 2 hours, 4 hours, 8 hours, 12 hours Sets the unit to "Off". Off (default) Does not set "ECO Mode" to standby mode when you can reduce the unit's power consumption. ID Displays the system ID number. SP A VOL. Off (default) Mute Sets the level to the DC OUT jack. Power Mode Selects how to supply power to the Yamaha AV accessory connected to the volume level of time...
... play audio at high volume, set the unit to standby mode automatically. 2 hours, 4 hours, 8 hours, 12 hours Sets the unit to "Off". Off (default) Does not set "ECO Mode" to standby mode when you can reduce the unit's power consumption. ID Displays the system ID number. SP A VOL. Off (default) Mute Sets the level to the DC OUT jack. Power Mode Selects how to supply power to the Yamaha AV accessory connected to the volume level of time...

Owners Manual
Page 43
... the input source selected on the front display. y You can control it using a pointed object such as CD players) if you have registered its remote control code. This would allow you to use the cursor keys or numeric keys to operate the TV (this manual) to find your TV's remote control code to the unit's input selection keys (p.40). INPUT TV operation keys MUTE TV VOL TV CH TV A Switches the video inputs...
... the input source selected on the front display. y You can control it using a pointed object such as CD players) if you have registered its remote control code. This would allow you to use the cursor keys or numeric keys to operate the TV (this manual) to find your TV's remote control code to the unit's input selection keys (p.40). INPUT TV operation keys MUTE TV VOL TV CH TV A Switches the video inputs...

Owners Manual
Page 44
... controlled by holding down). Switches information on the front display, registration has failed. Displays the top menu. Enter numerical values. Stops playback temporarily. Starts playback of the following keys after selecting the input source or scene. Control the TV (p.39). If "Rem: Fail" appears on the display. SOURCE A Menu operation keys DISPLAY SOURCE SLEEP CODE SET RECEIVER SPEAKERS ID DIMMER A B COAX1 HOME SETUP COAX2 OPT1 NOW PLAYING OPTION OPT2 ENTER VOLUME DISPLAY RETURN TOP MENU DISC...
... controlled by holding down). Switches information on the front display, registration has failed. Displays the top menu. Enter numerical values. Stops playback temporarily. Starts playback of the following keys after selecting the input source or scene. Control the TV (p.39). If "Rem: Fail" appears on the display. SOURCE A Menu operation keys DISPLAY SOURCE SLEEP CODE SET RECEIVER SPEAKERS ID DIMMER A B COAX1 HOME SETUP COAX2 OPT1 NOW PLAYING OPTION OPT2 ENTER VOLUME DISPLAY RETURN TOP MENU DISC...
Owners Manual
Page 45
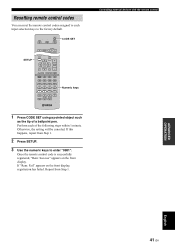
.... Resetting remote control codes You can reset the remote control codes assigned to each of a ballpoint pen. SOURCE SLEEP CODE SET RECEIVER CODE SET SETUP SPEAKERS ID DIMMER A B HOME SETUP NOW PLAYING OPTION ENTER VOLUME DISPLAY RETURN TOP MENU DISC SKIP POP-UP MENU MUTE 1 2 3 4 5 6 7 8 9 0 +10 ENT TV TV INPUT TV VOL TV CH TV MUTE Numeric keys 1 Press CODE SET using a pointed object such as the tip of the following steps within 1 minute. Perform each input selection keys to the factory default.
.... Resetting remote control codes You can reset the remote control codes assigned to each of a ballpoint pen. SOURCE SLEEP CODE SET RECEIVER CODE SET SETUP SPEAKERS ID DIMMER A B HOME SETUP NOW PLAYING OPTION ENTER VOLUME DISPLAY RETURN TOP MENU DISC SKIP POP-UP MENU MUTE 1 2 3 4 5 6 7 8 9 0 +10 ENT TV TV INPUT TV VOL TV CH TV MUTE Numeric keys 1 Press CODE SET using a pointed object such as the tip of the following steps within 1 minute. Perform each input selection keys to the factory default.

Owners Manual
Page 46
... firmware update is connected to restart and the firmware update starts. y You can download the firmware via the network and update it. NewFwAvailable 4 Press RETURN to return the previous state. 5 Use the cursor keys to select "Information" and press ENTER. SETUP Cursor keys B / C ENTER HOME SETUP NOW PLAYING OPTION ENTER VOLUME DISPLAY RETURN TOP MENU POP-UP MENU MUTE 1 Press SETUP. 2 Use the cursor keys to select "Network Setup" and press ENTER. 3 Use...
... firmware update is connected to restart and the firmware update starts. y You can download the firmware via the network and update it. NewFwAvailable 4 Press RETURN to return the previous state. 5 Use the cursor keys to select "Information" and press ENTER. SETUP Cursor keys B / C ENTER HOME SETUP NOW PLAYING OPTION ENTER VOLUME DISPLAY RETURN TOP MENU POP-UP MENU MUTE 1 Press SETUP. 2 Use the cursor keys to select "Network Setup" and press ENTER. 3 Use...
Owners Manual
Page 47
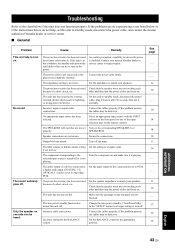
... speaker wires are not secure. Set this unit off . Secure the connections. The audio output of this unit does not function properly. The auto power standby function has turned this unit to standby mode, disconnect the power cable, plug it back in this unit back on and make sure it normally. Incorrect setting for the BALANCE control. The protection circuitry has been activated because of the connected device to PCM. Incorrect input or output cable connections. Turn the component...
... speaker wires are not secure. Set this unit off . Secure the connections. The audio output of this unit does not function properly. The auto power standby function has turned this unit to standby mode, disconnect the power cable, plug it back in this unit back on and make sure it normally. Incorrect setting for the BALANCE control. The protection circuitry has been activated because of the connected device to PCM. Incorrect input or output cable connections. Turn the component...

Owners Manual
Page 51
... desired remote control key(s). Even if the remote control code is striking the remote control sensor of this unit's ID. ■ Remote control Troubleshooting Problem The remote control does not work nor function properly. Direct sunlight or lighting (from the front panel. Cause Remedy Wrong distance or angle. Reposition this unit's ID do not respond to control. Switch the remote control ID or this manual. Try setting another code of the same manufacturer using "LIST OF REMOTE CONTROL CODES...
... desired remote control key(s). Even if the remote control code is striking the remote control sensor of this unit's ID. ■ Remote control Troubleshooting Problem The remote control does not work nor function properly. Direct sunlight or lighting (from the front panel. Cause Remedy Wrong distance or angle. Reposition this unit's ID do not respond to control. Switch the remote control ID or this manual. Try setting another code of the same manufacturer using "LIST OF REMOTE CONTROL CODES...
Owners Manual
Page 56
... (remote control 39 Power cable connection 13 Power indicator (front panel 4 Power Mode (DC OUT, SETUP menu 36 Preset station selection (FM/AM radio 19 PURE DIRECT 14 R Rear panel (part names and functions 7 REC (REC OUT) jack 10 Recording device connection 10 Remote control (part names and functions 8 Remote control code registration (playback device) ..... 39 Remote control range 9 Remote control signal transmitter (remote control) ........ 8 REMOTE ID (ADVANCED SETUP menu 37 Rename (network name 36 Repeat (iPod 21 Repeat (PC/NAS 25 Repeat (USB storage device 23 Reset (remote...
... (remote control 39 Power cable connection 13 Power indicator (front panel 4 Power Mode (DC OUT, SETUP menu 36 Preset station selection (FM/AM radio 19 PURE DIRECT 14 R Rear panel (part names and functions 7 REC (REC OUT) jack 10 Recording device connection 10 Remote control (part names and functions 8 Remote control code registration (playback device) ..... 39 Remote control range 9 Remote control signal transmitter (remote control) ........ 8 REMOTE ID (ADVANCED SETUP menu 37 Rename (network name 36 Repeat (iPod 21 Repeat (PC/NAS 25 Repeat (USB storage device 23 Reset (remote...


