
Service Manual
Page 2
... all Yamaha product owners that basic service procedures inherent to improve Yamaha products. WARNING: CHEMICAL CONTENT NOTICE! When soldering, do not inhale solder fumes or expose eyes to external device such as specified. Saved data may result in specification are continually striving to the industry, and more specifically Yamaha Products, are marked installed. PSR-VN300 IMPORTANT NOTICE This manual has been provided for the use...
... all Yamaha product owners that basic service procedures inherent to improve Yamaha products. WARNING: CHEMICAL CONTENT NOTICE! When soldering, do not inhale solder fumes or expose eyes to external device such as specified. Saved data may result in specification are continually striving to the industry, and more specifically Yamaha Products, are marked installed. PSR-VN300 IMPORTANT NOTICE This manual has been provided for the use...
Service Manual
Page 4
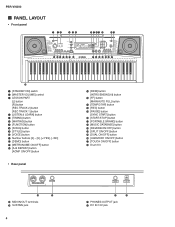
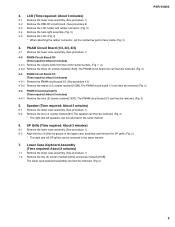
PSR-VN300 I PANEL LAYOUT • Front panel 1 23 4 56 0 7 89 A BC D EF G HI J KL M N OP Q R 1 [STANDBY/ON] switch 2 [MASTER VOLUME] control 3 LESSON PART [L] button [R] button [REC TRACK 2] button [REC TRACK 1] button 4 [LISTEN & LEARN] button 5 [TIMING] button 6 [WAITING] button 7 [FUNCTION] button 8 [SONG] button 9 [STYLE] button 0 [VOICE] button A Number buttons [0] - [9], [+/YES], [-/NO] B [DEMO] button C [METRONOME ON/OFF] button D [A-B REPEAT] button [ACMP ON/OFF] button • Rear panel E [REW] button [INTRO/ENDING/rit] button F [FF] button [MAIN/AUTO FILL] button G [TEMPO/...
PSR-VN300 I PANEL LAYOUT • Front panel 1 23 4 56 0 7 89 A BC D EF G HI J KL M N OP Q R 1 [STANDBY/ON] switch 2 [MASTER VOLUME] control 3 LESSON PART [L] button [R] button [REC TRACK 2] button [REC TRACK 1] button 4 [LISTEN & LEARN] button 5 [TIMING] button 6 [WAITING] button 7 [FUNCTION] button 8 [SONG] button 9 [STYLE] button 0 [VOICE] button A Number buttons [0] - [9], [+/YES], [-/NO] B [DEMO] button C [METRONOME ON/OFF] button D [A-B REPEAT] button [ACMP ON/OFF] button • Rear panel E [REW] button [INTRO/ENDING/rit] button F [FF] button [MAIN/AUTO FILL] button G [TEMPO/...
Service Manual
Page 5
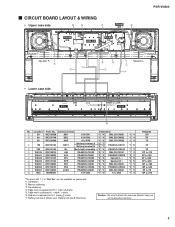
... (WE14060) JACK PNAM2/3-CN601 *3 *4 DMLCD-CN631 C 150c V8696200 61H-CN3 *1 *4 61L-CN4 *1 *4 *1 *4 *1 *4 *1 *6 *1 *4 *1 *4 *3 *4 *2 *5 *2 *5 *1 *4 *3 *4 *1 *4 *1 *4 Remarks 12P 5P 7P 3P 2P 11P L=170 5P L=120 2P L=280 2P L=220 16P L=100 10P L=340 9P L=70 12P L=210 *The parts with "( )" in "Part No." I CIRCUIT BOARD LAYOUT & WIRING • Upper case side 0 B 5 PNAM 8 3/3 + PNAM PNAM - - 2/3 DMLCD 1/3 + PSR-VN300 Speaker R 9 1 2 A 6 3 Speaker L 7 4 • Lower case...
... (WE14060) JACK PNAM2/3-CN601 *3 *4 DMLCD-CN631 C 150c V8696200 61H-CN3 *1 *4 61L-CN4 *1 *4 *1 *4 *1 *4 *1 *6 *1 *4 *1 *4 *3 *4 *2 *5 *2 *5 *1 *4 *3 *4 *1 *4 *1 *4 Remarks 12P 5P 7P 3P 2P 11P L=170 5P L=120 2P L=280 2P L=220 16P L=100 10P L=340 9P L=70 12P L=210 *The parts with "( )" in "Part No." I CIRCUIT BOARD LAYOUT & WIRING • Upper case side 0 B 5 PNAM 8 3/3 + PNAM PNAM - - 2/3 DMLCD 1/3 + PSR-VN300 Speaker R 9 1 2 A 6 3 Speaker L 7 4 • Lower case...

Service Manual
Page 6
... (11P) JK101 PHONES / OUTPUT BATTERY 1.5V x 6 AA-size,SUM-3,R6 batteries DC IN 12V AC adaptor PA-3B/PA-3C 28CA1-8834545 PSR-VN300 I BLOCK DIAGRAM Keybord 61KEY (16N) 6 TOUCH RESPONSE 61L (C1~B3) SW1-36 CN5 (7P) B01-B07 61H CN4 (12P) CN3 (12P) (C4~C6) PC0-5,PD0-5 SW37-61 B07-B11 CN2 (5P) CN1 (12P) MIDI SUSTAIN IN OUT 3 1 5 4 2 JK601...
... (11P) JK101 PHONES / OUTPUT BATTERY 1.5V x 6 AA-size,SUM-3,R6 batteries DC IN 12V AC adaptor PA-3B/PA-3C 28CA1-8834545 PSR-VN300 I BLOCK DIAGRAM Keybord 61KEY (16N) 6 TOUCH RESPONSE 61L (C1~B3) SW1-36 CN5 (7P) B01-B07 61H CN4 (12P) CN3 (12P) (C4~C6) PC0-5,PD0-5 SW37-61 B07-B11 CN2 (5P) CN1 (12P) MIDI SUSTAIN IN OUT 3 1 5 4 2 JK601...
Service Manual
Page 8
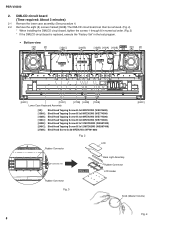
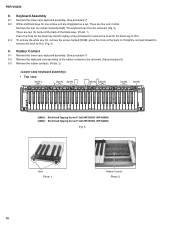
... removed. (Fig. 2) * When installing the DMLCD circuit board, tighten the screws 1 through 8 in numerical order. (Fig. 2) * If the DMLCD circuit board is replaced, execute the "Factory Set" in the test program. • Bottom view [30] [A] [150C] [240B] [150B] [150A] [150B] PNAM 3/3 [30] [A] PNAM 2/3 3456 DMLCD 1782 PNAM 1/3 [240C] [150C] Lower Case Keyboard Assembly [270B] [240B] [150B... (WF491000) Fig. 2 Rubber Connector LCD Conductor side DMLCD Back Light Assembly Rubber Connector LCD Holder [240C] Rubber Connector Fig. 3 Knob (Master Volume) Fig. 4 8 PSR-VN300 2.
... removed. (Fig. 2) * When installing the DMLCD circuit board, tighten the screws 1 through 8 in numerical order. (Fig. 2) * If the DMLCD circuit board is replaced, execute the "Factory Set" in the test program. • Bottom view [30] [A] [150C] [240B] [150B] [150A] [150B] PNAM 3/3 [30] [A] PNAM 2/3 3456 DMLCD 1782 PNAM 1/3 [240C] [150C] Lower Case Keyboard Assembly [270B] [240B] [150B... (WF491000) Fig. 2 Rubber Connector LCD Conductor side DMLCD Back Light Assembly Rubber Connector LCD Holder [240C] Rubber Connector Fig. 3 Knob (Master Volume) Fig. 4 8 PSR-VN300 2.
Service Manual
Page 9
... the control panel surface. (Fig. 1, 4) 4-2-2 Remove the three (3) screws marked [150A]. LCD (Time required: About 3 minutes) 3-1 Remove the lower case assembly. (See procedure 1) 3-2 Remove the DMLCD circuit board. (See procedure 2) 3-3 Remove the LCD holder and rubber connector. (Fig. 3) 3-4 Remove the back light assembly. (Fig. 3) 3-5 Remove the LCD. (Fig. 3) * When attaching the rubber connector, set the conductive part...
... the control panel surface. (Fig. 1, 4) 4-2-2 Remove the three (3) screws marked [150A]. LCD (Time required: About 3 minutes) 3-1 Remove the lower case assembly. (See procedure 1) 3-2 Remove the DMLCD circuit board. (See procedure 2) 3-3 Remove the LCD holder and rubber connector. (Fig. 3) 3-4 Remove the back light assembly. (Fig. 3) 3-5 Remove the LCD. (Fig. 3) * When attaching the rubber connector, set the conductive part...
Service Manual
Page 10
...and pull forward to remove the hook to lift it. (Fig. 5) 9. Rubber Contact 9-1 Remove the lower case keyboard assembly. (See procedure 7) 9-2 Remove the keyboard corresponding to the rubber contacts to remove the hook for one octave unit are integrated as a set. The keyboard can then be removed. (See ...keys for the black key to lift it. 8-3 To remove the white key C6, remove the screw marked [200B], press the hook at the back of the black keys. (Photo. 1) Press the hook for the black key and lift slightly, and pull forward to be removed. (Fig. 5) There are five sets in total. PSR-VN300...
...and pull forward to remove the hook to lift it. (Fig. 5) 9. Rubber Contact 9-1 Remove the lower case keyboard assembly. (See procedure 7) 9-2 Remove the keyboard corresponding to the rubber contacts to remove the hook for one octave unit are integrated as a set. The keyboard can then be removed. (See ...keys for the black key to lift it. 8-3 To remove the white key C6, remove the screw marked [200B], press the hook at the back of the black keys. (Photo. 1) Press the hook for the black key and lift slightly, and pull forward to be removed. (Fig. 5) There are five sets in total. PSR-VN300...

Service Manual
Page 14
... FUNCTION Data interface Common signal output for LCD driving Segment signal output for LCD driver outout Display data interface Read/write Enable Data interface Data interface PIN NO. PSR-VN300 • NT3881DF-01 (X3148A00) LCD DRIVER • ML9040A-B01GAZ03A (XZ987A00) LCD DRIVER PIN NO. NAME I/O 41 DB2 I/O 42 DB3 I/O 43 DB4 I/O 44 DB5 I/O 45 DB6 I/O 46 DB7 I /O FUNCTION Segment signal output for LCD driving Ground Oscillator Oscillator Power supply Data...
... FUNCTION Data interface Common signal output for LCD driving Segment signal output for LCD driver outout Display data interface Read/write Enable Data interface Data interface PIN NO. PSR-VN300 • NT3881DF-01 (X3148A00) LCD DRIVER • ML9040A-B01GAZ03A (XZ987A00) LCD DRIVER PIN NO. NAME I/O 41 DB2 I/O 42 DB3 I/O 43 DB4 I/O 44 DB5 I/O 45 DB6 I/O 46 DB7 I /O FUNCTION Segment signal output for LCD driving Ground Oscillator Oscillator Power supply Data...

Service Manual
Page 16
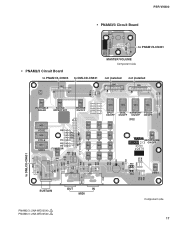
... (X2335C0 19 (X2336B0 19 Note: See parts list for details of circuit board component parts. • PNAM1/3 Circuit Board to PNAM2/3-CN502 to LCD BACK LIGHT A-B REPEAT REW FF TEMPO/TAP CLEAR SYNC START START/STOP to PNAM3/3-CN402 to DMLCD-CN131 LESSON PART R LESSON PART L WATING TIMING STANDBY /ON 16 LISTEN&LEARN to BATTERY DC IN 12V PHONES/ OUTPUT to SPEAKER L Component side 2NA-WE00540...
... (X2335C0 19 (X2336B0 19 Note: See parts list for details of circuit board component parts. • PNAM1/3 Circuit Board to PNAM2/3-CN502 to LCD BACK LIGHT A-B REPEAT REW FF TEMPO/TAP CLEAR SYNC START START/STOP to PNAM3/3-CN402 to DMLCD-CN131 LESSON PART R LESSON PART L WATING TIMING STANDBY /ON 16 LISTEN&LEARN to BATTERY DC IN 12V PHONES/ OUTPUT to SPEAKER L Component side 2NA-WE00540...
Service Manual
Page 17
PSR-VN300 • PNAM3/3 Circuit Board to PNAM1/3-CN401 • PNAM2/3 Circuit Board to PNAM1/3-CN503 to DMLCD-CN531 MASTER VOLUME Component side not installed not installed PORTABLE GRAND SOUND EFFECT KIT PEVERB ON/OFF SPLIT DUAL HARMONY TOUCH ON/OFF ON/OFF ON/OFF ON/OFF VOICE STYLE SONG FUNCTION - 0 + 7 8 9 4 5 6 1 2 3 METRONOME ON/OFF DEMO to DMLCD-CN631 SUSTAIN OUT IN MIDI PNAM2/3: 2NA-WE00540 1 PNAM3/3: 2NA-WE00540 1 Component side 17
PSR-VN300 • PNAM3/3 Circuit Board to PNAM1/3-CN401 • PNAM2/3 Circuit Board to PNAM1/3-CN503 to DMLCD-CN531 MASTER VOLUME Component side not installed not installed PORTABLE GRAND SOUND EFFECT KIT PEVERB ON/OFF SPLIT DUAL HARMONY TOUCH ON/OFF ON/OFF ON/OFF ON/OFF VOICE STYLE SONG FUNCTION - 0 + 7 8 9 4 5 6 1 2 3 METRONOME ON/OFF DEMO to DMLCD-CN631 SUSTAIN OUT IN MIDI PNAM2/3: 2NA-WE00540 1 PNAM3/3: 2NA-WE00540 1 Component side 17
Service Manual
Page 20
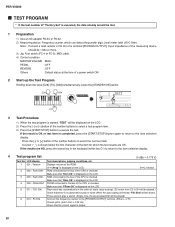
.... 3) Jig: Foot switch (FC-4 or FC-5), MIDI cable. 4) Control condition MASTER VOLUME : MAX. Make sure that "Ram OK" is displayed on the LCD. 2) Press the [-] or [+] button of the number buttons to select a test program item. 3) Press the [START/STOP] button to execute the test. Plays each key automatically in the keyboard (white key C1) to return to the terminal [PHONES/OUTPUT]. PEDAL : OFF REVERB : OFF Others : Default status at the time of...
.... 3) Jig: Foot switch (FC-4 or FC-5), MIDI cable. 4) Control condition MASTER VOLUME : MAX. Make sure that "Ram OK" is displayed on the LCD. 2) Press the [-] or [+] button of the number buttons to select a test program item. 3) Press the [START/STOP] button to execute the test. Plays each key automatically in the keyboard (white key C1) to return to the terminal [PHONES/OUTPUT]. PEDAL : OFF REVERB : OFF Others : Default status at the time of...

Service Manual
Page 21
... 0 TENKEY + DEMO METRONOME A-B REPEAT REW FF TEMPO/TAP REC PAUSE START/STOP PORTABLE GRAND SOUND EFFECT REVERB ON/OFF SPLIT ON/OFF DUAL ON/OFF HARMONY ON/OFF TOUCH ON/OFF LCD Display Tenkey 0 Tenkey + Demo Metro AB Rep Rew FF Temp/TAP Record Pause StartStp GP SoundEff Reverb Split Dual Harmony Touch Note Number G2 G#2 A2 A#2 B2 C3 C#3 D3 D#3 E3 F3 F#3 G3 G#3 A3 A#3 B3 C4 21 Connect the [MIDI IN] jack and [MIDI OUT] jack with JIS...
... 0 TENKEY + DEMO METRONOME A-B REPEAT REW FF TEMPO/TAP REC PAUSE START/STOP PORTABLE GRAND SOUND EFFECT REVERB ON/OFF SPLIT ON/OFF DUAL ON/OFF HARMONY ON/OFF TOUCH ON/OFF LCD Display Tenkey 0 Tenkey + Demo Metro AB Rep Rew FF Temp/TAP Record Pause StartStp GP SoundEff Reverb Split Dual Harmony Touch Note Number G2 G#2 A2 A#2 B2 C3 C#3 D3 D#3 E3 F3 F#3 G3 G#3 A3 A#3 B3 C4 21 Connect the [MIDI IN] jack and [MIDI OUT] jack with JIS...
Service Manual
Page 22
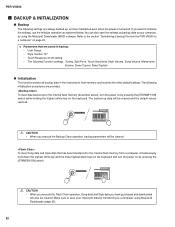
... even when the power is turned off setting • The following Function settings: Tuning, Split Point, Touch Sensitivity, Style Volume, Song Volume, Metronome Volume, Demo Cancel, Panel Sustain G Initialization This function erases all backup data in backup: • User Songs • Style number 107 • Touch Response on by transferring to the internal flash memory (described above), turn the power on /off . PSR-VN300 I BACKUP & INITIALIZATION G Backup The following initialization procedures are provided. If you want to a computer" on by using Musicsoft Downloader (page 23...
... even when the power is turned off setting • The following Function settings: Tuning, Split Point, Touch Sensitivity, Style Volume, Song Volume, Metronome Volume, Demo Cancel, Panel Sustain G Initialization This function erases all backup data in backup: • User Songs • Style number 107 • Touch Response on by transferring to the internal flash memory (described above), turn the power on /off . PSR-VN300 I BACKUP & INITIALIZATION G Backup The following initialization procedures are provided. If you want to a computer" on by using Musicsoft Downloader (page 23...
Service Manual
Page 23
... download the free Musicsoft Downloader application. * The SMF (Standard MIDI File) format is recommended) • Display : 800 x 600 HighColor (16-bit) • Other : Microsoft® Internet Explorer® 5.5 or higher NOTE • Visit the Yamaha website for Musicsoft Downloader operation are as the 107th style. Loaded Song data will be necessary for storing sequence data. Make sure that your computer, connect the PSR-VN300 as the Yamaha UX16) PSR-VN300 23 A Yamaha UX16 or similar USB-MIDI...
... download the free Musicsoft Downloader application. * The SMF (Standard MIDI File) format is recommended) • Display : 800 x 600 HighColor (16-bit) • Other : Microsoft® Internet Explorer® 5.5 or higher NOTE • Visit the Yamaha website for Musicsoft Downloader operation are as the 107th style. Loaded Song data will be necessary for storing sequence data. Make sure that your computer, connect the PSR-VN300 as the Yamaha UX16) PSR-VN300 23 A Yamaha UX16 or similar USB-MIDI...
Service Manual
Page 24
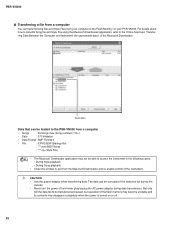
... the window to the PSR-VN300 from a computer • Songs : 99 Songs max (Song numbers 116-) • Data : 373 kilobytes • Data Format : SMF Format 0 • File : 07PK3.BUP (Backup file) : ***.mid (MIDI Song) : ***.sty (Style File) NOTE • The Musicsoft Downloader application may disappear completely when the power is turned on your PSR-VN300. For details about how to transmit Song file and Style File using the Musicsoft Downloader application, refer to the Flash Memory on or off and never plug/unplug...
... the window to the PSR-VN300 from a computer • Songs : 99 Songs max (Song numbers 116-) • Data : 373 kilobytes • Data Format : SMF Format 0 • File : 07PK3.BUP (Backup file) : ***.mid (MIDI Song) : ***.sty (Style File) NOTE • The Musicsoft Downloader application may disappear completely when the power is turned on your PSR-VN300. For details about how to transmit Song file and Style File using the Musicsoft Downloader application, refer to the Flash Memory on or off and never plug/unplug...

Service Manual
Page 25
... the display, and then use the number buttons [0]-[9], [+], [-] to display the backup file at the bottom of the Musicsoft Downloader. Click here to select the channel you transmit or receive. PSR-VN300 G Transferring a backup file from the computer, use the Delete function on Musicsoft Downloader. To erase specific Songs transferred from the PSR-VN300 to a computer You can be transferred to play back as the right-hand and left -hand part. Data that...
... the display, and then use the number buttons [0]-[9], [+], [-] to display the backup file at the bottom of the Musicsoft Downloader. Click here to select the channel you transmit or receive. PSR-VN300 G Transferring a backup file from the computer, use the Delete function on Musicsoft Downloader. To erase specific Songs transferred from the PSR-VN300 to a computer You can be transferred to play back as the right-hand and left -hand part. Data that...
Service Manual
Page 26
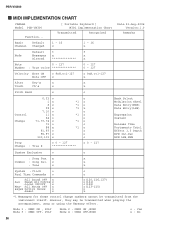
... playing the accompaniment, song or using the Harmony effect. Mode 1 : OMNI ON , POLY Mode 3 : OMNI OFF, POLY Mode 2 : OMNI ON ,MONO Mode 4 : OMNI OFF,MONO o : Yes x : No 26 PSR-VN300 I MIDI IMPLEMENTATION CHART YAMAHA Model PSR-VN300 Function... [ Portable Keyboard ] MIDI Implementation Chart Transmitted Recognized Date:21-Aug-2006 Version:1.0 Remarks Basic Default Channel Changed 1 - 16 x 1 - 16 x Mode Default 3 3 Messages x x Altered x Note 0 - 127 Number : True voice 0 - 127 0 - 127 Velocity Note ON Note OFF o 9nH,v=1-127 x o 9nH,v=1-127 x After Key...
... playing the accompaniment, song or using the Harmony effect. Mode 1 : OMNI ON , POLY Mode 3 : OMNI OFF, POLY Mode 2 : OMNI ON ,MONO Mode 4 : OMNI OFF,MONO o : Yes x : No 26 PSR-VN300 I MIDI IMPLEMENTATION CHART YAMAHA Model PSR-VN300 Function... [ Portable Keyboard ] MIDI Implementation Chart Transmitted Recognized Date:21-Aug-2006 Version:1.0 Remarks Basic Default Channel Changed 1 - 16 x 1 - 16 x Mode Default 3 3 Messages x x Altered x Note 0 - 127 Number : True voice 0 - 127 0 - 127 Velocity Note ON Note OFF o 9nH,v=1-127 x o 9nH,v=1-127 x After Key...
Service Manual
Page 28
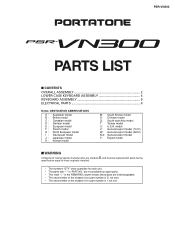
...J : Japanese model K : Korean model M : South African model O : Chinese model Q : South-east Asia model T : Taiwan model U : U.S.A. model V : General export model (110V) W: General export model (220V) N,X: General export model Y : Export model I WARNING Components having • The numbers "QTY" show quantities for each unit. • The parts with "--" in the REMARKS column means these parts are marked specification equal to those originally installed. PSR-VN300 PARTS LIST I CONTENTS OVERALL ASSEMBLY 2 LOWER CASE KEYBOARD ASSEMBLY 4 KEYBOARD ASSEMBLY 5 ELECTRICAL PARTS 6 Notes...
...J : Japanese model K : Korean model M : South African model O : Chinese model Q : South-east Asia model T : Taiwan model U : U.S.A. model V : General export model (110V) W: General export model (220V) N,X: General export model Y : Export model I WARNING Components having • The numbers "QTY" show quantities for each unit. • The parts with "--" in the REMARKS column means these parts are marked specification equal to those originally installed. PSR-VN300 PARTS LIST I CONTENTS OVERALL ASSEMBLY 2 LOWER CASE KEYBOARD ASSEMBLY 4 KEYBOARD ASSEMBLY 5 ELECTRICAL PARTS 6 Notes...

Service Manual
Page 30
...;ςʔϓ ෆ ৫ ෆ ৫ REMARKS PSR-VN300 (WH99910) (WJ00060) (WF25430) STANDBY/ON LESSON PART L,R A-B REPEAT,...,TEMPO/TAP SPLIT ON/OFF,...,TOUCH ON/OFF LISTEN&LEARN,...,WAITING PAUSE,START/STOP SONG,STYLE,VOICE FUNCTION PORTABLE GRAND,••• REVERB,ON/OFF 0-9,-,+ DEMO METRONOME ON/OFF,REC 1/3,2/3,3/3 (WE14140) (WH74380) (WD87980) (WD87990) (WD88000) MASTER VOLUME (WB79380) (WF25440) (WG81830) QTY RANK 06 06 16 2 04 8 01...
...;ςʔϓ ෆ ৫ ෆ ৫ REMARKS PSR-VN300 (WH99910) (WJ00060) (WF25430) STANDBY/ON LESSON PART L,R A-B REPEAT,...,TEMPO/TAP SPLIT ON/OFF,...,TOUCH ON/OFF LISTEN&LEARN,...,WAITING PAUSE,START/STOP SONG,STYLE,VOICE FUNCTION PORTABLE GRAND,••• REVERB,ON/OFF 0-9,-,+ DEMO METRONOME ON/OFF,REC 1/3,2/3,3/3 (WE14140) (WH74380) (WD87980) (WD87990) (WD88000) MASTER VOLUME (WB79380) (WF25440) (WG81830) QTY RANK 06 06 16 2 04 8 01...

Service Manual
Page 38
... and must be replaced with parts having specifications equel to those originally installed. A B C D PSR-VN300 OVERALL CIRCUIT DIAGRAM 1 LCD DRVER 2 3 LCD SYSTEM RESET 4 XX CPU SWL01 XX 5 XX DMLCD 6 DAC P · B XX DAC/AMP 7 8 PSR-VN300 9 A B C D E XX OP AMP E XX XX F G H MASK ROM 64M PROGRAM/WAVE FLASH ROM 4M MR27T6402L MEMORY XX DRAM 4M GLT440L16-40TC OR PN MIDI REGULATOR +3.3V REGULATOR +2.5V DECODER POWER SUPPLY MK 28CC1...
... and must be replaced with parts having specifications equel to those originally installed. A B C D PSR-VN300 OVERALL CIRCUIT DIAGRAM 1 LCD DRVER 2 3 LCD SYSTEM RESET 4 XX CPU SWL01 XX 5 XX DMLCD 6 DAC P · B XX DAC/AMP 7 8 PSR-VN300 9 A B C D E XX OP AMP E XX XX F G H MASK ROM 64M PROGRAM/WAVE FLASH ROM 4M MR27T6402L MEMORY XX DRAM 4M GLT440L16-40TC OR PN MIDI REGULATOR +3.3V REGULATOR +2.5V DECODER POWER SUPPLY MK 28CC1...


