

Owner's Manual
Page 3
... Converter that makes MIDI timing signals from any appropriate MIDI device usable for synchronization With a full complement of the Yamaha MT2X Multitrack Cassette Recorder. CONTENTS BEFORE OPERATION 2 PLEASE NOTE THE FOLLOWING PRECAUTIONS 2 THE DIFFERENCE BETWEEN TRACKS AND CHANNELS 3 WHAT IS A MULTITRACK CASSETTE RECORDER 3 THE CONTROLS AND THEIR FUNCTIONS 4 MIXER SECTION 4 RECORDER SECTION 8 METER AND MONITOR SECTION 10 CONNECTOR SECTION 12 CONNECTION EXAMPLE 14 ABOUT CASSETTE TAPES 15 MULTITRACK RECORDING TECHNIQUES...
... Converter that makes MIDI timing signals from any appropriate MIDI device usable for synchronization With a full complement of the Yamaha MT2X Multitrack Cassette Recorder. CONTENTS BEFORE OPERATION 2 PLEASE NOTE THE FOLLOWING PRECAUTIONS 2 THE DIFFERENCE BETWEEN TRACKS AND CHANNELS 3 WHAT IS A MULTITRACK CASSETTE RECORDER 3 THE CONTROLS AND THEIR FUNCTIONS 4 MIXER SECTION 4 RECORDER SECTION 8 METER AND MONITOR SECTION 10 CONNECTOR SECTION 12 CONNECTION EXAMPLE 14 ABOUT CASSETTE TAPES 15 MULTITRACK RECORDING TECHNIQUES...
Owner's Manual
Page 4
... license of equipment failure. and Canadian models is set the dbx switch ON when playing back tapes recorded with benzene or other equipment. Also, the use of C-120 tapes is all connection cords have been removed from the unit before moving it OFF when playing back tapes recorded without dbx. *dbx and the dbx mark are designed to radio and television reception. The rated supply...
... license of equipment failure. and Canadian models is set the dbx switch ON when playing back tapes recorded with benzene or other equipment. Also, the use of C-120 tapes is all connection cords have been removed from the unit before moving it OFF when playing back tapes recorded without dbx. *dbx and the dbx mark are designed to radio and television reception. The rated supply...
Owner's Manual
Page 6
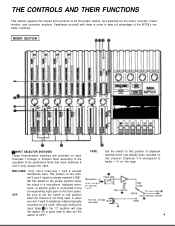
.... MIC/LINE: Only input channels 1 and 2 accept microphone input. nel 3 and 4 inputs is connected to the Microphone or instrument to take full advantage of the MT2X's versatile functions. Position them in order to channel 1 or 2 corresponding input jack on the track. OFF: Be sure to set the switch to playback material already recorded on the front panel. THE CONTROLS AND THEIR FUNCTIONS This section explains the names and functions of a microphone, keyboard...
.... MIC/LINE: Only input channels 1 and 2 accept microphone input. nel 3 and 4 inputs is connected to the Microphone or instrument to take full advantage of the MT2X's versatile functions. Position them in order to channel 1 or 2 corresponding input jack on the track. OFF: Be sure to set the switch to playback material already recorded on the front panel. THE CONTROLS AND THEIR FUNCTIONS This section explains the names and functions of a microphone, keyboard...
Owner's Manual
Page 7
.... GAIN CONTROLS These controls adjust the input level of the channel to match the output level of a microphone or instrument connected to input jack of other channels. Low output source, such as a microphone High output source, such as "pre-emphasis," and is causing clipping distortion. Control from -10dB to that instrument's harmonic sound components as outlined in professional recording. Each control is known as an electronic keyboard CLIP INDICATOR These LED indicators are used...
.... GAIN CONTROLS These controls adjust the input level of the channel to match the output level of a microphone or instrument connected to input jack of other channels. Low output source, such as a microphone High output source, such as "pre-emphasis," and is causing clipping distortion. Control from -10dB to that instrument's harmonic sound components as outlined in professional recording. Each control is known as an electronic keyboard CLIP INDICATOR These LED indicators are used...
Owner's Manual
Page 8
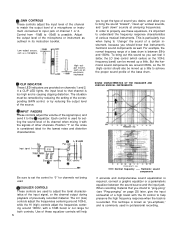
... the left side of the stereo sound field; PAN (PAN POT) CONTROLS After volume level and equalizing, the input signal is equipped with an AUX SEND jack and two (left and right) AUX RETURN jacks When special effects are also useful in ping-ponging (see "Mixdown" on page 31, each control helps determine the acoustic "position" of the signal in regards to the...
... the left side of the stereo sound field; PAN (PAN POT) CONTROLS After volume level and equalizing, the input signal is equipped with an AUX SEND jack and two (left and right) AUX RETURN jacks When special effects are also useful in ping-ponging (see "Mixdown" on page 31, each control helps determine the acoustic "position" of the signal in regards to the...
Owner's Manual
Page 9
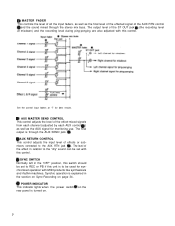
... Sync-Recording on the 7 Synchro operation is turned on. POWER INDICATOR This indicator lights when the power switch rear panel is explained in the "OFF" position, this switch should be set to REC or PB if this unit is through the AUX SEND jack AUX RETURN CONTROL This control adjusts the input level of the AUX RTN control and the sound mixed through the stereo mix buss. Set the control input faders at mixdown) and the recording level...
... Sync-Recording on the 7 Synchro operation is turned on. POWER INDICATOR This indicator lights when the power switch rear panel is explained in the "OFF" position, this switch should be set to REC or PB if this unit is through the AUX SEND jack AUX RETURN CONTROL This control adjusts the input level of the AUX RTN control and the sound mixed through the stereo mix buss. Set the control input faders at mixdown) and the recording level...
Owner's Manual
Page 11
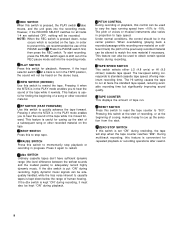
... the sound of the previously recorded material can be recorded. The low-speed setting corresponds to adequately record highly dynamic music. Press the PAUSE switch first, then press the REC switch. This feature can be used to vary the tape running speed from the start of a subsequent song or other recorded material. TAPE COUNTER This displays the amount of a track is useful for repeated playback or recording operations after rewind. 9 ZERO STOP SWITCH If this control can...
... the sound of the previously recorded material can be recorded. The low-speed setting corresponds to adequately record highly dynamic music. Press the PAUSE switch first, then press the REC switch. This feature can be used to vary the tape running speed from the start of a subsequent song or other recorded material. TAPE COUNTER This displays the amount of a track is useful for repeated playback or recording operations after rewind. 9 ZERO STOP SWITCH If this control can...
Owner's Manual
Page 13
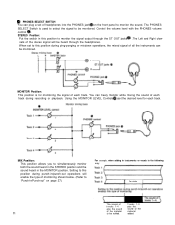
... PHONES volume control . STEREO Position: Put the switch in the following way: For retake The sound of Tracks 1-3 tracks 1-4 plus the plus the sound sound of the of the material material 11 to monitor the sound. PHONES SELECT SWITCH You can plug a set the desired level for monitoring the signal of each track. For example, when adding in instruments or vocals in this position during recording or playback.
... PHONES volume control . STEREO Position: Put the switch in the following way: For retake The sound of Tracks 1-3 tracks 1-4 plus the plus the sound sound of the of the material material 11 to monitor the sound. PHONES SELECT SWITCH You can plug a set the desired level for monitoring the signal of each track. For example, when adding in instruments or vocals in this position during recording or playback.
Owner's Manual
Page 15
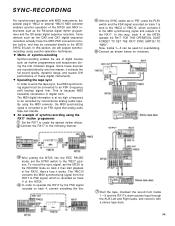
... playback, the signals of each channel (and each track. This is recorded on the MT2X. SYNC IN/SYNC OUT JACKS These jacks are output. The synchronization signal is useful if the effects device being played are used to both Left and Right channels. ST OUT JACKS The mixed signals of the tracks being used as an output terminal for the connection of the YMC2 MIDI Converter designed specifically for mixdown. POWER SWITCH This switch turns on track 4 of each track...
... playback, the signals of each channel (and each track. This is recorded on the MT2X. SYNC IN/SYNC OUT JACKS These jacks are output. The synchronization signal is useful if the effects device being played are used to both Left and Right channels. ST OUT JACKS The mixed signals of the tracks being used as an output terminal for the connection of the YMC2 MIDI Converter designed specifically for mixdown. POWER SWITCH This switch turns on track 4 of each track...
Owner's Manual
Page 16
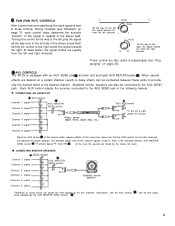
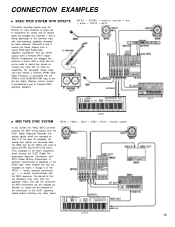
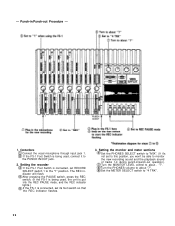
... YMC2 and used to good use. A microphone for repatching. On playback, the analog tape signals are plugged into MIDI form by these channels. CONNECTION EXAMPLES n BASIC MT2X SYSTEM WITH EFFECTS This basic recording system puts the MT2X's six input channels to control START and STOP of Yamaha KS10 powered speakers. Channels 3 and 4 receive the stereo outputs from a Yamaha DX100 Digital Programmable Algorithm Synthesizer, and the stereo outputs from the QX21 Digital Sequence Recorder into analog signals which controls the DX27 Digital Programmable Algorithm...
... YMC2 and used to good use. A microphone for repatching. On playback, the analog tape signals are plugged into MIDI form by these channels. CONNECTION EXAMPLES n BASIC MT2X SYSTEM WITH EFFECTS This basic recording system puts the MT2X's six input channels to control START and STOP of Yamaha KS10 powered speakers. Channels 3 and 4 receive the stereo outputs from a Yamaha DX100 Digital Programmable Algorithm Synthesizer, and the stereo outputs from the QX21 Digital Sequence Recorder into analog signals which controls the DX27 Digital Programmable Algorithm...
Owner's Manual
Page 17
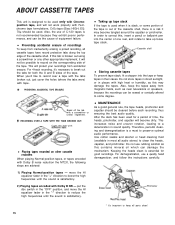
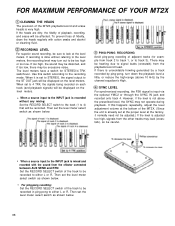
... before each recording, thus ensuring the best audio quality. EQ: 70µ should be used for both the A and B sides of C-120 tapes is a risk it will not be used when it 's necessary to a deterioration in most all parts clean! 15 Use cotton swabs and alcohol or head cleaning fluid (available in sound quality. put the dbx switch in...
... before each recording, thus ensuring the best audio quality. EQ: 70µ should be used for both the A and B sides of C-120 tapes is a risk it will not be used when it 's necessary to a deterioration in most all parts clean! 15 Use cotton swabs and alcohol or head cleaning fluid (available in sound quality. put the dbx switch in...

Owner's Manual
Page 18
...-speed mode when you a choice of two tape speeds. Solo instruments with a stereo output can have their left channel connected to a delay machine, while the right channel is mixed down to produce a stereo master tape. MONlTORlNG In addition to circuits for signal recording, this case, set the PHONES SELECT switch to the "MONITOR" position. In addition, powered monitor speakers can be decided on track 1 Mixdown tracks 1 - 4 to produce a stereo master tape Track 1 Track 2 Track 3 Track...
...-speed mode when you a choice of two tape speeds. Solo instruments with a stereo output can have their left channel connected to a delay machine, while the right channel is mixed down to produce a stereo master tape. MONlTORlNG In addition to circuits for signal recording, this case, set the PHONES SELECT switch to the "MONITOR" position. In addition, powered monitor speakers can be decided on track 1 Mixdown tracks 1 - 4 to produce a stereo master tape Track 1 Track 2 Track 3 Track...

Owner's Manual
Page 20
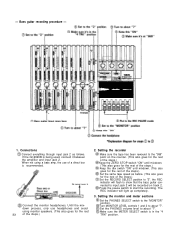
... then turn the MT2X "ON". Press the pause switch to record the Left stereo signal onto track 1. Connections Plug the AC cord into INPUTs 1 and 2. This is recommended. The REC indicator will light. 3. Plug a pair of the AUX RTN jacks (output). 2. The POWER indicator will begin flashing. - Setting up completely. 18 is to start the recording. Select the appropriate tape speed the 9.5 cm/sec. Turn "ON" the ZERO STOP switch. The REC indicator will light up the recorder section Press the RESET switch to return...
... then turn the MT2X "ON". Press the pause switch to record the Left stereo signal onto track 1. Connections Plug the AC cord into INPUTs 1 and 2. This is recommended. The REC indicator will light. 3. Plug a pair of the AUX RTN jacks (output). 2. The POWER indicator will begin flashing. - Setting up completely. 18 is to start the recording. Select the appropriate tape speed the 9.5 cm/sec. Turn "ON" the ZERO STOP switch. The REC indicator will light up the recorder section Press the RESET switch to return...

Owner's Manual
Page 23
... record the bass. Make sure the METER SELECT switch is recorded properly and there doesn't seem to be any problems, press the REW switch and reset all switches and controls to "4 TRK". If the recording is not to record over a certain spot on track 1 by headphones, and by looking at the level meter. Press the PLAY switch, and check the sound recorded on the tape. Or you can use...
... record the bass. Make sure the METER SELECT switch is recorded properly and there doesn't seem to be any problems, press the REW switch and reset all switches and controls to "4 TRK". If the recording is not to record over a certain spot on track 1 by headphones, and by looking at the level meter. Press the PLAY switch, and check the sound recorded on the tape. Or you can use...
Owner's Manual
Page 25
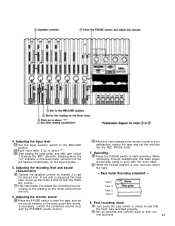
....) Set the RECORD SELECT position to "2". the REC indicator will flash to show that the bass guitar connected to about "7". Setting the monitor and meter sections Set the PHONES SELECT switch to start the recording. Make sure the METER SELECT switch is being used, connect it between the amplifier and input jack 2. If the GC2020B is in the "4 TRK" position. Connect the monitor headphones. Set the PHONES volume level to input jack 2 will light...
....) Set the RECORD SELECT position to "2". the REC indicator will flash to show that the bass guitar connected to about "7". Setting the monitor and meter sections Set the PHONES SELECT switch to start the recording. Make sure the METER SELECT switch is being used, connect it between the amplifier and input jack 2. If the GC2020B is in the "4 TRK" position. Connect the monitor headphones. Set the PHONES volume level to input jack 2 will light...
Owner's Manual
Page 26
... monitor sound Press the PAUSE switch to about "7". While monitoring through headphones, the bass player should play switch to check to start the tape, and set the recorder into the REC PAUSE mode. 7. Track 1 Track 2 Track 3 Track 4 8. When the musical segment is over, stop and rewind the tape. - Recording Press the PAUSE switch to see that the track was recorded properly. 4. Start playing the bass guitar, and slide gain control 2 towards the "MIC" direction, stopping when the "+3" indicator on the level...
... monitor sound Press the PAUSE switch to about "7". While monitoring through headphones, the bass player should play switch to check to start the tape, and set the recorder into the REC PAUSE mode. 7. Track 1 Track 2 Track 3 Track 4 8. When the musical segment is over, stop and rewind the tape. - Recording Press the PAUSE switch to see that the track was recorded properly. 4. Start playing the bass guitar, and slide gain control 2 towards the "MIC" direction, stopping when the "+3" indicator on the level...

Owner's Manual
Page 28
.... Rewind the tape, and reset to mix the sound of each channel, 1-3, to about "7". Setting the recorder Set the channel-4 RECORD SELECT switch to the "R" position to the REC PAUSE mode. 4. Use the level meter on the far right as you like until everything was recorded properly. When ping-pong recording is set to start recording. Track 1 Track 2 Track 3 Track 4 5. The REC indicator will record the keyboards. 26 Ping-pong Recording Completed - Return all switches and controls to monitor the sound recorded...
.... Rewind the tape, and reset to mix the sound of each channel, 1-3, to about "7". Setting the recorder Set the channel-4 RECORD SELECT switch to the "R" position to the REC PAUSE mode. 4. Use the level meter on the far right as you like until everything was recorded properly. When ping-pong recording is set to start recording. Track 1 Track 2 Track 3 Track 4 5. The REC indicator will record the keyboards. 26 Ping-pong Recording Completed - Return all switches and controls to monitor the sound recorded...
Owner's Manual
Page 31
... unit is put into the REC PAUSE mode, and the REC indicator lights.) If the FS-1 is being used , connect it 's not set to this position, you won't be able to monitor the new recording sound and the playback sound of tracks 1-4 during punch-in /Punch-out Procedure - 1. After pressing the PAUSE switch, press the REC switch. (If the FS-1 is connected, set RECORD SELECT switch 1 to about "7". Connections Connect the vocal microphone through input jack...
... unit is put into the REC PAUSE mode, and the REC indicator lights.) If the FS-1 is being used , connect it 's not set to this position, you won't be able to monitor the new recording sound and the playback sound of tracks 1-4 during punch-in /Punch-out Procedure - 1. After pressing the PAUSE switch, press the REC switch. (If the FS-1 is connected, set RECORD SELECT switch 1 to about "7". Connections Connect the vocal microphone through input jack...
Owner's Manual
Page 36
... sounds input through the AUX Left and Right jacks, and record it to the RECORD mode on track 4 then start playback of these sources are recorded directly onto the master, it works. l An example of synchro-recording using synchro-operation techniques. With the SYNC switch set to the "REC" position. To record the sync signal, set the SYNC switch to "PB", press the PLAY switch and the FSK signal recorded on track 1 is recorded on track 4, connect everything like this way, track 4 of the MT2X operates...
... sounds input through the AUX Left and Right jacks, and record it to the RECORD mode on track 4 then start playback of these sources are recorded directly onto the master, it works. l An example of synchro-recording using synchro-operation techniques. With the SYNC switch set to the "REC" position. To record the sync signal, set the SYNC switch to "PB", press the PLAY switch and the FSK signal recorded on track 1 is recorded on track 4, connect everything like this way, track 4 of the MT2X operates...
Owner's Manual
Page 37
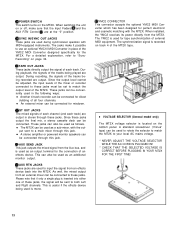
... jack will be displayed on the level meters. Use this happens repeatedly, adjust the level adjustment volume at the bottom of the MT2X. (Since the unit is already set at the proper level at the level meters. PING-PONG RECORDING Avoid ping-pong recording of adjacent tracks (for STEREO/4 TRK switchover. If this switch according to signal leaks (crosstalk) from the other tracks may not operate during playback. Then set the level meter select switch...
... jack will be displayed on the level meters. Use this happens repeatedly, adjust the level adjustment volume at the bottom of the MT2X. (Since the unit is already set at the proper level at the level meters. PING-PONG RECORDING Avoid ping-pong recording of adjacent tracks (for STEREO/4 TRK switchover. If this switch according to signal leaks (crosstalk) from the other tracks may not operate during playback. Then set the level meter select switch...


