
Owner's Manual
Page 2
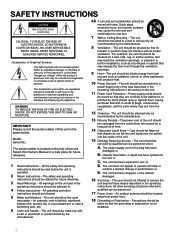
... Instructions - or B. Please record the serial number of time. 14 Object and Liquid Entry - for example, near a bathtub, washbowl, kitchen sink, laundry tub, in a safe place for a long period of this Owner's Manual in a wet basement, or near water - Power-supply cords should be referred to service the unit beyond those means described in the space below. Retain this unit in the operating instructions...
... Instructions - or B. Please record the serial number of time. 14 Object and Liquid Entry - for example, near a bathtub, washbowl, kitchen sink, laundry tub, in a safe place for a long period of this Owner's Manual in a wet basement, or near water - Power-supply cords should be referred to service the unit beyond those means described in the space below. Retain this unit in the operating instructions...
Owner's Manual
Page 3
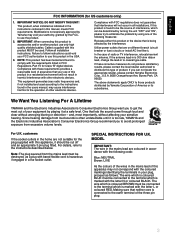
... use the product. 2. Follow all installations. Failure to follow instructions could void your plug, proceed as follows: The wire which is coloured BLUE must be destroyed, as indicated in the instructions contained in this product in the users manual, may void your sensitive hearing. In the case of America or its subsidiaries. If you to coaxial type cable. One that lets the sound...
... use the product. 2. Follow all installations. Failure to follow instructions could void your plug, proceed as follows: The wire which is coloured BLUE must be destroyed, as indicated in the instructions contained in this product in the users manual, may void your sensitive hearing. In the case of America or its subsidiaries. If you to coaxial type cable. One that lets the sound...
Owner's Manual
Page 7
... recording for purchasing this manual carefully. English ENGLISH INTRODUCTION Thank you for long time recording • Optical Digital Input/Output • Full Operation Remote control When you connect the unit to CRX-M5 • Automatic Synchronized Recording • Timer Play • Sleep Timer • Recording Using Timer CONTENTS PRECAUTIONS 2 NAMES OF BUTTONS, CONTROLS, AND INDICATORS 3 GETTING STARTED Connecting the unit to the CRX-M5 .......... 4 Turning on/off the unit 5 Preparing the remote control transmitter .. 6 PLAYBACK MD playback 7 Selecting the time display...
... recording for purchasing this manual carefully. English ENGLISH INTRODUCTION Thank you for long time recording • Optical Digital Input/Output • Full Operation Remote control When you connect the unit to CRX-M5 • Automatic Synchronized Recording • Timer Play • Sleep Timer • Recording Using Timer CONTENTS PRECAUTIONS 2 NAMES OF BUTTONS, CONTROLS, AND INDICATORS 3 GETTING STARTED Connecting the unit to the CRX-M5 .......... 4 Turning on/off the unit 5 Preparing the remote control transmitter .. 6 PLAYBACK MD playback 7 Selecting the time display...
Owner's Manual
Page 8
... located on the rear exterior. (U.K., Europe, Singapore, and General models only.) Laser component in this product is called the standby mode. E-2 Using this unit with chemical solvents; NOTE Please check the copyright laws in your country to use force on switches, knobs or cords. • When not planning to record from windows, heat sources, vibration, dust, moisture, or cold. Precautions should...
... located on the rear exterior. (U.K., Europe, Singapore, and General models only.) Laser component in this product is called the standby mode. E-2 Using this unit with chemical solvents; NOTE Please check the copyright laws in your country to use force on switches, knobs or cords. • When not planning to record from windows, heat sources, vibration, dust, moisture, or cold. Precautions should...
Owner's Manual
Page 9
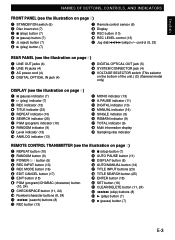
... (General model only) DISPLAY (see the illustration on page 6) 1 REPEAT button (10) 2 RANDOM button (9) 3 POWER / button (5) 4 REC INPUT button (13) 5 REC MODE button (16) 6 EDIT CANCEL button (17) 7 EDIT button (18) 8 PGM (program)/CHARAC (character) button (10, 24) 9 CHECK/SPACE button (11, 24) ! REC LEVEL control (13) " Jog dial/4/¢ (skip)/+/- English NAMES OF BUTTONS, CONTROLS, AND INDICATORS FRONT PANEL (see the illustration on page 5) 1 STANDBY/ON switch (5) 2 Disc insert slot (7) 3 7 (stop ) button (7) % AUTO PAUSE button (11) & DISPLAY button (8) ( AUTO/MANUAL button (14...
... (General model only) DISPLAY (see the illustration on page 6) 1 REPEAT button (10) 2 RANDOM button (9) 3 POWER / button (5) 4 REC INPUT button (13) 5 REC MODE button (16) 6 EDIT CANCEL button (17) 7 EDIT button (18) 8 PGM (program)/CHARAC (character) button (10, 24) 9 CHECK/SPACE button (11, 24) ! REC LEVEL control (13) " Jog dial/4/¢ (skip)/+/- English NAMES OF BUTTONS, CONTROLS, AND INDICATORS FRONT PANEL (see the illustration on page 5) 1 STANDBY/ON switch (5) 2 Disc insert slot (7) 3 7 (stop ) button (7) % AUTO PAUSE button (11) & DISPLAY button (8) ( AUTO/MANUAL button (14...

Owner's Manual
Page 10
... you can connect C or D using the audio connecting cords. Insert the plugs into the wall outlet until all other connections are completed. Make sure that the plugs are properly made, and that the left channel and the red plug corresponds to a wall outlet. 1 AUX/MD TAPE C IN D OUT A IN B OUT L L R R SPEAKERS 6 MIN. /SPEAKER 6 MIN. /HAUT-PARLEUR +R- - L+ SUBWOOFER OUT FM 75 UNBAL GND AM ANTENNA DIGITAL OUT SYSTEM...
... you can connect C or D using the audio connecting cords. Insert the plugs into the wall outlet until all other connections are completed. Make sure that the plugs are properly made, and that the left channel and the red plug corresponds to a wall outlet. 1 AUX/MD TAPE C IN D OUT A IN B OUT L L R R SPEAKERS 6 MIN. /SPEAKER 6 MIN. /HAUT-PARLEUR +R- - L+ SUBWOOFER OUT FM 75 UNBAL GND AM ANTENNA DIGITAL OUT SYSTEM...
Owner's Manual
Page 11
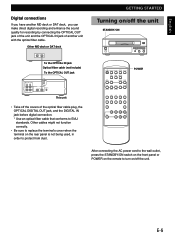
GettPinlagyiSntgarCteDds GETTING STARTED Turning on/off the unit STANDBY/ON STANDBY/ON REC REC LEVEL - + 0 10 AUTO POWER RANDOM REPEAT PAUSE DISPLAY / REC REC AUTO/ INPUT MODE MANUAL EDIT CANCEL EDIT TITLE TITLE SEARCH INPUT PGM CHECK CLEAR SET ENTER CHARAC SPACE DELETE ABC DEF G H I J K L 1 2 3 4 5 MNO PRS TUV WXY Q Z 6 7 8 9 0 & ( ) - / +100 ' , : ? ! +10 REC POWER After connecting the AC power cord to the wall outlet, press the STANDBY/ON switch on the front panel or POWER on the remote to EIAJ standards...
GettPinlagyiSntgarCteDds GETTING STARTED Turning on/off the unit STANDBY/ON STANDBY/ON REC REC LEVEL - + 0 10 AUTO POWER RANDOM REPEAT PAUSE DISPLAY / REC REC AUTO/ INPUT MODE MANUAL EDIT CANCEL EDIT TITLE TITLE SEARCH INPUT PGM CHECK CLEAR SET ENTER CHARAC SPACE DELETE ABC DEF G H I J K L 1 2 3 4 5 MNO PRS TUV WXY Q Z 6 7 8 9 0 & ( ) - / +100 ' , : ? ! +10 REC POWER After connecting the AC power cord to the wall outlet, press the STANDBY/ON switch on the front panel or POWER on the remote to EIAJ standards...
Owner's Manual
Page 13
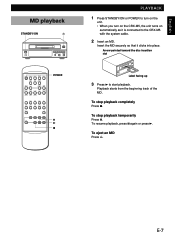
... 8. To stop playback completely Press 7. To eject an MD Press ). English MD playback STANDBY/ON ) STANDBY/ON REC LEVEL REC - + 0 10 AUTO POWER RANDOM REPEAT PAUSE DISPLAY / REC REC AUTO/ INPUT MODE MANUAL EDIT CANCEL EDIT TITLE TITLE SEARCH INPUT PGM CHECK CLEAR SET ENTER CHARAC SPACE DELETE ABC DEF G H I J K L 1 2 3 4 5 MNO PRS TUV WXY Q Z 6 7 8 9 0 & ( ) - / +100 ' , : ? ! +10 REC POWER 8 3 7 GettPinlagyiSntgarCteDds PLAYBACK 1 Press STANDBY/ON or POWER to turn on the unit. • When you turn on the CRX-M5, the unit turns on...
... 8. To stop playback completely Press 7. To eject an MD Press ). English MD playback STANDBY/ON ) STANDBY/ON REC LEVEL REC - + 0 10 AUTO POWER RANDOM REPEAT PAUSE DISPLAY / REC REC AUTO/ INPUT MODE MANUAL EDIT CANCEL EDIT TITLE TITLE SEARCH INPUT PGM CHECK CLEAR SET ENTER CHARAC SPACE DELETE ABC DEF G H I J K L 1 2 3 4 5 MNO PRS TUV WXY Q Z 6 7 8 9 0 & ( ) - / +100 ' , : ? ! +10 REC POWER 8 3 7 GettPinlagyiSntgarCteDds PLAYBACK 1 Press STANDBY/ON or POWER to turn on the unit. • When you turn on the CRX-M5, the unit turns on...

Owner's Manual
Page 14
... a track, or for reviewing the contents quickly. AUTO POWER RANDOM REPEAT PAUSE DISPLAY / REC REC AUTO/ INPUT MODE MANUAL EDIT CANCEL EDIT TITLE TITLE SEARCH INPUT PGM CHECK CLEAR SET ENTER CHARAC SPACE DELETE ABC DEF G H I J K L 1 2 3 4 5 MNO PRS TUV WXY Q Z 6 7 8 9 0 & ( ) - / +100 ' , : ? ! +10 DISPLAY REC Each time you display other information, such as follows: Disc title (during stop) or track title (during playback or stop mode. • If ¢ or 4 is pressed and held, the track number successively changes...
... a track, or for reviewing the contents quickly. AUTO POWER RANDOM REPEAT PAUSE DISPLAY / REC REC AUTO/ INPUT MODE MANUAL EDIT CANCEL EDIT TITLE TITLE SEARCH INPUT PGM CHECK CLEAR SET ENTER CHARAC SPACE DELETE ABC DEF G H I J K L 1 2 3 4 5 MNO PRS TUV WXY Q Z 6 7 8 9 0 & ( ) - / +100 ' , : ? ! +10 DISPLAY REC Each time you display other information, such as follows: Disc title (during stop) or track title (during playback or stop mode. • If ¢ or 4 is pressed and held, the track number successively changes...
Owner's Manual
Page 15
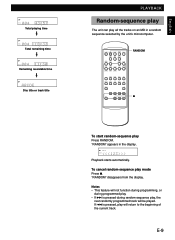
... DISPLAY / REC REC AUTO/ INPUT MODE MANUAL EDIT CANCEL EDIT TITLE TITLE SEARCH INPUT PGM CHECK CLEAR SET ENTER CHARAC SPACE DELETE ABC DEF G H I J K L 1 2 3 4 5 MNO PRS TUV WXY Q Z 6 7 8 9 0 & ( ) - / +100 ' , : ? ! +10 REC RANDOM 7 To start random-sequence play mode Press 7. "RANDOM" disappears from the display. "RANDOM" appears in a random sequence selected by the unit's microcomputer. RANDOM SINGLE Playback starts automatically. TOTAL Total playing time TOTAL Total remaining time REMAIN Remaining recordable time Disc title or track...
... DISPLAY / REC REC AUTO/ INPUT MODE MANUAL EDIT CANCEL EDIT TITLE TITLE SEARCH INPUT PGM CHECK CLEAR SET ENTER CHARAC SPACE DELETE ABC DEF G H I J K L 1 2 3 4 5 MNO PRS TUV WXY Q Z 6 7 8 9 0 & ( ) - / +100 ' , : ? ! +10 REC RANDOM 7 To start random-sequence play mode Press 7. "RANDOM" disappears from the display. "RANDOM" appears in a random sequence selected by the unit's microcomputer. RANDOM SINGLE Playback starts automatically. TOTAL Total playing time TOTAL Total remaining time REMAIN Remaining recordable time Disc title or track...

Owner's Manual
Page 17
PGM Selected track Program number number 5 Repeat steps 3 and 4 to be used during stop in program play Press PGM so that "PGM" disappears from the display, or press POWER to stop program play to skip to start program play . 2. Press 7 to turn off the unit. Press CHECK. Press PGM. AUTO POWER RANDOM REPEAT PAUSE DISPLAY / REC REC AUTO/ INPUT MODE MANUAL EDIT CANCEL EDIT TITLE TITLE SEARCH INPUT PGM CHECK CLEAR SET ENTER CHARAC SPACE DELETE ABC DEF G H I J K L 1 2 3 4 5 MNO PRS TUV...
PGM Selected track Program number number 5 Repeat steps 3 and 4 to be used during stop in program play Press PGM so that "PGM" disappears from the display, or press POWER to stop program play to skip to start program play . 2. Press 7 to turn off the unit. Press CHECK. Press PGM. AUTO POWER RANDOM REPEAT PAUSE DISPLAY / REC REC AUTO/ INPUT MODE MANUAL EDIT CANCEL EDIT TITLE TITLE SEARCH INPUT PGM CHECK CLEAR SET ENTER CHARAC SPACE DELETE ABC DEF G H I J K L 1 2 3 4 5 MNO PRS TUV...
Owner's Manual
Page 18
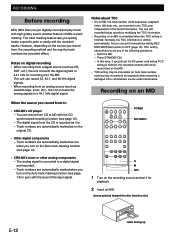
... be impossible (or Auto track number marking may not perform as cassette tape, tuner, etc.), the unit converts the analog signals to a 44.1 kHz digital signal. Press STANDBY/ON. - TOC writing starts when you do any of MDs is when you turn on the Auto track marking function (see page 14). • CRX-M5's tuner or other analog components - Recording on an MD AUTO POWER RANDOM REPEAT PAUSE DISPLAY / REC REC AUTO/ INPUT MODE MANUAL EDIT CANCEL EDIT...
... be impossible (or Auto track number marking may not perform as cassette tape, tuner, etc.), the unit converts the analog signals to a 44.1 kHz digital signal. Press STANDBY/ON. - TOC writing starts when you do any of MDs is when you turn on the Auto track marking function (see page 14). • CRX-M5's tuner or other analog components - Recording on an MD AUTO POWER RANDOM REPEAT PAUSE DISPLAY / REC REC AUTO/ INPUT MODE MANUAL EDIT CANCEL EDIT...

Owner's Manual
Page 19
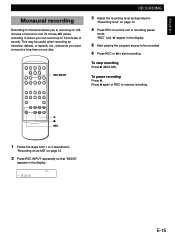
... unit to recording pause mode. Tuner, tape deck,etc.) DIGITAL TOTAL For digital recording from the LINE IN input (Ex. The OVER indicators should not light. English 3 Press REC INPUT repeatedly to select the input connected to the sound source you press DISPLAY while recording, the display changes as follows: Current track number and recording time of the MD and the recording is completed. To pause recording Press 8. E-13 Adjust the recording level by turning the REC LEVEL control so that has a digital output (volume) control, set the recording level, first play...
... unit to recording pause mode. Tuner, tape deck,etc.) DIGITAL TOTAL For digital recording from the LINE IN input (Ex. The OVER indicators should not light. English 3 Press REC INPUT repeatedly to select the input connected to the sound source you press DISPLAY while recording, the display changes as follows: Current track number and recording time of the MD and the recording is completed. To pause recording Press 8. E-13 Adjust the recording level by turning the REC LEVEL control so that has a digital output (volume) control, set the recording level, first play...

Owner's Manual
Page 20
When recording digital signals Track numbers are in the display. 5 Press CD SYNC . When you press 7 (MDX-M5) and the REC END WRITING function set the unit to manual track marking, press EDIT at the desired point during recording. RECORDING Auto track marking When making a recording, you start recording, but none are written in the display). You can easily record a CD on an MD with the input level of the recording, both units are written in the same positions as...
When recording digital signals Track numbers are in the display. 5 Press CD SYNC . When you press 7 (MDX-M5) and the REC END WRITING function set the unit to manual track marking, press EDIT at the desired point during recording. RECORDING Auto track marking When making a recording, you start recording, but none are written in the display). You can easily record a CD on an MD with the input level of the recording, both units are written in the same positions as...
Owner's Manual
Page 21
...Start playing the program source to be recorded. 6 Press REC or 8 to start recording. AUTO POWER RANDOM REPEAT PAUSE DISPLAY / REC REC AUTO/ INPUT MODE MANUAL EDIT CANCEL EDIT TITLE TITLE SEARCH INPUT PGM CHECK CLEAR SET ENTER CHARAC SPACE DELETE ABC DEF G H I J K L 1 2 3 4 5 MNO PRS TUV WXY Q Z 6 7 8 9 0 & ( ) - / +100 ' , : ? ! +10 REC REC INPUT 8 7 REC GettPinlagyiSntgarCteDds RECORDING 3 Adjust the recording level as described in stereo you can record up to 148 minutes of sound). To stop recording Press 7 (MDX-M5). To pause recording Press 8. English...
...Start playing the program source to be recorded. 6 Press REC or 8 to start recording. AUTO POWER RANDOM REPEAT PAUSE DISPLAY / REC REC AUTO/ INPUT MODE MANUAL EDIT CANCEL EDIT TITLE TITLE SEARCH INPUT PGM CHECK CLEAR SET ENTER CHARAC SPACE DELETE ABC DEF G H I J K L 1 2 3 4 5 MNO PRS TUV WXY Q Z 6 7 8 9 0 & ( ) - / +100 ' , : ? ! +10 REC REC INPUT 8 7 REC GettPinlagyiSntgarCteDds RECORDING 3 Adjust the recording level as described in stereo you can record up to 148 minutes of sound). To stop recording Press 7 (MDX-M5). To pause recording Press 8. English...

Owner's Manual
Page 23
AUTO POWER RANDOM REPEAT PAUSE DISPLAY / REC REC AUTO/ INPUT MODE MANUAL EDIT CANCEL EDIT TITLE TITLE SEARCH INPUT PGM CHECK CLEAR SET ENTER CHARAC SPACE DELETE ABC DEF G H I J K L 1 2 3 4 5 MNO PRS TUV WXY Q Z 6 7 8 9 0 & ( ) - / +100 ' , : ? ! +10 REC EDIT CANCEL ENTER SET Notes on editing Before editing Make sure that track numbers are updated automatically when you perform MOVE, ERASE, COMBINE, or DIVIDE operations.) • MOVE Lets you move a track to the condition before...
AUTO POWER RANDOM REPEAT PAUSE DISPLAY / REC REC AUTO/ INPUT MODE MANUAL EDIT CANCEL EDIT TITLE TITLE SEARCH INPUT PGM CHECK CLEAR SET ENTER CHARAC SPACE DELETE ABC DEF G H I J K L 1 2 3 4 5 MNO PRS TUV WXY Q Z 6 7 8 9 0 & ( ) - / +100 ' , : ? ! +10 REC EDIT CANCEL ENTER SET Notes on editing Before editing Make sure that track numbers are updated automatically when you perform MOVE, ERASE, COMBINE, or DIVIDE operations.) • MOVE Lets you move a track to the condition before...

Owner's Manual
Page 31
... at a preset time Play the desired disc with the system cable, you can easily locate a desired track using the title you press TITLE INPUT during stop or playback. • During playback The title of the current track appears. • During stop an MD at a preset time Insert a blank disc into the unit and set the CRX-M5 to start play from the beginning of the CRX-M5. AUTO POWER RANDOM REPEAT PAUSE DISPLAY / REC REC AUTO/ INPUT MODE MANUAL EDIT CANCEL...
... at a preset time Play the desired disc with the system cable, you can easily locate a desired track using the title you press TITLE INPUT during stop or playback. • During playback The title of the current track appears. • During stop an MD at a preset time Insert a blank disc into the unit and set the CRX-M5 to start play from the beginning of the CRX-M5. AUTO POWER RANDOM REPEAT PAUSE DISPLAY / REC REC AUTO/ INPUT MODE MANUAL EDIT CANCEL...

Owner's Manual
Page 32
... tracks cannot be "2" minutes. Track numbers are several times already. The correct recorded/playing time may not lead to the MD recording system and are not counted, so erasing them may not be displayed. The remaining recording time does not increase even after erasing numerous short tracks Tracks under 12 seconds in length are not a result of monaural-format MDs. The contents recorded may exhibit sound dropout during digital recording...
... tracks cannot be "2" minutes. Track numbers are several times already. The correct recorded/playing time may not lead to the MD recording system and are not counted, so erasing them may not be displayed. The remaining recording time does not increase even after erasing numerous short tracks Tracks under 12 seconds in length are not a result of monaural-format MDs. The contents recorded may exhibit sound dropout during digital recording...

Owner's Manual
Page 34
... unit. The carriage lock function has been activated. REMEDY Replace the current disc with fewer recorded tracks, or erase unnecessary tracks from recording ("PROTECTED" appears in the display). Reload the disc with new ones. E-28 The input setting is too low. Place the unit further away from the beginning. Excessive noise. The disc has been loaded incorrectly. The recording level is incorrect. The remote control is not possible. Recording is being used . Set the digital output level...
... unit. The carriage lock function has been activated. REMEDY Replace the current disc with fewer recorded tracks, or erase unnecessary tracks from recording ("PROTECTED" appears in the display). Reload the disc with new ones. E-28 The input setting is too low. Place the unit further away from the beginning. Excessive noise. The disc has been loaded incorrectly. The recording level is incorrect. The remote control is not possible. Recording is being used . Set the digital output level...

Owner's Manual
Page 35
... because the maximum number of characters for playback only (you cannot record on the inserted MD is made to the selected digital input jack. This is in progress. Change the disc with enough blank for digital recordings are not possible because of the displayed messages are: DISPLAYED MESSAGE NO DISC UNLOCK SCMS ON Not Audio DISC FULL TITLE FULL BLANK DISC NO TRACKS READING WRITING DISC ERROR EDIT NOW! Record some characters. If...
... because the maximum number of characters for playback only (you cannot record on the inserted MD is made to the selected digital input jack. This is in progress. Change the disc with enough blank for digital recordings are not possible because of the displayed messages are: DISPLAYED MESSAGE NO DISC UNLOCK SCMS ON Not Audio DISC FULL TITLE FULL BLANK DISC NO TRACKS READING WRITING DISC ERROR EDIT NOW! Record some characters. If...

