
Owner's Manual
Page 3
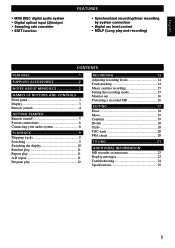
... function FEATURES • Synchronized recording/timer recording by system connection • Digital rec level control • MDLP (Long play and recording) CONTENTS FEATURES 1 SUPPLIED ACCESSORIES 2 NOTES ABOUT MINIDISCS 2 NAMES OF BUTTONS AND CONTROLS Front panel 3 Display 3 Remote control 4 GETTING STARTED Remote control 5 System connections 6 Connecting your audio system 8 PLAYBACK 9 Skipping tracks 9 Searching 9 Switching the display 10...
... function FEATURES • Synchronized recording/timer recording by system connection • Digital rec level control • MDLP (Long play and recording) CONTENTS FEATURES 1 SUPPLIED ACCESSORIES 2 NOTES ABOUT MINIDISCS 2 NAMES OF BUTTONS AND CONTROLS Front panel 3 Display 3 Remote control 4 GETTING STARTED Remote control 5 System connections 6 Connecting your audio system 8 PLAYBACK 9 Skipping tracks 9 Searching 9 Switching the display 10...

Owner's Manual
Page 4
... wiping it with a dry cloth. • Because the MD itself is dirty or warped. SUPPLIED ACCESSORIES Check that the following items are included. • Remote control • Optical cable TITLE DELETE SET CANCEL ENTER CHAR NUMBER EDIT ABC DEF GHI JKL 1 2 3 4 MNO PQR STU VWX 5 6 7 8 ...Y Z / SPACE 9 0 +10 +100 REC/ PAUSE SYNC M-MARK REC MODE INPUT RANDOM PROGRAM REPEAT A-B S/F DISPLAY SCROLL POWER • System control cable • Batteries (AA, R6, UM-3) • Audio pin cable NOTES ABOUT MINIDISCS Care of MDs • Do not expose the MD to force the...
... wiping it with a dry cloth. • Because the MD itself is dirty or warped. SUPPLIED ACCESSORIES Check that the following items are included. • Remote control • Optical cable TITLE DELETE SET CANCEL ENTER CHAR NUMBER EDIT ABC DEF GHI JKL 1 2 3 4 MNO PQR STU VWX 5 6 7 8 ...Y Z / SPACE 9 0 +10 +100 REC/ PAUSE SYNC M-MARK REC MODE INPUT RANDOM PROGRAM REPEAT A-B S/F DISPLAY SCROLL POWER • System control cable • Batteries (AA, R6, UM-3) • Audio pin cable NOTES ABOUT MINIDISCS Care of MDs • Do not expose the MD to force the...
Owner's Manual
Page 5
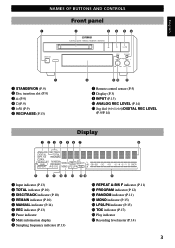
DIGITAL + MIN MAX 8 90 q 7 Remote control sensor (P.5) 8 Display (P.3) 9 INPUT (P.13) 0 ANALOG REC LEVEL (P.14) q Jog dial ($ ›)/DIGITAL REC LEVEL (P.9/P.14) Display 1 23 4 5 6 7 8 ANALOG DISC ...(P.11) e MONO indicator (P.15) r LP2/LP4 indicator (P.15) t TOC indicator (P.17) y Play indicator u Recording level meter (P.14) 3 English NAMES OF BUTTONS AND CONTROLS Front panel 1 2 3 4 56 NATURAL SOUND MINIDISC RECORDER MDX-E300 STANDBY/ON 7 1 STANDBY/ON (P.9) 2 Disc insertion slot (P.9) 3 (P.9) 4 & (P.9) 5 #/* (P.9) 6 REC/PAUSE (P.13) INPUT REC/PAUSE REC LEVEL ANALOG -
DIGITAL + MIN MAX 8 90 q 7 Remote control sensor (P.5) 8 Display (P.3) 9 INPUT (P.13) 0 ANALOG REC LEVEL (P.14) q Jog dial ($ ›)/DIGITAL REC LEVEL (P.9/P.14) Display 1 23 4 5 6 7 8 ANALOG DISC ...(P.11) e MONO indicator (P.15) r LP2/LP4 indicator (P.15) t TOC indicator (P.17) y Play indicator u Recording level meter (P.14) 3 English NAMES OF BUTTONS AND CONTROLS Front panel 1 2 3 4 56 NATURAL SOUND MINIDISC RECORDER MDX-E300 STANDBY/ON 7 1 STANDBY/ON (P.9) 2 Disc insertion slot (P.9) 3 (P.9) 4 & (P.9) 5 #/* (P.9) 6 REC/PAUSE (P.13) INPUT REC/PAUSE REC LEVEL ANALOG -

Owner's Manual
Page 6
NAMES OF BUTTONS AND CONTROLS Remote control 1 t TITLE DELETE SET 2 CANCEL ENTER EDIT y 3 CHAR NUMBER 4 ABC DEF GHI JKL 1 2 3 4 5 MNO PQR STU VWX 5 6 7 8 Y Z / SPACE 9 0 +10 +100 6 u 7 i 8 REC/ PAUSE 9 o SYNC p 0 M-MARK REC MODE ...
NAMES OF BUTTONS AND CONTROLS Remote control 1 t TITLE DELETE SET 2 CANCEL ENTER EDIT y 3 CHAR NUMBER 4 ABC DEF GHI JKL 1 2 3 4 5 MNO PQR STU VWX 5 6 7 8 Y Z / SPACE 9 0 +10 +100 6 u 7 i 8 REC/ PAUSE 9 o SYNC p 0 M-MARK REC MODE ...
Owner's Manual
Page 7
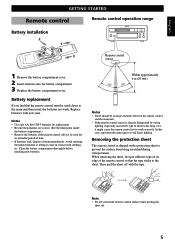
English GETTING STARTED Remote control Battery installation 2 1 Remote control operation range STANDBY/ON NATURAL SOUND MINIDISC RECORDER MDX-E300 INPUT REC/PAUSE REC LEVEL ANALOG -... V W 8 NUMCBAEDNCERELLETE ENTESRET T Q R S 7 +S1P0ACE 2 EF TITLE +100 G 3 U T D CHAR Q R S 7 +S1P0ACE 2 EF TITLE D CHAR P 6 C B P 6 C M N 5O YZ 9 / 0 A 1 B M N 5O YZ 9 / 0 A 1 Note • Do not scratch the remote control surface when peeling the sheet off with a protection sheet to avoid direct lighting. Battery replacement If you find that the tape sticks to work correctly...
English GETTING STARTED Remote control Battery installation 2 1 Remote control operation range STANDBY/ON NATURAL SOUND MINIDISC RECORDER MDX-E300 INPUT REC/PAUSE REC LEVEL ANALOG -... V W 8 NUMCBAEDNCERELLETE ENTESRET T Q R S 7 +S1P0ACE 2 EF TITLE +100 G 3 U T D CHAR Q R S 7 +S1P0ACE 2 EF TITLE D CHAR P 6 C B P 6 C M N 5O YZ 9 / 0 A 1 B M N 5O YZ 9 / 0 A 1 Note • Do not scratch the remote control surface when peeling the sheet off with a protection sheet to avoid direct lighting. Battery replacement If you find that the tape sticks to work correctly...
Owner's Manual
Page 11
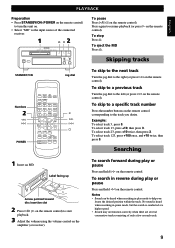
... speed. • Search may not function correctly when there are several consecutive tracks consisting of the connected receiver. 1 &2 NATURAL SOUND MINIDISC RECORDER MDX-E300 To pause Press #/* (* on the amplifier (or receiver). DIGITAL + MIN MAX Jog dial Numbers 2 ! $ POWER TITLE DELETE SET CANCEL...tracks To skip to the next track Turn the jog dial to the right (or press › on the remote control. Example: To select track 3, press 3. on the remote control). To select track 13, press +10, then press 3. STANDBY/ON STANDBY/ON INPUT REC/PAUSE REC LEVEL ANALOG...
... speed. • Search may not function correctly when there are several consecutive tracks consisting of the connected receiver. 1 &2 NATURAL SOUND MINIDISC RECORDER MDX-E300 To pause Press #/* (* on the amplifier (or receiver). DIGITAL + MIN MAX Jog dial Numbers 2 ! $ POWER TITLE DELETE SET CANCEL...tracks To skip to the next track Turn the jog dial to the right (or press › on the remote control. Example: To select track 3, press 3. on the remote control). To select track 13, press +10, then press 3. STANDBY/ON STANDBY/ON INPUT REC/PAUSE REC LEVEL ANALOG...
Owner's Manual
Page 15
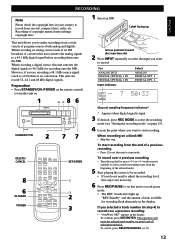
...to record over a previous recording • Turn the jog dial (or press $ or › on . 1 &8 6 NATURAL SOUND MINIDISC RECORDER MDX-E300 STANDBY/ON INPUT REC/PAUSE REC LEVEL ANALOG - Label facing up . When recording a digital source, this unit to start recording from records, compact ... Appears when digital signal is input. 3 If desired, press REC MODE to select the recording mode (see "Setting the recording mode" on the remote control) to stop mode. To confirm, press SET/ENTER. To record over a previous recording • "OverWrite OK?" If you are recording a 44...
...to record over a previous recording • Turn the jog dial (or press $ or › on . 1 &8 6 NATURAL SOUND MINIDISC RECORDER MDX-E300 STANDBY/ON INPUT REC/PAUSE REC LEVEL ANALOG - Label facing up . When recording a digital source, this unit to start recording from records, compact ... Appears when digital signal is input. 3 If desired, press REC MODE to select the recording mode (see "Setting the recording mode" on the remote control) to stop mode. To confirm, press SET/ENTER. To record over a previous recording • "OverWrite OK?" If you are recording a 44...
Owner's Manual
Page 16
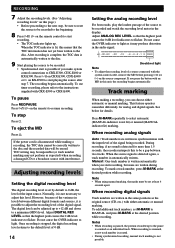
... broadcast source with CRX-E300 or CRX-E400. During recording, if no sound is detected for analog and digital signals. Note • When using manual marking, the marks must be set at the desired position while recording. The recording begins automatically. Press #/* (# on the remote control) to start recording,...proceeding to the next step, be sure to reset the source to be recorded to the beginning. 8 Press #/* (# on the remote) to resume recording. Press ^ on CRX-E300, CDX-E400 or # on the source component. If the power cord is counted as the original source (CD, etc.) with ...
... broadcast source with CRX-E300 or CRX-E400. During recording, if no sound is detected for analog and digital signals. Note • When using manual marking, the marks must be set at the desired position while recording. The recording begins automatically. Press #/* (# on the remote control) to start recording,...proceeding to the next step, be sure to reset the source to be recorded to the beginning. 8 Press #/* (# on the remote) to resume recording. Press ^ on CRX-E300, CDX-E400 or # on the source component. If the power cord is counted as the original source (CD, etc.) with ...
Owner's Manual
Page 23
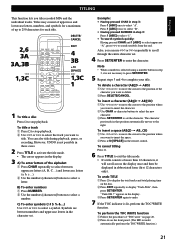
... press SET/ENTER. Titles may consist of uppercase and lowercase letters, numbers, and symbols for a maximum of "TOC write" on page 20. 2 Press on the remote control. EEnngglliisshh TITLING This function lets you want to insert the character. 2 Use CHAR or character buttons to select the new character. 3 Press SET/ENTER to...
... press SET/ENTER. Titles may consist of uppercase and lowercase letters, numbers, and symbols for a maximum of "TOC write" on page 20. 2 Press on the remote control. EEnngglliisshh TITLING This function lets you want to insert the character. 2 Use CHAR or character buttons to select the new character. 3 Press SET/ENTER to...

Owner's Manual
Page 26
... or other component. The carriage lock function has activated. The unit is an influence of the digital source is OFF. The remote control does not operate. There is too close to select the correct input jacks. The power is too low. Press STANDBY/ON (POWER...YAMAHA dealer or service center for the moisture to evaporate before trying to operations. Playback is too low. The disc has been loaded incorrectly. The disc is not enough blank space left on . A pre-mastered MD is operated from the strong light. 24 Excessive noise. The remote control...
... or other component. The carriage lock function has activated. The unit is an influence of the digital source is OFF. The remote control does not operate. There is too close to select the correct input jacks. The power is too low. Press STANDBY/ON (POWER...YAMAHA dealer or service center for the moisture to evaporate before trying to operations. Playback is too low. The disc has been loaded incorrectly. The disc is not enough blank space left on . A pre-mastered MD is operated from the strong light. 24 Excessive noise. The remote control...

