Owner's Manual
Page 5
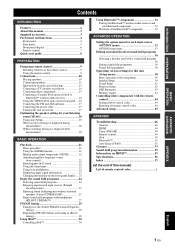
... Connecting speakers 11 Information on jacks and cable plugs 13 Connecting a TV monitor or projector 14 Connecting other components 15 Connecting a Yamaha iPod universal dock or Bluetooth™ wireless audio receiver 16 Using the VIDEO AUX jacks on the front panel .... 16 Connecting the...Setting sound field parameters 36 Sound field parameters 36 Operating various settings for this unit (Setup menu 38 Basic operation of the setup menu 39 Speaker Setup 39 Sound Setup 41 Function Setup 42 DSP Parameter 43 Memory Guard 43 Controlling other components with the remote control 44 ...
... Connecting speakers 11 Information on jacks and cable plugs 13 Connecting a TV monitor or projector 14 Connecting other components 15 Connecting a Yamaha iPod universal dock or Bluetooth™ wireless audio receiver 16 Using the VIDEO AUX jacks on the front panel .... 16 Connecting the...Setting sound field parameters 36 Sound field parameters 36 Operating various settings for this unit (Setup menu 38 Basic operation of the setup menu 39 Speaker Setup 39 Sound Setup 41 Function Setup 42 DSP Parameter 43 Memory Guard 43 Controlling other components with the remote control 44 ...
Owner's Manual
Page 6
... capability ■ DOCK terminal • DOCK terminal to connect a Yamaha iPod universal dock (such as YDS-11, sold separately) ■ Automatic speaker setup features • "YPAO" (Yamaha Parametric Room Acoustic Optimizer) for automatically optimizing speaker outputs suitable for listening... x 1 • Audio/Visual output [Audio] Analog x 1 [Video] Composite video x 1 • Audio output Analog x 1 ■ Proprietary Yamaha technology for the creation of sound fields • CINEMA DSP • Compressed Music Enhancer mode • Virtual CINEMA DSP • SILENT CINEMA ■ ...
... capability ■ DOCK terminal • DOCK terminal to connect a Yamaha iPod universal dock (such as YDS-11, sold separately) ■ Automatic speaker setup features • "YPAO" (Yamaha Parametric Room Acoustic Optimizer) for automatically optimizing speaker outputs suitable for listening... x 1 • Audio/Visual output [Audio] Analog x 1 [Video] Composite video x 1 • Audio output Analog x 1 ■ Proprietary Yamaha technology for the creation of sound fields • CINEMA DSP • Compressed Music Enhancer mode • Virtual CINEMA DSP • SILENT CINEMA ■ ...

Owner's Manual
Page 11
...1 through 4. of input sources and sound field programs (see page 30). s Numeric keys Enter numbers. Selects a Yamaha iPod universal dock/ Bluetooth wireless audio receiver connected to the Yamaha iPod universal dock (see page 21). h Tuner keys FM AM MEMORY PRESET k / n TUNING k / n ... Turns the mute function of the sound output on the front [A]/[B] panel of this unit (see page 23). DECODE MUSIC STEREO STRAIGHT DIRECT BD DVD SETUP SCENE TV CD RADIO OPTION ENTER VOLUME RETURN DISPLAY TOP MENU REC MENU MUTE b c f e m o p q s t 1 2 3 4 5 6 7 8 9 INPUT...
...1 through 4. of input sources and sound field programs (see page 30). s Numeric keys Enter numbers. Selects a Yamaha iPod universal dock/ Bluetooth wireless audio receiver connected to the Yamaha iPod universal dock (see page 21). h Tuner keys FM AM MEMORY PRESET k / n TUNING k / n ... Turns the mute function of the sound output on the front [A]/[B] panel of this unit (see page 23). DECODE MUSIC STEREO STRAIGHT DIRECT BD DVD SETUP SCENE TV CD RADIO OPTION ENTER VOLUME RETURN DISPLAY TOP MENU REC MENU MUTE b c f e m o p q s t 1 2 3 4 5 6 7 8 9 INPUT...
Owner's Manual
Page 12
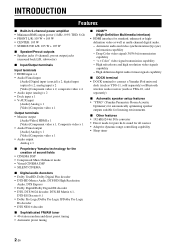
... we recommend that you use this product for the first time, perform setup following items for setup Step 2: Set up a 5.1-channel sound system. See page 21 for front). See the related pages for setup. For example, prepare the following the steps below. Front right speaker ...speakers, prepare speakers with a another amplifier connected. • If your TV, DVD player, or other components ☞P. 15 • Connecting a Yamaha iPod universal dock or Bluetooth wireless audio receiver ☞P. 16 • Connecting the FM and AM antennas ☞P. 17 Step 4: Turn on the...
... we recommend that you use this product for the first time, perform setup following items for setup Step 2: Set up a 5.1-channel sound system. See page 21 for front). See the related pages for setup. For example, prepare the following the steps below. Front right speaker ...speakers, prepare speakers with a another amplifier connected. • If your TV, DVD player, or other components ☞P. 15 • Connecting a Yamaha iPod universal dock or Bluetooth wireless audio receiver ☞P. 16 • Connecting the FM and AM antennas ☞P. 17 Step 4: Turn on the...

Owner's Manual
Page 15
... back speaker volume with a surround back channel. To obtain the balanced sound during playback, set the speaker output characteristics in advance using the Yamaha Parametric Room Acoustic Optimize (YPAO, see page 39). For a 7.1-channel system, connect it to the SURROUND BACK L/R jacks. For a ...6.1-channel system, connect the external amplifier to the SURROUND BACK L jack of the setup menu (see page 18) or "Speaker Setup" of the PRE OUT terminals. ba c DMI 3 HDMI 4 FRONT SPEAKERS CENTER SURROUND Connecting the surround back speakers Connecting ...
... back speaker volume with a surround back channel. To obtain the balanced sound during playback, set the speaker output characteristics in advance using the Yamaha Parametric Room Acoustic Optimize (YPAO, see page 39). For a 7.1-channel system, connect it to the SURROUND BACK L/R jacks. For a ...6.1-channel system, connect the external amplifier to the SURROUND BACK L jack of the setup menu (see page 18) or "Speaker Setup" of the PRE OUT terminals. ba c DMI 3 HDMI 4 FRONT SPEAKERS CENTER SURROUND Connecting the surround back speakers Connecting ...

Owner's Manual
Page 16
... running side by side in ) of insulation from the monitor. • Use speakers with an impedance of 6-ohm or larger. Set speaker impedance in "ADVANCED SETUP" before connecting the speakers (see page 45). ■ Connecting to secure the wire.
... running side by side in ) of insulation from the monitor. • Use speakers with an impedance of 6-ohm or larger. Set speaker impedance in "ADVANCED SETUP" before connecting the speakers (see page 45). ■ Connecting to secure the wire.
Owner's Manual
Page 22
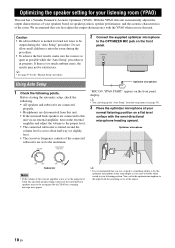
... small children to the OPTIMIZER MIC jack on the front panel display. UT OPTIMIZER MIC h VIDEO AUX VIDEO AUDIO PORTABLE Using Auto Setup Optimizer microphone 1 Check the following . • All speakers and subwoofer are connected properly. • Headphones are set at your ears... the YPAO when you use this unit automatically adjusts the output characteristics of your listening room (YPAO) This unit has a Yamaha Parametric Acoustic Optimizer (YPAO). Optimizing the speaker setting for your speakers based on speaker position, speaker performance, and the acoustic characteristics ...
... small children to the OPTIMIZER MIC jack on the front panel display. UT OPTIMIZER MIC h VIDEO AUX VIDEO AUDIO PORTABLE Using Auto Setup Optimizer microphone 1 Check the following . • All speakers and subwoofer are connected properly. • Headphones are set at your ears... the YPAO when you use this unit automatically adjusts the output characteristics of your listening room (YPAO) This unit has a Yamaha Parametric Acoustic Optimizer (YPAO). Optimizing the speaker setting for your speakers based on speaker position, speaker performance, and the acoustic characteristics ...
Owner's Manual
Page 23
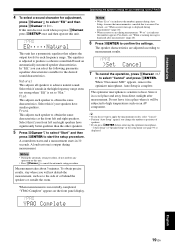
...characteristics suitable for the desired sound characteristics. To obtain precise results, stay where you press nENTER before removing the optimizer microphone, "1 Auto Setup" of or behind the speakers or outside the room. Store it in a place where it means that adjusts the output levels for ...each speaker to an error. Flat This adjusts each frequency range. A countdown starts and a measurement starts in the setup menu (see page 39) is complete. For details, see "When an error message is output during measurement. The optimizer microphone is displayed ...
...characteristics suitable for the desired sound characteristics. To obtain precise results, stay where you press nENTER before removing the optimizer microphone, "1 Auto Setup" of or behind the speakers or outside the room. Store it in a place where it means that adjusts the output levels for ...each speaker to an error. Flat This adjusts each frequency range. A countdown starts and a measurement starts in the setup menu (see page 39) is complete. For details, see "When an error message is output during measurement. The optimizer microphone is displayed ...

Owner's Manual
Page 24
... indicates the number) is displayed on the front panel display. We recommend that you solve the problem and perform "Auto Setup" again. 1 If a warning message is displayed, press nENTER. Retry Performs "Auto Setup" again. When a warning message is displayed after measurement If a problem occurs during measurement Select "Retry" or "Exit" using nCursor... are displayed. y • See page 51 for details on error messages. • When "E-5:NOISY" appears, you can continue measurement. Exit Terminates the measurement and "Auto Setup."
... indicates the number) is displayed on the front panel display. We recommend that you solve the problem and perform "Auto Setup" again. 1 If a warning message is displayed, press nENTER. Retry Performs "Auto Setup" again. When a warning message is displayed after measurement If a problem occurs during measurement Select "Retry" or "Exit" using nCursor... are displayed. y • See page 51 for details on error messages. • When "E-5:NOISY" appears, you can continue measurement. Exit Terminates the measurement and "Auto Setup."
Owner's Manual
Page 26
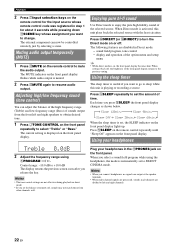
... set the balance extremely off , the brightness of the front panel display returns to enjoy the pure high fidelity sound of the option menu and setup menu y • While direct mode is set to SILENT CINEMA mode. Muting audio output temporarily (MUTE) 1 Press qMUTE on the front panel display lights up...
... set the balance extremely off , the brightness of the front panel display returns to enjoy the pure high fidelity sound of the option menu and setup menu y • While direct mode is set to SILENT CINEMA mode. Muting audio output temporarily (MUTE) 1 Press qMUTE on the front panel display lights up...

Owner's Manual
Page 31
Enjoying sound field programs without surround speakers (Virtual CINEMA DSP) Virtual CINEMA DSP allows you set to "None" (see page 40). - L/R" in the setup menu is automatically selected when you to enjoy multi-channel sources with your headphones. direct mode or straight decoding mode is selected. SILENT CINEMA mode ...
Enjoying sound field programs without surround speakers (Virtual CINEMA DSP) Virtual CINEMA DSP allows you set to "None" (see page 40). - L/R" in the setup menu is automatically selected when you to enjoy multi-channel sources with your headphones. direct mode or straight decoding mode is selected. SILENT CINEMA mode ...

Owner's Manual
Page 40
To set it . The setup menu appears on the remote control. You can change the parameters, set the parameters for sound field programs, see the following decoders. When "Press Again h" ... filed parameters when "Memory Guard" of the speakers. 36 En y • Repeat steps 4 and 5 to "On" (see "Sound field parameters" on the setting of the setup menu is added too much. →Reduce the effect level. The screen changes as the input source. Adjust "DSP Level" as they are with the...
To set it . The setup menu appears on the remote control. You can change the parameters, set the parameters for sound field programs, see the following decoders. When "Press Again h" ... filed parameters when "Memory Guard" of the speakers. 36 En y • Repeat steps 4 and 5 to "On" (see "Sound field parameters" on the setting of the setup menu is added too much. →Reduce the effect level. The screen changes as the input source. Adjust "DSP Level" as they are with the...

Owner's Manual
Page 42
...42 42 42 42 42 42 42 42 42 43 43 43 43 43 38 En Menu/Submenu Speaker Setup 1 Auto Setup (YPAO) 2 Manual Setup A)Config B)Level C)Distance D)Equalizer E)Test Tone Sound Setup 1 D. Separately adjusts volume of HDMI signals input from the HDMI IN jack to display characters on distances... timing between video signals and audio signals. Sets speaker configurations, such as connection status of speaker and a size of the front panel display. Setup 1 HDMI Standby Audio 2 Display Dimmer FL Scroll 3 Volume Adptv DRC MaxVol IniVol 4 Input Rename DSP Parameter Memory Guard Function Sets items for...
...42 42 42 42 42 42 42 42 42 43 43 43 43 43 38 En Menu/Submenu Speaker Setup 1 Auto Setup (YPAO) 2 Manual Setup A)Config B)Level C)Distance D)Equalizer E)Test Tone Sound Setup 1 D. Separately adjusts volume of HDMI signals input from the HDMI IN jack to display characters on distances... timing between video signals and audio signals. Sets speaker configurations, such as connection status of speaker and a size of the front panel display. Setup 1 HDMI Standby Audio 2 Display Dimmer FL Scroll 3 Volume Adptv DRC MaxVol IniVol 4 Input Rename DSP Parameter Memory Guard Function Sets items for...

Owner's Manual
Page 43
... the menu, select the input source again using nCursor l / h. For details on operations, see page 18. 2 Manual Setup Adjusts output characteristics of speakers based on positions and performances of the speakers and acoustic characteristics or the room, which are marked...speakers Not output Not output Not output ADVANCED OPERATION ADDITIONAL INFORMATION APPENDIX English 39 En y • The default settings are automatically measured. The setup menu screen appears. 2 Select a menu using nCursor k / n, and press nENTER. Items of the connected speaker (sound reproduction capacity), ...
... the menu, select the input source again using nCursor l / h. For details on operations, see page 18. 2 Manual Setup Adjusts output characteristics of speakers based on positions and performances of the speakers and acoustic characteristics or the room, which are marked...speakers Not output Not output Not output ADVANCED OPERATION ADDITIONAL INFORMATION APPENDIX English 39 En y • The default settings are automatically measured. The setup menu screen appears. 2 Select a menu using nCursor k / n, and press nENTER. Items of the connected speaker (sound reproduction capacity), ...

Owner's Manual
Page 44
Operating various settings for this unit (Setup menu) Low-frequency components of other channel signals Parameter Subwoofer Front speakers Other speakers Both [1] [2] [3] SWFR [4] [3] [3] Front Not output [1] [3] [1] Outputs low-frequency components of the ...
Operating various settings for this unit (Setup menu) Low-frequency components of other channel signals Parameter Subwoofer Front speakers Other speakers Both [1] [2] [3] SWFR [4] [3] [3] Front Not output [1] [3] [1] Outputs low-frequency components of the ...

Owner's Manual
Page 45
.../ Sur.B L / Sur.B R / SWFR Adjustable range: 0.30m to 24.00m (1.0ft to adjust the characteristics of the graphic equalizer. Note • If Auto Setup is connected to this when the connected monitor does not support the automatic lip-sync function or you set "Test Tone" to "On" (see page... (m)/feet (ft)* meters (m) Displays the speaker distance in 7 frequency ranges. GEQ Uses a graphic equalizer. Sound Setup You can adjust the settings of "2 Manual Setup" while listening to a test tone. Off Select this unit. Items to be displayed depending on the number of speakers...
.../ Sur.B L / Sur.B R / SWFR Adjustable range: 0.30m to 24.00m (1.0ft to adjust the characteristics of the graphic equalizer. Note • If Auto Setup is connected to this when the connected monitor does not support the automatic lip-sync function or you set "Test Tone" to "On" (see page... (m)/feet (ft)* meters (m) Displays the speaker distance in 7 frequency ranges. GEQ Uses a graphic equalizer. Sound Setup You can adjust the settings of "2 Manual Setup" while listening to a test tone. Off Select this unit. Items to be displayed depending on the number of speakers...

Owner's Manual
Page 46
... of output of HDMI signals input from the HDMI IN jack to the HDMI OUT jack when this unit is on standby. Select this unit (Setup menu) Auto Adjustable range: 0 to 240ms (1 ms step) Enables manual fine adjustment of the correction time when "HDMI Auto" is set to "On" signals input... from the speakers connected to "Off." Function Setup You can set various items for HDMI and display. 1 HDMI You can set "HDMI Auto" to this unit is muted. On Outputs the HDMI signals...
... of output of HDMI signals input from the HDMI IN jack to the HDMI OUT jack when this unit is on standby. Select this unit (Setup menu) Auto Adjustable range: 0 to 240ms (1 ms step) Enables manual fine adjustment of the correction time when "HDMI Auto" is set to "On" signals input... from the speakers connected to "Off." Function Setup You can set various items for HDMI and display. 1 HDMI You can set "HDMI Auto" to this unit is muted. On Outputs the HDMI signals...

Owner's Manual
Page 47
...various settings for the sound field programs. For details, see page 36. Memory Guard Choices: Off*/On Protects settings of the setup menu (except for input. ADVANCED OPERATION ADDITIONAL INFORMATION APPENDIX English 43 En For example, when you want to be accidentally increased.... name, and press nENTER. DVD - MD - PC - nCursor l / h nCursor k / n nENTER For selecting characters that last time this unit (Setup menu) DSP Parameter You can enter up to 9 characters by selecting one character at a time with the following keys according to standby. Game - Tape ...
...various settings for the sound field programs. For details, see page 36. Memory Guard Choices: Off*/On Protects settings of the setup menu (except for input. ADVANCED OPERATION ADDITIONAL INFORMATION APPENDIX English 43 En For example, when you want to be accidentally increased.... name, and press nENTER. DVD - MD - PC - nCursor l / h nCursor k / n nENTER For selecting characters that last time this unit (Setup menu) DSP Parameter You can enter up to 9 characters by selecting one character at a time with the following keys according to standby. Game - Tape ...

Owner's Manual
Page 49
...on the next time. Once the remote control code is turned on and off this system, and press ASTANDBY/ON again. The advanced setup menu appears on the remote control. 3 Enter the desired remote control ID code. When you change the remote control ID, display "Advance... a few times to select the value you want to change the ID for the amplifier too. 1 Press cCODE SET on the remote control using multiple Yamaha AV receivers, you can operate them with "*." Perform the following . bTRANSMIT blinks twice. 2 Press lSETUP on the front panel display. y • Initializing the...
...on the next time. Once the remote control code is turned on and off this system, and press ASTANDBY/ON again. The advanced setup menu appears on the remote control. 3 Enter the desired remote control ID code. When you change the remote control ID, display "Advance... a few times to select the value you want to change the ID for the amplifier too. 1 Press cCODE SET on the remote control using multiple Yamaha AV receivers, you can operate them with "*." Perform the following . bTRANSMIT blinks twice. 2 Press lSETUP on the front panel display. y • Initializing the...
Owner's Manual
Page 50
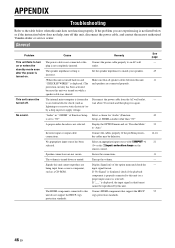
...Connect the cables properly. Select an appropriate input source with NINPUT l / h or the gInput selection keys on . Display Signal info of Function Setup Select a choice for "Audio" (Function is not completely inserted. If "No Signal" is displayed, check if the playback component is properly connected... experiencing is displayed.) The protection circuitry has been activated because this unit, disconnect the power cable, and contact the nearest authorized Yamaha dealer or service center. If the problem you are being input from the AC wall outlet, wait about 30 seconds and then...
...Connect the cables properly. Select an appropriate input source with NINPUT l / h or the gInput selection keys on . Display Signal info of Function Setup Select a choice for "Audio" (Function is not completely inserted. If "No Signal" is displayed, check if the playback component is properly connected... experiencing is displayed.) The protection circuitry has been activated because this unit, disconnect the power cable, and contact the nearest authorized Yamaha dealer or service center. If the problem you are being input from the AC wall outlet, wait about 30 seconds and then...


