
Owner's Manual
Page 4
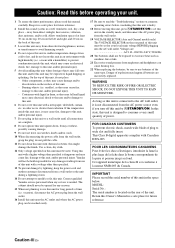
... 12 Only voltage specified on switches, knobs and/or cords. 10 When disconnecting the power cable from the wall outlet, grasp the plug; Yamaha will not be held responsible for any service is needed. FOR CANADIAN CUSTOMERS To prevent electric shock, match wide blade of plug to liquid... prevent condensation inside this unit rises, it is located on the back of the unit. Contact qualified Yamaha service personnel when any damage resulting from use force on this unit must be set for your unit. 1 To assure the finest performance, please read the "Troubleshooting" section on common ...
... 12 Only voltage specified on switches, knobs and/or cords. 10 When disconnecting the power cable from the wall outlet, grasp the plug; Yamaha will not be held responsible for any service is needed. FOR CANADIAN CUSTOMERS To prevent electric shock, match wide blade of plug to liquid... prevent condensation inside this unit rises, it is located on the back of the unit. Contact qualified Yamaha service personnel when any damage resulting from use force on this unit must be set for your unit. 1 To assure the finest performance, please read the "Troubleshooting" section on common ...
Owner's Manual
Page 5
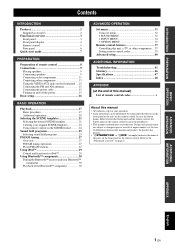
... and functions for iPod 29 Using Bluetooth™ components 30 Pairing the Bluetooth™ receiver and your Bluetooth™ component 30 Playback of the Bluetooth™ component 30 ADVANCED OPERATION Set menu 31 Using set menu 32 1 SOUND MENU 32 2 INPUT MENU 34 3 OPTION MENU 35 Remote ...control features 37 Controlling this unit, a TV, or other components .... 37 Setting remote control codes 39 Advanced setup 40 ADDITIONAL INFORMATION Troubleshooting 41 Glossary 46 Specifications 47 Index 48 APPENDIX (at the end of this manual...
... and functions for iPod 29 Using Bluetooth™ components 30 Pairing the Bluetooth™ receiver and your Bluetooth™ component 30 Playback of the Bluetooth™ component 30 ADVANCED OPERATION Set menu 31 Using set menu 32 1 SOUND MENU 32 2 INPUT MENU 34 3 OPTION MENU 35 Remote ...control features 37 Controlling this unit, a TV, or other components .... 37 Setting remote control codes 39 Advanced setup 40 ADDITIONAL INFORMATION Troubleshooting 41 Glossary 46 Specifications 47 Index 48 APPENDIX (at the end of this manual...
Owner's Manual
Page 7
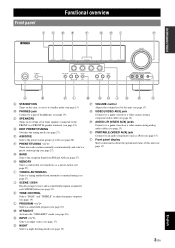
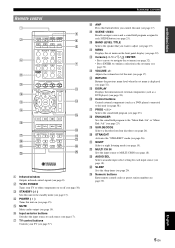
C SPEAKERS Turns on this unit, or sets it to standby mode (see page 15). F PRESET/TUNING l / h Tunes into as iPod) (see page 15). I TUNING AUTO/MAN'L Selects a tuning method from FM and ... PROGRAM l h STRAIGHT EFFECT INPUT l h NIGHT VIDEO AUX VIDEO AUDIO PORTABLE BASIC OPERATION ADVANCED OPERATION ADDITIONAL INFORMATION A B KL M NOJ Q R S A STANDBY/ON Turns on or off the set of front speakers connected to the FRONT A or FRONT B speaker terminals (see page 18).
C SPEAKERS Turns on this unit, or sets it to standby mode (see page 15). F PRESET/TUNING l / h Tunes into as iPod) (see page 15). I TUNING AUTO/MAN'L Selects a tuning method from FM and ... PROGRAM l h STRAIGHT EFFECT INPUT l h NIGHT VIDEO AUX VIDEO AUDIO PORTABLE BASIC OPERATION ADVANCED OPERATION ADDITIONAL INFORMATION A B KL M NOJ Q R S A STANDBY/ON Turns on or off the set of front speakers connected to the FRONT A or FRONT B speaker terminals (see page 18).
Owner's Manual
Page 8
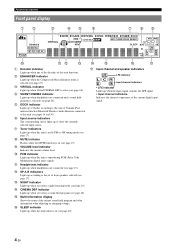
... when the input signal contains the LFE signal. • Input channel indicators Indicates the channel components of Yamaha iPod universal dock or Bluetooth Wireless Audio Receiver connected to the state of the current digital input signal. 4 En i VOLUME level indicator Indicates the ... 14 and 30). m NIGHT indicator Lights up when any of the decoders of the current sound field program and other information when adjusting or changing settings. Functional overview Front panel display a b c d e f g h i t ENHANCER q DIGITAL q PL q PL PCM VIRTUAL DVR V-AUX DOCK SP SILENT ...
... when the input signal contains the LFE signal. • Input channel indicators Indicates the channel components of Yamaha iPod universal dock or Bluetooth Wireless Audio Receiver connected to the state of the current digital input signal. 4 En i VOLUME level indicator Indicates the ... 14 and 30). m NIGHT indicator Lights up when any of the decoders of the current sound field program and other information when adjusting or changing settings. Functional overview Front panel display a b c d e f g h i t ENHANCER q DIGITAL q PL q PL PCM VIRTUAL DVR V-AUX DOCK SP SILENT ...
Owner's Manual
Page 9
...external components (such as a DVD player) (see page 21). w AUDIO SEL Selects an audio input select setting for each SCENE button (see page 38). c STANDBY ( ) Sets this unit (see page 17). t STRAIGHT Activates the "STRAIGHT" mode (see page 19). i SCENE ... page 8). l Cursors (l / h / n / k) / ENTER • Press cursors to navigate the set menu is displayed (see page 37). INTRODUCTION PREPARATION BASIC OPERATION ADVANCED OPERATION Remote control a c b POWER POWER STANDBY POWER TV AV d A B C MUTE e CD MD/CD-R TUNER f DVD DTV/CBL DVR TV CH V-AUX/DOCK ...
...external components (such as a DVD player) (see page 21). w AUDIO SEL Selects an audio input select setting for each SCENE button (see page 38). c STANDBY ( ) Sets this unit (see page 17). t STRAIGHT Activates the "STRAIGHT" mode (see page 19). i SCENE ... page 8). l Cursors (l / h / n / k) / ENTER • Press cursors to navigate the set menu is displayed (see page 37). INTRODUCTION PREPARATION BASIC OPERATION ADVANCED OPERATION Remote control a c b POWER POWER STANDBY POWER TV AV d A B C MUTE e CD MD/CD-R TUNER f DVD DTV/CBL DVR TV CH V-AUX/DOCK ...
Owner's Manual
Page 11
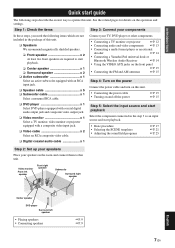
... SCENE templates • Adjusting the sound field programs ☞P. 17 ☞P. 21 ☞P. 25 ❏ Digital coaxial audio cable x 1 Step 2: Set up your speakers Place your speakers in the step 3 as an input source and start playback. ❏ Center speaker x 1 ❏ Surround speaker x... ☞P. 13 • Connecting a multi-format player or an external decoder ☞P. 14 • Connecting a Yamaha iPod universal dock or Bluetooth Wireless Audio Receiver ☞P. 14 • Using the VIDEO AUX jacks on the front panel ☞P. 15 • Connecting the FM...
... SCENE templates • Adjusting the sound field programs ☞P. 17 ☞P. 21 ☞P. 25 ❏ Digital coaxial audio cable x 1 Step 2: Set up your speakers Place your speakers in the step 3 as an input source and start playback. ❏ Center speaker x 1 ❏ Surround speaker x... ☞P. 13 • Connecting a multi-format player or an external decoder ☞P. 14 • Connecting a Yamaha iPod universal dock or Bluetooth Wireless Audio Receiver ☞P. 14 • Using the VIDEO AUX jacks on the front panel ☞P. 15 • Connecting the FM...

Owner's Manual
Page 12
... window Outputs infrared control signals. places of high humidity, such as these different types of batteries may be cleared. dusty places • To set the remote control codes for other components, see page 39. 8 En Clean the battery compartment thoroughly before installing new batteries. • Do ...• Do not use old batteries together with your local regulations. • If the remote control is cleared, insert new batteries and set the remote control codes for more than 2 minutes, or if exhausted batteries remain in the remote control 13 Using the remote control The...
... window Outputs infrared control signals. places of high humidity, such as these different types of batteries may be cleared. dusty places • To set the remote control codes for other components, see page 39. 8 En Clean the battery compartment thoroughly before installing new batteries. • Do ...• Do not use old batteries together with your local regulations. • If the remote control is cleared, insert new batteries and set the remote control codes for more than 2 minutes, or if exhausted batteries remain in the remote control 13 Using the remote control The...
Owner's Manual
Page 13
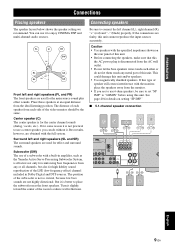
... this unit and/or speakers. • Use magnetically shielded speakers. If this unit. Caution • Use speakers with the specified impedance shown on setting "SP IMP." ■ 5.1-channel speaker connection cd e fg D DTV/CBL HDMI VIDEO BL DVR IN OUT MONITOR OUT ANTENNA AM GND FM...front speakers. to "6ΩMIN" before using this type of the LFE (low-frequency effect) channel included in amplifier, such as the Yamaha Active Servo Processing Subwoofer System, is not so critical, because low bass sounds are not highly directional. If for effect and surround sounds...
... this unit and/or speakers. • Use magnetically shielded speakers. If this unit. Caution • Use speakers with the specified impedance shown on setting "SP IMP." ■ 5.1-channel speaker connection cd e fg D DTV/CBL HDMI VIDEO BL DVR IN OUT MONITOR OUT ANTENNA AM GND FM...front speakers. to "6ΩMIN" before using this type of the LFE (low-frequency effect) channel included in amplifier, such as the Yamaha Active Servo Processing Subwoofer System, is not so critical, because low bass sounds are not highly directional. If for effect and surround sounds...
Owner's Manual
Page 14
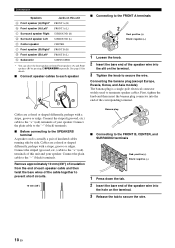
... striped (grooved, etc.) cable to the "+" (red) terminals of this unit FRONT A (R) FRONT A (L) SURROUND (R) SURROUND (L) CENTER FRONT B (R) FRONT B (L) SUBWOOFER * You can select the front speaker set from the end of each speaker ■ Connecting to the FRONT A terminals 2 1 Red: positive (+) Black: negative (-) 3 1 Loosen the knob. 2 Insert the bare end of the...
... striped (grooved, etc.) cable to the "+" (red) terminals of this unit FRONT A (R) FRONT A (L) SURROUND (R) SURROUND (L) CENTER FRONT B (R) FRONT B (L) SUBWOOFER * You can select the front speaker set from the end of each speaker ■ Connecting to the FRONT A terminals 2 1 Red: positive (+) Black: negative (-) 3 1 Loosen the knob. 2 Insert the bare end of the...
Owner's Manual
Page 15
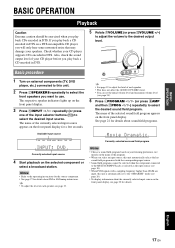
To enjoy the sound from speakers connected to this unit is turned on and set to the input source (DVD or DTV/ CBL). At that time, audio/video signals output from the connected component (such as DVD player etc.) are ...
To enjoy the sound from speakers connected to this unit is turned on and set to the input source (DVD or DTV/ CBL). At that time, audio/video signals output from the connected component (such as DVD player etc.) are ...
Owner's Manual
Page 17
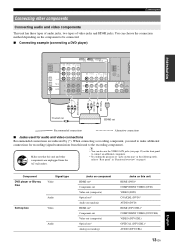
...; You can choose the connection method depending on the component to connect an additional component. Component DVD player or Blu-ray Disc Signal type Video Set-top box Audio Video Audio Jacks on component HDMI out* Component out Video out (composite) Optical out* Audio out (analog) HDMI out* Component out Video...
...; You can choose the connection method depending on the component to connect an additional component. Component DVD player or Blu-ray Disc Signal type Video Set-top box Audio Video Audio Jacks on component HDMI out* Component out Video out (composite) Optical out* Audio out (analog) HDMI out* Component out Video...
Owner's Manual
Page 18
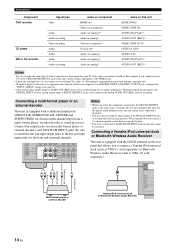
... can be recorded using this unit, connect other than the default one assigned to each DIGITAL INPUT or DIGITAL OUTPUT jack, configure the "INPUT ASSIGN" setting (see page 34), this unit cannot be recorded. CD 3 DTV/ CBL 2 COAXIAL DVD 1 MULTI CH INPUT FRONT SURROUND CENTER L DVD DTV...the recording components. DOCK Center out Subwoofer out Surround out Front out LR LR Multi-format player or external decoder Yamaha iPod universal dock or Bluetooth Wireless Audio Receiver DIGITAL INPUT OPTICAL COAXIAL CD 3 DTV/ CBL 2 DVD 1 14 En Therefore Digital signals input at the ...
... can be recorded using this unit, connect other than the default one assigned to each DIGITAL INPUT or DIGITAL OUTPUT jack, configure the "INPUT ASSIGN" setting (see page 34), this unit cannot be recorded. CD 3 DTV/ CBL 2 COAXIAL DVD 1 MULTI CH INPUT FRONT SURROUND CENTER L DVD DTV...the recording components. DOCK Center out Subwoofer out Surround out Front out LR LR Multi-format player or external decoder Yamaha iPod universal dock or Bluetooth Wireless Audio Receiver DIGITAL INPUT OPTICAL COAXIAL CD 3 DTV/ CBL 2 DVD 1 14 En Therefore Digital signals input at the ...
Owner's Manual
Page 19
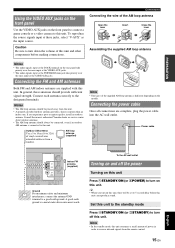
...earth ground is a metal stake driven into the AC wall outlet. Consult the nearest authorized Yamaha dealer or service center about outdoor antennas. • The AM loop antenna should provide sufficient signal strength. Set this unit to the standby mode Press ASTANDBY/ON (or cSTANDBY) to turn on this... unit can reproduce sound. AM loop antenna (supplied) Note • The types of power in order to receive infrared signals from the remote control. 15...
...earth ground is a metal stake driven into the AC wall outlet. Consult the nearest authorized Yamaha dealer or service center about outdoor antennas. • The AM loop antenna should provide sufficient signal strength. Set this unit to the standby mode Press ASTANDBY/ON (or cSTANDBY) to turn on this... unit can reproduce sound. AM loop antenna (supplied) Note • The types of power in order to receive infrared signals from the remote control. 15...
Owner's Manual
Page 20
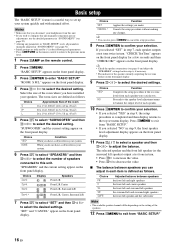
...number of speakers connected to this unit manually using more precise adjustments, use the detailed parameters in "SOUND MENU" (see page 9) and adjust the "SPEAKERS" settings back in step 9, the setup procedure is defined as follows: Choice S M* L Approximate Size of the room 16 x 13 ft, 200 ft2 (4.8 ...the front panel display. 11 Press lk / n to select a speaker and then ll / h to adjust the balance. Choice Function SET Applies the settings you have a subwoofer in turn . Proceeds to the speaker level adjustment menu to balance the output level of each parameters. • ...
...number of speakers connected to this unit manually using more precise adjustments, use the detailed parameters in "SOUND MENU" (see page 9) and adjust the "SPEAKERS" settings back in step 9, the setup procedure is defined as follows: Choice S M* L Approximate Size of the room 16 x 13 ft, 200 ft2 (4.8 ...the front panel display. 11 Press lk / n to select a speaker and then ll / h to adjust the balance. Choice Function SET Applies the settings you have a subwoofer in turn . Proceeds to the speaker level adjustment menu to balance the output level of each parameters. • ...
Owner's Manual
Page 21
... on a DTS-incompatible CD player, you want to use. Basic procedure 1 Turn on external components (TV, DVD player, etc.) connected to this unit is automatically set the initial volume level and maximum volume level (see page 34). 6 Press LPROGRAM l / h (or press hAMP and then qPROG l / h) repeatedly to select the desired sound... AM tuning instructions. Also, check the sound output level of each speaker. • This does not affect the AUDIO OUT (REC) level. • You can set to select the desired input source.
... on a DTS-incompatible CD player, you want to use. Basic procedure 1 Turn on external components (TV, DVD player, etc.) connected to this unit is automatically set the initial volume level and maximum volume level (see page 34). 6 Press LPROGRAM l / h (or press hAMP and then qPROG l / h) repeatedly to select the desired sound... AM tuning instructions. Also, check the sound output level of each speaker. • This does not affect the AUDIO OUT (REC) level. • You can set to select the desired input source.
Owner's Manual
Page 22
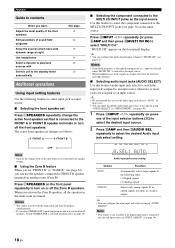
... input jacks (AUDIO SELECT) Use this unit to the standby mode automatically See page 19 26 19 19 26 20 Additional operations Using input setting features Use the following order: (1) Digital signals (2) Analog signals ANALOG Selects only analog signals. If no analog signals are muted. cannot be...input selector buttons (f)) to select the desired input source. 2 Press hAMP and then wAUDIO SEL repeatedly to select the desired Audio input jack select setting. "MULTI CH" appears on or off the front speakers. y • You can adjust the default audio input jack select of this unit...
... input jacks (AUDIO SELECT) Use this unit to the standby mode automatically See page 19 26 19 19 26 20 Additional operations Using input setting features Use the following order: (1) Digital signals (2) Analog signals ANALOG Selects only analog signals. If no analog signals are muted. cannot be...input selector buttons (f)) to select the desired input source. 2 Press hAMP and then wAUDIO SEL repeatedly to select the desired Audio input jack select setting. "MULTI CH" appears on or off the front speakers. y • You can adjust the default audio input jack select of this unit...

Owner's Manual
Page 23
... modes are stored independently. • If you can configure the muting level by pressing lk / n. • The available speaker channels differ depending on the speaker settings. 2 Press ll / h on the remote control (or press FPRESET/TUNING l / h) to adjust the speaker output level. Each choice is also possible when playing sources input...
... modes are stored independently. • If you can configure the muting level by pressing lk / n. • The available speaker channels differ depending on the speaker settings. 2 Press ll / h on the remote control (or press FPRESET/TUNING l / h) to adjust the speaker output level. Each choice is also possible when playing sources input...
Owner's Manual
Page 24
...:MUSIC" adjustments are connected to select "SLEEP OFF." SLEEP 120min SLEEP 90min SLEEP OFF SLEEP 30min SLEEP 60min Once the sleep timer is set this unit is automatically canceled. ■ Playing video sources in DTS, Dolby Digital, or PCM signals that cue this unit to automatically switch... decoders. 4 Press kMENU on the input source and surround sound settings you use the night listening modes in the input signal (front/surround/LFE). The following cases: - Flag data encoded in the background...
...:MUSIC" adjustments are connected to select "SLEEP OFF." SLEEP 120min SLEEP 90min SLEEP OFF SLEEP 30min SLEEP 60min Once the sleep timer is set this unit is automatically canceled. ■ Playing video sources in DTS, Dolby Digital, or PCM signals that cue this unit to automatically switch... decoders. 4 Press kMENU on the input source and surround sound settings you use the night listening modes in the input signal (front/surround/LFE). The following cases: - Flag data encoded in the background...

Owner's Manual
Page 25
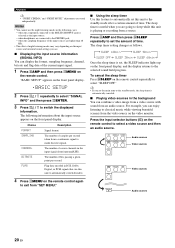
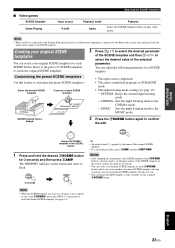
... panel and the remote control. The MEMORY indicator on the front panel starts to enjoy a DVD playback. See page 24 for details. *3 You have to set the input source of the indoor FM antenna. Default SCENE button SCENE 1 SCENE 2 SCENE 3 SCENE 4 The name of input sources and sound field programs. ...Notes *1 You must connect a cable TV or a satellite tuner to 28 for 3 seconds. input source: DVD - See pages 27 to this unit in the default settings. Select the desired SCENE template SCENE template library (Image) 1 Assign the SCENE template to select the desired template.
... panel and the remote control. The MEMORY indicator on the front panel starts to enjoy a DVD playback. See page 24 for details. *3 You have to set the input source of the indoor FM antenna. Default SCENE button SCENE 1 SCENE 2 SCENE 3 SCENE 4 The name of input sources and sound field programs. ...Notes *1 You must connect a cable TV or a satellite tuner to 28 for 3 seconds. input source: DVD - See pages 27 to this unit in the default settings. Select the desired SCENE template SCENE template library (Image) 1 Assign the SCENE template to select the desired template.
Owner's Manual
Page 27
... button. Note • When an iPod is connected to the Yamaha iPod universal dock or a Bluetooth component is connected to select the desired value of the SCENE template and then ll / h to the Bluetooth receiver, this SCENE template when you want to recall the desired SCENE ...original SCENE template • The input source component • The active sound field programs or STRAIGHT mode • The night listening mode setting (see page 21). Notes • After changing the assignment of the SCENE template to the iSCENE buttons, you create another customized SCENE template...
... button. Note • When an iPod is connected to the Yamaha iPod universal dock or a Bluetooth component is connected to select the desired value of the SCENE template and then ll / h to the Bluetooth receiver, this SCENE template when you want to recall the desired SCENE ...original SCENE template • The input source component • The active sound field programs or STRAIGHT mode • The night listening mode setting (see page 21). Notes • After changing the assignment of the SCENE template to the iSCENE buttons, you create another customized SCENE template...


