
Owner's Manual
Page 3
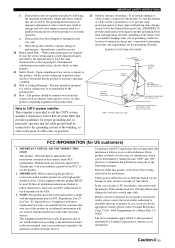
... cable. NATIONAL ELECTRICAL CODE ANTENNA LEAD IN WIRE ANTENNA DISCHARGE UNIT (NEC SECTION 810-20) GROUNDING CONDUCTORS (NEC SECTION 810-21) GROUND CLAMPS POWER SERVICE GROUNDING ELECTRODE SYSTEM (NEC ART 250. Failure to follow instructions could void your FCC authorization to use this product in the USA. 3 NOTE: This product has been tested and found in the users manual, may void your use...
... cable. NATIONAL ELECTRICAL CODE ANTENNA LEAD IN WIRE ANTENNA DISCHARGE UNIT (NEC SECTION 810-20) GROUNDING CONDUCTORS (NEC SECTION 810-21) GROUND CLAMPS POWER SERVICE GROUNDING ELECTRODE SYSTEM (NEC ART 250. Failure to follow instructions could void your FCC authorization to use this product in the USA. 3 NOTE: This product has been tested and found in the users manual, may void your use...
Owner's Manual
Page 5
... accessories 2 Functional overview 3 Front panel 3 Front panel display 4 Remote control 5 Rear panel 6 Quick start guide 7 L PREPARATION Preparation of remote control 8 Connections 9 Placing speakers 9 Connecting speakers 9 Connecting video components 11 Connecting other components 13 Using the VIDEO AUX jacks on the front panel .... 15 Connecting the FM and AM antennas 15 Connecting the power cable 15 Turning on and off the power 15 Basic setup 16 BASIC OPERATION Playback 17 Basic procedure 17 Additional operations 18 Selecting the SCENE templates 21 Selecting the desired...
... accessories 2 Functional overview 3 Front panel 3 Front panel display 4 Remote control 5 Rear panel 6 Quick start guide 7 L PREPARATION Preparation of remote control 8 Connections 9 Placing speakers 9 Connecting speakers 9 Connecting video components 11 Connecting other components 13 Using the VIDEO AUX jacks on the front panel .... 15 Connecting the FM and AM antennas 15 Connecting the power cable 15 Turning on and off the power 15 Basic setup 16 BASIC OPERATION Playback 17 Basic procedure 17 Additional operations 18 Selecting the SCENE templates 21 Selecting the desired...
Owner's Manual
Page 7
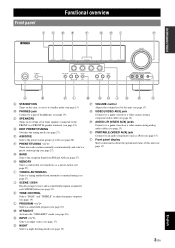
... / h Tunes into as iPod) (see page 27). H MEMORY Stores a station that you tuned into radio stations manually or automatically and selects a preset station group (see page 19). K TONE CONTROL Selects "BASS" and "TREBLE" to E) (see page 19). S PORTABLE (VIDEO AUX) jack Connects to standby mode (see page 17). C SPEAKERS Turns on this unit, or sets it to an audio component (such as a preset station (see page 15). R AUDIO L/R (VIDEO AUX) jacks Connects to a game console or a video camera using analog audio cables (see page 18). P VOLUME control Adjusts the volume level...
... / h Tunes into as iPod) (see page 27). H MEMORY Stores a station that you tuned into radio stations manually or automatically and selects a preset station group (see page 19). K TONE CONTROL Selects "BASS" and "TREBLE" to E) (see page 19). S PORTABLE (VIDEO AUX) jack Connects to standby mode (see page 17). C SPEAKERS Turns on this unit, or sets it to an audio component (such as a preset station (see page 15). R AUDIO L/R (VIDEO AUX) jacks Connects to a game console or a video camera using analog audio cables (see page 18). P VOLUME control Adjusts the volume level...
Owner's Manual
Page 9
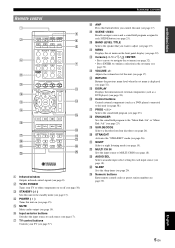
...). d POWER ( ) Turns this unit (see page 32). g TV control buttons Controls your TV or other components on or off (see page 15). k MENU Displays the set menu on (see page 38). x SLEEP Sets the sleep timer (see page 18). w AUDIO SEL Selects an audio input select setting for each input source (see page 20). INTRODUCTION PREPARATION BASIC OPERATION ADVANCED OPERATION Remote control a c b POWER POWER STANDBY POWER TV AV d A B C MUTE e CD MD/CD-R TUNER f DVD DTV/CBL DVR TV CH V-AUX/DOCK D E g h AMP TV INPUT...
...). d POWER ( ) Turns this unit (see page 32). g TV control buttons Controls your TV or other components on or off (see page 15). k MENU Displays the set menu on (see page 38). x SLEEP Sets the sleep timer (see page 18). w AUDIO SEL Selects an audio input select setting for each input source (see page 20). INTRODUCTION PREPARATION BASIC OPERATION ADVANCED OPERATION Remote control a c b POWER POWER STANDBY POWER TV AV d A B C MUTE e CD MD/CD-R TUNER f DVD DTV/CBL DVR TV CH V-AUX/DOCK D E g h AMP TV INPUT...
Owner's Manual
Page 10
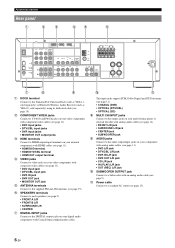
... separately) or Bluetooth Wireless Audio Receiver (such as YBA-10, sold separately) using its dedicated cable (see page 9). Functional overview Rear panel a b c d e f DOCK DIGITAL INPUT OPTICAL CD DTV/ CBL COMPONENT VIDEO DVD DTV/CBL DVR MONITOR OUT PR OUT DVD DTV/CBL HDMI VIDEO PB DVD DTV/CBL DVR MONITOR IN OUT OUT Y MULTI CH INPUT FRONT SURROUND CENTER DVD DTV/CBL AUDIO DVR CD IN OUT COAXIAL DVD SUBWOOFER ANTENNA SPEAKERS SURROUND CENTER FRONT B AM GND FM UNBAL. j k This input jacks support PCM, Dolby Digital and DTS...
... separately) or Bluetooth Wireless Audio Receiver (such as YBA-10, sold separately) using its dedicated cable (see page 9). Functional overview Rear panel a b c d e f DOCK DIGITAL INPUT OPTICAL CD DTV/ CBL COMPONENT VIDEO DVD DTV/CBL DVR MONITOR OUT PR OUT DVD DTV/CBL HDMI VIDEO PB DVD DTV/CBL DVR MONITOR IN OUT OUT Y MULTI CH INPUT FRONT SURROUND CENTER DVD DTV/CBL AUDIO DVR CD IN OUT COAXIAL DVD SUBWOOFER ANTENNA SPEAKERS SURROUND CENTER FRONT B AM GND FM UNBAL. j k This input jacks support PCM, Dolby Digital and DTS...
Owner's Manual
Page 11
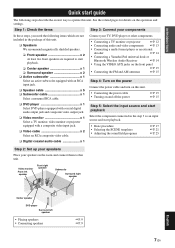
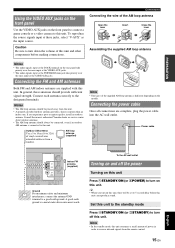
... with an RCA input jack. ❏ Speaker cable x 5 ❏ Subwoofer cable x 1 Select a monaural RCA cable. Connect your TV, DVD player or other components. • Connecting a TV monitor or projector ☞P. 12 • Connecting audio and video components ☞P. 13 • Connecting a multi-format player or an external decoder ☞P. 14 • Connecting a Yamaha iPod universal dock or Bluetooth Wireless Audio Receiver ☞P. 14 • Using the VIDEO AUX jacks on the front panel ☞P. 15 • Connecting the FM and AM antennas ☞P. 15 Step...
... with an RCA input jack. ❏ Speaker cable x 5 ❏ Subwoofer cable x 1 Select a monaural RCA cable. Connect your TV, DVD player or other components. • Connecting a TV monitor or projector ☞P. 12 • Connecting audio and video components ☞P. 13 • Connecting a multi-format player or an external decoder ☞P. 14 • Connecting a Yamaha iPod universal dock or Bluetooth Wireless Audio Receiver ☞P. 14 • Using the VIDEO AUX jacks on the front panel ☞P. 15 • Connecting the FM and AM antennas ☞P. 15 Step...
Owner's Manual
Page 18
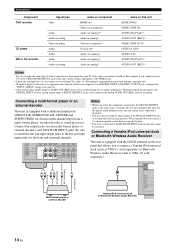
... discrete multi-channel input from CDs, radio, etc. Therefore Digital signals input at the DIGITAL INPUT jacks or analog signals input at MULTI CH INPUT jacks can be output at AUDIO OUT (REC) jack can be recorded using this feature. • The source connected to the MULTI CH INPUT jacks. DOCK Center out Subwoofer out Surround out Front out LR LR Multi-format player or external decoder Yamaha iPod universal dock or Bluetooth Wireless Audio Receiver DIGITAL INPUT OPTICAL COAXIAL CD 3 DTV/ CBL 2 DVD 1 14 En For example, if you cannot select sound field programs. •...
... discrete multi-channel input from CDs, radio, etc. Therefore Digital signals input at the DIGITAL INPUT jacks or analog signals input at MULTI CH INPUT jacks can be output at AUDIO OUT (REC) jack can be recorded using this feature. • The source connected to the MULTI CH INPUT jacks. DOCK Center out Subwoofer out Surround out Front out LR LR Multi-format player or external decoder Yamaha iPod universal dock or Bluetooth Wireless Audio Receiver DIGITAL INPUT OPTICAL COAXIAL CD 3 DTV/ CBL 2 DVD 1 14 En For example, if you cannot select sound field programs. •...
Owner's Manual
Page 19
... antenna Notes • The audio signals input at the DOCK terminal on the models. Consult the nearest authorized Yamaha dealer or service center about outdoor antennas. • The AM loop antenna should provide sufficient signal strength. Connecting the power cable Once all connections are supplied with this unit. In general, these jacks, select "V-AUX" as the input source. To the AC wall outlet Turning on and off this unit. Set this unit to the standby mode...
... antenna Notes • The audio signals input at the DOCK terminal on the models. Consult the nearest authorized Yamaha dealer or service center about outdoor antennas. • The AM loop antenna should provide sufficient signal strength. Connecting the power cable Once all connections are supplied with this unit. In general, these jacks, select "V-AUX" as the input source. To the AC wall outlet Turning on and off this unit. Set this unit to the standby mode...
Owner's Manual
Page 22
... program and activate the Zone B speakers, Virtual CINEMA DSP is activated automatically (see page 26). ■ Selecting the component connected to the MULTI CH INPUT jacks as the input source Use this feature to select the component connected to the MULTI CH INPUT jacks (see page 14) as follows: FRONT A FRONT B OFF Note • Turn off the volume level of this unit before you switch the front speaker setting. ■ Using the Zone B feature When you set the audio input jack select...
... program and activate the Zone B speakers, Virtual CINEMA DSP is activated automatically (see page 26). ■ Selecting the component connected to the MULTI CH INPUT jacks as the input source Use this feature to select the component connected to the MULTI CH INPUT jacks (see page 14) as follows: FRONT A FRONT B OFF Note • Turn off the volume level of this unit before you switch the front speaker setting. ■ Using the Zone B feature When you set the audio input jack select...
Owner's Manual
Page 31
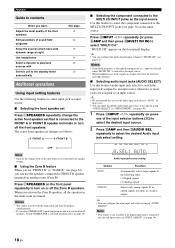
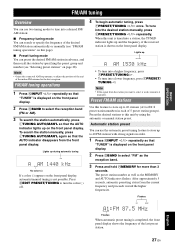
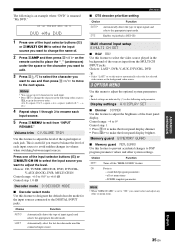
.../TUNING l / h once. Preset FM/AM stations Use this unit by specifying the preset group and number (see "FM/AM tuning operations" on this unit is tuned into a station, the TUNED indicator lights up and the frequency of the received station is shown on the front panel display. To search the station manually, press ITUNING AUTO/MAN'L again so that the AUTO indicator disappears from the current frequency and proceeds toward the higher frequencies. Flashes AUTO...
.../TUNING l / h once. Preset FM/AM stations Use this unit by specifying the preset group and number (see "FM/AM tuning operations" on this unit is tuned into a station, the TUNED indicator lights up and the frequency of the received station is shown on the front panel display. To search the station manually, press ITUNING AUTO/MAN'L again so that the AUTO indicator disappears from the current frequency and proceeds toward the higher frequencies. Flashes AUTO...
Owner's Manual
Page 35
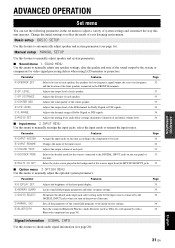
... component to the DIGITAL INPUT jacks on the power of each speaker. Select the video source played in the set menu settings. Page 35 35 36 36 36 Signal information SIGNAL INFO Use this feature to adjust a variety of 35 this unit. Locks sound field program parameters and other set menu to check audio signal information (see page 30). Designates the default audio input jack select setting mode for video signal processing delays when using LCD monitors or projectors. Parameter A)SPEAKER SET B)SP LEVEL C)SP DISTANCE D)CENTER GEQ E)LFE LEVEL...
... component to the DIGITAL INPUT jacks on the power of each speaker. Select the video source played in the set menu settings. Page 35 35 36 36 36 Signal information SIGNAL INFO Use this feature to adjust a variety of 35 this unit. Locks sound field program parameters and other set menu to check audio signal information (see page 30). Designates the default audio input jack select setting mode for video signal processing delays when using LCD monitors or projectors. Parameter A)SPEAKER SET B)SP LEVEL C)SP DISTANCE D)CENTER GEQ E)LFE LEVEL...
Owner's Manual
Page 36
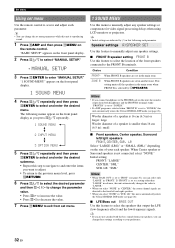
... menu. "BASIC SETUP" appears on the front panel display. 1 SOUND MENU 4 Press lk / n repeatedly and then press lENTER to select the speakers that output the LFE (low-frequency effect) and the low-frequency signals. The following each speaker. Speaker settings A)SPEAKER SET Use this feature to the front left /right speakers FRONT, CENTER, SUR. Initial setting: FRONT: "LARGE" CENTER: "SML" SUR. Choice Condition FRONT* When FRONT B speakers are directed to manually adjust any speaker settings or compensate for video signal processing delays when using...
... menu. "BASIC SETUP" appears on the front panel display. 1 SOUND MENU 4 Press lk / n repeatedly and then press lENTER to select the speakers that output the LFE (low-frequency effect) and the low-frequency signals. The following each speaker. Speaker settings A)SPEAKER SET Use this feature to the front left /right speakers FRONT, CENTER, SUR. Initial setting: FRONT: "LARGE" CENTER: "SML" SUR. Choice Condition FRONT* When FRONT B speakers are directed to manually adjust any speaker settings or compensate for video signal processing delays when using...
Owner's Manual
Page 39
...* Turns off the "MEM.GUARD" feature. DVR V-AUX DTV/CBL pDVD MD/CD-R TUNER CD DVD My DVD 1 Press one of the signal input at each parameter. LAST Automatically select the last decoder mode used the connected input source. sound field program parameters - Display settings A)DISPLAY SET ■ Dimmer DIMMER Use this menu to adjust the level of the input selector buttons (f) or vMULTI CH IN to select the input source you want to exit from the MULTI CH INPUT jacks. Multi channel input setup E)MULTI...
...* Turns off the "MEM.GUARD" feature. DVR V-AUX DTV/CBL pDVD MD/CD-R TUNER CD DVD My DVD 1 Press one of the signal input at each parameter. LAST Automatically select the last decoder mode used the connected input source. sound field program parameters - Display settings A)DISPLAY SET ■ Dimmer DIMMER Use this menu to adjust the level of the input selector buttons (f) or vMULTI CH IN to select the input source you want to exit from the MULTI CH INPUT jacks. Multi channel input setup E)MULTI...
Owner's Manual
Page 42
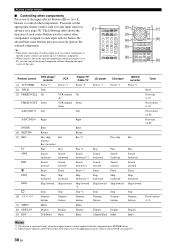
... POWER STANDBY POWER TV AV A B C MUTE CD MD/CD-R TUNER DVD DTV/CBL DVR TV CH V-AUX/DOCK D E AMP TV INPUT TV MUTE TV VOL SCENE 1 2 3 4 [2] BAND LEVEL TITLE MENU VOLUME [3] [4] [5] ENTER RETURN REC DISPLAY [7] [8] [6] l PROG h 1 2 ENHANCER SUR. y • The remote control has 13 modes (input areas) to control components so that some buttons may not correctly operate the selected component. Remote control features ■ Controlling other components Press one of the optional component control area buttons (A to E), you can operate up (A-E) Preset stations...
... POWER STANDBY POWER TV AV A B C MUTE CD MD/CD-R TUNER DVD DTV/CBL DVR TV CH V-AUX/DOCK D E AMP TV INPUT TV MUTE TV VOL SCENE 1 2 3 4 [2] BAND LEVEL TITLE MENU VOLUME [3] [4] [5] ENTER RETURN REC DISPLAY [7] [8] [6] l PROG h 1 2 ENHANCER SUR. y • The remote control has 13 modes (input areas) to control components so that some buttons may not correctly operate the selected component. Remote control features ■ Controlling other components Press one of the optional component control area buttons (A to E), you can operate up (A-E) Preset stations...
Owner's Manual
Page 43
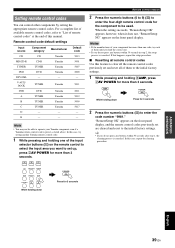
E - - - A B C 2 Press the numeric buttons (0 to 9) (y) to enter the four-digit remote control code for more than 3 seconds. AMP POWER AV While holding one of them to the initial factory settings. In this manual. If this happens, repeat the setup procedure. ■ Resetting all remote control codes Use this case, try each of the input selector buttons (f) on the remote control to select the input area you want to operate your component has more than one . •...
E - - - A B C 2 Press the numeric buttons (0 to 9) (y) to enter the four-digit remote control code for more than 3 seconds. AMP POWER AV While holding one of them to the initial factory settings. In this manual. If this happens, repeat the setup procedure. ■ Resetting all remote control codes Use this case, try each of the input selector buttons (f) on the remote control to select the input area you want to operate your component has more than one . •...

Owner's Manual
Page 45
.... Select the front speakers with NINPUT l / h on the front panel (or the input selector buttons (f) on this unit, and play the source again. The sound is correct. HDMI connection. Set the speaker impedance to resume audio output and then adjust the volume. Set this unit. The volume is not completely inserted. on . been set. The front speakers to the standby mode, disconnect the power cable, plug it back in after the power is turned on the remote control to...
.... Select the front speakers with NINPUT l / h on the front panel (or the input selector buttons (f) on this unit, and play the source again. The sound is correct. HDMI connection. Set the speaker impedance to resume audio output and then adjust the volume. Set this unit. The volume is not completely inserted. on . been set. The front speakers to the standby mode, disconnect the power cable, plug it back in after the power is turned on the remote control to...
Owner's Manual
Page 47
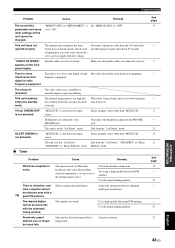
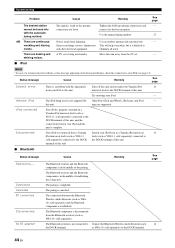
... FM antenna. Select an input source other than "MULTI CH." Exit from digital or radio frequency equipment. Select an input source other than "MULTI CH." Try using a high-quality directional FM antenna. Use the manual tuning method. There is noise interference from the "5ch Stereo" mode. The unit is in "OPTION MENU" is set to prevent dubbing. Check the antenna connections. Adjust the antenna position to "OFF." Use the manual tuning method. frequency equipment. This unit suddenly enters the standby mode. Virtual CINEMA...
... FM antenna. Select an input source other than "MULTI CH." Exit from digital or radio frequency equipment. Select an input source other than "MULTI CH." Try using a high-quality directional FM antenna. Use the manual tuning method. There is noise interference from the "5ch Stereo" mode. The unit is in "OPTION MENU" is set to prevent dubbing. Check the antenna connections. Adjust the antenna position to "OFF." Use the manual tuning method. frequency equipment. This unit suddenly enters the standby mode. Virtual CINEMA...
Owner's Manual
Page 48
... Use the manual tuning method. See page - 27 - - universal dock to the DOCK terminal of the pairing. Disconnected Your iPod was removed from a Yamaha Station your iPod back in the middle of this unit. The paring is difficult to eliminate all noise. iPod connected Your iPod is not supported by Only iPod (Click and Wheel), iPod nano, and iPod - A TV set . Try resetting your iPod (see page 14). The Bluetooth receiver and the Bluetooth component...
... Use the manual tuning method. See page - 27 - - universal dock to the DOCK terminal of the pairing. Disconnected Your iPod was removed from a Yamaha Station your iPod back in the middle of this unit. The paring is difficult to eliminate all noise. iPod connected Your iPod is not supported by Only iPod (Click and Wheel), iPod nano, and iPod - A TV set . Try resetting your iPod (see page 14). The Bluetooth receiver and the Bluetooth component...
Owner's Manual
Page 52
... remote control 5 ■D D)CENTER GEQ 33 D)DECODER MODE 35 D)PARAM. Index ■ Numerics 1 SOUND MENU 31, 32 2 INPUT MENU 31, 34 2ch Stereo 25 3 OPTION MENU 31, 35 5ch Stereo 25 ■A A)DISPLAY SET 35 A)INPUT ASSIGN 34 A)SPEAKER SET 32 A.DELAY 34 A/B/C/D/E, front panel 3 Adjusting the speaker level 19 Adjusting the tonal quality 19 AM tuning 27 AMP, remote control 5 ANTENNA terminals 6 Audio cable plugs 11 Audio delay 34 AUDIO jacks 6, 11 Audio jacks 11 AUDIO L/R (VIDEO AUX) jacks, front panel 3 AUDIO SEL, remote control 5 AUDIO SELECT 18 Audio select 36 Audio...
... remote control 5 ■D D)CENTER GEQ 33 D)DECODER MODE 35 D)PARAM. Index ■ Numerics 1 SOUND MENU 31, 32 2 INPUT MENU 31, 34 2ch Stereo 25 3 OPTION MENU 31, 35 5ch Stereo 25 ■A A)DISPLAY SET 35 A)INPUT ASSIGN 34 A)SPEAKER SET 32 A.DELAY 34 A/B/C/D/E, front panel 3 Adjusting the speaker level 19 Adjusting the tonal quality 19 AM tuning 27 AMP, remote control 5 ANTENNA terminals 6 Audio cable plugs 11 Audio delay 34 AUDIO jacks 6, 11 Audio jacks 11 AUDIO L/R (VIDEO AUX) jacks, front panel 3 AUDIO SEL, remote control 5 AUDIO SELECT 18 Audio select 36 Audio...

Owner's Manual
Page 53
... message ..........44 Selecting audio input jacks 18 Selecting preset stations 28 Selecting the MULTI CH INPUT component as the input source 18 Selecting the night listening mode 19 Selecting the SCENE templates 21 Set menu 31 Set this unit to "Functional overview" on page 3. LR 32 SUR.DECODE, remote control 5 Surround left/right speakers 32 SWFR PHASE 33 ■T TEST 34 Test tone 34 TONE CONTROL, front panel 3 Troubleshooting 41 Tuner indicators 4 TUNING AUTO/MAN'L, front panel 3 Turning off the power 15 Turning on the power 15 TV control buttons, remote control 5 TV...
... message ..........44 Selecting audio input jacks 18 Selecting preset stations 28 Selecting the MULTI CH INPUT component as the input source 18 Selecting the night listening mode 19 Selecting the SCENE templates 21 Set menu 31 Set this unit to "Functional overview" on page 3. LR 32 SUR.DECODE, remote control 5 Surround left/right speakers 32 SWFR PHASE 33 ■T TEST 34 Test tone 34 TONE CONTROL, front panel 3 Troubleshooting 41 Tuner indicators 4 TUNING AUTO/MAN'L, front panel 3 Turning off the power 15 Turning on the power 15 TV control buttons, remote control 5 TV...


