MCXSP10 Manual
Page 6
... and the remote control, the button name on the front panel or the remote control. We Want You Listening For A Lifetime Yamaha and the Electronic Industries Association's Consumer Electronics Group want you to get the most importantly, without annoying blaring or distortion - DTS-...ES | NEO:6 | 96/24. "96/24" is a trademark of YAMAHA CORPORATION. Product "DTS" and "DTS-ES | NEO:6" are trademarks or registered trademarks of HDMI Licensing LLC. "HDMI", the "HDMI" logo and "High-Definition Multimedia Interface" are registered trademarks of DTS, Inc. "SILENT CINEMA" ...
... and the remote control, the button name on the front panel or the remote control. We Want You Listening For A Lifetime Yamaha and the Electronic Industries Association's Consumer Electronics Group want you to get the most importantly, without annoying blaring or distortion - DTS-...ES | NEO:6 | 96/24. "96/24" is a trademark of YAMAHA CORPORATION. Product "DTS" and "DTS-ES | NEO:6" are trademarks or registered trademarks of HDMI Licensing LLC. "HDMI", the "HDMI" logo and "High-Definition Multimedia Interface" are registered trademarks of DTS, Inc. "SILENT CINEMA" ...

MCXSP10 Manual
Page 7
... experience ◆ XM Satellite Radio information displaying capability Supplied accessories HDMI (High-Definition Multimedia Interface) ◆ HDMI interface for standard, enhanced or high-definition video (includes 1080p ... Check that you received all sources ◆ Cinema and music night listening modes ◆ Remote control with the SCENE function Sound field programs ◆ Proprietary Yamaha technology for the...original SCENE templates for discrete multi- Remote control CODE SET TRANSMIT POWER TV POWER AV STANDBY POWER CD DVD DOCK V-AUX MD CD-R CBL DTV MULTI CH IN AUDIO...
... experience ◆ XM Satellite Radio information displaying capability Supplied accessories HDMI (High-Definition Multimedia Interface) ◆ HDMI interface for standard, enhanced or high-definition video (includes 1080p ... Check that you received all sources ◆ Cinema and music night listening modes ◆ Remote control with the SCENE function Sound field programs ◆ Proprietary Yamaha technology for the...original SCENE templates for discrete multi- Remote control CODE SET TRANSMIT POWER TV POWER AV STANDBY POWER CD DVD DOCK V-AUX MD CD-R CBL DTV MULTI CH IN AUDIO...

MCXSP10 Manual
Page 10
...perhaps with a stripe, groove or ridge. BACK SUBWOOFER VIDEO S VIDEO MD/CD-R 2 DVD 3 DTV /CBL IN2 DTV/CBL 4 OPTICAL COAXIAL CD 5 OUT HDMI DVD 6 DIGITAL INPUT Y PB PR MONITOR OUT Y PB DVR C PR COMPONENT VIDEO FRONT B/PRESENCE R EXTRA SP L ANTENNA FM GND AM 75 UNBAL. Connect ... SUBWOOFER R FRONT SURROUND SUR. Be sure to connect the left speaker To the surround back right speaker 1 Make sure that this unit. Subwoofer AV receiver 6 En Input jack Subwoofer cable SUBWOOFER PRE OUT jack Quick start guide Step 1: Set up your speakers Place your speakers in the room. ...
...perhaps with a stripe, groove or ridge. BACK SUBWOOFER VIDEO S VIDEO MD/CD-R 2 DVD 3 DTV /CBL IN2 DTV/CBL 4 OPTICAL COAXIAL CD 5 OUT HDMI DVD 6 DIGITAL INPUT Y PB PR MONITOR OUT Y PB DVR C PR COMPONENT VIDEO FRONT B/PRESENCE R EXTRA SP L ANTENNA FM GND AM 75 UNBAL. Connect ... SUBWOOFER R FRONT SURROUND SUR. Be sure to connect the left speaker To the surround back right speaker 1 Make sure that this unit. Subwoofer AV receiver 6 En Input jack Subwoofer cable SUBWOOFER PRE OUT jack Quick start guide Step 1: Set up your speakers Place your speakers in the room. ...
MCXSP10 Manual
Page 11
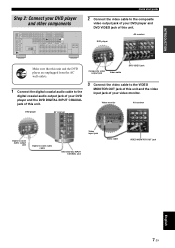
...DVD player and DVD VIDEO jack of this unit and the video input jack of this unit. Video monitor AV receiver DVD player AV receiver Digital coaxial audio output jack Digital coaxial audio cable Video input jack Video cable DVD DIGITAL INPUT COAXIAL jack VIDEO... MONITOR OUT jack English 7 En INTRODUCTION Step 2: Connect your video monitor. BACK SUBWOOFER VIDEO S VIDEO MD/CD-R 2 DVD 3 DTV /CBL IN2 DTV/CBL 4 OPTICAL COAXIAL CD 5 OUT HDMI...
...DVD player and DVD VIDEO jack of this unit and the video input jack of this unit. Video monitor AV receiver DVD player AV receiver Digital coaxial audio output jack Digital coaxial audio cable Video input jack Video cable DVD DIGITAL INPUT COAXIAL jack VIDEO... MONITOR OUT jack English 7 En INTRODUCTION Step 2: Connect your video monitor. BACK SUBWOOFER VIDEO S VIDEO MD/CD-R 2 DVD 3 DTV /CBL IN2 DTV/CBL 4 OPTICAL COAXIAL CD 5 OUT HDMI...
MCXSP10 Manual
Page 15
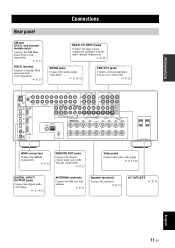
...FM GND AM 75 UNBAL. and Canada models only) Connect the XM MiniTuner Dock (sold separately). ☞ P. 53 DOCK terminal Connect a Yamaha iPod universal dock (sold separately). ☞ P. 23 MULTI CH INPUT jacks Connect the input source component equipped with the multi-channel output ...OUT MONITOR OUT SURROUND R L SURROUND BACK/ BI-AMP R SINGLE L REMOTE OUT AC OUTLETS HDMI connectors Connect the HDMI components. ☞ P. 16 REMOTE OUT jacks Connect the remote control input jack of the Yamaha components. ☞ P. 23 Video jacks Connect the video cable plugs. ☞ P. 18-...
...FM GND AM 75 UNBAL. and Canada models only) Connect the XM MiniTuner Dock (sold separately). ☞ P. 53 DOCK terminal Connect a Yamaha iPod universal dock (sold separately). ☞ P. 23 MULTI CH INPUT jacks Connect the input source component equipped with the multi-channel output ...OUT MONITOR OUT SURROUND R L SURROUND BACK/ BI-AMP R SINGLE L REMOTE OUT AC OUTLETS HDMI connectors Connect the HDMI components. ☞ P. 16 REMOTE OUT jacks Connect the remote control input jack of the Yamaha components. ☞ P. 23 Video jacks Connect the video cable plugs. ☞ P. 18-...

MCXSP10 Manual
Page 20
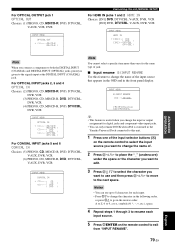
...jack via a DVI connection, this unit while data is played back, video and audio signals may not be output at input jacks other DVI components. HDMI HDMI cable plug y • We recommend that you turn off the power of the DVD player. • This unit is not compatible with this unit ...signals input at the composite video, S-video and component video jacks can check the potential problem about the HDMI connection (see page 81) to activate this unit to other than the HDMI IN 1 or HDMI IN 2 jack of this unit may disrupt playback or cause noise. • Audio signals input at ...
...jack via a DVI connection, this unit while data is played back, video and audio signals may not be output at input jacks other DVI components. HDMI HDMI cable plug y • We recommend that you turn off the power of the DVD player. • This unit is not compatible with this unit ...signals input at the composite video, S-video and component video jacks can check the potential problem about the HDMI connection (see page 81) to activate this unit to other than the HDMI IN 1 or HDMI IN 2 jack of this unit may disrupt playback or cause noise. • Audio signals input at ...
MCXSP10 Manual
Page 21
... 1080p of resolution. • The OSD signal is not output at the VCR OUT and DVR OUT jacks and is not recorded. • Use the "HDMI UP-SCALING" parameter in "DISPLAY SET" to deinterlace and convert the resolution of the video signals output at the COMPONENT VIDEO, S VIDEO and VIDEO jacks..., the priority order of the input signals is as multi-channel PCM, Dolby Digital and DTS signals input at the HDMI IN 1 or HDMI IN 2 jack can be output at the HDMI OUT jack only when "SUPPORT AUDIO" is set to "OTHER" (see page 77). • Audio signals input at the...
... 1080p of resolution. • The OSD signal is not output at the VCR OUT and DVR OUT jacks and is not recorded. • Use the "HDMI UP-SCALING" parameter in "DISPLAY SET" to deinterlace and convert the resolution of the video signals output at the COMPONENT VIDEO, S VIDEO and VIDEO jacks..., the priority order of the input signals is as multi-channel PCM, Dolby Digital and DTS signals input at the HDMI IN 1 or HDMI IN 2 jack can be output at the HDMI OUT jack only when "SUPPORT AUDIO" is set to "OTHER" (see page 77). • Audio signals input at the...
MCXSP10 Manual
Page 22
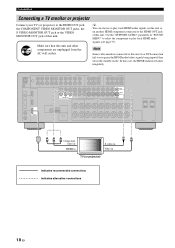
...signals being input if they are unplugged from the AC wall outlets. Connections Connecting a TV monitor or projector Connect your TV (or projector) to the HDMI OUT jack, the COMPONENT VIDEO MONITOR OUT jacks, the S VIDEO MONITOR OUT jack or the VIDEO MONITOR OUT jack of this unit. Note Some ... VIDEO VIDEO VIDEO S VIDEO MONITOR OUT Y PB PR Component video in HDMI in S-video in Video in the standby mode. y You can choose to play back HDMI audio signals on this unit or on another HDMI component connected to the HDMI OUT jack of this unit via a DVI connection fail to play back...
...signals being input if they are unplugged from the AC wall outlets. Connections Connecting a TV monitor or projector Connect your TV (or projector) to the HDMI OUT jack, the COMPONENT VIDEO MONITOR OUT jacks, the S VIDEO MONITOR OUT jack or the VIDEO MONITOR OUT jack of this unit. Note Some ... VIDEO VIDEO VIDEO S VIDEO MONITOR OUT Y PB PR Component video in HDMI in S-video in Video in the standby mode. y You can choose to play back HDMI audio signals on this unit or on another HDMI component connected to the HDMI OUT jack of this unit via a DVI connection fail to play back...
MCXSP10 Manual
Page 23
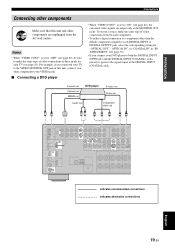
... Connecting other components Make sure that this unit, connect your other components are output only at the DIGITAL INPUT (COAXIAL) jack. Coaxial out Optical out HDMI out DVD player S-video out Video out Audio out Component video out C RL PR PB Y V S O L R DVD IN1 DVD 3 AUDIO DVD DVD A DVD COMPONENT VIDEO VIDEO...
... Connecting other components Make sure that this unit, connect your other components are output only at the DIGITAL INPUT (COAXIAL) jack. Coaxial out Optical out HDMI out DVD player S-video out Video out Audio out Component video out C RL PR PB Y V S O L R DVD IN1 DVD 3 AUDIO DVD DVD A DVD COMPONENT VIDEO VIDEO...
MCXSP10 Manual
Page 24
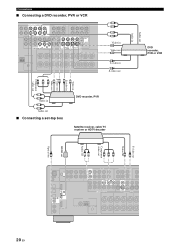
... L R Audio out ■ Connecting a set-top box DVD recorder, PVR Satellite receiver, cable TV receiver or HDTV decoder DVD recorder, PVR or VCR S-video out Video out Component video out Audio out HDMI out Optical out O L R DTV /CBL IN2 DTV/CBL 4 OPTICAL HDMI DIGITAL INPUT LR PR PB Y V S AUDIO DTV/CBL DTV/CBL B COMPONENT...
... L R Audio out ■ Connecting a set-top box DVD recorder, PVR Satellite receiver, cable TV receiver or HDTV decoder DVD recorder, PVR or VCR S-video out Video out Component video out Audio out HDMI out Optical out O L R DTV /CBL IN2 DTV/CBL 4 OPTICAL HDMI DIGITAL INPUT LR PR PB Y V S AUDIO DTV/CBL DTV/CBL B COMPONENT...
MCXSP10 Manual
Page 30
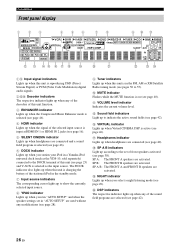
.... 3 ENHANCER indicator Lights up when the Compressed Music Enhancer mode is selected (see page 46). 4 HDMI indicator Lights up when the signal of the selected input source is input at HDMI IN 1 or HDMI IN 2 jacks (see page 16). 5 SILENT CINEMA indicator Lights up when headphones are connected and a... sound field program is selected (see page 46). 6 DOCK indicator Lights up when you station your iPod in a Yamaha iPod universal dock (such as the...
.... 3 ENHANCER indicator Lights up when the Compressed Music Enhancer mode is selected (see page 46). 4 HDMI indicator Lights up when the signal of the selected input source is input at HDMI IN 1 or HDMI IN 2 jacks (see page 16). 5 SILENT CINEMA indicator Lights up when headphones are connected and a... sound field program is selected (see page 46). 6 DOCK indicator Lights up when you station your iPod in a Yamaha iPod universal dock (such as the...
MCXSP10 Manual
Page 43
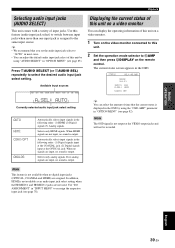
... VCR DVR V-AUX DTV/CBL DVD MD/CD-R TUNER CD XM PHONO A.SEL: AUTO Currently selected audio input jack select setting AUTO HDMI COAX/OPT ANALOG Automatically selects input signals in the following order: (1) Digital signals input at the COAXIAL jack. (2) Digital signals input ... SELECT (or IAUDIO SEL) repeatedly to reassign the respective input jack (see page 78). Automatically selects input signals in the following order: (1) HDMI (2) Digital signals (3) Analog signals. Displaying the current status of this unit on a video monitor You can display the operating information of this unit...
... VCR DVR V-AUX DTV/CBL DVD MD/CD-R TUNER CD XM PHONO A.SEL: AUTO Currently selected audio input jack select setting AUTO HDMI COAX/OPT ANALOG Automatically selects input signals in the following order: (1) Digital signals input at the COAXIAL jack. (2) Digital signals input ... SELECT (or IAUDIO SEL) repeatedly to reassign the respective input jack (see page 78). Automatically selects input signals in the following order: (1) HDMI (2) Digital signals (3) Analog signals. Displaying the current status of this unit on a video monitor You can display the operating information of this unit...

MCXSP10 Manual
Page 45
... a source. Note "---" appears when this unit cannot display the corresponding information. ■ Video information HDMI SIGNAL HDMI RES. Note Even if this unit is in the front panel display. See page 99 for HDMI sources or connected HDMI devices. When this unit does not cut off the power to the AC OUTLETS (see... page 24). HDMI ERROR Type of the source video signals and the video signals output at the HDMI OUT jack of time. Each time you are switching the amount of time. y The sleep timer setting can ...
... a source. Note "---" appears when this unit cannot display the corresponding information. ■ Video information HDMI SIGNAL HDMI RES. Note Even if this unit is in the front panel display. See page 99 for HDMI sources or connected HDMI devices. When this unit does not cut off the power to the AC OUTLETS (see... page 24). HDMI ERROR Type of the source video signals and the video signals output at the HDMI OUT jack of time. Each time you are switching the amount of time. y The sleep timer setting can ...
MCXSP10 Manual
Page 65
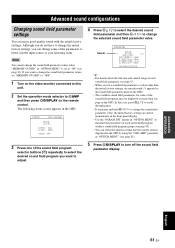
... to adjust. 5 Press ODISPLAY to change the selected sound field parameter value. Cursor PARAMETER MOVIE . STATUS VOL:-40.0dB MOVIE Sci-Fi INPUT: DVD A.SEL: HDMI NIGHT: OFF 4 Press Dk / n to select the desired sound field parameter and then Dl / h to turn off the sound field parameter display. INI" feature in...
... to adjust. 5 Press ODISPLAY to change the selected sound field parameter value. Cursor PARAMETER MOVIE . STATUS VOL:-40.0dB MOVIE Sci-Fi INPUT: DVD A.SEL: HDMI NIGHT: OFF 4 Press Dk / n to select the desired sound field parameter and then Dl / h to turn off the sound field parameter display. INI" feature in...

MCXSP10 Manual
Page 73
Sound menu 1 SOUND MENU Use this menu to play back HDMI audio signals. Adjusts the output level of each speaker, the speakers for low-frequency signal output, the crossover frequency, and the assignment of the sound ... Sets the input channel numbers and other parameters of the speakers. Parameter A)SPEAKER SET B)SPEAKER LEVEL C)SP DISTANCE D)EQUALIZER E)LFE LEVEL F)DYNAMIC RANGE G)AUDIO SET H)HDMI SET I /O ASSIGNMENT Assigns the input/output jacks of this unit. Selects the equalizer setting of the multi channel input. Selects the mode of the input...
Sound menu 1 SOUND MENU Use this menu to play back HDMI audio signals. Adjusts the output level of each speaker, the speakers for low-frequency signal output, the crossover frequency, and the assignment of the sound ... Sets the input channel numbers and other parameters of the speakers. Parameter A)SPEAKER SET B)SPEAKER LEVEL C)SP DISTANCE D)EQUALIZER E)LFE LEVEL F)DYNAMIC RANGE G)AUDIO SET H)HDMI SET I /O ASSIGNMENT Assigns the input/output jacks of this unit. Selects the equalizer setting of the multi channel input. Selects the mode of the input...
MCXSP10 Manual
Page 75
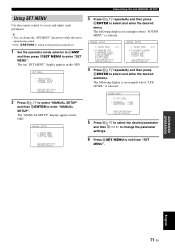
... 2 INPUT MENU 3 OPTION MENU [ ]/[ ]:Up/Down [ENTER]:Enter 3 Press Dk / n repeatedly and then press DENTER to access and adjust each parameter. F)DYNAMIC RANGE G)AUDIO SET H)HDMI SET I)EXTD SUR. [ ]/[ ]:Up/Down [ENTER]:Enter p p p 4 Press Dk / n repeatedly and then press DENTER to exit from "SET MENU". SPEAKER;;;;;;0dB HEADPHONE;;;;0dB [ ]/[ ]:Up/Down...
... 2 INPUT MENU 3 OPTION MENU [ ]/[ ]:Up/Down [ENTER]:Enter 3 Press Dk / n repeatedly and then press DENTER to access and adjust each parameter. F)DYNAMIC RANGE G)AUDIO SET H)HDMI SET I)EXTD SUR. [ ]/[ ]:Up/Down [ENTER]:Enter p p p 4 Press Dk / n repeatedly and then press DENTER to exit from "SET MENU". SPEAKER;;;;;;0dB HEADPHONE;;;;0dB [ ]/[ ]:Up/Down...

MCXSP10 Manual
Page 76
F)DYNAMIC RANGE G)AUDIO SET H)HDMI SET I)EXTD SUR. [ ]/[ ]:Up/Down [ENTER]:Enter ■ Speaker settings A)SPEAKER SET Use this feature to prioritize either the presence or the surround back speakers ...
F)DYNAMIC RANGE G)AUDIO SET H)HDMI SET I)EXTD SUR. [ ]/[ ]:Up/Down [ENTER]:Enter ■ Speaker settings A)SPEAKER SET Use this feature to prioritize either the presence or the surround back speakers ...

MCXSP10 Manual
Page 81
...the power of the decoder driving. setting takes priority over the initial volume setting. Choices: HTR-6080, OTHER • Select "HTR-6080" to play back HDMI audio signals on this unit or on another HDMI component connected to enjoy 6.1/7.1-channel playback for multi-channel sources using the Dolby Digital EX ...EX or DTS-ES decoders by this unit is in "MODE". Use this feature to set to play back HDMI audio signals on . SOUND MENU H)HDMI SET SUPPORT AUDIO: HTR-6080 [p]/[[]:Select [ENTER]:Return Support audio SUPPORT AUDIO Use this feature to select whether to play back...
...the power of the decoder driving. setting takes priority over the initial volume setting. Choices: HTR-6080, OTHER • Select "HTR-6080" to play back HDMI audio signals on this unit or on another HDMI component connected to enjoy 6.1/7.1-channel playback for multi-channel sources using the Dolby Digital EX ...EX or DTS-ES decoders by this unit is in "MODE". Use this feature to set to play back HDMI audio signals on . SOUND MENU H)HDMI SET SUPPORT AUDIO: HTR-6080 [p]/[[]:Select [ENTER]:Return Support audio SUPPORT AUDIO Use this feature to select whether to play back...
MCXSP10 Manual
Page 83
... 3 Press Dk / n to select the character you connect a component to both the DIGITAL INPUT (COAXIAL) and DIGITAL INPUT (OPTICAL) jacks, priority is stationed in the Yamaha Universal Dock connected to this feature to change the name of the input selector buttons (A) on the remote control to the next space. DVD ( DVD...Choices: (1) PHONO, CD, MD/CD-R, DVD, DTV/CBL, V-AUX, VCR, DVR INPUT MENU OPTICAL OUT . (1);;;;;MD/CD-R (MD/CD-R ) Customizing this unit (MANUAL SETUP) For HDMI IN jacks 1 and 2 HDMI IN Choices: [IN1] DVD, DTV/CBL, V-AUX, DVR, VCR [IN2] DVD, DTV/CBL, V-AUX, DVR, VCR INPUT MENU...
... 3 Press Dk / n to select the character you connect a component to both the DIGITAL INPUT (COAXIAL) and DIGITAL INPUT (OPTICAL) jacks, priority is stationed in the Yamaha Universal Dock connected to this feature to change the name of the input selector buttons (A) on the remote control to the next space. DVD ( DVD...Choices: (1) PHONO, CD, MD/CD-R, DVD, DTV/CBL, V-AUX, VCR, DVR INPUT MENU OPTICAL OUT . (1);;;;;MD/CD-R (MD/CD-R ) Customizing this unit (MANUAL SETUP) For HDMI IN jacks 1 and 2 HDMI IN Choices: [IN1] DVD, DTV/CBL, V-AUX, DVR, VCR [IN2] DVD, DTV/CBL, V-AUX, DVR, VCR INPUT MENU...
MCXSP10 Manual
Page 85
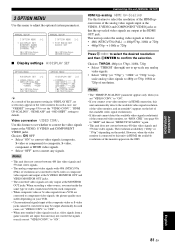
... are output at the composite video or S-video jacks cannot be output abnormally. CHK" (see page 93) to set the "VIDEO CONV.", "HDMI UP-SCALING", "HDMI ASP" and "OSD SHIFT" settings to default. ADVANCED OPERATION English 81 En In such a case, use "V.RESET" (see page 90) to...; 1080i or 720p Press Dl / h to select the desired resolution and then DENTER to "ON". A)DISPLAY SET B)MEMORY GUARD C)AUDIO SELECT D)PARAM. VIDEO-CONV.;;;ON HDMI UP-SCALING >*THRGH *480p *1080i *720p [ ]/[ ]:Up/Down [ ]/[[]:Select p p OPTION MENU A)DISPLAY SET 2/2 . Use this feature to set whether to "ON"....
... are output at the composite video or S-video jacks cannot be output abnormally. CHK" (see page 93) to set the "VIDEO CONV.", "HDMI UP-SCALING", "HDMI ASP" and "OSD SHIFT" settings to default. ADVANCED OPERATION English 81 En In such a case, use "V.RESET" (see page 90) to...; 1080i or 720p Press Dl / h to select the desired resolution and then DENTER to "ON". A)DISPLAY SET B)MEMORY GUARD C)AUDIO SELECT D)PARAM. VIDEO-CONV.;;;ON HDMI UP-SCALING >*THRGH *480p *1080i *720p [ ]/[ ]:Up/Down [ ]/[[]:Select p p OPTION MENU A)DISPLAY SET 2/2 . Use this feature to set whether to "ON"....


