
Owner's Manual
Page 1
U HTR-6030 AV Receiver OWNER'S MANUAL
U HTR-6030 AV Receiver OWNER'S MANUAL
Owner's Manual
Page 7
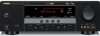
... them immediately. Read the packaging carefully as alkaline and manganese batteries) together. INTRODUCTION Getting started Getting started ■ Checking the supplied accessories Check that you received all of the batteries if you notice the following parts. Remote control POWER POWER STANDBY POWER TV AV MULTI CH IN AUDIO SEL SLEEP MUTE...
... them immediately. Read the packaging carefully as alkaline and manganese batteries) together. INTRODUCTION Getting started Getting started ■ Checking the supplied accessories Check that you received all of the batteries if you notice the following parts. Remote control POWER POWER STANDBY POWER TV AV MULTI CH IN AUDIO SEL SLEEP MUTE...

Owner's Manual
Page 9
... your speakers in the room. 2 Connect speaker cables to the input jack of the subwoofer and the SUBWOOFER OUTPUT jack of this unit. Subwoofer AV receiver IN MD/ OUT (PLAY) CD-R (REC) OUTPUT SUB WOOFER Input jack Subwoofer cable SUBWOOFER OUTPUT jack English 5 En XM COMPONENT VIDEO DVD DTV/CBL DVR...
... your speakers in the room. 2 Connect speaker cables to the input jack of the subwoofer and the SUBWOOFER OUTPUT jack of this unit. Subwoofer AV receiver IN MD/ OUT (PLAY) CD-R (REC) OUTPUT SUB WOOFER Input jack Subwoofer cable SUBWOOFER OUTPUT jack English 5 En XM COMPONENT VIDEO DVD DTV/CBL DVR...

Owner's Manual
Page 10
... player Make sure that this unit. DVD player AV receiver 3 Connect the video cable to the video input jack of your DVD player and the DVD VIDEO jack of this unit. Quick start guide Step 2: ... the video cable to the composite video output jack of your video monitor and the VIDEO MONITOR OUT jack of this unit. Video monitor AV receiver S-VIDEO L/MONO R VIDEO AUDIO VIDEO-1 IN Y PB PR L/MONO R COLOR STREAM HD IN AUDIO Digital coaxial audio output jack Video input jack Video cable Digital...
... player Make sure that this unit. DVD player AV receiver 3 Connect the video cable to the video input jack of your DVD player and the DVD VIDEO jack of this unit. Quick start guide Step 2: ... the video cable to the composite video output jack of your video monitor and the VIDEO MONITOR OUT jack of this unit. Video monitor AV receiver S-VIDEO L/MONO R VIDEO AUDIO VIDEO-1 IN Y PB PR L/MONO R COLOR STREAM HD IN AUDIO Digital coaxial audio output jack Video input jack Video cable Digital...

Owner's Manual
Page 13
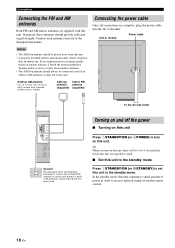
... the connected AM loop antenna, or adjust the position of the end of power in order to receive infrared signals from the FM radio station..." To turn on the front panel to set to receive infrared signals from the standby mode, press 1STANDBY/ ON (or LPOWER) on the front panel. In the...
... the connected AM loop antenna, or adjust the position of the end of power in order to receive infrared signals from the FM radio station..." To turn on the front panel to set to receive infrared signals from the standby mode, press 1STANDBY/ ON (or LPOWER) on the front panel. In the...
Owner's Manual
Page 22
Consult the nearest authorized Yamaha dealer or service center about outdoor antennas. • The AM loop antenna should always be a 4 to 5-second delay before this unit can reproduce sound. ■ ... AM antennas Both FM and AM indoor antennas are complete, plug the power cable into moist earth. Outdoor AM antenna Use a 5 to 10 m (16 to receive infrared signals from this unit.
Consult the nearest authorized Yamaha dealer or service center about outdoor antennas. • The AM loop antenna should always be a 4 to 5-second delay before this unit can reproduce sound. ■ ... AM antennas Both FM and AM indoor antennas are complete, plug the power cable into moist earth. Outdoor AM antenna Use a 5 to 10 m (16 to receive infrared signals from this unit.
Owner's Manual
Page 38
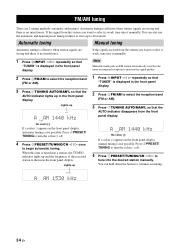
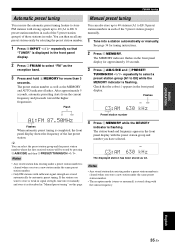
...AUTO A AM 1440 kHz 1 Press DINPUT l / h repeatedly so that "TUNER" is not possible. Lights up and the frequency of the received station is no interference. Automatic tuning Manual tuning Automatic tuning is effective when station signals are strong and there is weak, tune into it manually. ...FM or AM). 3 Press 7TUNING AUTO/MAN'L so that the AUTO indicator lights up to store up in the front panel display. If the signal received from the front panel display. Note Manually tuning into the desired station manually. No colon (:) If a colon (:) appears in the front panel display,...
...AUTO A AM 1440 kHz 1 Press DINPUT l / h repeatedly so that "TUNER" is not possible. Lights up and the frequency of the received station is no interference. Automatic tuning Manual tuning Automatic tuning is effective when station signals are strong and there is weak, tune into it manually. ...FM or AM). 3 Press 7TUNING AUTO/MAN'L so that the AUTO indicator lights up to store up in the front panel display. If the signal received from the front panel display. Note Manually tuning into the desired station manually. No colon (:) If a colon (:) appears in the front panel display,...
Owner's Manual
Page 39
y You can select the preset station group and the preset station number where the first received station will be stored by selecting the preset station number. 1 Press DINPUT l / h repeatedly so that the colon (:) appears in the front panel display for approximately ...
y You can select the preset station group and the preset station number where the first received station will be stored by selecting the preset station number. 1 Press DINPUT l / h repeatedly so that the colon (:) appears in the front panel display for approximately ...
Owner's Manual
Page 42
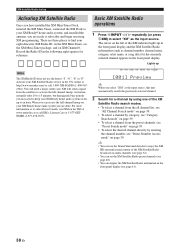
... normally takes 10 to 15 minutes, but during peak busy periods you may need a major credit card. There are three places to subscribe and begin receiving XM programming. You will send a signal from the preset channels, see "Preset Search mode" on page 39. • To select the desired channel directly by...
... normally takes 10 to 15 minutes, but during peak busy periods you may need a major credit card. There are three places to subscribe and begin receiving XM programming. You will send a signal from the preset channels, see "Preset Search mode" on page 39. • To select the desired channel directly by...


