
Owner's Manual
Page 1
U HTR-6030 AV Receiver OWNER'S MANUAL
U HTR-6030 AV Receiver OWNER'S MANUAL

Owner's Manual
Page 3
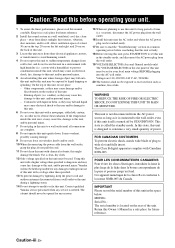
...level of other electronic devices. If you can be mounted to a wall or ceiling only as practical. Modifications not expressly approved by Yamaha may result in to coaxial type cable. Utilize power outlets that are covered by the operating instructions as radiators, heat registers, stoves,... system is 300 ohm ribbon lead, change in wire to an antenna discharge unit, size of grounding conductors, location of this manual, meets FCC requirements. Compliance with this product or the device that the product is being affected by the interference. Follow all ...
...level of other electronic devices. If you can be mounted to a wall or ceiling only as practical. Modifications not expressly approved by Yamaha may result in to coaxial type cable. Utilize power outlets that are covered by the operating instructions as radiators, heat registers, stoves,... system is 300 ohm ribbon lead, change in wire to an antenna discharge unit, size of grounding conductors, location of this manual, meets FCC requirements. Compliance with this product or the device that the product is being affected by the interference. Follow all ...
Owner's Manual
Page 4
... space of at least 30 cm on the top, 20 cm on the left and right, and 20 cm on the rear of power. this manual carefully. This state is faulty. 18 Before moving this unit, and/or personal injury. - This Class B digital apparatus complies with high humidity (i.e. Containers ...finest performance, please read the "Troubleshooting" section on common operating errors before operating your local main voltage BEFORE plugging into the AC wall outlet. Yamaha will not be used. WARNING TO REDUCE THE RISK OF FIRE OR ELECTRIC SHOCK, DO NOT EXPOSE THIS UNIT TO RAIN OR MOISTURE. IMPORTANT ...
... space of at least 30 cm on the top, 20 cm on the left and right, and 20 cm on the rear of power. this manual carefully. This state is faulty. 18 Before moving this unit, and/or personal injury. - This Class B digital apparatus complies with high humidity (i.e. Containers ...finest performance, please read the "Troubleshooting" section on common operating errors before operating your local main voltage BEFORE plugging into the AC wall outlet. Yamaha will not be used. WARNING TO REDUCE THE RISK OF FIRE OR ELECTRIC SHOCK, DO NOT EXPOSE THIS UNIT TO RAIN OR MOISTURE. IMPORTANT ...
Owner's Manual
Page 5
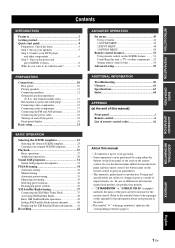
...a TV, or other components 6 Step 3: Turn on the power and press SCENE 1 button 8 What do you want to change in parentheses. • This manual is printed prior to the attached sheet or the top pages of improvements, etc. In case of differences between the front panel and the remote... control, the button name on the remote control is given in part as a result of this manual • y indicates a tip for your DVD player and other components.... 52 Setting remote control codes 54 Advanced setup 55 PREPARATION Connections 10 ...
...a TV, or other components 6 Step 3: Turn on the power and press SCENE 1 button 8 What do you want to change in parentheses. • This manual is printed prior to the attached sheet or the top pages of improvements, etc. In case of differences between the front panel and the remote... control, the button name on the remote control is given in part as a result of this manual • y indicates a tip for your DVD player and other components.... 52 Setting remote control codes 54 Advanced setup 55 PREPARATION Connections 10 ...

Owner's Manual
Page 13
... from the remote control. ■ Adjusting the parameters of this unit • Optimizing the speaker parameters for your listening room (BASIC SETUP) ☞ P. 21 • Manually adjusting various parameters of this unit ☞ P. 43 • Setting the remote control ☞ P. 51 • Adjusts the advanced parameters ☞ P. 55 ■ Additional features...
... from the remote control. ■ Adjusting the parameters of this unit • Optimizing the speaker parameters for your listening room (BASIC SETUP) ☞ P. 21 • Manually adjusting various parameters of this unit ☞ P. 43 • Setting the remote control ☞ P. 51 • Adjusts the advanced parameters ☞ P. 55 ■ Additional features...

Owner's Manual
Page 25
..."YES" if you have a subwoofer in "SOUND MENU" (see page 45). • Altering any parameters in "BASIC SETUP" resets all parameters manually adjusted in your system. • Select "NONE" if you do not have installed your system quickly and with minimal effort. and Canada models] ... return to the previous menu level. 1 Press DAMP on the remote control. 2 Press PMENU. Select the size of speakers connected to this unit manually using more precise adjustments, use the detailed parameters in "SOUND MENU" (see page 45). • Initial settings are defined as follows: Choices:...
..."YES" if you have a subwoofer in "SOUND MENU" (see page 45). • Altering any parameters in "BASIC SETUP" resets all parameters manually adjusted in your system. • Select "NONE" if you do not have installed your system quickly and with minimal effort. and Canada models] ... return to the previous menu level. 1 Press DAMP on the remote control. 2 Press PMENU. Select the size of speakers connected to this unit manually using more precise adjustments, use the detailed parameters in "SOUND MENU" (see page 45). • Initial settings are defined as follows: Choices:...
Owner's Manual
Page 38
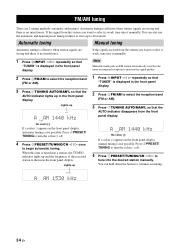
...Press 3FM/AM to 40 stations. Press 2PRESET/ TUNING to turn the colon (:) off . 4 Press 5PRESET/TUNING/CH l / h once to tune into it manually. Press 2PRESET/ TUNING to turn the colon (:) off . 4 Press 5PRESET/TUNING/CH l / h to begin automatic tuning. FM/AM TUNING FM/AM tuning ... shown in the front panel display, automatic tuning is not possible. Automatic tuning is effective when station signals are 2 tuning methods: automatic and manual. Note Manually tuning into a station, the TUNED indicator lights up A AM 1440 kHz No colon (:) If a colon (:) appears in the front panel ...
...Press 3FM/AM to 40 stations. Press 2PRESET/ TUNING to turn the colon (:) off . 4 Press 5PRESET/TUNING/CH l / h once to tune into it manually. Press 2PRESET/ TUNING to turn the colon (:) off . 4 Press 5PRESET/TUNING/CH l / h to begin automatic tuning. FM/AM TUNING FM/AM tuning ... shown in the front panel display, automatic tuning is not possible. Automatic tuning is effective when station signals are 2 tuning methods: automatic and manual. Note Manually tuning into a station, the TUNED indicator lights up A AM 1440 kHz No colon (:) If a colon (:) appears in the front panel ...
Owner's Manual
Page 39
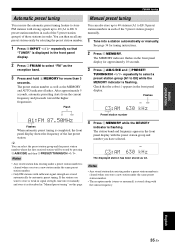
...display shows the frequency of the last preset station. The preset station number as well as C3. BASIC OPERATION FM/AM tuning Automatic preset tuning Manual preset tuning You can use the automatic preset tuning feature to store FM stations with strong signals up to 40 stations (A1 to E8: 8... have selected. You can also store up to 40 (A1 to E8: 8 preset station numbers in each of the 5 preset station groups) manually. 1 Tune into it manually and store it as the reception band. 3 Press and hold 6MEMORY for more than 3 seconds. You can then recall any preset station easily ...
...display shows the frequency of the last preset station. The preset station number as well as C3. BASIC OPERATION FM/AM tuning Automatic preset tuning Manual preset tuning You can use the automatic preset tuning feature to store FM stations with strong signals up to 40 stations (A1 to E8: 8... have selected. You can also store up to 40 (A1 to E8: 8 preset station numbers in each of the 5 preset station groups) manually. 1 Tune into it manually and store it as the reception band. 3 Press and hold 6MEMORY for more than 3 seconds. You can then recall any preset station easily ...
Owner's Manual
Page 47
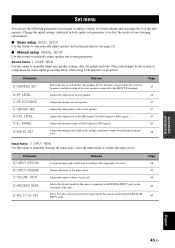
...9632; Basic setup BASIC SETUP Use this feature to automatically adjust speaker and system parameters (see page 21). ■ Manual setup MANUAL SETUP Use this menu to manually adjust any speaker settings, alter the quality and tone of the sound output by the system or compensate for the sources...operates. Changes the name of Dolby Digital or DTS signals. RANGE G)AUDIO SET Features Selects the size of the front speakers connected to manually adjust speaker and system parameters. Adjusts the distance of each speaker. Adjusts the muting level, audio delay settings, maximum volume level and...
...9632; Basic setup BASIC SETUP Use this feature to automatically adjust speaker and system parameters (see page 21). ■ Manual setup MANUAL SETUP Use this menu to manually adjust any speaker settings, alter the quality and tone of the sound output by the system or compensate for the sources...operates. Changes the name of Dolby Digital or DTS signals. RANGE G)AUDIO SET Features Selects the size of the front speakers connected to manually adjust speaker and system parameters. Adjusts the distance of each speaker. Adjusts the muting level, audio delay settings, maximum volume level and...

Owner's Manual
Page 48
... the front panel display as you press G k / n repeatedly. 1 SOUND MENU 2 INPUT MENU 3 OPTION MENU 2 Press Gk / n to select "MANUAL SETUP". .MANUAL SETUP 3 Press GENTER to select and enter the desired menu. Displays the current reception level of the sound field programs to access and adjust each.... The following menus appear in the front panel display. .BASIC SETUP 4 Press Gk / n repeatedly and then press GENTER to enter "MANUAL SETUP". Locks sound field program parameters and other set menu Use the remote control to the initial factory settings. INI E)XM RADIO SET Features...
... the front panel display as you press G k / n repeatedly. 1 SOUND MENU 2 INPUT MENU 3 OPTION MENU 2 Press Gk / n to select "MANUAL SETUP". .MANUAL SETUP 3 Press GENTER to select and enter the desired menu. Displays the current reception level of the sound field programs to access and adjust each.... The following menus appear in the front panel display. .BASIC SETUP 4 Press Gk / n repeatedly and then press GENTER to enter "MANUAL SETUP". Locks sound field program parameters and other set menu Use the remote control to the initial factory settings. INI E)XM RADIO SET Features...
Owner's Manual
Page 49
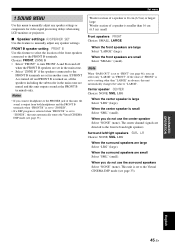
... unit is set to "ZONE B". • If a DSP program is selected when "FRONT B" is turned on and off and FRONT B is set to manually adjust any speaker settings. ADVANCED OPERATION English 45 En Note When "BASS OUT" is set to "FRNT" (see page 46), you do not use the... on , all the speakers including the subwoofer in the main zone are large Select "LARGE" (large). Set menu 1 SOUND MENU Use this menu to manually adjust any speaker settings or compensate for video signal processing delays when using LCD monitors or projectors. ■ Speaker settings A)SPEAKER SET Use this feature...
... unit is set to "ZONE B". • If a DSP program is selected when "FRONT B" is turned on and off and FRONT B is set to manually adjust any speaker settings. ADVANCED OPERATION English 45 En Note When "BASS OUT" is set to "FRNT" (see page 46), you do not use the... on , all the speakers including the subwoofer in the main zone are large Select "LARGE" (large). Set menu 1 SOUND MENU Use this menu to manually adjust any speaker settings or compensate for video signal processing delays when using LCD monitors or projectors. ■ Speaker settings A)SPEAKER SET Use this feature...

Owner's Manual
Page 50
... the speakers set to "SML" (or "SMALL") or to the front left and right channels, and the low-frequency signals of other speakers set to manually adjust the output level of each speaker. The LFE signals, the lowfrequency signals of the front left and right speakers regardless of the "FRONT" setting...
... the speakers set to "SML" (or "SMALL") or to the front left and right channels, and the low-frequency signals of other speakers set to manually adjust the output level of each speaker. The LFE signals, the lowfrequency signals of the front left and right speakers regardless of the "FRONT" setting...

Owner's Manual
Page 51
... adjust speaker distances in meters. • Select "feet" to adjust speaker distances in most home situations. ■ Speaker distance C)SP DISTANCE Use this feature to manually adjust the distance of each speaker should be applied to your subwoofer or headphones. This setting is selected as the frequency band. 100Hz--||-- 0 Test tone...
... adjust speaker distances in meters. • Select "feet" to adjust speaker distances in most home situations. ■ Speaker distance C)SP DISTANCE Use this feature to manually adjust the distance of each speaker should be applied to your subwoofer or headphones. This setting is selected as the frequency band. 100Hz--||-- 0 Test tone...

Owner's Manual
Page 58
... area you do not press any buttons within 30 seconds in step 2, the setup process is preset as listed above. If this manual. In this case, try each of them until you find the correct one of the input selector buttons (C) on the remote control...Remote control features Setting remote control codes You can control other components by setting the appropriate remote control codes. V-AUX TUNER YAMAHA 5011 XM TUNER YAMAHA 5009 DVR DVR YAMAHA 2011 TUNER YAMAHA 5012 1 While pressing and holding down Press for 3 seconds 2 Press the numeric buttons (0 to 9) (V) to operate...
... area you do not press any buttons within 30 seconds in step 2, the setup process is preset as listed above. If this manual. In this case, try each of them until you find the correct one of the input selector buttons (C) on the remote control...Remote control features Setting remote control codes You can control other components by setting the appropriate remote control codes. V-AUX TUNER YAMAHA 5011 XM TUNER YAMAHA 5009 DVR DVR YAMAHA 2011 TUNER YAMAHA 5012 1 While pressing and holding down Press for 3 seconds 2 Press the numeric buttons (0 to 9) (V) to operate...

Owner's Manual
Page 63
...multi-path interference. AM There are buzzing and whining noises. This unit has been disconnected for the best reception level. Use the manual tuning method. The XM user encryption code is weak or the antenna connections are not connected to eliminate multi-path interference. There are... for a long period. and Canada models only) If an operation takes longer than four seconds for the best reception level. Use the manual tuning method. l / h) repeatedly. The signal is being used nearby. No artist name or song title is poor. The characteristics of...
...multi-path interference. AM There are buzzing and whining noises. This unit has been disconnected for the best reception level. Use the manual tuning method. The XM user encryption code is weak or the antenna connections are not connected to eliminate multi-path interference. There are... for a long period. and Canada models only) If an operation takes longer than four seconds for the best reception level. Use the manual tuning method. l / h) repeatedly. The signal is being used nearby. No artist name or song title is poor. The characteristics of...

Owner's Manual
Page 64
... remote control sensor of this unit. Try setting another code for the same manufacturer using "List of remote control codes" at the end of this manual. However, the advanced setup menu parameters will not be initialized. • The initial factory settings are weak. Even if the remote control code is not... completely resets all batteries. y To cancel the initialization procedure at the end of this unit to the initial factory settings. 1 Press 1STANDBY/ON on this manual.
... remote control sensor of this unit. Try setting another code for the same manufacturer using "List of remote control codes" at the end of this manual. However, the advanced setup menu parameters will not be initialized. • The initial factory settings are weak. Even if the remote control code is not... completely resets all batteries. y To cancel the initialization procedure at the end of this unit to the initial factory settings. 1 Press 1STANDBY/ON on this manual.

Owner's Manual
Page 68
... to the MULTI CH INPUT jacks 17 Connecting to the SURROUND terminals 13 Connecting to unprocessed input signals 33 Low-frequency effect level 47 ■M Manual preset tuning 35 MANUAL SETUP 43 Manual setup 43 Manual tuning 34 MAX VOL 48 Maximum volume 48 MEM.
... to the MULTI CH INPUT jacks 17 Connecting to the SURROUND terminals 13 Connecting to unprocessed input signals 33 Low-frequency effect level 47 ■M Manual preset tuning 35 MANUAL SETUP 43 Manual setup 43 Manual tuning 34 MAX VOL 48 Maximum volume 48 MEM.
Owner's Manual
Page 77
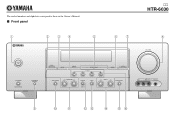
The circled numbers and alphabets correspond to those in the Owner's Manual. ■ Front panel U HTR-6030 1 2 34 5 67 8 VOLUME STANDBY /ON PHONES SILENT CINEMA SPEAKERS A/B/OFF EDIT SEARCH MODE PRESET/TUNING FM/AM CATEGORY A/B/C/D/E 1 l PRESET/TUNING/CH h SCENE 2 3 4 MEMORY DISPLAY TUNING AUTO/MAN'L TONE CONTROL l PROGRAM h STRAIGHT NIGHT l INPUT h AUDIO SELECT EFFECT VIDEO VIDEO AUX L AUDIO R PORTABLE 9 0 A BC D EF
The circled numbers and alphabets correspond to those in the Owner's Manual. ■ Front panel U HTR-6030 1 2 34 5 67 8 VOLUME STANDBY /ON PHONES SILENT CINEMA SPEAKERS A/B/OFF EDIT SEARCH MODE PRESET/TUNING FM/AM CATEGORY A/B/C/D/E 1 l PRESET/TUNING/CH h SCENE 2 3 4 MEMORY DISPLAY TUNING AUTO/MAN'L TONE CONTROL l PROGRAM h STRAIGHT NIGHT l INPUT h AUDIO SELECT EFFECT VIDEO VIDEO AUX L AUDIO R PORTABLE 9 0 A BC D EF


