Owner's Manual
Page 5
...on the SCENE feature........... 51 Controlling this manual for your DVD player and other components.... 52 Setting remote control codes 54 Advanced setup 55 PREPARATION Connections 10 Rear panel 10 Placing speakers 11 Connecting speakers 12 Setting the speaker impedance (U.S.A. Design and specifications are subject...FM and AM antennas 18 Connecting the power cable 18 Turning on and off the power 18 Front panel display 19 Basic setup 21 BASIC OPERATION Selecting the SCENE templates 23 Selecting the desired SCENE template 23 Creating your original SCENE templates 26 Playback ...
...on the SCENE feature........... 51 Controlling this manual for your DVD player and other components.... 52 Setting remote control codes 54 Advanced setup 55 PREPARATION Connections 10 Rear panel 10 Placing speakers 11 Connecting speakers 12 Setting the speaker impedance (U.S.A. Design and specifications are subject...FM and AM antennas 18 Connecting the power cable 18 Turning on and off the power 18 Front panel display 19 Basic setup 21 BASIC OPERATION Selecting the SCENE templates 23 Selecting the desired SCENE template 23 Creating your original SCENE templates 26 Playback ...

Owner's Manual
Page 13
... the front panel. Notes • To use the "Radio Listening" template, you can select and change the assigned SCENE template for your listening room (BASIC SETUP) ☞ P. 21 • Manually adjusting various parameters of this unit... Press FSCENE 4 (or ESCENE 4) to the standby mode. INTRODUCTION Case C: "I want to do with this...
... the front panel. Notes • To use the "Radio Listening" template, you can select and change the assigned SCENE template for your listening room (BASIC SETUP) ☞ P. 21 • Manually adjusting various parameters of this unit... Press FSCENE 4 (or ESCENE 4) to the standby mode. INTRODUCTION Case C: "I want to do with this...
Owner's Manual
Page 17
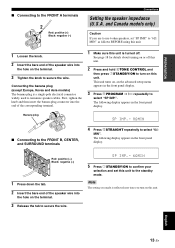
.... 1 Loosen the knob. 2 Insert the bare end of the speaker wire into the end of the speaker wire into the hole on , an the advanced setup menu appears in the front panel display. 3 Press APROGRAM l / h repeatedly to select "6Ω MIN". The following display appears in the front panel display. PREPARATION ■...
.... 1 Loosen the knob. 2 Insert the bare end of the speaker wire into the end of the speaker wire into the hole on , an the advanced setup menu appears in the front panel display. 3 Press APROGRAM l / h repeatedly to select "6Ω MIN". The following display appears in the front panel display. PREPARATION ■...

Owner's Manual
Page 25
... select the desired setting. "ROOM" appears in the front panel display. 5 Press Gn to select "SUBWOOFER" and then Gl / h to enter "BASIC SETUP". ROOM: S >M L Choices: YES, NONE • Select "YES" if you have a subwoofer in your system. • Select "NONE" if ...MENU" (see page 45). • Initial settings are defined as follows: Choices: S, M, L [U.S.A. "BASIC SETUP" appears in the front panel display. PREPARATION Basic setup Basic setup The "BASIC SETUP" feature is a useful way to select the desired setting. SUBWOOFER .. In general, the room sizes are indicated ...
... select the desired setting. "ROOM" appears in the front panel display. 5 Press Gn to select "SUBWOOFER" and then Gl / h to enter "BASIC SETUP". ROOM: S >M L Choices: YES, NONE • Select "YES" if you have a subwoofer in your system. • Select "NONE" if ...MENU" (see page 45). • Initial settings are defined as follows: Choices: S, M, L [U.S.A. "BASIC SETUP" appears in the front panel display. PREPARATION Basic setup Basic setup The "BASIC SETUP" feature is a useful way to select the desired setting. SUBWOOFER .. In general, the room sizes are indicated ...
Owner's Manual
Page 26
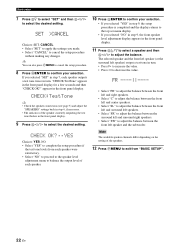
... a test tone twice in the front panel display. 11 Press Gk / n to select a speaker and then Gl / h to adjust the balance. Basic setup 7 Press Gn to select "SET" and then Gl / h to decrease the value. "CHECK:TestTone" appears in the front panel display. The selected speaker ..."SW" to adjust the balance between the front left speaker) output a test tone in the front panel display. 9 Press Gl / h to cancel the setup procedure without making any changes. Note The available speaker channels differ depending on the setting of the speaker currently outputting the test tone flashes in...
... a test tone twice in the front panel display. 11 Press Gk / n to select a speaker and then Gl / h to adjust the balance. Basic setup 7 Press Gn to select "SET" and then Gl / h to decrease the value. "CHECK:TestTone" appears in the front panel display. The selected speaker ..."SW" to adjust the balance between the front left speaker) output a test tone in the front panel display. 9 Press Gl / h to cancel the setup procedure without making any changes. Note The available speaker channels differ depending on the setting of the speaker currently outputting the test tone flashes in...

Owner's Manual
Page 34
"BASIC SETUP" appears in DTS, Dolby Digital, or PCM signals that cue this unit to automatically switch decoders. 4 Press PMENU to exit. ■ Using the sleep timer ... then an audio source. CH B.RATE FLAG Description Signal format. The number of samples per second. Flag data encoded in the front panel display. ;BASIC SETUP 2 Press Gk / n repeatedly to select "SIGNAL INFO" and then press GENTER. 3 Press Gk / n to switch the displayed information. SLEEP 120min SLEEP 90min SLEEP OFF SLEEP...
"BASIC SETUP" appears in DTS, Dolby Digital, or PCM signals that cue this unit to automatically switch decoders. 4 Press PMENU to exit. ■ Using the sleep timer ... then an audio source. CH B.RATE FLAG Description Signal format. The number of samples per second. Flag data encoded in the front panel display. ;BASIC SETUP 2 Press Gk / n repeatedly to select "SIGNAL INFO" and then press GENTER. 3 Press Gk / n to switch the displayed information. SLEEP 120min SLEEP 90min SLEEP OFF SLEEP...
Owner's Manual
Page 47
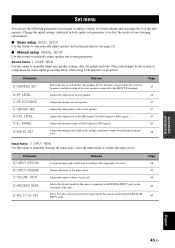
...rear panel of this unit according to the component to automatically adjust speaker and system parameters (see page 21). ■ Manual setup MANUAL SETUP Use this unit operates. Parameter A)INPUT ASSIGN B)INPUT RENAME C)VOLUME TRIM D)DECODER MODE E)MULTI CH SET Features Assigns the input... jacks of your listening environment. ■ Basic setup BASIC SETUP Use this feature to be used. Parameter A)SPEAKER SET B)SP LEVEL C)SP DISTANCE D)CENTER GEQ E)LFE LEVEL F)D. Adjusts the output volume...
...rear panel of this unit according to the component to automatically adjust speaker and system parameters (see page 21). ■ Manual setup MANUAL SETUP Use this unit operates. Parameter A)INPUT ASSIGN B)INPUT RENAME C)VOLUME TRIM D)DECODER MODE E)MULTI CH SET Features Assigns the input... jacks of your listening environment. ■ Basic setup BASIC SETUP Use this feature to be used. Parameter A)SPEAKER SET B)SP LEVEL C)SP DISTANCE D)CENTER GEQ E)LFE LEVEL F)D. Adjusts the output volume...

Owner's Manual
Page 48
...appears in the front panel display as you press G k / n repeatedly. 1 SOUND MENU 2 INPUT MENU 3 OPTION MENU 2 Press Gk / n to select "MANUAL SETUP". .MANUAL SETUP 3 Press GENTER to enter "MANUAL SETUP". and Canada models. ■ Signal information SIGNAL INFO Use this menu to manually adjust the optional system parameters. "BASIC... 1 Press DAMP and then press PMENU on the power of the front panel display and the way in the front panel display. .BASIC SETUP 4 Press Gk / n repeatedly and then press GENTER to select and enter the desired menu. The following menus appear in the front panel ...
...appears in the front panel display as you press G k / n repeatedly. 1 SOUND MENU 2 INPUT MENU 3 OPTION MENU 2 Press Gk / n to select "MANUAL SETUP". .MANUAL SETUP 3 Press GENTER to enter "MANUAL SETUP". and Canada models. ■ Signal information SIGNAL INFO Use this menu to manually adjust the optional system parameters. "BASIC... 1 Press DAMP and then press PMENU on the power of the front panel display and the way in the front panel display. .BASIC SETUP 4 Press Gk / n repeatedly and then press GENTER to select and enter the desired menu. The following menus appear in the front panel ...

Owner's Manual
Page 53
... Gn to change the character in the following is an example where "DVD" is useful if you play back a DTS-CD. ■ Multi channel input setup E)MULTI CH SET BGV BGV Use this feature to select the video source played in the reverse order: A to Z, a space, 0 to 9, a space, a to z, a space, symbols...
... Gn to change the character in the following is an example where "DVD" is useful if you play back a DTS-CD. ■ Multi channel input setup E)MULTI CH SET BGV BGV Use this feature to select the video source played in the reverse order: A to Z, a space, 0 to 9, a space, a to z, a space, symbols...

Owner's Manual
Page 58
... • If you want to "List of remote control codes" at the end of your Yamaha component even if a Yamaha remote control code is canceled. Note You may not be used. In this happens, repeat the setup procedure. For a complete list of available remote control codes, refer to set up, press AV ...POWER for the component to be able to operate your component has more than one code, try setting another Yamaha remote control code. 54 En Remote control ...
... • If you want to "List of remote control codes" at the end of your Yamaha component even if a Yamaha remote control code is canceled. Note You may not be used. In this happens, repeat the setup procedure. For a complete list of available remote control codes, refer to set up, press AV ...POWER for the component to be able to operate your component has more than one code, try setting another Yamaha remote control code. 54 En Remote control ...

Owner's Manual
Page 59
...of your listening environment. Notes • Only 1STANDBY/ON, APROGRAM l / h and BSTRAIGHT are effective while you are using the advanced setup menu. • The advanced setup menu is only available in the front panel display. 1 Press 1STANDBY/ON on this unit. ■ Tuner frequency step TU (Asia... of the selected parameter appears in your selection and set the speaker impedance of this unit so that it matches that are using the advanced setup menu. • No other areas. Notes • This setting completely resets all other operations can be 8 Ω or higher. 6Ω MIN...
...of your listening environment. Notes • Only 1STANDBY/ON, APROGRAM l / h and BSTRAIGHT are effective while you are using the advanced setup menu. • The advanced setup menu is only available in the front panel display. 1 Press 1STANDBY/ON on this unit. ■ Tuner frequency step TU (Asia... of the selected parameter appears in your selection and set the speaker impedance of this unit so that it matches that are using the advanced setup menu. • No other areas. Notes • This setting completely resets all other operations can be 8 Ω or higher. 6Ω MIN...

Owner's Manual
Page 64
... at the end of remote control codes" at any time without making any changes. 5 Press 1STANDBY/ON to the remote control. However, the advanced setup menu parameters will not be initialized. • The initial factory settings are activated next time you turn on this manual. Troubleshooting ■ Remote control ...3 Press APROGRAM l / h to select "PRESET". 4 Press BSTRAIGHT repeatedly to the standby mode. 60 En Direct sunlight or lighting (from the front panel. The advanced setup menu appears in the front panel display. Replace all the parameters of this unit.
... at the end of remote control codes" at any time without making any changes. 5 Press 1STANDBY/ON to the remote control. However, the advanced setup menu parameters will not be initialized. • The initial factory settings are activated next time you turn on this manual. Troubleshooting ■ Remote control ...3 Press APROGRAM l / h to select "PRESET". 4 Press BSTRAIGHT repeatedly to the standby mode. 60 En Direct sunlight or lighting (from the front panel. The advanced setup menu appears in the front panel display. Replace all the parameters of this unit.

Owner's Manual
Page 68
...50 Audio settings 48 Automatic preset tuning 35 Automatic tuning 34 ■B B)INPUT RENAME 49 B)MEMORY GUARD 50 B)SP LEVEL 46 BASIC SETUP 21, 43 Basic setup 43 BASS OUT 46 ■C C)SP DISTANCE 47 C)VOLUME TRIM 49 Category Search mode 39 CD Music Listening 25 CD Listening 25 ...Connecting to the SURROUND terminals 13 Connecting to unprocessed input signals 33 Low-frequency effect level 47 ■M Manual preset tuning 35 MANUAL SETUP 43 Manual setup 43 Manual tuning 34 MAX VOL 48 Maximum volume 48 MEM. GUARD 50 Memory guard 50 Movie Dramatic 31 Movie Spacious 31 64 ...
...50 Audio settings 48 Automatic preset tuning 35 Automatic tuning 34 ■B B)INPUT RENAME 49 B)MEMORY GUARD 50 B)SP LEVEL 46 BASIC SETUP 21, 43 Basic setup 43 BASS OUT 46 ■C C)SP DISTANCE 47 C)VOLUME TRIM 49 Category Search mode 39 CD Music Listening 25 CD Listening 25 ...Connecting to the SURROUND terminals 13 Connecting to unprocessed input signals 33 Low-frequency effect level 47 ■M Manual preset tuning 35 MANUAL SETUP 43 Manual setup 43 Manual tuning 34 MAX VOL 48 Maximum volume 48 MEM. GUARD 50 Memory guard 50 Movie Dramatic 31 Movie Spacious 31 64 ...

Owner's Manual
Page 69
... terminals 10 Specifications 63 Straight mode 33 SUBWOOFER OUTPUT jack 10 Subwoofer phase 46 Supplied accessories 3 SUR. MULTI CH INPUT jacks 10 Multi channel input setup 49 Multi-channel sources and sound field programs with headphones 33 Multi-information display 19 Music Disc Listening 25 Music Enh. 2ch 31 Music Enh...
... terminals 10 Specifications 63 Straight mode 33 SUBWOOFER OUTPUT jack 10 Subwoofer phase 46 Supplied accessories 3 SUR. MULTI CH INPUT jacks 10 Multi channel input setup 49 Multi-channel sources and sound field programs with headphones 33 Multi-information display 19 Music Disc Listening 25 Music Enh. 2ch 31 Music Enh...


