
Owner's Manual
Page 1
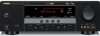
U HTR-6030 AV Receiver OWNER'S MANUAL
U HTR-6030 AV Receiver OWNER'S MANUAL
Owner's Manual
Page 7
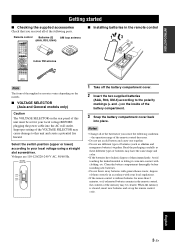
... SELECTOR on the inside of the VOLTAGE SELECTOR may be set up the remote control code. Notes • Change all of the batteries if you received all of the following condition: - Avoid touching the leaked material or letting it come into contact with general house waste; Select the switch position (upper...
... SELECTOR on the inside of the VOLTAGE SELECTOR may be set up the remote control code. Notes • Change all of the batteries if you received all of the following condition: - Avoid touching the leaked material or letting it come into contact with general house waste; Select the switch position (upper...

Owner's Manual
Page 9
... terminal of this unit. 1 2 3 4 1 Make sure that this unit and the subwoofer are colored or shaped differently, perhaps with a stripe, groove or ridge. Subwoofer AV receiver IN MD/ OUT (PLAY) CD-R (REC) OUTPUT SUB WOOFER Input jack Subwoofer cable SUBWOOFER OUTPUT jack English 5 En To the front right speaker Front left...
... terminal of this unit. 1 2 3 4 1 Make sure that this unit and the subwoofer are colored or shaped differently, perhaps with a stripe, groove or ridge. Subwoofer AV receiver IN MD/ OUT (PLAY) CD-R (REC) OUTPUT SUB WOOFER Input jack Subwoofer cable SUBWOOFER OUTPUT jack English 5 En To the front right speaker Front left...

Owner's Manual
Page 10
... audio cable to the digital coaxial audio output jack of your video monitor and the VIDEO MONITOR OUT jack of this unit. Video monitor AV receiver S-VIDEO L/MONO R VIDEO AUDIO VIDEO-1 IN Y PB PR L/MONO R COLOR STREAM HD IN AUDIO Digital coaxial audio output jack Video input jack Video ...cable Digital coaxial audio cable DVD DIGITAL INPUT COAXIAL jack VIDEO MONITOR OUT jack 6 En DVD player AV receiver 3 Connect the video cable to the video input jack of your DVD player and the DVD DIGITAL INPUT COAXIAL jack of this unit. AV...
... audio cable to the digital coaxial audio output jack of your video monitor and the VIDEO MONITOR OUT jack of this unit. Video monitor AV receiver S-VIDEO L/MONO R VIDEO AUDIO VIDEO-1 IN Y PB PR L/MONO R COLOR STREAM HD IN AUDIO Digital coaxial audio output jack Video input jack Video ...cable Digital coaxial audio cable DVD DIGITAL INPUT COAXIAL jack VIDEO MONITOR OUT jack 6 En DVD player AV receiver 3 Connect the video cable to the video input jack of your DVD player and the DVD DIGITAL INPUT COAXIAL jack of this unit. AV...

Owner's Manual
Page 13
... this unit • Optimizing the speaker parameters for your listening room (BASIC SETUP) ☞ P. 21 • Manually adjusting various parameters of power in order to receive infrared signals from the FM radio station..." In the standby mode, this unit consumes a small amount of power in order to... receive infrared signals from the standby mode, press 1STANDBY/ ON (or LPOWER) on this unit ☞ P. 30 English 9 En Note In the standby mode, this unit...
... this unit • Optimizing the speaker parameters for your listening room (BASIC SETUP) ☞ P. 21 • Manually adjusting various parameters of power in order to receive infrared signals from the FM radio station..." In the standby mode, this unit consumes a small amount of power in order to... receive infrared signals from the standby mode, press 1STANDBY/ ON (or LPOWER) on this unit ☞ P. 30 English 9 En Note In the standby mode, this unit...
Owner's Manual
Page 22
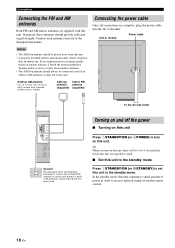
...second delay before this unit can reproduce sound. ■ Set this unit to the standby mode Press 1STANDBY/ON (or MSTANDBY) to receive infrared signals from this unit. • A properly installed outdoor antenna provides clearer reception than an indoor one. y When you experience ...antenna antenna (supplied) (supplied) Connecting the power cable Once all connections are supplied with this unit. Consult the nearest authorized Yamaha dealer or service center about outdoor antennas. • The AM loop antenna should provide sufficient signal strength. Connect each antenna correctly...
...second delay before this unit can reproduce sound. ■ Set this unit to the standby mode Press 1STANDBY/ON (or MSTANDBY) to receive infrared signals from this unit. • A properly installed outdoor antenna provides clearer reception than an indoor one. y When you experience ...antenna antenna (supplied) (supplied) Connecting the power cable Once all connections are supplied with this unit. Consult the nearest authorized Yamaha dealer or service center about outdoor antennas. • The AM loop antenna should provide sufficient signal strength. Connect each antenna correctly...
Owner's Manual
Page 38
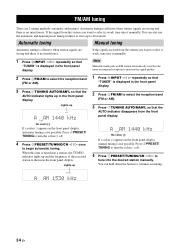
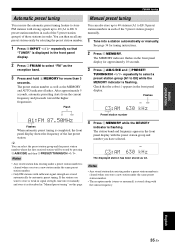
... indicator lights up A AM 1440 kHz No colon (:) If a colon (:) appears in the front panel display. Lights up and the frequency of the received station is displayed in the front panel display. If the signal from the station you want to begin automatic tuning. Lights up AUTO A AM 1440... / h repeatedly so that the AUTO indicator lights up to store up in the front panel display, manual tuning is not possible. If the signal received from the front panel display. You can also use the automatic and manual preset tuning features to 40 stations. You can hold down the button...
... indicator lights up A AM 1440 kHz No colon (:) If a colon (:) appears in the front panel display. Lights up and the frequency of the received station is displayed in the front panel display. If the signal from the station you want to begin automatic tuning. Lights up AUTO A AM 1440... / h repeatedly so that the AUTO indicator lights up to store up in the front panel display, manual tuning is not possible. If the signal received from the front panel display. You can also use the automatic and manual preset tuning features to 40 stations. You can hold down the button...
Owner's Manual
Page 39
... from the current frequency and proceeds toward the higher frequencies. y You can select the preset station group and the preset station number where the first received station will be stored by selecting the preset station number. 1 Press DINPUT l / h repeatedly so that the colon (:) appears in the front panel display for approximately...
... from the current frequency and proceeds toward the higher frequencies. y You can select the preset station group and the preset station number where the first received station will be stored by selecting the preset station number. 1 Press DINPUT l / h repeatedly so that the colon (:) appears in the front panel display for approximately...
Owner's Manual
Page 42
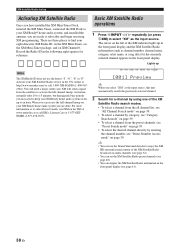
... are three places to select "XM" as the input source, this unit automatically recalls the previously selected channel. 2 Search for up to subscribe and begin receiving XM programming. Basic XM Satellite Radio operations 1 Press DINPUT l / h repeatedly (or press CXM) to find your XM Satellite Radio service in the following eight squares...
... are three places to select "XM" as the input source, this unit automatically recalls the previously selected channel. 2 Search for up to subscribe and begin receiving XM programming. Basic XM Satellite Radio operations 1 Press DINPUT l / h repeatedly (or press CXM) to find your XM Satellite Radio service in the following eight squares...


