Owner's Manual
Page 4
... user and/or damage to read the "Troubleshooting" section on the surface of this Owner's Manual in order not to wide slot and fully insert. Yamaha will not be reached easily. 17 Be sure to this unit. 6 Do not cover this manual carefully. POUR LES CONSOMMATEURS CANADIENS Pour éviter les... 3 Locate this unit away from other than specified is dangerous and may cause fire, damage to set for any service is faulty. 18 Before moving this unit, press STANDBY/ON to this unit must be set this unit in a safe place for any damage resulting from the AC power source as long...
... user and/or damage to read the "Troubleshooting" section on the surface of this Owner's Manual in order not to wide slot and fully insert. Yamaha will not be reached easily. 17 Be sure to this unit. 6 Do not cover this manual carefully. POUR LES CONSOMMATEURS CANADIENS Pour éviter les... 3 Locate this unit away from other than specified is dangerous and may cause fire, damage to set for any service is faulty. 18 Before moving this unit, press STANDBY/ON to this unit must be set this unit in a safe place for any damage resulting from the AC power source as long...
Owner's Manual
Page 5
...tuning 37 Connecting the XM Mini-Tuner Dock 37 Activating XM Satellite Radio 38 Basic XM Satellite Radio operations 38 Setting XM Satellite Radio preset channels 40 Displaying the XM Satellite Radio information...... 41 Recording 42 ADDITIONAL INFORMATION Troubleshooting 56 ...reference page(s). INTRODUCTION PREPARATION BASIC OPERATION Contents INTRODUCTION Features 2 Getting started 3 Quick start guide 4 Preparation: Check the items 4 Step 1: Set up your speakers 5 Step 2: Connect your operation. • Some operations can be performed by using either the buttons on the front ...
...tuning 37 Connecting the XM Mini-Tuner Dock 37 Activating XM Satellite Radio 38 Basic XM Satellite Radio operations 38 Setting XM Satellite Radio preset channels 40 Displaying the XM Satellite Radio information...... 41 Recording 42 ADDITIONAL INFORMATION Troubleshooting 56 ...reference page(s). INTRODUCTION PREPARATION BASIC OPERATION Contents INTRODUCTION Features 2 Getting started 3 Quick start guide 4 Preparation: Check the items 4 Step 1: Set up your speakers 5 Step 2: Connect your operation. • Some operations can be performed by using either the buttons on the front ...
Owner's Manual
Page 7
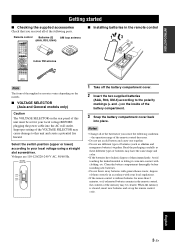
...local voltage using a straight slot screwdriver. Notes • Change all of the batteries if you received all of the memory may be set up the remote control code. Avoid touching the leaked material or letting it come into place. dispose of the battery compartment. 3 Snap...batteries with clothing, etc. INTRODUCTION Getting started Getting started ■ Checking the supplied accessories Check that you notice the following parts. Improper setting of the VOLTAGE SELECTOR may have the same shape and color. • If the batteries have leaked, dispose of them correctly in ...
...local voltage using a straight slot screwdriver. Notes • Change all of the batteries if you received all of the memory may be set up the remote control code. Avoid touching the leaked material or letting it come into place. dispose of the battery compartment. 3 Snap...batteries with clothing, etc. INTRODUCTION Getting started Getting started ■ Checking the supplied accessories Check that you notice the following parts. Improper setting of the VOLTAGE SELECTOR may have the same shape and color. • If the batteries have leaked, dispose of them correctly in ...
Owner's Manual
Page 8
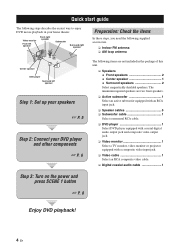
... In these steps, you need the following supplied accessories. ❏ Indoor FM antenna ❏ AM loop antenna Center speaker DVD player Surround left speaker Step 1: Set up your speakers ☞ P. 5 Step 2: Connect your home theater.
... In these steps, you need the following supplied accessories. ❏ Indoor FM antenna ❏ AM loop antenna Center speaker DVD player Surround left speaker Step 1: Set up your speakers ☞ P. 5 Step 2: Connect your home theater.

Owner's Manual
Page 9
... jack of this unit. 1 2 3 4 1 Make sure that this unit and the subwoofer are colored or shaped differently, perhaps with a stripe, groove or ridge. INTRODUCTION Step 1: Set up your speakers Place your speakers in the room. 2 Connect speaker cables to each speaker cable to the corresponding speaker terminal of this unit.
... jack of this unit. 1 2 3 4 1 Make sure that this unit and the subwoofer are colored or shaped differently, perhaps with a stripe, groove or ridge. INTRODUCTION Step 1: Set up your speakers Place your speakers in the room. 2 Connect speaker cables to each speaker cable to the corresponding speaker terminal of this unit.

Owner's Manual
Page 12
... SCENE button to watch a TV program..." Case A: "I want to listen to this unit automatically optimize own status for details. If the speakers are 6 ohm speakers, set "SP IMP."
... SCENE button to watch a TV program..." Case A: "I want to listen to this unit automatically optimize own status for details. If the speakers are 6 ohm speakers, set "SP IMP."

Owner's Manual
Page 13
...small amount of power in order to receive infrared signals from the standby mode, press 1STANDBY/ ON (or LPOWER) on the front panel to set to the standby mode. Notes • To use the "Radio Listening" template, you want to listen to a music program from the remote ... See page 23 for your listening room (BASIC SETUP) ☞ P. 21 • Manually adjusting various parameters of this unit ☞ P. 43 • Setting the remote control ☞ P. 51 • Adjusts the advanced parameters ☞ P. 55 ■ Additional features Automatically turning off this unit to the standby ...
...small amount of power in order to receive infrared signals from the standby mode, press 1STANDBY/ ON (or LPOWER) on the front panel to set to the standby mode. Notes • To use the "Radio Listening" template, you want to listen to a music program from the remote ... See page 23 for your listening room (BASIC SETUP) ☞ P. 21 • Manually adjusting various parameters of this unit ☞ P. 43 • Setting the remote control ☞ P. 51 • Adjusts the advanced parameters ☞ P. 55 ■ Additional features Automatically turning off this unit to the standby ...
Owner's Manual
Page 15
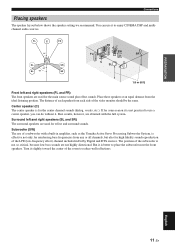
...used for the center channel sounds (dialog, vocals, etc.). Turn it . PREPARATION Connections Placing speakers The speaker layout below shows the speaker setting we recommend. Place these speakers at an equal distance from each speaker from the ideal listening position. Subwoofer (SW) The use of the... to reduce wall reflections. The distance of each side of the LFE (low-frequency effect) channel included in amplifier, such as the Yamaha Active Servo Processing Subwoofer System, is not practical to enjoy CINEMA DSP and multichannel audio sources. But it to use it is for...
...used for the center channel sounds (dialog, vocals, etc.). Turn it . PREPARATION Connections Placing speakers The speaker layout below shows the speaker setting we recommend. Place these speakers at an equal distance from each speaker from the ideal listening position. Subwoofer (SW) The use of the... to reduce wall reflections. The distance of each side of the LFE (low-frequency effect) channel included in amplifier, such as the Yamaha Active Servo Processing Subwoofer System, is not practical to enjoy CINEMA DSP and multichannel audio sources. But it to use it is for...
Owner's Manual
Page 16
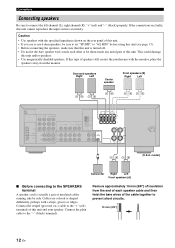
... Connections Connecting speakers Be sure to the "-" (black) terminals. Connect the plain cable to connect the left channel (L), right channel (R), "+" (red) and "-" (black) properly. to set "SP IMP." If this unit. • If you are faulty, this unit and/or speakers. • Use magnetically shielded speakers.
... Connections Connecting speakers Be sure to the "-" (black) terminals. Connect the plain cable to connect the left channel (L), right channel (R), "+" (red) and "-" (black) properly. to set "SP IMP." If this unit. • If you are faulty, this unit and/or speakers. • Use magnetically shielded speakers.
Owner's Manual
Page 17
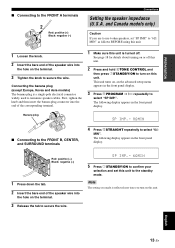
...on the terminal. 3 Release the tab to terminate speaker cables. SP IMP.- 6 MIN 5 Press 1STANDBY/ON to confirm your selection and set "SP IMP." PREPARATION ■ Connecting to select "6Ω MIN". English 13 En Banana plug SP IMP.- 8 MIN ■ Connecting ...FRONT B, CENTER, and SURROUND terminals 4 Press BSTRAIGHT repeatedly to the FRONT A terminals 2 1 Red: positive (+) Black: negative (-) 3 Connections Setting the speaker impedance (U.S.A. First, tighten the knob and then insert the banana plug connector into the end of the speaker wire into the hole on...
...on the terminal. 3 Release the tab to terminate speaker cables. SP IMP.- 6 MIN 5 Press 1STANDBY/ON to confirm your selection and set "SP IMP." PREPARATION ■ Connecting to select "6Ω MIN". English 13 En Banana plug SP IMP.- 8 MIN ■ Connecting ...FRONT B, CENTER, and SURROUND terminals 4 Press BSTRAIGHT repeatedly to the FRONT A terminals 2 1 Red: positive (+) Black: negative (-) 3 Connections Setting the speaker impedance (U.S.A. First, tighten the knob and then insert the banana plug connector into the end of the speaker wire into the hole on...
Owner's Manual
Page 22
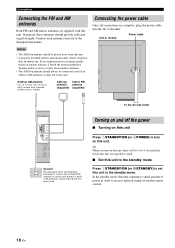
... an indoor one. If you turn on this unit, there will be a 4 to 5-second delay before this unit can reproduce sound. ■ Set this unit to the standby mode Press 1STANDBY/ON (or MSTANDBY) to the standby mode. In general, these antennas should be connected, even if an... outdoor AM antenna is a metal stake driven into the AC wall outlet. (U.S.A. Consult the nearest authorized Yamaha dealer or service center about outdoor antennas. • The AM loop antenna should always be placed away from this unit consumes a small amount of...
... an indoor one. If you turn on this unit, there will be a 4 to 5-second delay before this unit can reproduce sound. ■ Set this unit to the standby mode Press 1STANDBY/ON (or MSTANDBY) to the standby mode. In general, these antennas should be connected, even if an... outdoor AM antenna is a metal stake driven into the AC wall outlet. (U.S.A. Consult the nearest authorized Yamaha dealer or service center about outdoor antennas. • The AM loop antenna should always be placed away from this unit consumes a small amount of...
Owner's Manual
Page 23
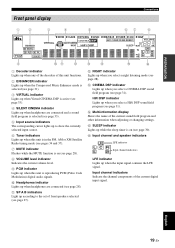
... field program (see page 31). Input channel indicators Indicate the channel components of the current sound field program and other information when adjusting or changing settings. English 19 En PREPARATION Front panel display Connections 1 2 3 4 5 67 8 t ENHANCER q DIGITAL q PL q PL PCM neural VIRTUAL DVR V-AUX DTV/CBL DVD SP SILENT CINEMA A B NIGHT...). 5 Input source indicators The corresponding cursor lights up when you select a HiFi DSP sound field program (see page 30). B NIGHT indicator Lights up to the set of front speakers selected (see page 28).
... field program (see page 31). Input channel indicators Indicate the channel components of the current sound field program and other information when adjusting or changing settings. English 19 En PREPARATION Front panel display Connections 1 2 3 4 5 67 8 t ENHANCER q DIGITAL q PL q PL PCM neural VIRTUAL DVR V-AUX DTV/CBL DVD SP SILENT CINEMA A B NIGHT...). 5 Input source indicators The corresponding cursor lights up when you select a HiFi DSP sound field program (see page 30). B NIGHT indicator Lights up to the set of front speakers selected (see page 28).

Owner's Manual
Page 24
places of high temperature, such as near a heater or stove - places of high humidity, such as near a bath - y To set the remote control codes for other liquids on this window at the component you want to aim the remote control directly at the remote control ...
places of high temperature, such as near a heater or stove - places of high humidity, such as near a bath - y To set the remote control codes for other liquids on this window at the component you want to aim the remote control directly at the remote control ...

Owner's Manual
Page 25
... sure you disconnect your headphones from this unit. • If you wish to configure this unit. 4 Press Gl / h to select the desired setting. SUBWOOFER .. Select the size of the room where you do not have installed your system. 6 Press Gn to select "SPEAKERS" and then Gl ... (see page 45). • Altering any parameters in "BASIC SETUP" resets all parameters manually adjusted in "SOUND MENU" (see page 45). • Initial settings are defined as follows: Choices: S, M, L [U.S.A. In general, the room sizes are indicated in your speakers. YES .BASIC SETUP 3 Press GENTER to enter...
... sure you disconnect your headphones from this unit. • If you wish to configure this unit. 4 Press Gl / h to select the desired setting. SUBWOOFER .. Select the size of the room where you do not have installed your system. 6 Press Gn to select "SPEAKERS" and then Gl ... (see page 45). • Altering any parameters in "BASIC SETUP" resets all parameters manually adjusted in "SOUND MENU" (see page 45). • Initial settings are defined as follows: Choices: S, M, L [U.S.A. In general, the room sizes are indicated in your speakers. YES .BASIC SETUP 3 Press GENTER to enter...
Owner's Manual
Page 26
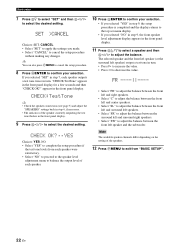
...then Gl / h to complete the setup procedure if the test tone levels from "BASIC SETUP". 22 En SET >CANCEL Choices: SET, CANCEL • Select "SET" to apply the settings you selected "SET" in step 7, each speaker. 10 Press GENTER to cancel the setup procedure without making any changes. FR ----||----... • Select "SW" to adjust the balance. CHECK:TestTone y • Check the speaker connections (see page 5) and adjust the "SPEAKERS" settings back in step 6, if necessary. • The indicator of each speaker outputs a test tone twice in the front panel display. 11 Press Gk /...
...then Gl / h to complete the setup procedure if the test tone levels from "BASIC SETUP". 22 En SET >CANCEL Choices: SET, CANCEL • Select "SET" to apply the settings you selected "SET" in step 7, each speaker. 10 Press GENTER to cancel the setup procedure without making any changes. FR ----||----... • Select "SW" to adjust the balance. CHECK:TestTone y • Check the speaker connections (see page 5) and adjust the "SPEAKERS" settings back in step 6, if necessary. • The indicator of each speaker outputs a test tone twice in the front panel display. 11 Press Gk /...

Owner's Manual
Page 27
... following SCENE templates are assigned to the corresponding SCENE buttons, you may need to set the input source of the SCENE template on the remote control. The indicator on the selected SCENE button on the front panel starts to flash, ...
... following SCENE templates are assigned to the corresponding SCENE buttons, you may need to set the input source of the SCENE template on the remote control. The indicator on the selected SCENE button on the front panel starts to flash, ...

Owner's Manual
Page 29
... this SCENE template when you enjoy XM Satellite Radio programs. XM MUSIC ENHANCER 5ch STEREO TV Viewing (SCENE 3 as the default setting) Select this SCENE template when you enjoy TV programs. DTV/CBL STRAIGHT TV Sports Viewing Select this SCENE template when you play video... player. BASIC OPERATION ■ Preset SCENE template descriptions SCENE template Features Input source Playback mode DVD Viewing (SCENE 1 as the default setting) Select this SCENE template when you play back general contents on your DVD player. CD 2ch Stereo Selecting the SCENE templates CD Music...
... this SCENE template when you enjoy XM Satellite Radio programs. XM MUSIC ENHANCER 5ch STEREO TV Viewing (SCENE 3 as the default setting) Select this SCENE template when you enjoy TV programs. DTV/CBL STRAIGHT TV Sports Viewing Select this SCENE template when you play video... player. BASIC OPERATION ■ Preset SCENE template descriptions SCENE template Features Input source Playback mode DVD Viewing (SCENE 1 as the default setting) Select this SCENE template when you play back general contents on your DVD player. CD 2ch Stereo Selecting the SCENE templates CD Music...

Owner's Manual
Page 30
... available for a SCENE template: • The input source component • The active sound field programs or STRAIGHT mode • The night listening mode setting (see page 23). 1 y An asterisk mark (*) appears by the name of the selected parameter. Notes • After changing the assignment of the ...SCENE template to the ESCENE buttons, you may need to set the input source of the SCENE template on the front panel display. 1 AMP 3 seconds Note When the SCENE template you create another ...
... available for a SCENE template: • The input source component • The active sound field programs or STRAIGHT mode • The night listening mode setting (see page 23). 1 y An asterisk mark (*) appears by the name of the selected parameter. Notes • After changing the assignment of the ...SCENE template to the ESCENE buttons, you may need to set the input source of the SCENE template on the front panel display. 1 AMP 3 seconds Note When the SCENE template you create another ...

Owner's Manual
Page 31
... sources which have wide dynamic range at night Use headphones Select a decoder to play back a CD encoded in DTS. If you play back sources with Set this unit to the standby mode automatically See page 29 32 28 28 32 30 English 27 En Check whether your CD player supports CDs... selected as the input source (see page 28). • When PCM signals with a sampling frequency higher than 48 kHz are input, this unit is automatically set to the "STRAIGHT" mode (see page 33). • To display information about the currently selected input source in the front panel display, see page 30...
... sources which have wide dynamic range at night Use headphones Select a decoder to play back a CD encoded in DTS. If you play back sources with Set this unit to the standby mode automatically See page 29 32 28 28 32 30 English 27 En Check whether your CD player supports CDs... selected as the input source (see page 28). • When PCM signals with a sampling frequency higher than 48 kHz are input, this unit is automatically set to the "STRAIGHT" mode (see page 33). • To display information about the currently selected input source in the front panel display, see page 30...

Owner's Manual
Page 32
...DINPUT l / h repeatedly (or press AMULTI CH IN) so that "MULTI CH" appears in the front panel display. 28 En y Use "MULTI CH SET" menu in the front panel display when the audio output is muted and disappears from the front left and right channels. ■ Selecting the night... selected, the NIGHT indicator lights up in the front panel display. Notes • Sound field programs mode cannot be selected when the component connected to set the parameter for all sounds. • Select "NIGHT OFF" if you select a sound field program, SILENT CINEMA mode activates automatically (see page 33). ...
...DINPUT l / h repeatedly (or press AMULTI CH IN) so that "MULTI CH" appears in the front panel display. 28 En y Use "MULTI CH SET" menu in the front panel display when the audio output is muted and disappears from the front left and right channels. ■ Selecting the night... selected, the NIGHT indicator lights up in the front panel display. Notes • Sound field programs mode cannot be selected when the component connected to set the parameter for all sounds. • Select "NIGHT OFF" if you select a sound field program, SILENT CINEMA mode activates automatically (see page 33). ...

