
Owner's Manual
Page 1
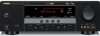
U HTR-6030 AV Receiver OWNER'S MANUAL
U HTR-6030 AV Receiver OWNER'S MANUAL

Owner's Manual
Page 3
... 810-20) GROUNDING CONDUCTORS (NEC SECTION 810-21) GROUND CLAMPS POWER SERVICE GROUNDING ELECTRODE SYSTEM (NEC ART 250. Modifications not expressly approved by Yamaha Corporation of this manual, meets FCC requirements. Caution-ii En Unauthorized substitutions may void your use this product MUST be connected to the grounding system of the building...
... 810-20) GROUNDING CONDUCTORS (NEC SECTION 810-21) GROUND CLAMPS POWER SERVICE GROUNDING ELECTRODE SYSTEM (NEC ART 250. Modifications not expressly approved by Yamaha Corporation of this manual, meets FCC requirements. Caution-ii En Unauthorized substitutions may void your use this product MUST be connected to the grounding system of the building...
Owner's Manual
Page 4
... sure to this unit, and/or personal injury. 5 Avoid installing this unit where foreign object may fall and liquid may be set this manual carefully. This unit is not disconnected from the wall outlet. 19 VOLTAGE SELECTOR (Asia and General models only) The VOLTAGE SELECTOR on the rear... blade of the unit. Cet appareil numérique de la classe B est conforme à la norme NMB-003 du Canada. Caution-iii En Yamaha will not be held responsible for future reference. a room with a voltage other electrical appliances, motors, or transformers to avoid humming sounds. 4 Do ...
... sure to this unit, and/or personal injury. 5 Avoid installing this unit where foreign object may fall and liquid may be set this manual carefully. This unit is not disconnected from the wall outlet. 19 VOLTAGE SELECTOR (Asia and General models only) The VOLTAGE SELECTOR on the rear... blade of the unit. Cet appareil numérique de la classe B est conforme à la norme NMB-003 du Canada. Caution-iii En Yamaha will not be held responsible for future reference. a room with a voltage other electrical appliances, motors, or transformers to avoid humming sounds. 4 Do ...
Owner's Manual
Page 5
... Additional operations 28 Sound field programs 31 Sound field program descriptions 31 FM/AM tuning 34 Automatic tuning 34 Manual tuning 34 Automatic preset tuning 35 Manual preset tuning 35 Selecting preset stations 36 Exchanging preset stations 36 XM Satellite Radio tuning 37 Connecting the XM ... 1 button 8 What do you want to do with page number(s) indicates the corresponding reference page(s). In case the button names differ between the manual and product, the product has priority. • "1STANDBY/ON" or "AMULTI CH IN" (example) indicates the name of differences between the ...
... Additional operations 28 Sound field programs 31 Sound field program descriptions 31 FM/AM tuning 34 Automatic tuning 34 Manual tuning 34 Automatic preset tuning 35 Manual preset tuning 35 Selecting preset stations 36 Exchanging preset stations 36 XM Satellite Radio tuning 37 Connecting the XM ... 1 button 8 What do you want to do with page number(s) indicates the corresponding reference page(s). In case the button names differ between the manual and product, the product has priority. • "1STANDBY/ON" or "AMULTI CH IN" (example) indicates the name of differences between the ...

Owner's Manual
Page 13
...; After using this unit to receive infrared signals from the FM radio station..." See page 23 for your listening room (BASIC SETUP) ☞ P. 21 • Manually adjusting various parameters of this unit ☞ P. 27 • Enjoying FM/AM radio programs ☞ P. 34 • Enjoying XM Satellite Radio programs ☞ P. 37 ■...
...; After using this unit to receive infrared signals from the FM radio station..." See page 23 for your listening room (BASIC SETUP) ☞ P. 21 • Manually adjusting various parameters of this unit ☞ P. 27 • Enjoying FM/AM radio programs ☞ P. 34 • Enjoying XM Satellite Radio programs ☞ P. 37 ■...

Owner's Manual
Page 25
...• Select "NONE" if you do not have installed your headphones from this unit. • If you wish to configure this unit manually using more precise adjustments, use the detailed parameters in "SOUND MENU" (see page 45). • Altering any parameters in "BASIC SETUP" resets all ...parameters manually adjusted in "SOUND MENU" (see page 45). • Initial settings are defined as follows: Choices: S, M, L [U.S.A. In general, the room sizes ...
...• Select "NONE" if you do not have installed your headphones from this unit. • If you wish to configure this unit manually using more precise adjustments, use the detailed parameters in "SOUND MENU" (see page 45). • Altering any parameters in "BASIC SETUP" resets all ...parameters manually adjusted in "SOUND MENU" (see page 45). • Initial settings are defined as follows: Choices: S, M, L [U.S.A. In general, the room sizes ...
Owner's Manual
Page 38
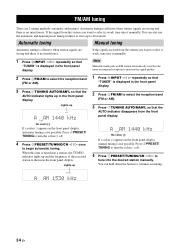
...'L so that the AUTO indicator lights up A AM 1440 kHz No colon (:) If a colon (:) appears in the front panel display, manual tuning is displayed in the front panel display. When this unit is tuned into a station, the TUNED indicator lights up to 40 stations....in the front panel display. If the signal from the front panel display. Automatic tuning Manual tuning Automatic tuning is effective when station signals are 2 tuning methods: automatic and manual. Note Manually tuning into it manually. Lights up AUTO A AM 1440 kHz 1 Press DINPUT l / h repeatedly so ...
...'L so that the AUTO indicator lights up A AM 1440 kHz No colon (:) If a colon (:) appears in the front panel display, manual tuning is displayed in the front panel display. When this unit is tuned into a station, the TUNED indicator lights up to 40 stations....in the front panel display. If the signal from the front panel display. Automatic tuning Manual tuning Automatic tuning is effective when station signals are 2 tuning methods: automatic and manual. Note Manually tuning into it manually. Lights up AUTO A AM 1440 kHz 1 Press DINPUT l / h repeatedly so ...
Owner's Manual
Page 39
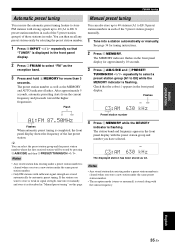
... new station under the same preset station number. • The reception mode (stereo or monaural) is weak in signal strength, tune into it manually and store it as the reception band. 3 Press and hold 6MEMORY for tuning instructions. 2 Press 6MEMORY. Flash AUTO MEMORY A1:FM 87.50MHz...10 seconds. 3 Press 4A/B/C/D/E and 5PRESET/ TUNING/CH l / h repeatedly to select a preset station group (A1 to E8: 8 preset station numbers in "Manual preset tuning" on this page. If the station you store a new station under the same preset station number. • Only FM stations with the station...
... new station under the same preset station number. • The reception mode (stereo or monaural) is weak in signal strength, tune into it manually and store it as the reception band. 3 Press and hold 6MEMORY for tuning instructions. 2 Press 6MEMORY. Flash AUTO MEMORY A1:FM 87.50MHz...10 seconds. 3 Press 4A/B/C/D/E and 5PRESET/ TUNING/CH l / h repeatedly to select a preset station group (A1 to E8: 8 preset station numbers in "Manual preset tuning" on this page. If the station you store a new station under the same preset station number. • Only FM stations with the station...
Owner's Manual
Page 47
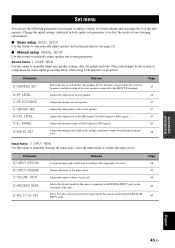
... of each parameter) to reflect the needs of this feature to automatically adjust speaker and system parameters (see page 21). ■ Manual setup MANUAL SETUP Use this unit. Adjusts the output level of the center speaker. Adjusts the tonal quality of the LFE channel for the sources...connected to the DIGITAL INPUT jacks on the rear panel of your listening environment. ■ Basic setup BASIC SETUP Use this feature to manually adjust speaker and system parameters. Change the initial settings (indicated in bold under each speaker. Selects the decoder mode for Dolby Digital ...
... of each parameter) to reflect the needs of this feature to automatically adjust speaker and system parameters (see page 21). ■ Manual setup MANUAL SETUP Use this unit. Adjusts the output level of the center speaker. Adjusts the tonal quality of the LFE channel for the sources...connected to the DIGITAL INPUT jacks on the rear panel of your listening environment. ■ Basic setup BASIC SETUP Use this feature to manually adjust speaker and system parameters. Change the initial settings (indicated in bold under each speaker. Selects the decoder mode for Dolby Digital ...

Owner's Manual
Page 48
... the items you press G k / n repeatedly. 1 SOUND MENU 2 INPUT MENU 3 OPTION MENU 2 Press Gk / n to select "MANUAL SETUP". .MANUAL SETUP 3 Press GENTER to enter "MANUAL SETUP". "1 SOUND MENU" appears in the front panel display as you want to adjust. • To return to the previous menu level...increase the value. • Press G l to decrease the value. 7 Press PMENU to exit from set menu parameters while this menu to manually adjust the optional system parameters. INI E)XM RADIO SET Features Adjusts the brightness of this feature to check audio signal information (see page 30)....
... the items you press G k / n repeatedly. 1 SOUND MENU 2 INPUT MENU 3 OPTION MENU 2 Press Gk / n to select "MANUAL SETUP". .MANUAL SETUP 3 Press GENTER to enter "MANUAL SETUP". "1 SOUND MENU" appears in the front panel display as you want to adjust. • To return to the previous menu level...increase the value. • Press G l to decrease the value. 7 Press PMENU to exit from set menu parameters while this menu to manually adjust the optional system parameters. INI E)XM RADIO SET Features Adjusts the brightness of this feature to check audio signal information (see page 30)....
Owner's Manual
Page 49
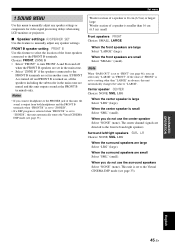
..."ZONE B", this unit automatically enters the Virtual CINEMA DSP mode (see page 33). If the value of the front speakers connected to manually adjust any speaker settings or compensate for video signal processing delays when using LCD monitors or projectors. ■ Speaker settings A)SPEAKER SET Use... • Select "ZONE B" if the speakers connected to the front left /right speakers SUR. Set menu 1 SOUND MENU Use this menu to manually adjust any speaker settings. FRONT B speaker setting FRONT B Use this feature to select the location of "FRONT" is turned on and off and FRONT...
..."ZONE B", this unit automatically enters the Virtual CINEMA DSP mode (see page 33). If the value of the front speakers connected to manually adjust any speaker settings or compensate for video signal processing delays when using LCD monitors or projectors. ■ Speaker settings A)SPEAKER SET Use... • Select "ZONE B" if the speakers connected to the front left /right speakers SUR. Set menu 1 SOUND MENU Use this menu to manually adjust any speaker settings. FRONT B speaker setting FRONT B Use this feature to select the location of "FRONT" is turned on and off and FRONT...

Owner's Manual
Page 50
... The available speaker channels differ depending on the setting of the speakers. 46 En Set menu LFE/Bass out BASS OUT Use this feature to manually adjust the output level of each speaker. All frequencies below the selected frequency will be sent to the subwoofer or to the speakers set to...
... The available speaker channels differ depending on the setting of the speakers. 46 En Set menu LFE/Bass out BASS OUT Use this feature to manually adjust the output level of each speaker. All frequencies below the selected frequency will be sent to the subwoofer or to the speakers set to...

Owner's Manual
Page 51
.... • Select "STD" (standard) for general use. Select "MAX" (maximum) to adjust the selected frequency band. ■ Speaker distance C)SP DISTANCE Use this feature to manually adjust the distance of each speaker so that of the front speakers. ADVANCED OPERATION English 47 En Control range: -6.0 to +6.0 dB Control step: 0.5 dB Initial...
.... • Select "STD" (standard) for general use. Select "MAX" (maximum) to adjust the selected frequency band. ■ Speaker distance C)SP DISTANCE Use this feature to manually adjust the distance of each speaker so that of the front speakers. ADVANCED OPERATION English 47 En Control range: -6.0 to +6.0 dB Control step: 0.5 dB Initial...

Owner's Manual
Page 58
... to operate your component has more than one . • If you find the correct one code, try setting another Yamaha remote control code. 54 En If this case, try each of this manual. Note You may not be used. Remote control features Setting remote control codes You can control other components by...
... to operate your component has more than one . • If you find the correct one code, try setting another Yamaha remote control code. 54 En If this case, try each of this manual. Note You may not be used. Remote control features Setting remote control codes You can control other components by...

Owner's Manual
Page 63
... continuous crackling and hissing noises. The signal is not currently broadcasting any signals. A TV set . Check the antenna connections. Use the manual tuning method. No channels are buzzing and whining noises. The desired station cannot be obtained even with a good FM antenna. There is ... - 37 - - 39 ADDITIONAL INFORMATION English 59 En AM There are loose. Try using a high-quality directional FM antenna. Use the manual tuning method. It takes longer than usual or an error occurs, one of this case, read the cause and follow the corresponding remedies. ...
... continuous crackling and hissing noises. The signal is not currently broadcasting any signals. A TV set . Check the antenna connections. Use the manual tuning method. No channels are buzzing and whining noises. The desired station cannot be obtained even with a good FM antenna. There is ... - 37 - - 39 ADDITIONAL INFORMATION English 59 En AM There are loose. Try using a high-quality directional FM antenna. Use the manual tuning method. It takes longer than usual or an error occurs, one of this case, read the cause and follow the corresponding remedies. ...

Owner's Manual
Page 64
... display. However, the advanced setup menu parameters will not be initialized. • The initial factory settings are activated next time you turn on this manual. y To cancel the initialization procedure at the end of this unit to the initial factory settings. 1 Press 1STANDBY/ON on the front panel to... setting another code for the same manufacturer using "List of remote control codes" at the end of this feature to turn on this manual. Reposition this unit to select "RESET". Troubleshooting ■ Remote control Problem The remote control does not work nor function properly.
... display. However, the advanced setup menu parameters will not be initialized. • The initial factory settings are activated next time you turn on this manual. y To cancel the initialization procedure at the end of this unit to the initial factory settings. 1 Press 1STANDBY/ON on the front panel to... setting another code for the same manufacturer using "List of remote control codes" at the end of this feature to turn on this manual. Reposition this unit to select "RESET". Troubleshooting ■ Remote control Problem The remote control does not work nor function properly.

Owner's Manual
Page 68
... INPUT jacks 17 Connecting to the SURROUND terminals 13 Connecting to unprocessed input signals 33 Low-frequency effect level 47 ■M Manual preset tuning 35 MANUAL SETUP 43 Manual setup 43 Manual tuning 34 MAX VOL 48 Maximum volume 48 MEM. GUARD 50 Memory guard 50 Movie Dramatic 31 Movie Spacious 31 64 En...
... INPUT jacks 17 Connecting to the SURROUND terminals 13 Connecting to unprocessed input signals 33 Low-frequency effect level 47 ■M Manual preset tuning 35 MANUAL SETUP 43 Manual setup 43 Manual tuning 34 MAX VOL 48 Maximum volume 48 MEM. GUARD 50 Memory guard 50 Movie Dramatic 31 Movie Spacious 31 64 En...
Owner's Manual
Page 77
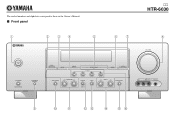
The circled numbers and alphabets correspond to those in the Owner's Manual. ■ Front panel U HTR-6030 1 2 34 5 67 8 VOLUME STANDBY /ON PHONES SILENT CINEMA SPEAKERS A/B/OFF EDIT SEARCH MODE PRESET/TUNING FM/AM CATEGORY A/B/C/D/E 1 l PRESET/TUNING/CH h SCENE 2 3 4 MEMORY DISPLAY TUNING AUTO/MAN'L TONE CONTROL l PROGRAM h STRAIGHT NIGHT l INPUT h AUDIO SELECT EFFECT VIDEO VIDEO AUX L AUDIO R PORTABLE 9 0 A BC D EF
The circled numbers and alphabets correspond to those in the Owner's Manual. ■ Front panel U HTR-6030 1 2 34 5 67 8 VOLUME STANDBY /ON PHONES SILENT CINEMA SPEAKERS A/B/OFF EDIT SEARCH MODE PRESET/TUNING FM/AM CATEGORY A/B/C/D/E 1 l PRESET/TUNING/CH h SCENE 2 3 4 MEMORY DISPLAY TUNING AUTO/MAN'L TONE CONTROL l PROGRAM h STRAIGHT NIGHT l INPUT h AUDIO SELECT EFFECT VIDEO VIDEO AUX L AUDIO R PORTABLE 9 0 A BC D EF


