
Owner's Manual
Page 1
U HTR-6030 AV Receiver OWNER'S MANUAL
U HTR-6030 AV Receiver OWNER'S MANUAL
Owner's Manual
Page 7
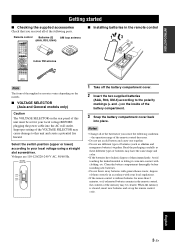
... set for more than 2 minutes, or if exhausted batteries remain in accordance with general house waste; Notes • Change all of the batteries if you received all of this unit and create a potential fire hazard. Remote control POWER POWER STANDBY POWER TV AV MULTI CH IN AUDIO SEL SLEEP MUTE CD...
... set for more than 2 minutes, or if exhausted batteries remain in accordance with general house waste; Notes • Change all of the batteries if you received all of this unit and create a potential fire hazard. Remote control POWER POWER STANDBY POWER TV AV MULTI CH IN AUDIO SEL SLEEP MUTE CD...

Owner's Manual
Page 9
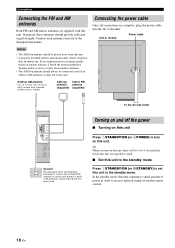
.... 2 Twist the exposed wires of the speaker cables together to prevent short circuits. 3 Do not let the bare speaker wires touch each speaker. Subwoofer AV receiver IN MD/ OUT (PLAY) CD-R (REC) OUTPUT SUB WOOFER Input jack Subwoofer cable SUBWOOFER OUTPUT jack English 5 En To the front right speaker Front left...
.... 2 Twist the exposed wires of the speaker cables together to prevent short circuits. 3 Do not let the bare speaker wires touch each speaker. Subwoofer AV receiver IN MD/ OUT (PLAY) CD-R (REC) OUTPUT SUB WOOFER Input jack Subwoofer cable SUBWOOFER OUTPUT jack English 5 En To the front right speaker Front left...

Owner's Manual
Page 10
... cable to the digital coaxial audio output jack of your DVD player and the DVD DIGITAL INPUT COAXIAL jack of this unit. DVD player AV receiver 3 Connect the video cable to the video input jack of your video monitor and the VIDEO MONITOR OUT jack of this unit and the DVD... player are unplugged from the AC wall outlets. AV receiver DVD player Make sure that this unit. Video monitor AV receiver S-VIDEO L/MONO R VIDEO AUDIO VIDEO-1 IN Y PB PR L/MONO R COLOR STREAM HD IN AUDIO Digital coaxial audio output jack Video...
... cable to the digital coaxial audio output jack of your DVD player and the DVD DIGITAL INPUT COAXIAL jack of this unit. DVD player AV receiver 3 Connect the video cable to the video input jack of your video monitor and the VIDEO MONITOR OUT jack of this unit and the DVD... player are unplugged from the AC wall outlets. AV receiver DVD player Make sure that this unit. Video monitor AV receiver S-VIDEO L/MONO R VIDEO AUDIO VIDEO-1 IN Y PB PR L/MONO R COLOR STREAM HD IN AUDIO Digital coaxial audio output jack Video...

Owner's Manual
Page 13
... the best possible reception, orient the connected AM loop antenna, or adjust the position of the end of power in order to set to receive infrared signals from the remote control. ■ Adjusting the parameters of this unit • Optimizing the speaker parameters for the SCENE buttons. ...power in order to the standby mode. Press 1STANDBY/ON on this unit to select "Radio Listening". To turn on the front panel to receive infrared signals from the remote control. Notes • To use the "Radio Listening" template, you can select and change the assigned SCENE template...
... the best possible reception, orient the connected AM loop antenna, or adjust the position of the end of power in order to set to receive infrared signals from the remote control. ■ Adjusting the parameters of this unit • Optimizing the speaker parameters for the SCENE buttons. ...power in order to the standby mode. Press 1STANDBY/ON on this unit to select "Radio Listening". To turn on the front panel to receive infrared signals from the remote control. Notes • To use the "Radio Listening" template, you can select and change the assigned SCENE template...
Owner's Manual
Page 22
...outdoor antenna. A good earth ground is connected to a good earth ground. In the standby mode, this unit to 32 ft) of power in order to receive infrared signals from a window. If you turn on this unit. Outdoor AM antenna Use a 5 to 10 m (16 to the standby mode. Notes &#... MSTANDBY) to set this unit consumes a small amount of vinyl-covered wire extended outdoors from the remote control. 18 En Consult the nearest authorized Yamaha dealer or service center about outdoor antennas. • The AM loop antenna should provide sufficient signal strength. IN MD/ (PLAY) CD-R Ground ...
...outdoor antenna. A good earth ground is connected to a good earth ground. In the standby mode, this unit to 32 ft) of power in order to receive infrared signals from a window. If you turn on this unit. Outdoor AM antenna Use a 5 to 10 m (16 to the standby mode. Notes &#... MSTANDBY) to set this unit consumes a small amount of vinyl-covered wire extended outdoors from the remote control. 18 En Consult the nearest authorized Yamaha dealer or service center about outdoor antennas. • The AM loop antenna should provide sufficient signal strength. IN MD/ (PLAY) CD-R Ground ...
Owner's Manual
Page 38
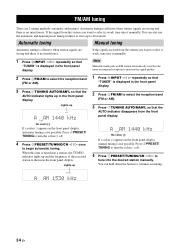
...automatic tuning. Press 2PRESET/ TUNING to turn the colon (:) off . 4 Press 5PRESET/TUNING/CH l / h once to tune into it manually. If the signal received from the front panel display. Lights up to store up A AM 1440 kHz No colon (:) If a colon (:) appears in the front panel display. 2 Press... to select is tuned into it manually. 1 Press DINPUT l / h repeatedly so that the AUTO indicator lights up and the frequency of the received station is no interference. Lights up AUTO A AM 1440 kHz 1 Press DINPUT l / h repeatedly so that the AUTO indicator disappears from the ...
...automatic tuning. Press 2PRESET/ TUNING to turn the colon (:) off . 4 Press 5PRESET/TUNING/CH l / h once to tune into it manually. If the signal received from the front panel display. Lights up to store up A AM 1440 kHz No colon (:) If a colon (:) appears in the front panel display. 2 Press... to select is tuned into it manually. 1 Press DINPUT l / h repeatedly so that the AUTO indicator lights up and the frequency of the received station is no interference. Lights up AUTO A AM 1440 kHz 1 Press DINPUT l / h repeatedly so that the AUTO indicator disappears from the ...
Owner's Manual
Page 39
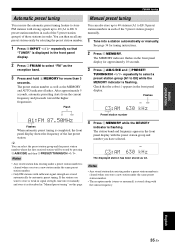
... band. 3 Press and hold 6MEMORY for tuning instructions. 2 Press 6MEMORY. You can select the preset station group and the preset station number where the first received station will be stored by selecting the preset station number. 1 Press DINPUT l / h repeatedly so that the colon (:) appears in the front panel display. 2 Press 3FM...
... band. 3 Press and hold 6MEMORY for tuning instructions. 2 Press 6MEMORY. You can select the preset station group and the preset station number where the first received station will be stored by selecting the preset station number. 1 Press DINPUT l / h repeatedly so that the colon (:) appears in the front panel display. 2 Press 3FM...
Owner's Manual
Page 42
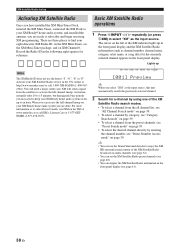
... Search mode" on page 39. • To select the desired channel directly by using one of the XM indicator lights up to subscribe and begin receiving XM programming. When you can display the XM Satellite Radio information in the front panel display (see page 40). • You can access the full...
... Search mode" on page 39. • To select the desired channel directly by using one of the XM indicator lights up to subscribe and begin receiving XM programming. When you can display the XM Satellite Radio information in the front panel display (see page 40). • You can access the full...


