Owners Manual
Page 5
... DVD recorder, a VCR or an STB 20 Connecting a CD player, an MD player, a tape deck or a turntable 23 Connecting a YAMAHA iPod universal dock ........ 24 Connecting an external amplifier 25 Connecting a multi-format player or an external decoder 26 Connecting a game console, a video... MENU 94 ADVANCED SETUP 97 REMOTE CONTROL FEATURES 99 Controlling this unit, a TV, or other components 99 Setting the remote control code 101 Setting library codes 102 Resetting all remote control codes 103 USING iPod 104 Setting the remote control code 104 Controlling iPod 104 RESETTING THE SYSTEM ...
... DVD recorder, a VCR or an STB 20 Connecting a CD player, an MD player, a tape deck or a turntable 23 Connecting a YAMAHA iPod universal dock ........ 24 Connecting an external amplifier 25 Connecting a multi-format player or an external decoder 26 Connecting a game console, a video... MENU 94 ADVANCED SETUP 97 REMOTE CONTROL FEATURES 99 Controlling this unit, a TV, or other components 99 Setting the remote control code 101 Setting library codes 102 Resetting all remote control codes 103 USING iPod 104 Setting the remote control code 104 Controlling iPod 104 RESETTING THE SYSTEM ...
Owners Manual
Page 6
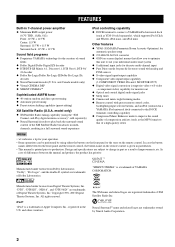
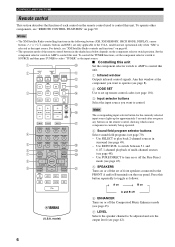
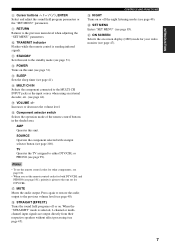
...9670; Cinema and music night listening modes ◆ Remote control with preset remote control codes, backlighting input selector buttons, and an iPod (stationed in a YAMAHA iPod universal dock connected to the DOCK terminal) controlling capability ◆ Compressed Music Enhancer mode to suit your...115 W Surround back: 115 W + 115 W Sound field programs ◆ Proprietary YAMAHA technology for the creation of differences between the front panel and the remote control, the button name on the remote control is given in the U.S. In case the button names differ between the manual and product...
...9670; Cinema and music night listening modes ◆ Remote control with preset remote control codes, backlighting input selector buttons, and an iPod (stationed in a YAMAHA iPod universal dock connected to the DOCK terminal) controlling capability ◆ Compressed Music Enhancer mode to suit your...115 W Surround back: 115 W + 115 W Sound field programs ◆ Proprietary YAMAHA technology for the creation of differences between the front panel and the remote control, the button name on the remote control is given in the U.S. In case the button names differ between the manual and product...

Owners Manual
Page 7
...A-E/CAT. and Canada models) AM loop antenna Indoor FM antenna (Australia model) GETTING STARTED Optimizer microphone Installing batteries in the remote control, the contents of the memory may be cleared. Read the packaging carefully as alkaline and manganese batteries) together. INTRODUCTION GETTING ... in accordance with clothing, etc. When the memory is without batteries for more than 2 minutes, or if exhausted batteries remain in the remote control 13 2 1 Take off the battery compartment cover. 2 Insert the two supplied batteries (AA, R6, UM-3) according to the polarity ...
...A-E/CAT. and Canada models) AM loop antenna Indoor FM antenna (Australia model) GETTING STARTED Optimizer microphone Installing batteries in the remote control, the contents of the memory may be cleared. Read the packaging carefully as alkaline and manganese batteries) together. INTRODUCTION GETTING ... in accordance with clothing, etc. When the memory is without batteries for more than 2 minutes, or if exhausted batteries remain in the remote control 13 2 1 Take off the battery compartment cover. 2 Insert the two supplied batteries (AA, R6, UM-3) according to the polarity ...

Owners Manual
Page 8
...of this unit or sets it to the standby mode (see "XM Satellite Radio controls and functions" on or off the Pure Direct mode (see page 45). 3 Remote control sensor Receives signals from the remote control (see page 8). 4 Front panel display Shows information about the operational status of ...XM" is selected as the input source. For details, see page 31). CONTROLS AND FUNCTIONS CONTROLS AND FUNCTIONS Front panel Note The XM Satellite Radio controlling functions in order to receive infrared signals from the remote control. • When you want to adjust when "TUNER" is not selected...
...of this unit or sets it to the standby mode (see "XM Satellite Radio controls and functions" on or off the Pure Direct mode (see page 45). 3 Remote control sensor Receives signals from the remote control (see page 8). 4 Front panel display Shows information about the operational status of ...XM" is selected as the input source. For details, see page 31). CONTROLS AND FUNCTIONS CONTROLS AND FUNCTIONS Front panel Note The XM Satellite Radio controlling functions in order to receive infrared signals from the remote control. • When you want to adjust when "TUNER" is not selected...
Owners Manual
Page 9
...in the "AUTO SETUP" procedure (see page 54). 0 TUNING MODE (AUTO/MAN'L) Switches between automatic tuning (the AUTO indicator is turned on the remote control). The colon (:) is not displayed in the front panel display (see page 52). • Selects the tuning frequency when "TUNER" is not ... signals are mixed down this unit to 8) when "TUNER" is connected via both digital and analog connections (see page 41). G TONE CONTROL Adjusts the bass/treble balance of the 8 preset station numbers (1 to automatically detect the type of input signals and select the corresponding input ...
...in the "AUTO SETUP" procedure (see page 54). 0 TUNING MODE (AUTO/MAN'L) Switches between automatic tuning (the AUTO indicator is turned on the remote control). The colon (:) is not displayed in the front panel display (see page 52). • Selects the tuning frequency when "TUNER" is not ... signals are mixed down this unit to 8) when "TUNER" is connected via both digital and analog connections (see page 41). G TONE CONTROL Adjusts the bass/treble balance of the 8 preset station numbers (1 to automatically detect the type of input signals and select the corresponding input ...
Owners Manual
Page 10
... unit 1 0 Set the component selector switch to AMP to play back 2-channel sources in surround (see "XM Satellite Radio controls and functions" on page 60. • The operation mode of the remote control buttons in the following buttons (XM, XM MEMORY, SRCH MODE, DISPLAY, cursor buttons u / d / j / i, numeric... window at the 3 CD DVD MD CD-R CBL DTV SLEEP XM TUNER MULTI CH IN C D component you press any buttons on the remote control, showing which source component is selected as follows: A on B on (U.S.A. to the U.S.A. model) A and B off 6 ENHANCER Turns on or...
... unit 1 0 Set the component selector switch to AMP to play back 2-channel sources in surround (see "XM Satellite Radio controls and functions" on page 60. • The operation mode of the remote control buttons in the following buttons (XM, XM MEMORY, SRCH MODE, DISPLAY, cursor buttons u / d / j / i, numeric... window at the 3 CD DVD MD CD-R CBL DTV SLEEP XM TUNER MULTI CH IN C D component you press any buttons on the remote control, showing which source component is selected as follows: A on B on (U.S.A. to the U.S.A. model) A and B off 6 ENHANCER Turns on or...
Owners Manual
Page 11
... • When you set for your video monitor (see page 47). 7 Press again to restore the audio output to the one set the remote control codes for both DTV/CBL and PHONO (see page 101), priority is given to the previous volume level (see page 40). D MULTI CH ...(see page 99). AMP Operates this unit to the previous menu level when adjusting the "SET MENU" parameters. 0 TRANSMIT indicator Flashes while the remote control is selected, 2-channel or multichannel input signals are output directly from their respective speakers without effect processing (see page 41). G MUTE Mutes the ...
... • When you set for your video monitor (see page 47). 7 Press again to restore the audio output to the one set the remote control codes for both DTV/CBL and PHONO (see page 101), priority is given to the previous volume level (see page 40). D MULTI CH ...(see page 99). AMP Operates this unit to the previous menu level when adjusting the "SET MENU" parameters. 0 TRANSMIT indicator Flashes while the remote control is selected, 2-channel or multichannel input signals are output directly from their respective speakers without effect processing (see page 41). G MUTE Mutes the ...

Owners Manual
Page 12
... to E) and u / d to select a preset station number (1 to aim the remote control directly at the remote control sensor on the remote control. • Do not drop the remote control. • Do not leave or store the remote control in the following types of high humidity, such as near a bath - places of conditions:...preset stations. 7 BAND Switches the reception band between FM and AM (see page 56). ■ Using the remote control The remote control transmits a directional infrared ray. places of high temperatures, such as near a heater or stove - PURE DIRECT 5 6 7 ...
... to E) and u / d to select a preset station number (1 to aim the remote control directly at the remote control sensor on the remote control. • Do not drop the remote control. • Do not leave or store the remote control in the following types of high humidity, such as near a bath - places of conditions:...preset stations. 7 BAND Switches the reception band between FM and AM (see page 56). ■ Using the remote control The remote control transmits a directional infrared ray. places of high temperatures, such as near a heater or stove - PURE DIRECT 5 6 7 ...
Owners Manual
Page 28
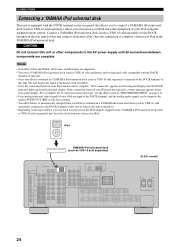
... a status message appears in the front panel display. iPod YAMAHA iPod universal dock (such as YDS-10 sold separately) to the DOCK terminal on the rear panel of this unit using the supplied remote control. CONNECTIONS Connecting a YAMAHA iPod universal dock This unit is equipped with the DOCK terminal... on the rear panel that allows you to connect a YAMAHA iPod universal dock (such as YDS-10 sold separately) where you ...
... a status message appears in the front panel display. iPod YAMAHA iPod universal dock (such as YDS-10 sold separately) to the DOCK terminal on the rear panel of this unit using the supplied remote control. CONNECTIONS Connecting a YAMAHA iPod universal dock This unit is equipped with the DOCK terminal... on the rear panel that allows you to connect a YAMAHA iPod universal dock (such as YDS-10 sold separately) where you ...

Owners Manual
Page 29
... PRE OUT jack outputs the same channel signals as the corresponding SPEAKERS terminals. • Adjust the volume level of the subwoofer with the supplied remote control (see page 42). • Some signals may not be output at the FRONT PRE OUT and CENTER PRE OUT jacks are complete. model)...(see page 86) and "LFE/BASS OUT" (see page 39). • If SPEAKERS A is also possible to adjust the volume level with the control on the settings for any home use another amplifier, connect an external amplifier to the PRE OUT jacks. Front channel amplifier Surround channel amplifier Surround...
... PRE OUT jack outputs the same channel signals as the corresponding SPEAKERS terminals. • Adjust the volume level of the subwoofer with the supplied remote control (see page 42). • Some signals may not be output at the FRONT PRE OUT and CENTER PRE OUT jacks are complete. model)...(see page 86) and "LFE/BASS OUT" (see page 39). • If SPEAKERS A is also possible to adjust the volume level with the control on the settings for any home use another amplifier, connect an external amplifier to the PRE OUT jacks. Front channel amplifier Surround channel amplifier Surround...

Owners Manual
Page 35
...MEMORY MAN'L/AUTO FM TUNING MODE DISPLAY AUTO/MAN'L INPUT MULTI CH INPUT VIDEO AUX S VIDEO VIDEO L AUDIO R OPTICAL (U.S.A. STANDBY /ON POWER or Front panel Remote control ■ Setting this unit to the standby mode Press STANDBY/ON on the front panel again (or STANDBY on this unit. STANDBY/ON (U.S.A. PREPARATION CONNECTIONS...VOL TV CH AMP VOLUME SOURCE TV STANDBY POWER ■ Turning on this unit Press STANDBY/ON on the front panel (or POWER on the remote control) to turn on the remote control) to set this unit to the standby mode. STANDBY /ON STANDBY or Front panel...
...MEMORY MAN'L/AUTO FM TUNING MODE DISPLAY AUTO/MAN'L INPUT MULTI CH INPUT VIDEO AUX S VIDEO VIDEO L AUDIO R OPTICAL (U.S.A. STANDBY /ON POWER or Front panel Remote control ■ Setting this unit to the standby mode Press STANDBY/ON on the front panel again (or STANDBY on this unit. STANDBY/ON (U.S.A. PREPARATION CONNECTIONS...VOL TV CH AMP VOLUME SOURCE TV STANDBY POWER ■ Turning on this unit Press STANDBY/ON on the front panel (or POWER on the remote control) to turn on the remote control) to set this unit to the standby mode. STANDBY /ON STANDBY or Front panel...

Owners Manual
Page 42
... to select an input source connected via digital connections, set the component selector switch to AMP and then press SPEAKERS on the remote control repeatedly). INPUT MD SLEEP CD CD-R XM CBL MULTI CH IN or DVD DTV TUNER V-AUX DVR VCR PHONO 3 2 ...component. STANDBY /ON PURE DIRECT OPTIMIZER MIC PHONES SPEAKERS A B SILENT CINEMA 2 (U.S.A. SPEAKERS A B AMP SOURCE TV Front panel or SPEAKERS 9 Remote control Front panel Remote control The name of the input selector buttons on the front panel (or set "INPUT MODE" to "AUTO" or "DTS" (see page 62. ...
... to select an input source connected via digital connections, set the component selector switch to AMP and then press SPEAKERS on the remote control repeatedly). INPUT MD SLEEP CD CD-R XM CBL MULTI CH IN or DVD DTV TUNER V-AUX DVR VCR PHONO 3 2 ...component. STANDBY /ON PURE DIRECT OPTIMIZER MIC PHONES SPEAKERS A B SILENT CINEMA 2 (U.S.A. SPEAKERS A B AMP SOURCE TV Front panel or SPEAKERS 9 Remote control Front panel Remote control The name of the input selector buttons on the front panel (or set "INPUT MODE" to "AUTO" or "DTS" (see page 62. ...

Owners Manual
Page 43
... sampled down to 48 kHz and then sound field programs are applied. • To display information about sound field programs. Front panel Remote control PROGRAM 6 Press TONE CONTROL on the remote control) to adjust the volume to the MULTI CH INPUT jacks is set to "AUTO" (see page 91), and "BASS" and "...independently. • When "TONE BYPASS" is selected as the input source (see page 44). • To enjoy multi-channel sources in the OSD. EFFECT Remote control VCR DVR V-AUX DTV/CBL pDVD SP A TREBLE MD/CD-R TUNER CD XM PHONO VOLUME dB 0dB L R • Select "TREBLE" to adjust ...
... sampled down to 48 kHz and then sound field programs are applied. • To display information about sound field programs. Front panel Remote control PROGRAM 6 Press TONE CONTROL on the remote control) to adjust the volume to the MULTI CH INPUT jacks is set to "AUTO" (see page 91), and "BASS" and "...independently. • When "TONE BYPASS" is selected as the input source (see page 44). • To enjoy multi-channel sources in the OSD. EFFECT Remote control VCR DVR V-AUX DTV/CBL pDVD SP A TREBLE MD/CD-R TUNER CD XM PHONO VOLUME dB 0dB L R • Select "TREBLE" to adjust ...

Owners Manual
Page 44
...the audio output is displayed in the front panel display. Muting the audio output Press MUTE on the type of -listening for maximum compression. 40 Remote control Effect.Lvl:MID Choices: MIN, MID, MAX • Select "MIN" for minimum compression. • Select "MID" for standard compression. &#...the night listening mode The night listening modes are playing. 1 Set the component selector switch to AMP and then press NIGHT on the remote control to select "NIGHT:CINEMA" or "NIGHT:MUSIC". PRESET/CH A-E/CAT. Notes • SILENT CINEMA does not activate when the component ...
...the audio output is displayed in the front panel display. Muting the audio output Press MUTE on the type of -listening for maximum compression. 40 Remote control Effect.Lvl:MID Choices: MIN, MID, MAX • Select "MIN" for minimum compression. • Select "MID" for standard compression. &#...the night listening mode The night listening modes are playing. 1 Set the component selector switch to AMP and then press NIGHT on the remote control to select "NIGHT:CINEMA" or "NIGHT:MUSIC". PRESET/CH A-E/CAT. Notes • SILENT CINEMA does not activate when the component ...

Owners Manual
Page 45
... input, no sound is output. See page 52 for the source component. y • We recommend setting "INPUT MODE" to "AUTO" in effectiveness depending on the remote control to select the desired input source. The sleep timer also automatically turns off any external components connected to the MULTI CH INPUT jacks is selected...
... input, no sound is output. See page 52 for the source component. y • We recommend setting "INPUT MODE" to "AUTO" in effectiveness depending on the remote control to select the desired input source. The sleep timer also automatically turns off any external components connected to the MULTI CH INPUT jacks is selected...

Owners Manual
Page 46
... 6 7 8 SPEAKERS 9 ENHANCER 0 NIGHT 10 STRAIGHT ENT. model) 3 2 1 Set the component selector switch to AMP and then press LEVEL on the remote control repeatedly to select the speaker you want to set the amount of time for the sleep timer. AMP SOURCE TV LEVEL TITLE BAND VCR DVR...LEVEL TITLE BAND PRESET/CH EFFECT SET MENU MENU SRCH MODE ENTER A-E/CAT. y This operation can also be performed using the control buttons on the remote control repeatedly to adjust. A-E/CAT. RETURN XM MEMORY REC DISC SKIP DISPLAY ON SCREEN AUDIO (U.S.A. Once the sleep timer is also ...
... 6 7 8 SPEAKERS 9 ENHANCER 0 NIGHT 10 STRAIGHT ENT. model) 3 2 1 Set the component selector switch to AMP and then press LEVEL on the remote control repeatedly to select the speaker you want to set the amount of time for the sleep timer. AMP SOURCE TV LEVEL TITLE BAND VCR DVR...LEVEL TITLE BAND PRESET/CH EFFECT SET MENU MENU SRCH MODE ENTER A-E/CAT. y This operation can also be performed using the control buttons on the remote control repeatedly to adjust. A-E/CAT. RETURN XM MEMORY REC DISC SKIP DISPLAY ON SCREEN AUDIO (U.S.A. Once the sleep timer is also ...

Owners Manual
Page 47
... the value. Notes • The Compressed Music Enhancer mode is compatible with any of "SUR. ENTER A-E/CAT. 3 Press ENTER on the remote control, you have completed your listening experience by pressing u / d. • Instead of the sound field programs. • When the Compressed Music...PRES. L" to adjust the surround back right speaker output level. • Select "SUR. y • Once you press LEVEL on the remote control when you can also select the speaker by regenerating the missing harmonics in a compression artifact. B" is resampled to lower the bitrate and to ...
... the value. Notes • The Compressed Music Enhancer mode is compatible with any of "SUR. ENTER A-E/CAT. 3 Press ENTER on the remote control, you have completed your listening experience by pressing u / d. • Instead of the sound field programs. • When the Compressed Music...PRES. L" to adjust the surround back right speaker output level. • Select "SUR. y • Once you press LEVEL on the remote control when you can also select the speaker by regenerating the missing harmonics in a compression artifact. B" is resampled to lower the bitrate and to ...

Owners Manual
Page 48
... level to "HIGH" or "LOW" according to select the desired Compressed Music Enhancer mode. MULTI CH INPUT Front panel MULTI CH IN or Remote control MULTI CH INPUT Choices: 2ch Stereo, 7ch Stereo, Off • Select "2ch Stereo" to play back compression artifacts in 2-channel stereo. ...frequency signals of some sources may be played. USING AUDIO FEATURES 1 Set the component selector switch to AMP and then press ENHANCER on the remote control repeatedly to the characteristics of a source. AMP SOURCE TV ENHANCER 0 MUSIC ENHANCER 2ch Stereo . Note When you select "Off ", this...
... level to "HIGH" or "LOW" according to select the desired Compressed Music Enhancer mode. MULTI CH INPUT Front panel MULTI CH IN or Remote control MULTI CH INPUT Choices: 2ch Stereo, 7ch Stereo, Off • Select "2ch Stereo" to play back compression artifacts in 2-channel stereo. ...frequency signals of some sources may be played. USING AUDIO FEATURES 1 Set the component selector switch to AMP and then press ENHANCER on the remote control repeatedly to the characteristics of a source. AMP SOURCE TV ENHANCER 0 MUSIC ENHANCER 2ch Stereo . Note When you select "Off ", this...

Owners Manual
Page 49
... multi-channel sources in 2-channel stereo You can enjoy pure hi-fi sound from 2-channel PCM and analog sources. Press PURE DIRECT on the remote control) to 2 channels and enjoy playback in 2-channel stereo. Set the component selector switch to AMP and then press STEREO on momentarily when an... You can also select the "2ch Stereo" mode by pressing STRAIGHT (EFFECT) on . EFFECT STRAIGHT AMP SOURCE TV Front panel or PURE DIRECT 8 Remote control Notes • To avoid unexpected noise, do not play CDs encoded in the Pure Direct mode. • The front panel display turns on the...
... multi-channel sources in 2-channel stereo You can enjoy pure hi-fi sound from 2-channel PCM and analog sources. Press PURE DIRECT on the remote control) to 2 channels and enjoy playback in 2-channel stereo. Set the component selector switch to AMP and then press STEREO on momentarily when an... You can also select the "2ch Stereo" mode by pressing STRAIGHT (EFFECT) on . EFFECT STRAIGHT AMP SOURCE TV Front panel or PURE DIRECT 8 Remote control Notes • To avoid unexpected noise, do not play CDs encoded in the Pure Direct mode. • The front panel display turns on the...

Owners Manual
Page 50
... MENU". Note "---" appears when this unit cannot detect a digital signal, it automatically switches to analog input. FLAG NONE [RETURN]:Exit 3 Press SET MENU on the remote control. SET MENU MENU SRCH MODE 46 The following information about the input source appears in the input signal (front/surround/LFE). Flag FLAG Flag data..., channel, bit rate and flag data of the current input signal. 1 Set the component selector switch to AMP and then press SET MENU on the remote control again to exit from a continuous signal to make a discrete signal.
... MENU". Note "---" appears when this unit cannot detect a digital signal, it automatically switches to analog input. FLAG NONE [RETURN]:Exit 3 Press SET MENU on the remote control. SET MENU MENU SRCH MODE 46 The following information about the input source appears in the input signal (front/surround/LFE). Flag FLAG Flag data..., channel, bit rate and flag data of the current input signal. 1 Set the component selector switch to AMP and then press SET MENU on the remote control again to exit from a continuous signal to make a discrete signal.


