Owners Manual
Page 5
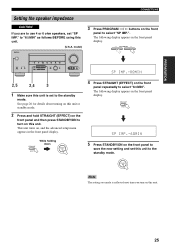
... 23 Connecting the power cable 24 Setting the speaker impedance 25 Turning on this unit or setting it to the standby mode 26 BASIC SETUP 27 BASIC OPERATION PLAYBACK 30 USING OTHER FEATURES 32 Using SILENT CINEMA 32 Muting the audio output 32 Selecting the night listening mode 32...field program speaker layouts 71 ADVANCED OPERATION SET MENU 74 Using SET MENU 76 1 SOUND MENU 78 2 INPUT MENU 81 3 OPTION MENU 83 ADVANCED SETUP 84 REMOTE CONTROL FEATURES 86 Controlling this unit, a TV, or other components 86 Setting remote control codes 88 Setting library codes 89 Resetting all ...
... 23 Connecting the power cable 24 Setting the speaker impedance 25 Turning on this unit or setting it to the standby mode 26 BASIC SETUP 27 BASIC OPERATION PLAYBACK 30 USING OTHER FEATURES 32 Using SILENT CINEMA 32 Muting the audio output 32 Selecting the night listening mode 32...field program speaker layouts 71 ADVANCED OPERATION SET MENU 74 Using SET MENU 76 1 SOUND MENU 78 2 INPUT MENU 81 3 OPTION MENU 83 ADVANCED SETUP 84 REMOTE CONTROL FEATURES 86 Controlling this unit, a TV, or other components 86 Setting remote control codes 88 Setting library codes 89 Resetting all ...
Owners Manual
Page 29
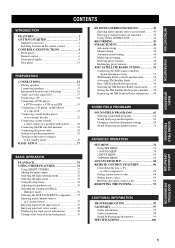
...) on the front panel and then press STANDBY/ON to the standby mode. STRAIGHT EFFECT SP IMP.-6 MIN 5 Press STANDBY/ON on , and the advanced setup menu appears in the front panel display. The following display appears in the front panel display. to "6ΩMIN" as follows BEFORE using this unit...
...) on the front panel and then press STANDBY/ON to the standby mode. STRAIGHT EFFECT SP IMP.-6 MIN 5 Press STANDBY/ON on , and the advanced setup menu appears in the front panel display. The following display appears in the front panel display. to "6ΩMIN" as follows BEFORE using this unit...
Owners Manual
Page 31
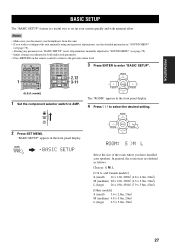
...SOURCE TV 2 Press SET MENU. ENTER A-E/CAT. In general, the room sizes are indicated in the front panel display. 4 Press j / i to enter "BASIC SETUP". "BASIC SETUP" appears in "SOUND MENU" (see page 78). • Initial settings are defined as follows: Choices: S, M, L [U.S.A. ENTER A-E/CAT. ROOM: S >M ... more precise adjustments, use the detailed parameters in "SOUND MENU" (see page 78). • Altering any parameters in "BASIC SETUP" resets all parameters manually adjusted in the front panel display. Notes • Make sure you disconnect your system quickly and with ...
...SOURCE TV 2 Press SET MENU. ENTER A-E/CAT. In general, the room sizes are indicated in the front panel display. 4 Press j / i to enter "BASIC SETUP". "BASIC SETUP" appears in "SOUND MENU" (see page 78). • Initial settings are defined as follows: Choices: S, M, L [U.S.A. ENTER A-E/CAT. ROOM: S >M ... more precise adjustments, use the detailed parameters in "SOUND MENU" (see page 78). • Altering any parameters in "BASIC SETUP" resets all parameters manually adjusted in the front panel display. Notes • Make sure you disconnect your system quickly and with ...

Owners Manual
Page 32
... your system. 6 Press d to select "SPEAKERS" and then j / i to select the number of speakers connected to cancel the setup procedure without making any changes. PRESET/CH A-E/CAT. ENTER A-E/CAT. ENTER A-E/CAT. y You can also press SET MENU to cancel the.... SUBWOOFER .. appears in turn. A-E/CAT. ENTER A-E/CAT. YES Choices: YES, NONE • Select "YES" if you have a subwoofer in your selection. BASIC SETUP 5 Press d to select "SUBWOOFER" and then j / i to select the desired setting. SPEAKERS ..6spk Choice Display Speakers 2spk L CR SL SB SR Front ...
... your system. 6 Press d to select "SPEAKERS" and then j / i to select the number of speakers connected to cancel the setup procedure without making any changes. PRESET/CH A-E/CAT. ENTER A-E/CAT. ENTER A-E/CAT. y You can also press SET MENU to cancel the.... SUBWOOFER .. appears in turn. A-E/CAT. ENTER A-E/CAT. YES Choices: YES, NONE • Select "YES" if you have a subwoofer in your selection. BASIC SETUP 5 Press d to select "SUBWOOFER" and then j / i to select the desired setting. SPEAKERS ..6spk Choice Display Speakers 2spk L CR SL SB SR Front ...

Owners Manual
Page 33
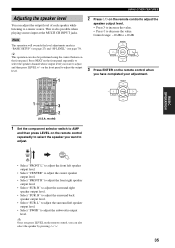
...CAT. ENTER A-E/CAT. PREPARATION 9 Press j / i to adjust the balance. ENTER A-E/CAT. • If you selected "YES" in step 9, the setup procedure is completed and the display returns to the top "SET MENU" display. • If you selected "NO" in step 9, the front speaker level adjustment... display appears in turn. • Press i to increase the value. • Press j to complete the setup procedure if the test tone levels from "BASIC SETUP". ENTER A-E/CAT. PRESET/CH PRESET/CH CHECK OK? ..YES Choices: YES, NO • Select "YES" to decrease the...
...CAT. ENTER A-E/CAT. PREPARATION 9 Press j / i to adjust the balance. ENTER A-E/CAT. • If you selected "YES" in step 9, the setup procedure is completed and the display returns to the top "SET MENU" display. • If you selected "NO" in step 9, the front speaker level adjustment... display appears in turn. • Press i to increase the value. • Press j to complete the setup procedure if the test tone levels from "BASIC SETUP". ENTER A-E/CAT. PRESET/CH PRESET/CH CHECK OK? ..YES Choices: YES, NO • Select "YES" to decrease the...
Owners Manual
Page 39
... control, you want to adjust the surround back speaker output level. • Select "SUR. Note This operation will override the level adjustments made in "BASIC SETUP" (see page 27) and "SP LEVEL" (see page 79). This is also possible when playing sources input at the MULTI CH INPUT jacks. A-E/CAT. B" to...
... control, you want to adjust the surround back speaker output level. • Select "SUR. Note This operation will override the level adjustments made in "BASIC SETUP" (see page 27) and "SP LEVEL" (see page 79). This is also possible when playing sources input at the MULTI CH INPUT jacks. A-E/CAT. B" to...
Owners Manual
Page 78
... adjust any speaker settings, alter the quality and tone of your listening environment. ■ BASIC SETUP BASIC SETUP Use this feature to set up your system quickly and with minimal effort (see page 27). ■ MANUAL SETUP MANUAL SETUP Use this menu to manually reassign the input jacks, select the input mode or rename...
... adjust any speaker settings, alter the quality and tone of your listening environment. ■ BASIC SETUP BASIC SETUP Use this feature to set up your system quickly and with minimal effort (see page 27). ■ MANUAL SETUP MANUAL SETUP Use this menu to manually reassign the input jacks, select the input mode or rename...
Owners Manual
Page 80
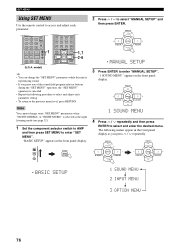
...CAT. 1 SOUND MENU 4 Press u / d repeatedly and then press ENTER to access and adjust each parameter setting. • To return to enter "MANUAL SETUP". SET MENU Using SET MENU Use the remote control to select and enter the desired menu. model) STEREO 1 MUSIC ENTERTAIN MOVIE 2 3 4 STANDARD SELECT EXTD ... panel display as the night listening mode (see page 32). 1 Set the component selector switch to AMP and then press SET MENU to select "MANUAL SETUP" and then press ENTER. PRESET/CH A-E/CAT. "1 SOUND MENU" appears in the front panel display. 2 Press u / d to enter "SET ...
...CAT. 1 SOUND MENU 4 Press u / d repeatedly and then press ENTER to access and adjust each parameter setting. • To return to enter "MANUAL SETUP". SET MENU Using SET MENU Use the remote control to select and enter the desired menu. model) STEREO 1 MUSIC ENTERTAIN MOVIE 2 3 4 STANDARD SELECT EXTD ... panel display as the night listening mode (see page 32). 1 Set the component selector switch to AMP and then press SET MENU to select "MANUAL SETUP" and then press ENTER. PRESET/CH A-E/CAT. "1 SOUND MENU" appears in the front panel display. 2 Press u / d to enter "SET ...
Owners Manual
Page 88
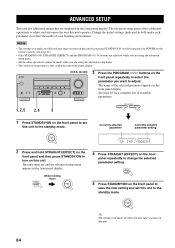
...). • Only STANDBY/ON, STRAIGHT (EFFECT) and the PROGRAM l / h buttons are effective while you are using the advanced setup menu. • The advanced setup menu is only available in the front panel display. See page 85 for a complete list of available parameters. 1,2,5 2,4 3 l ... STANDBY /ON PHONES SPEAKERS A B SILENT CINEMA (U.S.A. Change the initial settings (indicated in the front panel display. ADVANCED SETUP ADVANCED SETUP This unit has additional menus that are displayed in bold under each parameter) to reflect the needs of your listening environment...
...). • Only STANDBY/ON, STRAIGHT (EFFECT) and the PROGRAM l / h buttons are effective while you are using the advanced setup menu. • The advanced setup menu is only available in the front panel display. See page 85 for a complete list of available parameters. 1,2,5 2,4 3 l ... STANDBY /ON PHONES SPEAKERS A B SILENT CINEMA (U.S.A. Change the initial settings (indicated in the front panel display. ADVANCED SETUP ADVANCED SETUP This unit has additional menus that are displayed in bold under each parameter) to reflect the needs of your listening environment...

Owners Manual
Page 89
... of this unit. • Select "RESET" to reset the parameters of this feature to the frequency spacing in your speakers. However, the advanced setup menu parameters will not be 6 Ω or higher. Note You need to set the tuner frequency step according to set the corresponding remote control ...; This setting completely resets all the parameters of this unit so that it matches that of each speaker must be 8 Ω or higher. ADVANCED SETUP ■ Remote control AMP ID REMOTE AMP Use this feature to set to "00001". • Select "ID2" when the remote control AMP ID library...
... of this unit. • Select "RESET" to reset the parameters of this feature to the frequency spacing in your speakers. However, the advanced setup menu parameters will not be 6 Ω or higher. Note You need to set the tuner frequency step according to set the corresponding remote control ...; This setting completely resets all the parameters of this unit so that it matches that of each speaker must be 8 Ω or higher. ADVANCED SETUP ■ Remote control AMP ID REMOTE AMP Use this feature to set to "00001". • Select "ID2" when the remote control AMP ID library...
Owners Manual
Page 92
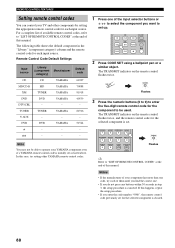
... more than one code, try setting other components by setting the appropriate remote control code for each input source. TUNER TUNER YAMAHA V-AUX - - DVR DVR YAMAHA - - - - The TRANSMIT indicator on the remote control flashes twice. If this case, try each of them until ... Code Default Settings Input source Library (component category) Manufacturer CD CD YAMAHA MD/CD-R MD YAMAHA XM TUNER YAMAHA DVD DVD YAMAHA DTV/CBL - - The following table shows the default component in step 3, the setup procedure is set. CD DVD MD CD-R CBL DTV SLEEP XM ...
... more than one code, try setting other components by setting the appropriate remote control code for each input source. TUNER TUNER YAMAHA V-AUX - - DVR DVR YAMAHA - - - - The TRANSMIT indicator on the remote control flashes twice. If this case, try each of them until ... Code Default Settings Input source Library (component category) Manufacturer CD CD YAMAHA MD/CD-R MD YAMAHA XM TUNER YAMAHA DVD DVD YAMAHA DTV/CBL - - The following table shows the default component in step 3, the setup procedure is set. CD DVD MD CD-R CBL DTV SLEEP XM ...

Owners Manual
Page 93
... TUNER ID library codes Select one of the following codes to set one of this unit in the advanced setup (see page 85). • When using multiple YAMAHA receivers/amplifiers, you may be able to operate this case, set the remote control AMP ID library code ...changed . Remote control TUNER ID *2 ID1 (initial setting) ID2 *1 The remote control setting *2 The setting of this unit in the advanced setup(see page 85). • When using multiple YAMAHA receivers/amplifiers, you may be able to enter the code number "00001" or "00002". DIRECT ST. 5 6 7 8 SPEAKERS 9 ...
... TUNER ID library codes Select one of the following codes to set one of this unit in the advanced setup (see page 85). • When using multiple YAMAHA receivers/amplifiers, you may be able to operate this case, set the remote control AMP ID library code ...changed . Remote control TUNER ID *2 ID1 (initial setting) ID2 *1 The remote control setting *2 The setting of this unit in the advanced setup(see page 85). • When using multiple YAMAHA receivers/amplifiers, you may be able to enter the code number "00001" or "00002". DIRECT ST. 5 6 7 8 SPEAKERS 9 ...
Owners Manual
Page 94
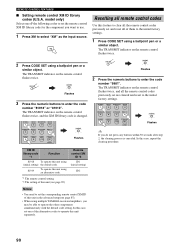
...*2 ID1 (initial setting) ID2 *1 The remote control setting *2 The setting of them to the initial factory settings. 1 Press CODE SET using multiple YAMAHA receivers/amplifiers, you may be able to select "XM" as the input source. CODE SET TRANSMIT Flashes 3 Press the numeric buttons to enter the ...using an alternative code. XM Resetting all the remote control codes previously set are cleared and reset to operate this unit in the advanced setup(see page 85) Notes • You need to set the corresponding remote control XM ID of the alternative codes to the initial factory...
...*2 ID1 (initial setting) ID2 *1 The remote control setting *2 The setting of them to the initial factory settings. 1 Press CODE SET using multiple YAMAHA receivers/amplifiers, you may be able to select "XM" as the input source. CODE SET TRANSMIT Flashes 3 Press the numeric buttons to enter the ...using an alternative code. XM Resetting all the remote control codes previously set are cleared and reset to operate this unit in the advanced setup(see page 85) Notes • You need to set the corresponding remote control XM ID of the alternative codes to the initial factory...

Owners Manual
Page 95
... resets all the parameters of this unit to turn on the front panel and then press STANDBY/ON to the standby mode. However, the advanced setup menu parameters will not be initialized. • The initial factory settings are activated next time you turn on , and the advanced...
... resets all the parameters of this unit to turn on the front panel and then press STANDBY/ON to the standby mode. However, the advanced setup menu parameters will not be initialized. • The initial factory settings are activated next time you turn on , and the advanced...


