

Quick Reference Guide
Page 7
... that is playing back and press RETURN. Only speakers configured for use in procedure 5 output the test tone. 12 Check that the test tone is outputting the test tone. To lower the volume: Press Cursor D. 16 Repeat steps 14 and 15 to adjust the...R Center speaker Surround speaker L Surround speaker R Subwoofer 15 If you have completed all speakers to your preference. 17 Press RETURN when setting is outputting the test tone, looking for use in a clockwise fashion. L Sur. Front speaker L Front speaker R Center speaker Surround speaker L Surround speaker R Subwoofer Setting feet...
... that is playing back and press RETURN. Only speakers configured for use in procedure 5 output the test tone. 12 Check that the test tone is outputting the test tone. To lower the volume: Press Cursor D. 16 Repeat steps 14 and 15 to adjust the...R Center speaker Surround speaker L Surround speaker R Subwoofer 15 If you have completed all speakers to your preference. 17 Press RETURN when setting is outputting the test tone, looking for use in a clockwise fashion. L Sur. Front speaker L Front speaker R Center speaker Surround speaker L Surround speaker R Subwoofer Setting feet...
Owners Manual
Page 2
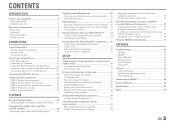
...menu 22 STEP 2: Set the speaker status and size 22 STEP 3: Set the distance from the listening point.......... 23 STEP 4: Playback a test tone 24 STEP 5: Adjust the volume 24 PLAYBACK Basic playback procedure 25 Adjusting high/low-frequency sound (Tone control) ..... 25 Changing input settings...55 Displaying/Setting the Advanced Setup menu 55 Setting the impedance of speakers 55 Avoiding crossing remote control signals when using multiple Yamaha receivers 56 Initializing various settings for this unit 56 Using the HDMI Control function 57 APPENDIX Troubleshooting 60 General 60 HDMI ...
...menu 22 STEP 2: Set the speaker status and size 22 STEP 3: Set the distance from the listening point.......... 23 STEP 4: Playback a test tone 24 STEP 5: Adjust the volume 24 PLAYBACK Basic playback procedure 25 Adjusting high/low-frequency sound (Tone control) ..... 25 Changing input settings...55 Displaying/Setting the Advanced Setup menu 55 Setting the impedance of speakers 55 Avoiding crossing remote control signals when using multiple Yamaha receivers 56 Initializing various settings for this unit 56 Using the HDMI Control function 57 APPENDIX Troubleshooting 60 General 60 HDMI ...
Owners Manual
Page 3
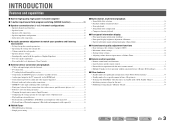
Setting for 2- Sound quality control with the equalizer Speaker layout...10 - Speaker impedance configuration...10 - Subwoofer cable connection ...12 ■ Acoustic parameter adjustment to 5.1-channel configurations - Speaker channels and functions ...9 - to match your speakers and listening environment - Speaker cable connection...10 - INTRODUCTION Features and capabilities ■ Built-in high-quality, high-power 5-channel amplifier ■ 1-button input/sound field program switching (SCENE function 26 ■ Speaker connections for speaker acoustic parameters...
Setting for 2- Sound quality control with the equalizer Speaker layout...10 - Speaker impedance configuration...10 - Subwoofer cable connection ...12 ■ Acoustic parameter adjustment to 5.1-channel configurations - Speaker channels and functions ...9 - to match your speakers and listening environment - Speaker cable connection...10 - INTRODUCTION Features and capabilities ■ Built-in high-quality, high-power 5-channel amplifier ■ 1-button input/sound field program switching (SCENE function 26 ■ Speaker connections for speaker acoustic parameters...
Owners Manual
Page 22
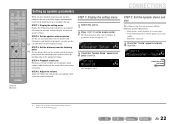
... 1: Display the setting menu Display the Setup menu from each speaker and configure them so that they output sound normally. CONFIG VOL. STEP 4: Playback a test tone Playback a test tone to allow you have finished connecting your settings are not necessary with the following steps to the next page i SETUP j ENTER J 1 : See the...
... 1: Display the setting menu Display the Setup menu from each speaker and configure them so that they output sound normally. CONFIG VOL. STEP 4: Playback a test tone Playback a test tone to allow you have finished connecting your settings are not necessary with the following steps to the next page i SETUP j ENTER J 1 : See the...

Owners Manual
Page 24
... HDMI 2 3 4 AV 2 3 4 AUDIO 1 2 V-AUX [ A ] [ B ] DOCK TUNER FM AM PRESET TUNING INFO MEMORY MOVIE ENHANCER SUR. TEST >Off On VOL. J 1 : Only speakers configured for all settings, press iSETUP to adjust the volume. J1 CONNECTIONS Setting up speaker parameters 16 Repeat steps 14 ...close the Setup menu. This completes step 4. DECODE MUSIC STEREO STRAIGHT BD DVD SETUP SCENE TV CD RADIO OPTION STEP 4: Playback a test tone 10 Press jCursor C repeatedly to display "Level" and press jENTER. This completes step 5. 18 Repeat procedures 10-12 (step 4)...
... HDMI 2 3 4 AV 2 3 4 AUDIO 1 2 V-AUX [ A ] [ B ] DOCK TUNER FM AM PRESET TUNING INFO MEMORY MOVIE ENHANCER SUR. TEST >Off On VOL. J 1 : Only speakers configured for all settings, press iSETUP to adjust the volume. J1 CONNECTIONS Setting up speaker parameters 16 Repeat steps 14 ...close the Setup menu. This completes step 4. DECODE MUSIC STEREO STRAIGHT BD DVD SETUP SCENE TV CD RADIO OPTION STEP 4: Playback a test tone 10 Press jCursor C repeatedly to display "Level" and press jENTER. This completes step 5. 18 Repeat procedures 10-12 (step 4)...
Owners Manual
Page 41
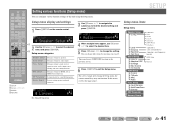
... auto-standby functions. HDMI VOL. SW L CR SL SR Ex: Sound Setup menu SETUP Setup menu items Setup menu Speaker Setup Config Level Distance Equalizer Test Tone Sound Setup Lipsync Adaptive DRC D.Range Max Volume Init.Volume HDMI Setup Control TVAudio ARC Audio Func. SOURCE 1 1 5 TRANSMIT CODE SET SLEEP RECEIVER HDMI...
... auto-standby functions. HDMI VOL. SW L CR SL SR Ex: Sound Setup menu SETUP Setup menu items Setup menu Speaker Setup Config Level Distance Equalizer Test Tone Sound Setup Lipsync Adaptive DRC D.Range Max Volume Init.Volume HDMI Setup Control TVAudio ARC Audio Func. SOURCE 1 1 5 TRANSMIT CODE SET SLEEP RECEIVER HDMI...
Owners Manual
Page 42
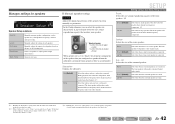
...channel and bass frequency audio from other channels. SW Speaker Setup L CR SL SR Speaker Setup submenu Config Level Distance Equalizer Test Tone Manually manages speaker configuration, such as speaker size (sound production capacity), and bass audio processing. Selects an equalizer to produce ...bass audio. Generates test tones. ■ Manual speaker setup Config Adjusts the output characteristics of audio signals transmitted from the front speakers if there ...
...channel and bass frequency audio from other channels. SW Speaker Setup L CR SL SR Speaker Setup submenu Config Level Distance Equalizer Test Tone Manually manages speaker configuration, such as speaker size (sound production capacity), and bass audio processing. Selects an equalizer to produce ...bass audio. Generates test tones. ■ Manual speaker setup Config Adjusts the output characteristics of audio signals transmitted from the front speakers if there ...

Owners Manual
Page 44
...adjust sound quality. En 44 Does not activate the equalizer. ■ Adjusting the graphic equalizer 1 When "EQ Select" is selected, test tones are adjusting 3 Press jCursor C repeatedly to select the frequency you have finished making adjustments, press iSETUP to adjust the volume. ...SL SR Frequency band Setting the volume level for each speaker, or whenever you adjust the settings on or off . Turn the test tone off when you can adjust the characteristics of circumstances. Lowering volume: Press jCursor D. ■ Adjusting sound quality with the equalizer...
...adjust sound quality. En 44 Does not activate the equalizer. ■ Adjusting the graphic equalizer 1 When "EQ Select" is selected, test tones are adjusting 3 Press jCursor C repeatedly to select the frequency you have finished making adjustments, press iSETUP to adjust the volume. ...SL SR Frequency band Setting the volume level for each speaker, or whenever you adjust the settings on or off . Turn the test tone off when you can adjust the characteristics of circumstances. Lowering volume: Press jCursor D. ■ Adjusting sound quality with the equalizer...

Owners Manual
Page 83
... the speaker that is playing back and press RETURN. This completes step 5. 18 Repeat procedures 10-12 (step 4) to stop playback of the test tone. 19 Once you have completed all speakers to your preference. 17 Press RETURN when setting is complete. If necessary, you select "On."... STEP 4: Playback a test tone 10 Press Cursor C repeatedly to display "Level" and press ENTER. Only speakers configured for all settings, press SETUP to close the Setup menu...
... the speaker that is playing back and press RETURN. This completes step 5. 18 Repeat procedures 10-12 (step 4) to stop playback of the test tone. 19 Once you have completed all speakers to your preference. 17 Press RETURN when setting is complete. If necessary, you select "On."... STEP 4: Playback a test tone 10 Press Cursor C repeatedly to display "Level" and press ENTER. Only speakers configured for all settings, press SETUP to close the Setup menu...

