Owners Manual
Page 2
...Bluetooth™ components....... 35 Connecting a Yamaha Bluetooth wireless audio receiver 35 Pairing Bluetooth™ components 35 Using Bluetooth™ components 36 SETUP Configuring the settings specific for each input source (Option menu 37 Option menu display and setup 37 Option menu items 37...that can be configured as needed (Advanced Setup menu 53 Displaying/Setting the Advanced Setup menu 53 Setting the impedance of speakers 53 Avoiding crossing remote control signals when using multiple Yamaha receivers 54 Initializing various settings for this unit 54 APPENDIX ...
...Bluetooth™ components....... 35 Connecting a Yamaha Bluetooth wireless audio receiver 35 Pairing Bluetooth™ components 35 Using Bluetooth™ components 36 SETUP Configuring the settings specific for each input source (Option menu 37 Option menu display and setup 37 Option menu items 37...that can be configured as needed (Advanced Setup menu 53 Displaying/Setting the Advanced Setup menu 53 Setting the impedance of speakers 53 Avoiding crossing remote control signals when using multiple Yamaha receivers 54 Initializing various settings for this unit 54 APPENDIX ...
Owners Manual
Page 3
Speaker channels and functions ...9 - Volume control for each speaker...42 - to match your speakers and listening environment - Subwoofer cable connection ...12 ■ Acoustic parameter adjustment to 5.1-channel configurations - Specifying the settings for each speaker 41 - Speaker layout...10 - INTRODUCTION Features and capabilities ■ Built-in high-quality, high-power 5-channel amplifier ■ 1-button input/sound field program switching (SCENE function 26 ■ Speaker connections for speaker acoustic parameters 22 - Speaker cable connection...10 - ...
Speaker channels and functions ...9 - Volume control for each speaker...42 - to match your speakers and listening environment - Subwoofer cable connection ...12 ■ Acoustic parameter adjustment to 5.1-channel configurations - Specifying the settings for each speaker 41 - Speaker layout...10 - INTRODUCTION Features and capabilities ■ Built-in high-quality, high-power 5-channel amplifier ■ 1-button input/sound field program switching (SCENE function 26 ■ Speaker connections for speaker acoustic parameters 22 - Speaker cable connection...10 - ...
Owners Manual
Page 4
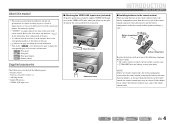
...AUX input cover ■ Attaching the VIDEO AUX input cover (included) To protect against dust, attach the supplied VIDEO AUX input cover to display the corresponding page in "Part names and functions." Refer to the corresponding numbers on the bottom of the page. • ☞ ... functions" (☞p. 5) for more than two minutes, or leaving exhausted batteries in the footnote. Front panel Rear panel Front panel display Remote control Supplied accessories Check that the reference is printed prior to change in the remote control, remove the battery compartment cover from the...
...AUX input cover ■ Attaching the VIDEO AUX input cover (included) To protect against dust, attach the supplied VIDEO AUX input cover to display the corresponding page in "Part names and functions." Refer to the corresponding numbers on the bottom of the page. • ☞ ... functions" (☞p. 5) for more than two minutes, or leaving exhausted batteries in the footnote. Front panel Rear panel Front panel display Remote control Supplied accessories Check that the reference is printed prior to change in the remote control, remove the battery compartment cover from the...
Owners Manual
Page 5
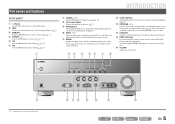
... this unit (☞p. 7). J1 e FM Sets the FM/AM tuner band to straight decoding mode (☞p. 27). J1 h Front panel display Displays information on and standby modes. Press either the left or right key repeatedly to cycle through the input sources in order. k SCENE Switches the... speakers/headphones (☞p. 25). o VIDEO AUX jacks For connecting video cameras, game consoles, and portable music players to switch on the front panel display (☞p. 7). PHONES SILENT CINEMA i J 1 : Usable when you are using this jack. b INFO Changes the information shown on the unit....
... this unit (☞p. 7). J1 e FM Sets the FM/AM tuner band to straight decoding mode (☞p. 27). J1 h Front panel display Displays information on and standby modes. Press either the left or right key repeatedly to cycle through the input sources in order. k SCENE Switches the... speakers/headphones (☞p. 25). o VIDEO AUX jacks For connecting video cameras, game consoles, and portable music players to switch on the front panel display (☞p. 7). PHONES SILENT CINEMA i J 1 : Usable when you are using this jack. b INFO Changes the information shown on the unit....
Owners Manual
Page 7
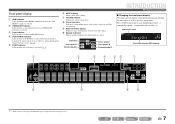
... muted. e SLEEP indicator Lights up when the sleep timer is active (☞p. 34). Press fINFO repeatedly to cycle through an optional Yamaha iPod universal dock (such as the active input source. En 7 d iPod CHARGE indicator Lights up when an iPod/iPhone is connected ...SW L CR SL SR Center speaker Front speaker R Surround speaker R INTRODUCTION Part names and functions ■ Changing the front panel display The front panel can display sound field programs and surround decoder names as well as YDS-12), and the iPod Standby Charge function is activated (☞p. 8).
... muted. e SLEEP indicator Lights up when the sleep timer is active (☞p. 34). Press fINFO repeatedly to cycle through an optional Yamaha iPod universal dock (such as the active input source. En 7 d iPod CHARGE indicator Lights up when an iPod/iPhone is connected ...SW L CR SL SR Center speaker Front speaker R Surround speaker R INTRODUCTION Part names and functions ■ Changing the front panel display The front panel can display sound field programs and surround decoder names as well as YDS-12), and the iPod Standby Charge function is activated (☞p. 8).
Owners Manual
Page 8
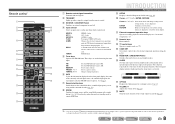
...MEMORY MOVIE ENHANCER SUR. FM Sets the FM/AM tuner band to AM. k External component operation keys Operate recording, playback, and menu displays etc. o RECEIVER A (RECEIVER Power) Switches this unit (☞p. 40). Adjusts the volume level (☞p. 25). En 8 These keys... to the previous screen when setting menus are displayed. g Sound selection keys Switch between on the unit. J 1 : You can use separate kExternal component operation keys for the sleep timer function. J1 DOCK A Yamaha iPod universal dock or Bluetooth wireless audio receiver ...
...MEMORY MOVIE ENHANCER SUR. FM Sets the FM/AM tuner band to AM. k External component operation keys Operate recording, playback, and menu displays etc. o RECEIVER A (RECEIVER Power) Switches this unit (☞p. 40). Adjusts the volume level (☞p. 25). En 8 These keys... to the previous screen when setting menus are displayed. g Sound selection keys Switch between on the unit. J 1 : You can use separate kExternal component operation keys for the sleep timer function. J1 DOCK A Yamaha iPod universal dock or Bluetooth wireless audio receiver ...
Owners Manual
Page 10
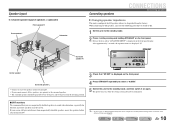
...needed (Advanced Setup menu)" for details on the Advanced Setup menu (☞p. 53). Release the keys when "ADVANCED SETUP" is displayed on the front panel. is dispatched from the factory. The power turns on again. If your screen still gets interference from magnetically ...shielded speakers, move the speakers farther away from the listening position. En 10 After approximately 3 seconds, the top menu items are displayed. J1 A STRAIGHT Center speaker 60q 60q 80q 80q Surround speaker R Surround speaker L • Connect at least two speakers (front left ...
...needed (Advanced Setup menu)" for details on the Advanced Setup menu (☞p. 53). Release the keys when "ADVANCED SETUP" is displayed on the front panel. is dispatched from the factory. The power turns on again. If your screen still gets interference from magnetically ...shielded speakers, move the speakers farther away from the listening position. En 10 After approximately 3 seconds, the top menu items are displayed. J1 A STRAIGHT Center speaker 60q 60q 80q 80q Surround speaker R Surround speaker L • Connect at least two speakers (front left ...
Owners Manual
Page 11
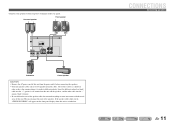
... Connect your speakers to indicate different polarity. One of these cables is switched on. This may damage this unit. will appear on the front panel display when this unit is a different color, or has a line running along it, to their respective terminals on this unit and the speakers, and the other...
... Connect your speakers to indicate different polarity. One of these cables is switched on. This may damage this unit. will appear on the front panel display when this unit is a different color, or has a line running along it, to their respective terminals on this unit and the speakers, and the other...
Owners Manual
Page 16
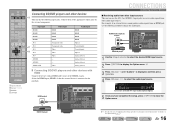
... input sources This unit can use the following input jacks. DECODE MUSIC STEREO STRAIGHT BD DVD SETUP SCENE TV CD RADIO OPTION ENTER VOLUME RETURN DISPLAY TOP MENU REC POP-UP MENU MUTE 1 2 3 4 5 6 7 8 9 INPUT MUTE 0 10 TV TV VOL TV CH ENT Connecting BD/DVD ... players and other devices d This unit has the following method to close the Option menu. Select the HDMI input (HDMI1-4) that the external device is displayed, and then press jENTER. 4 Press jCursor D / E to for details on "Configuring the settings specific for each input source (Option menu)" for...
... input sources This unit can use the following input jacks. DECODE MUSIC STEREO STRAIGHT BD DVD SETUP SCENE TV CD RADIO OPTION ENTER VOLUME RETURN DISPLAY TOP MENU REC POP-UP MENU MUTE 1 2 3 4 5 6 7 8 9 INPUT MUTE 0 10 TV TV VOL TV CH ENT Connecting BD/DVD ... players and other devices d This unit has the following method to close the Option menu. Select the HDMI input (HDMI1-4) that the external device is displayed, and then press jENTER. 4 Press jCursor D / E to for details on "Configuring the settings specific for each input source (Option menu)" for...
Owners Manual
Page 22
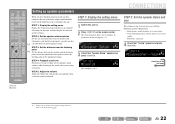
... Subwoofer: connected 4 Check that the sound from each speaker and configure them so that they output sound normally. STEP 1: Display the setting menu Display the Setup menu from the listening point j Set the distance between the speakers and the listening point so that "Config" appears...this unit appears. Carry out the following speaker configuration: - VOL. DECODE MUSIC STEREO STRAIGHT BD DVD SETUP SCENE TV CD RADIO OPTION ENTER VOLUME RETURN DISPLAY TOP MENU REC POP-UP MENU MUTE 1 2 3 4 5 6 7 8 9 INPUT MUTE 0 10 TV TV VOL TV CH ENT Setting ...
... Subwoofer: connected 4 Check that the sound from each speaker and configure them so that they output sound normally. STEP 1: Display the setting menu Display the Setup menu from the listening point j Set the distance between the speakers and the listening point so that "Config" appears...this unit appears. Carry out the following speaker configuration: - VOL. DECODE MUSIC STEREO STRAIGHT BD DVD SETUP SCENE TV CD RADIO OPTION ENTER VOLUME RETURN DISPLAY TOP MENU REC POP-UP MENU MUTE 1 2 3 4 5 6 7 8 9 INPUT MUTE 0 10 TV TV VOL TV CH ENT Setting ...
Owners Manual
Page 23
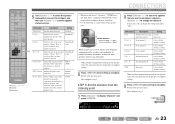
... effects sound and then configure them to the previous menu. DECODE MUSIC STEREO STRAIGHT BD DVD SETUP SCENE TV CD RADIO OPTION ENTER VOLUME RETURN DISPLAY TOP MENU REC POP-UP MENU MUTE 1 2 3 4 5 6 7 8 9 INPUT MUTE 0 10 TV TV VOL TV CH ENT j Cursor B / C / D / E j ENTER j RETURN 5 Use jCursor B / C to complete settings. This... R 1.0 ft to 80.0 ft (0.30 m to 24.0 m) SWFR Subwoofer 1.0 ft to 80.0 ft (0.30 m to 24.0 m) When you want to configure, and press jCursor D / E to display "Distance" and press jENTER.
... effects sound and then configure them to the previous menu. DECODE MUSIC STEREO STRAIGHT BD DVD SETUP SCENE TV CD RADIO OPTION ENTER VOLUME RETURN DISPLAY TOP MENU REC POP-UP MENU MUTE 1 2 3 4 5 6 7 8 9 INPUT MUTE 0 10 TV TV VOL TV CH ENT j Cursor B / C / D / E j ENTER j RETURN 5 Use jCursor B / C to complete settings. This... R 1.0 ft to 80.0 ft (0.30 m to 24.0 m) SWFR Subwoofer 1.0 ft to 80.0 ft (0.30 m to 24.0 m) When you want to configure, and press jCursor D / E to display "Distance" and press jENTER.
Owners Manual
Page 24
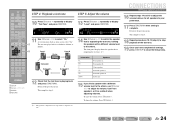
.... Use Front speaker L or R as you select "On." To raise the volume: Press jCursor E. To lower the volume: Press jCursor D. En 24 ENTER VOLUME RETURN DISPLAY TOP MENU REC POP-UP MENU MUTE j Front L Center Front R 1 2 3 4 5 6 7 8 9 INPUT MUTE 0 10 TV TV VOL TV CH ENT ... [ A ] [ B ] DOCK TUNER FM AM PRESET TUNING INFO MEMORY MOVIE ENHANCER SUR. SW L CR SL SR 11 Use jCursor D / E to display "Test Tone" and press jENTER. STEP 5: Adjust the volume 13 Press jCursor B repeatedly to the previous menu. d FL----d ---- i The test tone plays ...
.... Use Front speaker L or R as you select "On." To raise the volume: Press jCursor E. To lower the volume: Press jCursor D. En 24 ENTER VOLUME RETURN DISPLAY TOP MENU REC POP-UP MENU MUTE j Front L Center Front R 1 2 3 4 5 6 7 8 9 INPUT MUTE 0 10 TV TV VOL TV CH ENT ... [ A ] [ B ] DOCK TUNER FM AM PRESET TUNING INFO MEMORY MOVIE ENHANCER SUR. SW L CR SL SR 11 Use jCursor D / E to display "Test Tone" and press jENTER. STEP 5: Adjust the volume 13 Press jCursor B repeatedly to the previous menu. d FL----d ---- i The test tone plays ...
Owners Manual
Page 25
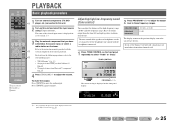
...C R SL SR 2 Press PROGRAM l / h to adjust the output level in those from the front left and right speakers to the previous display soon after you have selected as necessary (☞p. 46). Press sMUTE to adjust the volume. The name of the speakers or headphones can adjust the... TUNER FM AM PRESET TUNING INFO MEMORY MOVIE ENHANCER SUR. DECODE MUSIC STEREO STRAIGHT BD DVD SETUP SCENE TV CD RADIO OPTION ENTER VOLUME RETURN DISPLAY TOP MENU REC POP-UP MENU MUTE 1 2 3 4 5 6 7 8 9 INPUT MUTE 0 10 TV TV VOL TV CH ENT d Input selector r VOLUME +/s MUTE...
...C R SL SR 2 Press PROGRAM l / h to adjust the output level in those from the front left and right speakers to the previous display soon after you have selected as necessary (☞p. 46). Press sMUTE to adjust the volume. The name of the speakers or headphones can adjust the... TUNER FM AM PRESET TUNING INFO MEMORY MOVIE ENHANCER SUR. DECODE MUSIC STEREO STRAIGHT BD DVD SETUP SCENE TV CD RADIO OPTION ENTER VOLUME RETURN DISPLAY TOP MENU REC POP-UP MENU MUTE 1 2 3 4 5 6 7 8 9 INPUT MUTE 0 10 TV TV VOL TV CH ENT d Input selector r VOLUME +/s MUTE...
Owners Manual
Page 26
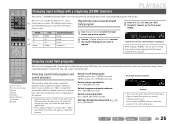
... SL SR Release the key when "SET Complete" is also equipped with a Yamaha digital sound field processing (DSP) chip. DECODE MUSIC STEREO STRAIGHT BD DVD SETUP SCENE TV CD RADIO OPTION ENTER VOLUME RETURN DISPLAY Changing input settings with a single key (SCENE function) This unit has a ...SCENE function that the remote control operates (☞p. 50). SCENE1 VOL. You can also use the speaker indicators on the front panel display to register. 3 Press the hSCENE key until "SET Complete" appears on the name or explanation of sound decoders. Four scenes are currently ...
... SL SR Release the key when "SET Complete" is also equipped with a Yamaha digital sound field processing (DSP) chip. DECODE MUSIC STEREO STRAIGHT BD DVD SETUP SCENE TV CD RADIO OPTION ENTER VOLUME RETURN DISPLAY Changing input settings with a single key (SCENE function) This unit has a ...SCENE function that the remote control operates (☞p. 50). SCENE1 VOL. You can also use the speaker indicators on the front panel display to register. 3 Press the hSCENE key until "SET Complete" appears on the name or explanation of sound decoders. Four scenes are currently ...
Owners Manual
Page 27
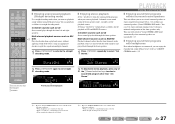
... Vienna SW L CR SL SR PLAYBACK Enjoying sound field programs ■ Enjoying sound field programs without any of the front speakers only. ENTER VOLUME RETURN DISPLAY TOP MENU REC POP-UP MENU MUTE 1 2 3 4 5 6 7 8 9 INPUT MUTE 0 10 TV TV VOL TV CH ENT 1 Press gSTRAIGHT to exit straight decoding mode. SW L CR...
... Vienna SW L CR SL SR PLAYBACK Enjoying sound field programs ■ Enjoying sound field programs without any of the front speakers only. ENTER VOLUME RETURN DISPLAY TOP MENU REC POP-UP MENU MUTE 1 2 3 4 5 6 7 8 9 INPUT MUTE 0 10 TV TV VOL TV CH ENT 1 Press gSTRAIGHT to exit straight decoding mode. SW L CR...

Owners Manual
Page 30
...frequency. Leave the decimal point out when entering a number. DECODE MUSIC STEREO STRAIGHT BD DVD SETUP SCENE TV CD RADIO OPTION ENTER VOLUME RETURN DISPLAY TOP MENU REC POP-UP MENU MUTE FM/AM tuning When using the FM/AM tuner, adjust the direction of receivable range. eTUNING H ...search automatically for a station on the remote control to receive. J2 For example, enter as follows to select a station on the front panel display when you enter a frequency that the frequency entered is out of the FM/AM antenna connected to this key for longer than the current ...
...frequency. Leave the decimal point out when entering a number. DECODE MUSIC STEREO STRAIGHT BD DVD SETUP SCENE TV CD RADIO OPTION ENTER VOLUME RETURN DISPLAY TOP MENU REC POP-UP MENU MUTE FM/AM tuning When using the FM/AM tuner, adjust the direction of receivable range. eTUNING H ...search automatically for a station on the remote control to receive. J2 For example, enter as follows to select a station on the front panel display when you enter a frequency that the frequency entered is out of the FM/AM antenna connected to this key for longer than the current ...
Owners Manual
Page 31
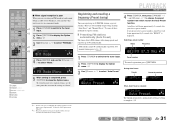
...Auto Preset VOL. SW L CR SL SR Preset number To cancel registration, press jRETURN. DECODE MUSIC STEREO e 2 Press qOPTION to display the Option menu. Use manual station preset (☞p. 32). Selecting a preset number Status Frequency READY VOL. 01:FM 87.5 MHz.... PLAYBACK FM/AM tuning 4 Press jENTER, then press ePRESET F / G or jCursor B / C to choose the preset number from which to the tuner input. q ENTER VOLUME RETURN DISPLAY TOP MENU REC POP-UP MENU MUTE 1 2 3 4 5 6 7 8 9 INPUT MUTE 0 10 TV TV VOL TV CH ENT d TUNER e PRESET F / G j Cursor B / C / ...
...Auto Preset VOL. SW L CR SL SR Preset number To cancel registration, press jRETURN. DECODE MUSIC STEREO e 2 Press qOPTION to display the Option menu. Use manual station preset (☞p. 32). Selecting a preset number Status Frequency READY VOL. 01:FM 87.5 MHz.... PLAYBACK FM/AM tuning 4 Press jENTER, then press ePRESET F / G or jCursor B / C to choose the preset number from which to the tuner input. q ENTER VOLUME RETURN DISPLAY TOP MENU REC POP-UP MENU MUTE 1 2 3 4 5 6 7 8 9 INPUT MUTE 0 10 TV TV VOL TV CH ENT d TUNER e PRESET F / G j Cursor B / C / ...
Owners Manual
Page 32
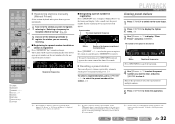
... TUNER FM AM PRESET TUNING INFO MEMORY MOVIE ENHANCER SUR. DECODE MUSIC STEREO STRAIGHT BD DVD SETUP SCENE TV CD RADIO OPTION ENTER VOLUME RETURN DISPLAY TOP MENU REC POP-UP MENU MUTE 1 2 3 4 5 6 7 8 9 INPUT MUTE 0 10 TV TV VOL TV CH ENT ■ Registering ...stations manually (Manual Preset) Select stations by hand and register them as presets individually. 1 Tune in Memory" is displayed when there are no q station is entered, "Wrong Num." J1 To select a registered station, press ePRESET F / G to select the preset ...
... TUNER FM AM PRESET TUNING INFO MEMORY MOVIE ENHANCER SUR. DECODE MUSIC STEREO STRAIGHT BD DVD SETUP SCENE TV CD RADIO OPTION ENTER VOLUME RETURN DISPLAY TOP MENU REC POP-UP MENU MUTE 1 2 3 4 5 6 7 8 9 INPUT MUTE 0 10 TV TV VOL TV CH ENT ■ Registering ...stations manually (Manual Preset) Select stations by hand and register them as presets individually. 1 Tune in Memory" is displayed when there are no q station is entered, "Wrong Num." J1 To select a registered station, press ePRESET F / G to select the preset ...
Owners Manual
Page 33
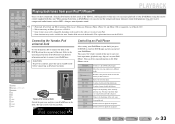
..., stop, skip etc) on the rear panel of this unit. DECODE MUSIC STEREO STRAIGHT BD DVD SETUP SCENE TV CD RADIO OPTION ENTER VOLUME RETURN DISPLAY TOP MENU REC POP-UP MENU MUTE 1 2 3 4 5 6 7 8 9 INPUT MUTE 0 10 TV TV VOL TV CH ENT d DOCK j...the iPod universal dock for playback. Switches between playback and pause. COMPONENT VIDEO PR HDMI OUT PR PB PB Y MONITOR OUT Y COMPON VIDEO OPTICA AV Yamaha iPod universal dock Switch the power on the iPod/ iPhone screen. Skips to different fields. dDOCK jCursor B / C jCursor D / E jENTER k w...
..., stop, skip etc) on the rear panel of this unit. DECODE MUSIC STEREO STRAIGHT BD DVD SETUP SCENE TV CD RADIO OPTION ENTER VOLUME RETURN DISPLAY TOP MENU REC POP-UP MENU MUTE 1 2 3 4 5 6 7 8 9 INPUT MUTE 0 10 TV TV VOL TV CH ENT d DOCK j...the iPod universal dock for playback. Switches between playback and pause. COMPONENT VIDEO PR HDMI OUT PR PB PB Y MONITOR OUT Y COMPON VIDEO OPTICA AV Yamaha iPod universal dock Switch the power on the iPod/ iPhone screen. Skips to different fields. dDOCK jCursor B / C jCursor D / E jENTER k w...
Owners Manual
Page 34
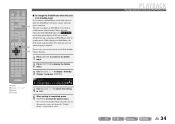
...this unit is finished. DOCK VOL. While charging an iPod/iPhone, the BD DVD SETUP SCENE TV CD RADIO OPTION iPod charge indicator lights. RETURN DISPLAY TOP MENU REC POP-UP MENU MUTE 1 Press dDOCK to switch to the DOCK input. 1 2 3 4 5 6 7 8 9 INPUT ...MUTE 0 10 TV TV VOL TV CH ENT d DOCK j Cursor B / C / D / E j ENTER q OPTION 2 Press qOPTION to display the Option menu. 3 Use jCursor B / C to "Off." 5 When setting is turned on the front panel display of this procedure again and change the "Standby Charge" setting back to close the Option menu. To re...
...this unit is finished. DOCK VOL. While charging an iPod/iPhone, the BD DVD SETUP SCENE TV CD RADIO OPTION iPod charge indicator lights. RETURN DISPLAY TOP MENU REC POP-UP MENU MUTE 1 Press dDOCK to switch to the DOCK input. 1 2 3 4 5 6 7 8 9 INPUT ...MUTE 0 10 TV TV VOL TV CH ENT d DOCK j Cursor B / C / D / E j ENTER q OPTION 2 Press qOPTION to display the Option menu. 3 Use jCursor B / C to "Off." 5 When setting is turned on the front panel display of this procedure again and change the "Standby Charge" setting back to close the Option menu. To re...


