
Owner's Manual
Page 1
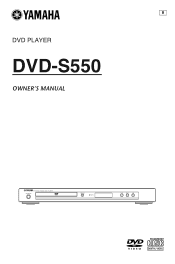
B DVD PLAYER DVD-S550 OWNER'S MANUAL
B DVD PLAYER DVD-S550 OWNER'S MANUAL
Owner's Manual
Page 5
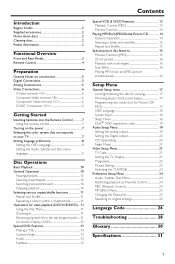
Introduction Region Codes 2 Supplied accessories 2 Notes about discs 2 Cleaning discs 2 Patent information 2 Functional Overview Front and Rear Panels 3 Remote Control 4 Preparation General Notes on connections 5 Digital Connections 5 Analog Connections 5 Video Connections 6 S-Video terminal
Introduction Region Codes 2 Supplied accessories 2 Notes about discs 2 Cleaning discs 2 Patent information 2 Functional Overview Front and Rear Panels 3 Remote Control 4 Preparation General Notes on connections 5 Digital Connections 5 Analog Connections 5 Video Connections 6 S-Video terminal
Owner's Manual
Page 6
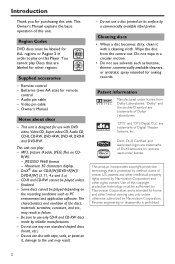
..."DTS" and "DTS Digital Out" are trademarks of this Player. patents and other rights owners. Use of Dolby Laboratories. You cannot play on it with DVD video, Video CD, Super video CD, Audio CD, CD-R, CD-RW, DVD+RW, DVD+R, DVD-R and DVD-RW. This unit is intended for analog records. materials, ...; When a disc becomes dirty, clean it , damage to the unit may result in ALL order to use a disc printed on CD-R[W]/DVD+R[W]/ DVD-R[W] (3.11, 4.x and 5.x) - This product incorporates copyright protection technology that are used under license from the centre out. Region Codes...
..."DTS" and "DTS Digital Out" are trademarks of this Player. patents and other rights owners. Use of Dolby Laboratories. You cannot play on it with DVD video, Video CD, Super video CD, Audio CD, CD-R, CD-RW, DVD+RW, DVD+R, DVD-R and DVD-RW. This unit is intended for analog records. materials, ...; When a disc becomes dirty, clean it , damage to the unit may result in ALL order to use a disc printed on CD-R[W]/DVD+R[W]/ DVD-R[W] (3.11, 4.x and 5.x) - This product incorporates copyright protection technology that are used under license from the centre out. Region Codes...
Owner's Manual
Page 8
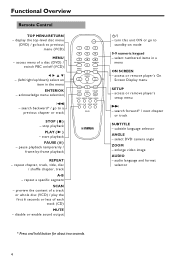
pause playback temporarily / frame-by-frame playback REPEAT - access or remove player's On Screen Display menu SETUP - subtitle language selector ANGLE - enlarge video image AUDIO - display the top-level disc menu (DVD) / go back to a previous chapter or track STOP ( 9 ) - repeat a ... language and format selector * Press and hold button for about two seconds. 4 Functional Overview Remote Control TOP MENU/RETURN - access or remove player's setup menu T - acknowledge menu selection S - repeat chapter, track, title, disc / shuffle chapter, track A-B - stop playback PLAY ...
pause playback temporarily / frame-by-frame playback REPEAT - access or remove player's On Screen Display menu SETUP - subtitle language selector ANGLE - enlarge video image AUDIO - display the top-level disc menu (DVD) / go back to a previous chapter or track STOP ( 9 ) - repeat a ... language and format selector * Press and hold button for about two seconds. 4 Functional Overview Remote Control TOP MENU/RETURN - access or remove player's setup menu T - acknowledge menu selection S - repeat chapter, track, title, disc / shuffle chapter, track A-B - stop playback PLAY ...
Owner's Manual
Page 10
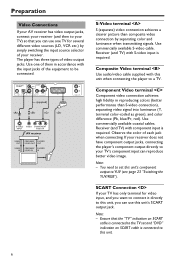
...and TV) with component input is required. You need to set and "DVD" indication on SCART cable is connected to the TV set this unit's ...'s SCART output jack. Use commercially available coaxial cables. Ensure that you can use this unit when connecting the player to your TV) so that the "TV" indication on SCART cable is connected to YUV (see page 23...(and TV) with S-video input is required. If your receiver does not have component output jacks, connecting the player's component output directly to your TV has only terminal for several different video sources (LD, VCR etc.) by ...
...and TV) with component input is required. You need to set and "DVD" indication on SCART cable is connected to the TV set this unit's ...'s SCART output jack. Use commercially available coaxial cables. Ensure that you can use this unit when connecting the player to your TV) so that the "TV" indication on SCART cable is connected to YUV (see page 23...(and TV) with S-video input is required. If your receiver does not have component output jacks, connecting the player's component output directly to your TV has only terminal for several different video sources (LD, VCR etc.) by ...
Owner's Manual
Page 11
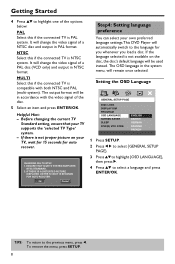
.... Refer to the correct Video IN channel. (eg. dusty places 1 Press SETUP. 2 Press 2 repeatedly to select {VIDEO SETUP PAGE}. 3 Press 34 to your TV This DVD Player is compatible with both NTSC and PAL. high humidity such as near a bath - extremely low temperature - Refer to your TV owner's manual for detail. 4 Turn...
.... Refer to the correct Video IN channel. (eg. dusty places 1 Press SETUP. 2 Press 2 repeatedly to select {VIDEO SETUP PAGE}. 3 Press 34 to your TV This DVD Player is compatible with both NTSC and PAL. high humidity such as near a bath - extremely low temperature - Refer to your TV owner's manual for detail. 4 Turn...
Owner's Manual
Page 12
.... It will automatically switch to the language for auto recover. Before changing the current TV Standard setting, ensure that your own preferred language settings.This DVD Player will change the video signal of the options below: PAL Select this if the connected TV is not proper picture on the disc, the disc...
.... It will automatically switch to the language for auto recover. Before changing the current TV Standard setting, ensure that your own preferred language settings.This DVD Player will change the video signal of the options below: PAL Select this if the connected TV is not proper picture on the disc, the disc...
Owner's Manual
Page 14
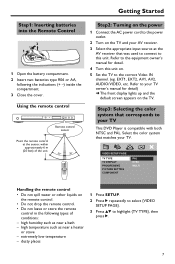
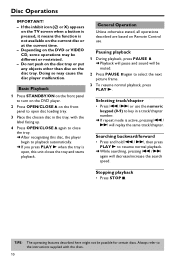
... select the next picture frame. 3 To resume normal playback, press PLAY B. Basic Playback 1 Press STANDBY/ON on the front panel to turn on the DVD player. 2 Press OPEN/CLOSE / on the front panel to resume normal playback. ➜ While searching, pressing S / T again will be muted. 2 ...not be different or restricted. - General Operation Unless otherwise stated, all operations described are based on the DVD or VIDEO CD, some operations may cause the disc player malfunction. Disc Operations IMPORTANT! - Doing so may be possible for certain discs. Depending on Remote Control ...
... select the next picture frame. 3 To resume normal playback, press PLAY B. Basic Playback 1 Press STANDBY/ON on the front panel to turn on the DVD player. 2 Press OPEN/CLOSE / on the front panel to resume normal playback. ➜ While searching, pressing S / T again will be muted. 2 ...not be different or restricted. - General Operation Unless otherwise stated, all operations described are based on the DVD or VIDEO CD, some operations may cause the disc player malfunction. Disc Operations IMPORTANT! - Doing so may be possible for certain discs. Depending on Remote Control ...
Owner's Manual
Page 21
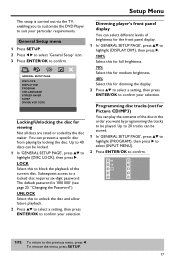
...Programming disc tracks (not for medium brightness. 40% Select this to block the playback of the disc in the order you to customize the DVD Player to confirm your selection. Up to 20 tracks can play the contents of the current disc. Subsequent access to the previous menu, press 1. ...To remove the menu, press SETUP. 17 Dimming player's front panel display You can select different levels of brightness for the front panel display. 1 In 'GENERAL SETUP PAGE', press 34 to highlight ...
...Programming disc tracks (not for medium brightness. 40% Select this to block the playback of the disc in the order you to customize the DVD Player to confirm your selection. Up to 20 tracks can play the contents of the current disc. Subsequent access to the previous menu, press 1. ...To remove the menu, press SETUP. 17 Dimming player's front panel display You can select different levels of brightness for the front panel display. 1 In 'GENERAL SETUP PAGE', press 34 to highlight ...
Owner's Manual
Page 22
To exit program playback 9 Use 1 234 to the previous menu, press 1. Sleep Timer This feature automatically sets the DVD player in standby mode after the amount of time you want to remove a track 6 Use 1 234 to move the cursor to the next position. ➜ If ...
To exit program playback 9 Use 1 234 to the previous menu, press 1. Sleep Timer This feature automatically sets the DVD player in standby mode after the amount of time you want to remove a track 6 Use 1 234 to move the cursor to the next position. ➜ If ...
Owner's Manual
Page 23
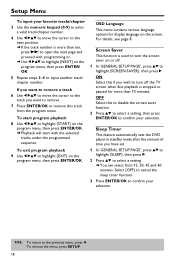
...then press 2. LT/RT Select this to reproduce the surround channels virtually. 2 Press 34 to select a setting, then press ENTER/OK to confirm your DVD Player's playback capability. 1 In 'AUDIO SETUP PAGE', press 34 to a Dolby Prologic decoder. AUDIO SETUP PAGE ANALOG OUTPUT DIGITAL AUDIO CD UPSAMPLING NIGHT MODE ...DivX® VOD service at www.divx.com/vod. To remove the menu, press SETUP. 19 Setup Menu DivX® VOD registration code Yamaha provide you with the DivX® VOD (Video On Demand) registration code that allows you to purchase or rent the videos from only the...
...then press 2. LT/RT Select this to reproduce the surround channels virtually. 2 Press 34 to select a setting, then press ENTER/OK to confirm your DVD Player's playback capability. 1 In 'AUDIO SETUP PAGE', press 34 to a Dolby Prologic decoder. AUDIO SETUP PAGE ANALOG OUTPUT DIGITAL AUDIO CD UPSAMPLING NIGHT MODE ...DivX® VOD service at www.divx.com/vod. To remove the menu, press SETUP. 19 Setup Menu DivX® VOD registration code Yamaha provide you with the DivX® VOD (Video On Demand) registration code that allows you to purchase or rent the videos from only the...
Owner's Manual
Page 24
... the sound quality. 48K Playback a disc recorded at a certain sampling rate. If you may need to adjust 'LPCM Output'. LPCM OUTPUT If you connect the DVD Player to a PCM compatible receiver via the digital terminals, such as coaxial or optical etc., you have connected your optional audio equipment connection. Discs are : 'Digital... jacks. ALL If you to convert your music CD to a multi-channel decoder/ receiver. CD Upsampling This feature allows you have activated the upsampling, the player will be muted to the previous menu, press 1.
... the sound quality. 48K Playback a disc recorded at a certain sampling rate. If you may need to adjust 'LPCM Output'. LPCM OUTPUT If you connect the DVD Player to a PCM compatible receiver via the digital terminals, such as coaxial or optical etc., you have connected your optional audio equipment connection. Discs are : 'Digital... jacks. ALL If you to convert your music CD to a multi-channel decoder/ receiver. CD Upsampling This feature allows you have activated the upsampling, the player will be muted to the previous menu, press 1.
Owner's Manual
Page 25
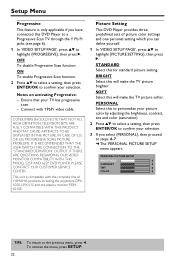
... not affect the picture during playback. 1 In 'VIDEO SETUP PAGE', press 34 to highlight {TV DISPLAY}, then press 2. 2 Press 34 to highlight one of the DVD Player according to the TV you have a widescreen TV. 3 Select an item and press ENTER/OK. Video Setup Menu 1 Press SETUP. 2 Press 1 2 to select 'Video Setup...
... not affect the picture during playback. 1 In 'VIDEO SETUP PAGE', press 34 to highlight {TV DISPLAY}, then press 2. 2 Press 34 to highlight one of the DVD Player according to the TV you have a widescreen TV. 3 Select an item and press ENTER/OK. Video Setup Menu 1 Press SETUP. 2 Press 1 2 to select 'Video Setup...
Owner's Manual
Page 26
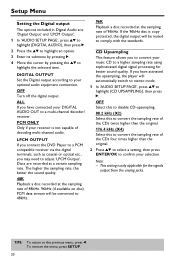
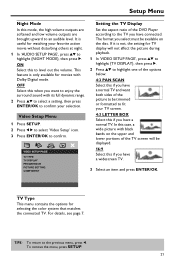
...➜ The 'PERSONAL PICTURE SETUP' menu appears. Picture Setting This DVD Player provides three predefined sets of YAMAHA products, including the projectors DPX1000, LPX-510 and the plasma monitor PDM4210E. SOFT Select this DVD Player to a Progressive Scan TV through the Y Pb Pr jacks (see ... press 1. Notes on activating Progressive: - IF THERE ARE QUESTIONS REGARDING OUR VIDEO MONITOR COMPATIBILITY WITH THIS MODEL 525P AND 625P DVD PLAYER, PLEASE CONTACT OUR CUSTOMER SERVICE CENTER. PERSONAL PICTURE SETUP BRIGHTNESS 0 CONTRAST 0 TINT 0 COLOR 0 TIPS: To return to...
...➜ The 'PERSONAL PICTURE SETUP' menu appears. Picture Setting This DVD Player provides three predefined sets of YAMAHA products, including the projectors DPX1000, LPX-510 and the plasma monitor PDM4210E. SOFT Select this DVD Player to a Progressive Scan TV through the Y Pb Pr jacks (see ... press 1. Notes on activating Progressive: - IF THERE ARE QUESTIONS REGARDING OUR VIDEO MONITOR COMPATIBILITY WITH THIS MODEL 525P AND 625P DVD PLAYER, PLEASE CONTACT OUR CUSTOMER SERVICE CENTER. PERSONAL PICTURE SETUP BRIGHTNESS 0 CONTRAST 0 TINT 0 COLOR 0 TIPS: To return to...
Owner's Manual
Page 32
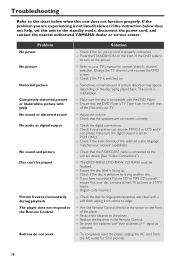
... depending on the front of the Disc and your receiver can 't be finalized. - This is connected to PCM ONLY. - Check that the DVD Player's TV Type is not listed below or if the instruction below when this unit to the Remote Control Buttons do not work Solution - Check if... your TV. - The DVD+R/RW, DVD-R/RW, CD-R/RW must be played Picture freezes momentarily during playback The player does not respond to the standby mode, disconnect the power cord, and contact the nearest authorized YAMAHA dealer or service center. Aim the Remote Control directly at...
... depending on the front of the Disc and your receiver can 't be finalized. - This is connected to PCM ONLY. - Check that the DVD Player's TV Type is not listed below or if the instruction below when this unit to the Remote Control Buttons do not work Solution - Check if... your TV. - The DVD+R/RW, DVD-R/RW, CD-R/RW must be played Picture freezes momentarily during playback The player does not respond to the standby mode, disconnect the power cord, and contact the nearest authorized YAMAHA dealer or service center. Aim the Remote Control directly at...
Owner's Manual
Page 33
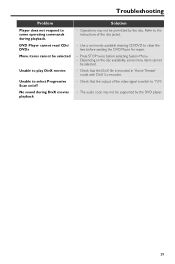
DVD Player cannot read CDs/ DVDs Menu items cannot be supported by the disc. The audio code may not be selected. - Refer to the instructions of the video signal is encoded ... movies playback Solution - Use a commonly available cleaning CD/DVD to clean the lens before selecting System Menu. - Depending on /off No sound during playback. Check that the DivX file is switch to 'YUV'. - Press STOP twice before sending the DVD Player for repair. - Troubleshooting Problem Player does not respond to some menu items cannot...
DVD Player cannot read CDs/ DVDs Menu items cannot be supported by the disc. The audio code may not be selected. - Refer to the instructions of the video signal is encoded ... movies playback Solution - Use a commonly available cleaning CD/DVD to clean the lens before selecting System Menu. - Depending on /off No sound during playback. Check that the DivX file is switch to 'YUV'. - Press STOP twice before sending the DVD Player for repair. - Troubleshooting Problem Player does not respond to some menu items cannot...

