Owner's Manual
Page 4
... to sudden temperature changes from use this unit for future reference. 2 Install this might damage the finish. The unit is designed to service this manual carefully. FOR CANADIAN CUSTOMERS To prevent electric shock, match wide blade of time (i.e., vacation), disconnect the AC power plug from the wall outlet. 15 Be sure to read this device. This Class B digital apparatus complies...
... to sudden temperature changes from use this unit for future reference. 2 Install this might damage the finish. The unit is designed to service this manual carefully. FOR CANADIAN CUSTOMERS To prevent electric shock, match wide blade of time (i.e., vacation), disconnect the AC power plug from the wall outlet. 15 Be sure to read this device. This Class B digital apparatus complies...

Owner's Manual
Page 5
... Connecting an AV receiver with 5.1ch/ digital input jacks 10 Video connections 11 Connecting the power cable 12 GETTING STARTED 13 Step 1: Inserting batteries into the remote control 13 Using the remote control 13 Step 2: Turning on the power 13 Step 3: Setting a TV type 14 Step 4: Setting a language preference ...... 15 Setting the OSD (On-Screen Display) language 15 Setting the audio, subtitle and disc menu languages 15 DISC OPERATION 16 Basic operation 16 Pausing playback 16 Selecting a track/chapter 16 Searching backward/forward 17 Repeat playback 17 Repeating playback...
... Connecting an AV receiver with 5.1ch/ digital input jacks 10 Video connections 11 Connecting the power cable 12 GETTING STARTED 13 Step 1: Inserting batteries into the remote control 13 Using the remote control 13 Step 2: Turning on the power 13 Step 3: Setting a TV type 14 Step 4: Setting a language preference ...... 15 Setting the OSD (On-Screen Display) language 15 Setting the audio, subtitle and disc menu languages 15 DISC OPERATION 16 Basic operation 16 Pausing playback 16 Selecting a track/chapter 16 Searching backward/forward 17 Repeat playback 17 Repeating playback...
Owner's Manual
Page 6
... Selecting the closed caption (U.S.A. Contents SETUP MENU 24 LANGUAGE CODE LIST 36 Menu overview 24 Setup menu operation 25 TROUBLESHOOTING 37 General setup menu 26 Selecting DVD-Audio mode 26 GLOSSARY 39 Selecting SA-CD mode 26 Setting the OSD language 26 Restricting playback with parental control ........ 26 SPECIFICATIONS 42 Changing the parental password 26 Setting the screen saver 27 Setting the auto power function 27 Setting the sleep timer 27 Resetting the system 27 Displaying the DivX® VOD registration code ... 27 Audio setup menu 28 Setting...
... Selecting the closed caption (U.S.A. Contents SETUP MENU 24 LANGUAGE CODE LIST 36 Menu overview 24 Setup menu operation 25 TROUBLESHOOTING 37 General setup menu 26 Selecting DVD-Audio mode 26 GLOSSARY 39 Selecting SA-CD mode 26 Setting the OSD language 26 Restricting playback with parental control ........ 26 SPECIFICATIONS 42 Changing the parental password 26 Setting the screen saver 27 Setting the auto power function 27 Setting the sleep timer 27 Resetting the system 27 Displaying the DivX® VOD registration code ... 27 Audio setup menu 28 Setting...

Owner's Manual
Page 10
... playing the multi-channel audio source. 5 D.MIX indicator (DVD-Audio only) Lights up when playing the disc that allows down mixing of the front panel display using DIMMER on the remote control. 6 En RANDOM ALL A B 7 1 P.SCAN indicator Lights up when the progressive scan function is activated. 2 Playback mode indicators Display the icon for the selected playback mode. 3 Decoder indicators Display the icon for the disc type. 7 Information display Displays various information such as a title/chapter/ track number or elapsed playing time. FUNCTIONAL OVERVIEW Front panel display...
... playing the multi-channel audio source. 5 D.MIX indicator (DVD-Audio only) Lights up when playing the disc that allows down mixing of the front panel display using DIMMER on the remote control. 6 En RANDOM ALL A B 7 1 P.SCAN indicator Lights up when the progressive scan function is activated. 2 Playback mode indicators Display the icon for the selected playback mode. 3 Decoder indicators Display the icon for the disc type. 7 Information display Displays various information such as a title/chapter/ track number or elapsed playing time. FUNCTIONAL OVERVIEW Front panel display...

Owner's Manual
Page 11
.... 5 REMOTE CONTROL (IN/OUT) connectors Use in custom installation. Electrostatic discharge may cause permanent damage to OFF.) Caution: Do not touch the inner pins of the jacks on the rear panel of your AV receiver. English Rear panel 1 23 4 56 FUNCTIONAL OVERVIEW 7 CENTER L COAXIAL L R SURROUND SUBWOOFER FRONT AUDIO OUT R MIXED 2CH OPTICAL DIGITAL HDMI AV IN VIDEO ON OFF RS-232C OUT REMOTE CONTROL PR / CR PB / CB Y S VIDEO COMPONENT VIDEO...
.... 5 REMOTE CONTROL (IN/OUT) connectors Use in custom installation. Electrostatic discharge may cause permanent damage to OFF.) Caution: Do not touch the inner pins of the jacks on the rear panel of your AV receiver. English Rear panel 1 23 4 56 FUNCTIONAL OVERVIEW 7 CENTER L COAXIAL L R SURROUND SUBWOOFER FRONT AUDIO OUT R MIXED 2CH OPTICAL DIGITAL HDMI AV IN VIDEO ON OFF RS-232C OUT REMOTE CONTROL PR / CR PB / CB Y S VIDEO COMPONENT VIDEO...
Owner's Manual
Page 13
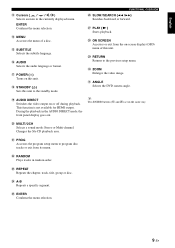
... backward or forward. j PLAY ( 3 ) Starts playback. o AUDIO DIRECT Switches the video output on this unit. a PROG Accesses the program setup menu to program disc tracks or exit from the on-screen display (OSD) menu of a disc. d REPEAT Repeats the chapter, track, title, group or disc. z ANGLE Selects the DVD camera angle. f A-B Repeats a specific segment. r MENU Accesses the menu of this unit. y Two ENTER buttons (e and g) act in the AUDIO DIRECT mode, the front panel display goes out. y AUDIO Selects the audio language or format. u POWER ( l ) Turns on...
... backward or forward. j PLAY ( 3 ) Starts playback. o AUDIO DIRECT Switches the video output on this unit. a PROG Accesses the program setup menu to program disc tracks or exit from the on-screen display (OSD) menu of a disc. d REPEAT Repeats the chapter, track, title, group or disc. z ANGLE Selects the DVD camera angle. f A-B Repeats a specific segment. r MENU Accesses the menu of this unit. y Two ENTER buttons (e and g) act in the AUDIO DIRECT mode, the front panel display goes out. y AUDIO Selects the audio language or format. u POWER ( l ) Turns on...
Owner's Manual
Page 15
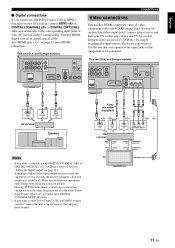
... you can use the Dolby Digital, DTS or MPEG function on your AV receiver, connect HDMI or DIGITAL (COAXIAL) or DIGITAL (OPTICAL) jack of this unit to an AV receiver that corresponds to the input jacks on the component to select the appropriate audio format from the menu screen on the disc. Make sure to be connected. Use the one TV for several different video sources (LD, VCR etc.) by simply switching the input source...
... you can use the Dolby Digital, DTS or MPEG function on your AV receiver, connect HDMI or DIGITAL (COAXIAL) or DIGITAL (OPTICAL) jack of this unit to an AV receiver that corresponds to the input jacks on the component to select the appropriate audio format from the menu screen on the disc. Make sure to be connected. Use the one TV for several different video sources (LD, VCR etc.) by simply switching the input source...
Owner's Manual
Page 16
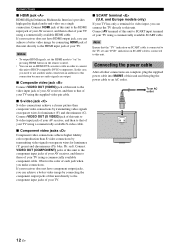
... unit to S-video input jack of this unit. and Europe models only) If your receiver does not have HDMI output jack, you make connections. Connecting the power cable After all other connections are output. ■ Composite video jack Connect VIDEO OUT (VIDEO) jack of your TV using a commercially available HDMI cable. Connect VIDEO OUT (S VIDEO) jack of your TV using the supplied video pin cable. ■ S-video jack S-video connections achieve a clearer picture than S-video connections by transmitting video signals on the remote control. • You...
... unit to S-video input jack of this unit. and Europe models only) If your receiver does not have HDMI output jack, you make connections. Connecting the power cable After all other connections are output. ■ Composite video jack Connect VIDEO OUT (VIDEO) jack of your TV using a commercially available HDMI cable. Connect VIDEO OUT (S VIDEO) jack of your TV using the supplied video pin cable. ■ S-video jack S-video connections achieve a clearer picture than S-video connections by transmitting video signals on the remote control. • You...

Owner's Manual
Page 17
... front panel display lights up orange. 5 Press STANDBY/ON on the front panel or POWER ( l ) on the remote control to turn on this unit and point it snaps into place. Refer to the manual supplied with your TV for details. 4 Press POWER switch on the front panel. ➜ The POWER indicator lights up . 6 Set the TV to the manual supplied with your AV receiver for details). ➜ The default screen...
... front panel display lights up orange. 5 Press STANDBY/ON on the front panel or POWER ( l ) on the remote control to turn on this unit and point it snaps into place. Refer to the manual supplied with your TV for details. 4 Press POWER switch on the front panel. ➜ The POWER indicator lights up . 6 Set the TV to the manual supplied with your AV receiver for details). ➜ The default screen...
Owner's Manual
Page 18
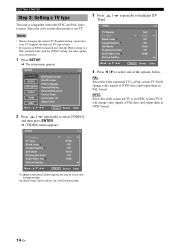
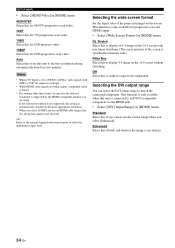
SETUP 1/2 GENERAL AUDIO SPEAKER VIDEO HDMI DISC Move : DVD-Audio mode SA-CD mode OSD Language Parental Rating Parental Password Screen Saver Auto Power Off Sleep Timer Return Select : Enter 3 Press / Type]. NTSC Select this if the connected TV is a PAL system TV. and Europe models. 14 En It will change video signals of the options below. and Canada models. *2: [Scart Video Out] is only for U.S.A. It will change video signals of PAL discs and output them in NTSC format. 2 Press / repeatedly to select one of NTSC discs and...
SETUP 1/2 GENERAL AUDIO SPEAKER VIDEO HDMI DISC Move : DVD-Audio mode SA-CD mode OSD Language Parental Rating Parental Password Screen Saver Auto Power Off Sleep Timer Return Select : Enter 3 Press / Type]. NTSC Select this if the connected TV is a PAL system TV. and Europe models. 14 En It will change video signals of the options below. and Canada models. *2: [Scart Video Out] is only for U.S.A. It will change video signals of PAL discs and output them in NTSC format. 2 Press / repeatedly to select one of NTSC discs and...
Owner's Manual
Page 25
... DivX discs with the desired font set, set default audio/subtitle languages in the disc menu or on disc characteristics or recording conditions. • Some external subtitle files may be loaded. This unit supports the following filename extensions of subtitle format are supported (note that these functions are available on page 15). Press PAGE (+/-) repeatedly to move to select an audio language. Press ANGLE repeatedly to the operating instructions in the setup menu (see "Setting the audio, subtitle and disc menu languages" on its jacket. Changing...
... DivX discs with the desired font set, set default audio/subtitle languages in the disc menu or on disc characteristics or recording conditions. • Some external subtitle files may be loaded. This unit supports the following filename extensions of subtitle format are supported (note that these functions are available on page 15). Press PAGE (+/-) repeatedly to move to select an audio language. Press ANGLE repeatedly to the operating instructions in the setup menu (see "Setting the audio, subtitle and disc menu languages" on its jacket. Changing...

Owner's Manual
Page 30
.... Enter your old four-digit password using the numeric buttons (0-9). (For details about the password, see "Setting the OSD (On-Screen Display) language" on the disc. SETUP MENU General setup menu SETUP GENERAL AUDIO SPEAKER VIDEO HDMI DISC Move : 1/2 DVD-Audio mode SA-CD mode OSD Language Parental Rating Parental Password Screen Saver Auto Power Off Sleep Timer Return Select : Enter Selecting DVD-Audio mode Some DVD-Audio discs contain the DVD-Video content in addition to select the rating level. • To disable parental controls and have all discs play back both SA-CD layer...
.... Enter your old four-digit password using the numeric buttons (0-9). (For details about the password, see "Setting the OSD (On-Screen Display) language" on the disc. SETUP MENU General setup menu SETUP GENERAL AUDIO SPEAKER VIDEO HDMI DISC Move : 1/2 DVD-Audio mode SA-CD mode OSD Language Parental Rating Parental Password Screen Saver Auto Power Off Sleep Timer Return Select : Enter Selecting DVD-Audio mode Some DVD-Audio discs contain the DVD-Video content in addition to select the rating level. • To disable parental controls and have all discs play back both SA-CD layer...

Owner's Manual
Page 31
... service at www.divx.com/vod. 1 Select [DivX Registration] in [GENERAL] menu. Mode 2 Select this to set this unit to rent and purchase videos using the numeric buttons (0-9). (For details about the password, see "Changing the parental password" on page 26.) ➜ The confirmation screen appears. Displaying the DivX® VOD registration code Yamaha provides you with the DivX® VOD (Video On Demand) registration code that allows you to the standby mode automatically when disc playback...
... service at www.divx.com/vod. 1 Select [DivX Registration] in [GENERAL] menu. Mode 2 Select this to set this unit to rent and purchase videos using the numeric buttons (0-9). (For details about the password, see "Changing the parental password" on page 26.) ➜ The confirmation screen appears. Displaying the DivX® VOD registration code Yamaha provides you with the DivX® VOD (Video On Demand) registration code that allows you to the standby mode automatically when disc playback...
Owner's Manual
Page 36
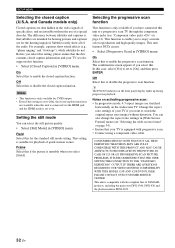
... PICTURE. Selecting the progressive scan function This function is only available for playback of the audio. IN CASE OF 525 OR 625 PROGRESSIVE SCAN PICTURE PROBLEMS, IT IS RECOMMENDED THAT THE USER SWITCH THE CONNECTION TO THE "STANDARD DEFINITION" OUTPUT. On Select this setting, please ensure that the disc contains closed caption information and your TV set to a progressive scan TV through the component video jacks (see "Selecting the wide screen format" on the front panel display lights up during progressive playback. Off Select...
... PICTURE. Selecting the progressive scan function This function is only available for playback of the audio. IN CASE OF 525 OR 625 PROGRESSIVE SCAN PICTURE PROBLEMS, IT IS RECOMMENDED THAT THE USER SWITCH THE CONNECTION TO THE "STANDARD DEFINITION" OUTPUT. On Select this setting, please ensure that the disc contains closed caption information and your TV set to a progressive scan TV through the component video jacks (see "Selecting the wide screen format" on the front panel display lights up during progressive playback. Off Select...
Owner's Manual
Page 37
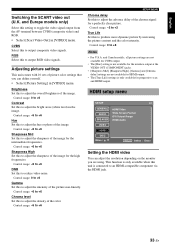
... picture color settings that you can adjust the resolution depending on the monitor you are not available for HDMI output. • The [True Life] settings is not available for a perfectly clear picture. Control range: 0 to an HDMI-compatible component via the HDMI jack. 33 En HDMI setup menu SETUP GENERAL AUDIO SPEAKER VIDEO HDMI DISC Move : 1/1 HDMI Video Wide Screen Format DVI Output Range HDMI Audio Return Select : Enter Setting the HDMI video You can define yourself. • Select [Picture Setting] in [VIDEO] menu. Control range: -6 to +6 Sharpness High Set...
... picture color settings that you can adjust the resolution depending on the monitor you are not available for HDMI output. • The [True Life] settings is not available for a perfectly clear picture. Control range: 0 to an HDMI-compatible component via the HDMI jack. 33 En HDMI setup menu SETUP GENERAL AUDIO SPEAKER VIDEO HDMI DISC Move : 1/1 HDMI Video Wide Screen Format DVI Output Range HDMI Audio Return Select : Enter Setting the HDMI video You can define yourself. • Select [Picture Setting] in [VIDEO] menu. Control range: -6 to +6 Sharpness High Set...
Owner's Manual
Page 38
Selecting the wide screen format Set the aspect ratio of the screen is connected to make no aspect ratio adjustment. Selecting the DVI output range You can select the DVI output range to select the appropriate aspect ratio. Auto Select this to set to the best resolution setting automatically based on your monitor to match the connected component. If the selected resolution is not supported, this unit to [NTSC] or [PAL], video signals with 480P or 576P are output accordingly. • While HDMI video signals are using. This...
Selecting the wide screen format Set the aspect ratio of the screen is connected to make no aspect ratio adjustment. Selecting the DVI output range You can select the DVI output range to select the appropriate aspect ratio. Auto Select this to set to the best resolution setting automatically based on your monitor to match the connected component. If the selected resolution is not supported, this unit to [NTSC] or [PAL], video signals with 480P or 576P are output accordingly. • While HDMI video signals are using. This...

Owner's Manual
Page 39
... MENU button on file sizes. 35 En Off Select this to match the connected component. This function is displayed continuously. y You can set playback control (PBC) to display a disc menu. An angle mark appears for the audio, subtitles and disc menus recorded on page 15. PCM Select this to turn off . For details, see "Using the Video CD playback control (PBC) menu (VCD/SVCD)" on or off the HDMI audio output. English SETUP MENU Setting the HDMI audio Set the HDMI audio output to output the decoded multi-channel or 2ch linear PCM audio signals...
... MENU button on file sizes. 35 En Off Select this to match the connected component. This function is displayed continuously. y You can set playback control (PBC) to display a disc menu. An angle mark appears for the audio, subtitles and disc menus recorded on page 15. PCM Select this to turn off . For details, see "Using the Video CD playback control (PBC) menu (VCD/SVCD)" on or off the HDMI audio output. English SETUP MENU Setting the HDMI audio Set the HDMI audio output to output the decoded multi-channel or 2ch linear PCM audio signals...
Owner's Manual
Page 41
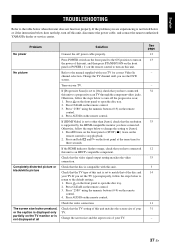
... the remote control to turn on the TV monitor or is not listed below or if the instruction below does not help, turn off this unit matches the screen size of your TV. English TROUBLESHOOTING TROUBLESHOOTING Refer to the table below when this unit to an HDCP-compatible component. If the HDMI indicator flashes orange, check that the video signal output setting matches the video connection. Change the screen size and the aspect ratio...
... the remote control to turn on the TV monitor or is not listed below or if the instruction below does not help, turn off this unit matches the screen size of your TV. English TROUBLESHOOTING TROUBLESHOOTING Refer to the table below when this unit to an HDCP-compatible component. If the HDMI indicator flashes orange, check that the video signal output setting matches the video connection. Change the screen size and the aspect ratio...
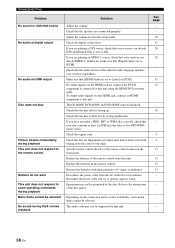
Owner's Manual
Page 42
... connected to the instructions of the selected audio language matches your receiver can decode MPEG-2. Check the disc for a few minutes. The audio code may not be permitted by the disc. Disconnect the power cable from the center to some menu items cannot be finalized. Aim the remote control directly at HDMI output Disc does not play Picture freezes momentarily during playback This unit does not respond to the remote control Buttons do not work This...
... connected to the instructions of the selected audio language matches your receiver can decode MPEG-2. Check the disc for a few minutes. The audio code may not be permitted by the disc. Disconnect the power cable from the center to some menu items cannot be finalized. Aim the remote control directly at HDMI output Disc does not play Picture freezes momentarily during playback This unit does not respond to the remote control Buttons do not work This...

Owner's Manual
Page 44
... can control DVD software distribution only to regions where they are three types of displaying all scanning lines in a frame at once, reducing flicker noticeable on video CDs. MPEG-1 offers VHS level video quality and is activated, playback will be played on digital photographs effectively. ■ MP3 (MPEG Audio Layer-3) An audio file compression technology. GLOSSARY ■ Interlace The most common type of scanning used on a larger screen and...
... can control DVD software distribution only to regions where they are three types of displaying all scanning lines in a frame at once, reducing flicker noticeable on video CDs. MPEG-1 offers VHS level video quality and is activated, playback will be played on digital photographs effectively. ■ MP3 (MPEG Audio Layer-3) An audio file compression technology. GLOSSARY ■ Interlace The most common type of scanning used on a larger screen and...


