

Owner's Manual
Page 5
... TEXT display • CD-RW compatible The receiver (RX-E400) and CD player (CDC-E500) are the main units of the YAMAHA Piano Craft Series. CONTENTS SUPPLIED ACCESSORIES 2 CD PREVENTIVE CARE 2 GETTING STARTED Notes on the transportation pad 3 Remote control 4 Connecting the speakers and antennas 5 Connecting the system 6 Setting the clock 7 Adjusting the brightness...
... TEXT display • CD-RW compatible The receiver (RX-E400) and CD player (CDC-E500) are the main units of the YAMAHA Piano Craft Series. CONTENTS SUPPLIED ACCESSORIES 2 CD PREVENTIVE CARE 2 GETTING STARTED Notes on the transportation pad 3 Remote control 4 Connecting the speakers and antennas 5 Connecting the system 6 Setting the clock 7 Adjusting the brightness...

Owner's Manual
Page 6
... by small particles of dust or fingerprints on the disc characteristics or recording conditions (copyrightprotected in a particular way, etc.). • Compact discs are contained. • Remote control POWER 1 2 3 1 2 3 4 5 6 4 5 6 7 8 9 7 8 0 +10 +100 REP RANDOM PROG A B C MODE TEXT/TIME DISC SKIP D E TAPE ...Batteries (AA, R6, UM-3) • AM loop antenna • Indoor FM antenna • Audio pin cable • System control cable CD PREVENTIVE CARE • This compact disc player is being handled can adversely affect the disc's play , but even so...
... by small particles of dust or fingerprints on the disc characteristics or recording conditions (copyrightprotected in a particular way, etc.). • Compact discs are contained. • Remote control POWER 1 2 3 1 2 3 4 5 6 4 5 6 7 8 9 7 8 0 +10 +100 REP RANDOM PROG A B C MODE TEXT/TIME DISC SKIP D E TAPE ...Batteries (AA, R6, UM-3) • AM loop antenna • Indoor FM antenna • Audio pin cable • System control cable CD PREVENTIVE CARE • This compact disc player is being handled can adversely affect the disc's play , but even so...
Owner's Manual
Page 8
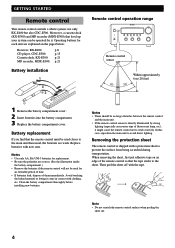
... on the pages below: Receiver, RX-E400: p.8 CD player, CDC-E500: p.15 Cassette deck, KX-E300: p.21 MD recorder, MDX-E300: p.21 Battery installation 1 3 2 Remote control operation range STANDBY/ON TIMER PHONES NATURAL SOUND STEREO RECEIVER RX-E400 VOLUME ... 2 Insert batteries into the battery compartment. 3 Replace the battery compartment cover. GETTING STARTED Remote control This remote control controls a whole system: not only RX-E400 but also CDC-E500. Replace batteries with clothing, etc. Clean the battery compartment thoroughly before installing new batteries. Removing...
... on the pages below: Receiver, RX-E400: p.8 CD player, CDC-E500: p.15 Cassette deck, KX-E300: p.21 MD recorder, MDX-E300: p.21 Battery installation 1 3 2 Remote control operation range STANDBY/ON TIMER PHONES NATURAL SOUND STEREO RECEIVER RX-E400 VOLUME ... 2 Insert batteries into the battery compartment. 3 Replace the battery compartment cover. GETTING STARTED Remote control This remote control controls a whole system: not only RX-E400 but also CDC-E500. Replace batteries with clothing, etc. Clean the battery compartment thoroughly before installing new batteries. Removing...

Owner's Manual
Page 11
...must reset the clock. The clock is disconnected for about 8 seconds, then the normal display returns. If you have connected the CD player (CDC-E500), cassette deck (KX-E300), and/or MD recorder (MDX-E300) to this unit. STANDBY/ON DISPLAY HOUR MIN STANDBY/ON TIMER PHONES NATURAL ...- + - + L R MIN MAX INPUT TIME ADJ PRESET/BAND 1 Turn on the power by pressing STANDBY/ON on the front panel, or POWER on the remote control. 2 While the power is on the display. DISPLAY STANDBY/ON TIMER PHONES NATURAL SOUND STEREO RECEIVER RX-E400 VOLUME DISPLAY MEMORY AUTO/MAN'L PRESET/BAND...
...must reset the clock. The clock is disconnected for about 8 seconds, then the normal display returns. If you have connected the CD player (CDC-E500), cassette deck (KX-E300), and/or MD recorder (MDX-E300) to this unit. STANDBY/ON DISPLAY HOUR MIN STANDBY/ON TIMER PHONES NATURAL ...- + - + L R MIN MAX INPUT TIME ADJ PRESET/BAND 1 Turn on the power by pressing STANDBY/ON on the front panel, or POWER on the remote control. 2 While the power is on the display. DISPLAY STANDBY/ON TIMER PHONES NATURAL SOUND STEREO RECEIVER RX-E400 VOLUME DISPLAY MEMORY AUTO/MAN'L PRESET/BAND...
Owner's Manual
Page 12
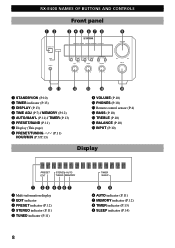
RX-E400 NAMES OF BUTTONS AND CONTROLS Front panel 12 3 45 6 7 8 9 STANDBY/ON NATURAL SOUND STEREO RECEIVER RX-E400 VOLUME TIMER PHONES DISPLAY MEMORY AUTO/MAN'L PRESET/BAND TIMER ADJ BASS... (P.7) / MEMORY (P.12) 5 AUTO/MAN'L (P.11) / TIMER (P.13) 6 PRESET/BAND (P.11) 7 Display (This page) 8 PRESET/TUNING / (P.11) HOUR/MIN (P.7/P.13) er t 9 VOLUME (P.10) 0 PHONES (P.10) q Remote control sensor (P.4) w BASS (P.10) e TREBLE (P.10) r BALANCE (P.10) t INPUT (P.10) Display PRESET EDIT STEREO AUTO TUNED MEMORY 1 23 456 7 1 Multi-information display 2 EDIT indicator 3 PRESET indicator...
RX-E400 NAMES OF BUTTONS AND CONTROLS Front panel 12 3 45 6 7 8 9 STANDBY/ON NATURAL SOUND STEREO RECEIVER RX-E400 VOLUME TIMER PHONES DISPLAY MEMORY AUTO/MAN'L PRESET/BAND TIMER ADJ BASS... (P.7) / MEMORY (P.12) 5 AUTO/MAN'L (P.11) / TIMER (P.13) 6 PRESET/BAND (P.11) 7 Display (This page) 8 PRESET/TUNING / (P.11) HOUR/MIN (P.7/P.13) er t 9 VOLUME (P.10) 0 PHONES (P.10) q Remote control sensor (P.4) w BASS (P.10) e TREBLE (P.10) r BALANCE (P.10) t INPUT (P.10) Display PRESET EDIT STEREO AUTO TUNED MEMORY 1 23 456 7 1 Multi-information display 2 EDIT indicator 3 PRESET indicator...

Owner's Manual
Page 13
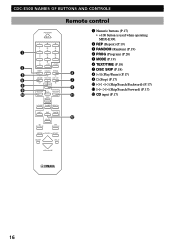
RX-E400 NAMES OF BUTTONS AND CONTROLS Remote control 1 2 3 POWER 1 2 3 1 2 3 4 5 6 4 5 6 7 8 9 7 8 0 +10 +100 REP RANDOM PROG A B C MODE TEXT/TIME DISC SKIP D E 4 6 0 TAPE DIRECTION PRESET TUNER PRESET MD CD ... q w 1 POWER (P.10) 2 Preset numbers (P.12) 3 A/B/C/D/E (P.12) 4 PRESET / (P.12) 5 TUNER (RX-E400) (P.12) 6 MD (MDX-E300) (P.21) 7 TAPE (KX-E300) (P.21) 8 CD (CDC-E500) (P.16) 9 AUX (The equipment connected to the AUX terminal) (P.6) 0 SLEEP (P.14) q DISPLAY (P.13) w VOLUME %/fi (P.10) Note • 5~9 are operation buttons and input selectors for...
RX-E400 NAMES OF BUTTONS AND CONTROLS Remote control 1 2 3 POWER 1 2 3 1 2 3 4 5 6 4 5 6 7 8 9 7 8 0 +10 +100 REP RANDOM PROG A B C MODE TEXT/TIME DISC SKIP D E 4 6 0 TAPE DIRECTION PRESET TUNER PRESET MD CD ... q w 1 POWER (P.10) 2 Preset numbers (P.12) 3 A/B/C/D/E (P.12) 4 PRESET / (P.12) 5 TUNER (RX-E400) (P.12) 6 MD (MDX-E300) (P.21) 7 TAPE (KX-E300) (P.21) 8 CD (CDC-E500) (P.16) 9 AUX (The equipment connected to the AUX terminal) (P.6) 0 SLEEP (P.14) q DISPLAY (P.13) w VOLUME %/fi (P.10) Note • 5~9 are operation buttons and input selectors for...
Owner's Manual
Page 14
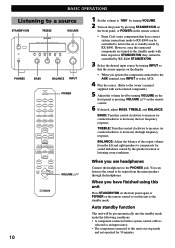
... desired input source by turning INPUT so that have finished using this unit Press STANDBY/ON on the front panel again or POWER on the remote control to set this unit is selected as an input source. • The component connected to this unit to the standby mode. BASIC OPERATIONS Listening... 10 1 Set the volume to "MIN" by turning VOLUME. 2 Turn on the power by pressing STANDBY/ON on the front panel, or POWER on the remote control. • Piano Craft series components that the source appears on the display. • When you operate the component connected to the AUX terminal, turn to...
... desired input source by turning INPUT so that have finished using this unit Press STANDBY/ON on the front panel again or POWER on the remote control to set this unit is selected as an input source. • The component connected to this unit to the standby mode. BASIC OPERATIONS Listening... 10 1 Set the volume to "MIN" by turning VOLUME. 2 Turn on the power by pressing STANDBY/ON on the front panel, or POWER on the remote control. • Piano Craft series components that the source appears on the display. • When you operate the component connected to the AUX terminal, turn to...

Owner's Manual
Page 16
To preset stations automatically 1 Select TUNER as input source by pressing PRESET/BAND and PRESET/TUNING / on the front panel or PRESET / , A/B/C/D/E and 1-8 on the remote control. Notes • A new setting can be stored. Continue pressing PRESET/TUNING / to 4 until all FM and AM stations are stored to 40 stations can be ...
To preset stations automatically 1 Select TUNER as input source by pressing PRESET/BAND and PRESET/TUNING / on the front panel or PRESET / , A/B/C/D/E and 1-8 on the remote control. Notes • A new setting can be stored. Continue pressing PRESET/TUNING / to 4 until all FM and AM stations are stored to 40 stations can be ...
Owner's Manual
Page 20
CDC-E500 NAMES OF BUTTONS AND CONTROLS Remote control 1 2 3 5 6 9 0 POWER 1 2 3 1 2 3 4 5 6 4 5 6 7 8 9 7 8 0 +10 +100 REP RANDOM PROG A B C MODE TEXT/TIME DISC SKIP D E TAPE DIRECTION PRESET TUNER PRESET MD CD TAPE AUX MD REC/PAUSE TAPE REC/...
CDC-E500 NAMES OF BUTTONS AND CONTROLS Remote control 1 2 3 5 6 9 0 POWER 1 2 3 1 2 3 4 5 6 4 5 6 7 8 9 7 8 0 +10 +100 REP RANDOM PROG A B C MODE TEXT/TIME DISC SKIP D E TAPE DIRECTION PRESET TUNER PRESET MD CD TAPE AUX MD REC/PAUSE TAPE REC/...
Owner's Manual
Page 21
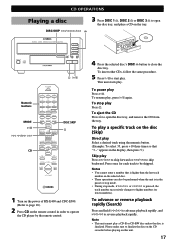
... button. (Example: To select 35, press +10 three times so that is in order to operate the CD player by the remote control. STANDBY/ON NATURAL SOUND COMPACT DISC PLAYER CDC-E500 DISC SKIP DISC 1 DISC 2 DISC 3 &^ POWER Numeric buttons MODE ^ $ !/⁄ › CD 1 2 3 1 2 3 4 5 6 4 5 6 7 8 9 7 8 0 +10 +100 ... rapidly, and $/! to close the disc tray. Please make sure to finalize the disc on the CD recorder before playing on the remote control in the pause or stop mode. • During stop play , press ^ again. Note • This unit cannot play Press ...
... button. (Example: To select 35, press +10 three times so that is in order to operate the CD player by the remote control. STANDBY/ON NATURAL SOUND COMPACT DISC PLAYER CDC-E500 DISC SKIP DISC 1 DISC 2 DISC 3 &^ POWER Numeric buttons MODE ^ $ !/⁄ › CD 1 2 3 1 2 3 4 5 6 4 5 6 7 8 9 7 8 0 +10 +100 ... rapidly, and $/! to close the disc tray. Please make sure to finalize the disc on the CD recorder before playing on the remote control in the pause or stop mode. • During stop play , press ^ again. Note • This unit cannot play Press ...
Owner's Manual
Page 22
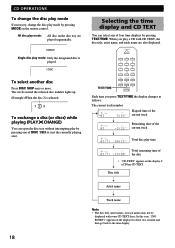
... MODE on the display for about two seconds and then go back to the time display. 18 In this case, "(NO ENTRY)" appears on the remote control.
... MODE on the display for about two seconds and then go back to the time display. 18 In this case, "(NO ENTRY)" appears on the remote control.

Owner's Manual
Page 29
...place. Noise from the TV or cover the TV's remote control sensor. The disc is dirty. The unit is striking the remote control sensor of the remote control are too weak. The disc has been loaded upside down. Clean the disc. Remote control is being subjected to play a disc. Replace the...functions strangely when the remote control is being used . There is delayed, or begins at an incorrect angle. Play is moisture on the laser pick-up . Relocate this unit away from inside of the unit. Securely connect the audio cables. CDC-E500 CD PLAYER ADDITIONAL INFORMATION ...
...place. Noise from the TV or cover the TV's remote control sensor. The disc is dirty. The unit is striking the remote control sensor of the remote control are too weak. The disc has been loaded upside down. Clean the disc. Remote control is being subjected to play a disc. Replace the...functions strangely when the remote control is being used . There is delayed, or begins at an incorrect angle. Play is moisture on the laser pick-up . Relocate this unit away from inside of the unit. Securely connect the audio cables. CDC-E500 CD PLAYER ADDITIONAL INFORMATION ...


