

Owner's Manual
Page 2
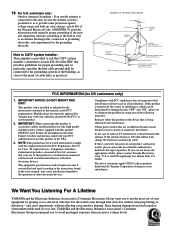
.... The user should be unplugged from the unit. 12 Cleaning - An outdoor antenna should not attempt to a wall or ceiling only as recommended by qualified service personnel when: A. The unit should be read before the unit is located on a bed, sofa, rug, or similar surface, that may impede the flow of this Owner's Manual in the operating instructions...
.... The user should be unplugged from the unit. 12 Cleaning - An outdoor antenna should not attempt to a wall or ceiling only as recommended by qualified service personnel when: A. The unit should be read before the unit is located on a bed, sofa, rug, or similar surface, that may impede the flow of this Owner's Manual in the operating instructions...
Owner's Manual
Page 3
... ohm ribbon lead, change the lead-in the users manual, may void your use the product. 2. If you to grounding electrodes, and requirements for US customers only) 1. PART H) FCC INFORMATION (for the grounding electrode. customers only: Outdoor Antenna Grounding - Compliance with regard to proper grounding of the mast and supporting structure, grounding of cable entry as indicated in the instructions...
... ohm ribbon lead, change the lead-in the users manual, may void your use the product. 2. If you to grounding electrodes, and requirements for US customers only) 1. PART H) FCC INFORMATION (for the grounding electrode. customers only: Outdoor Antenna Grounding - Compliance with regard to proper grounding of the mast and supporting structure, grounding of cable entry as indicated in the instructions...

Owner's Manual
Page 5
... Preset Tuning • SUBWOOFER Output Terminal • S-bit DAC and 8fs Digital Filter • Optical Digital Output • Random, Repeat, and Program Play • CD TEXT Display • Peak Level Search • Tape Programming The receiver (RX-E100) and CD player (CDX-E100) are the main units of the display 11 Before using the timer 12 Timer play and recording 12 Sleep timer 13 NAMES OF BUTTONS AND CONTROLS ..... 14 COMPACT DISC PLAYER OPERATIONS CD playback 16 Selecting the time display...
... Preset Tuning • SUBWOOFER Output Terminal • S-bit DAC and 8fs Digital Filter • Optical Digital Output • Random, Repeat, and Program Play • CD TEXT Display • Peak Level Search • Tape Programming The receiver (RX-E100) and CD player (CDX-E100) are the main units of the display 11 Before using the timer 12 Timer play and recording 12 Sleep timer 13 NAMES OF BUTTONS AND CONTROLS ..... 14 COMPACT DISC PLAYER OPERATIONS CD playback 16 Selecting the time display...

Owner's Manual
Page 6
... rear panel of this unit from use this manual carefully. Before setting this switch, disconnect the AC power plug of this unit) must be correctly set the VOLUME control to minimum before starting playback of an audio source: increase the volume gradually to an appropriate level after play has started. • When not planning to consume a very small quantity of power. and Europe models only) Be sure to turn...
... rear panel of this unit from use this manual carefully. Before setting this switch, disconnect the AC power plug of this unit) must be correctly set the VOLUME control to minimum before starting playback of an audio source: increase the volume gradually to an appropriate level after play has started. • When not planning to consume a very small quantity of power. and Europe models only) Be sure to turn...
Owner's Manual
Page 7
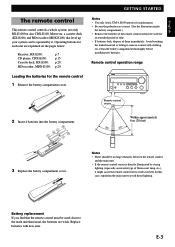
.... Remote control operation range NATURAL SOUND STEREO RECEIVER RX-E100 VOLUME DISPLAY MEMORY AUTO/MAN'L PRESET/BAND PRESET/TUNING STANDBY/ON PHONES TIME ADJ TIMER BASS HOUR TREBLE MIN BALANCE MIN MAX INPUT -+ -+ LR Remote control sensor 2 Insert 4 batteries into the battery compartment. Replace batteries with clothing, etc. Moreover, a cassette deck (KX-E100) and MD recorder (MDX-E100) that the remote control must be no large obstacles between the remote control and the main unit. • If the remote control sensor is directly illuminated...
.... Remote control operation range NATURAL SOUND STEREO RECEIVER RX-E100 VOLUME DISPLAY MEMORY AUTO/MAN'L PRESET/BAND PRESET/TUNING STANDBY/ON PHONES TIME ADJ TIMER BASS HOUR TREBLE MIN BALANCE MIN MAX INPUT -+ -+ LR Remote control sensor 2 Insert 4 batteries into the battery compartment. Replace batteries with clothing, etc. Moreover, a cassette deck (KX-E100) and MD recorder (MDX-E100) that the remote control must be no large obstacles between the remote control and the main unit. • If the remote control sensor is directly illuminated...

Owner's Manual
Page 8
Red: positive(+) Black: negative(-) 2 1 3 2 Connect the AM Antenna. Set up the AM loop antenna, then connect it. 3 Connect the FM Antenna. 75 Ω UNBAL FM ANT 4 Connect the AC power cord to the wall outlet until all connections are completed. To Connect the Subwoofer (optional) You can reinforce the bass frequencies by adding a subwoofer (optional). Connect the SUBWOOFER OUT terminal of the unit to the INPUT terminal of the speaker wires and insert...
Red: positive(+) Black: negative(-) 2 1 3 2 Connect the AM Antenna. Set up the AM loop antenna, then connect it. 3 Connect the FM Antenna. 75 Ω UNBAL FM ANT 4 Connect the AC power cord to the wall outlet until all connections are completed. To Connect the Subwoofer (optional) You can reinforce the bass frequencies by adding a subwoofer (optional). Connect the SUBWOOFER OUT terminal of the unit to the INPUT terminal of the speaker wires and insert...

Owner's Manual
Page 9
... system control cable. Take off the covers of RX-E100. Be sure to replace the terminal's cover when the terminal on the rear panel is for the UK model). English GETTING STARTED Connecting the system Connecting RX-E100 and CDX-E100 1 Connect ‰ to protect from dust. 5 AC OUTLET (CDX-E100) Connect the AC power plug of MDX-E100 or KX-E100 (Except for connecting MDX-E100 or KX-E100. 3 Connect the AC power plug of CDX-E100 to DIGITAL OPTICAL...
... system control cable. Take off the covers of RX-E100. Be sure to replace the terminal's cover when the terminal on the rear panel is for the UK model). English GETTING STARTED Connecting the system Connecting RX-E100 and CDX-E100 1 Connect ‰ to protect from dust. 5 AC OUTLET (CDX-E100) Connect the AC power plug of MDX-E100 or KX-E100 (Except for connecting MDX-E100 or KX-E100. 3 Connect the AC power plug of CDX-E100 to DIGITAL OPTICAL...

Owner's Manual
Page 11
...-E100 NAMES OF BUTTONS AND CONTROLS Remote control SLEEP A REP D PEAK TIME B RNDM DISP C PROG E TAPE MODE START VOLUME TAPE MD AUX CD TUNER MD REC PRESET TAPE REC TAPE ~ SLEEP (P.13) Ÿ DISP (Display) (P.11) ! A/B/C/D/E (P.10) ⁄ POWER (P.8) @ Preset numbers (P.10) ¤ VOLUME + - (P.8) # TAPE (KX-E100) (P.20) ‹ MD (MDX-E100) (P.20) $ AUX (The equipment connected to the AUX terminal) (P.5) › CD (CDX-E100) (P.16) % TUNER (RX-E100) (P.10) fi PRESET / (P.10) Note • #~fi are operation buttons and input selectors for each component. MODE...
...-E100 NAMES OF BUTTONS AND CONTROLS Remote control SLEEP A REP D PEAK TIME B RNDM DISP C PROG E TAPE MODE START VOLUME TAPE MD AUX CD TUNER MD REC PRESET TAPE REC TAPE ~ SLEEP (P.13) Ÿ DISP (Display) (P.11) ! A/B/C/D/E (P.10) ⁄ POWER (P.8) @ Preset numbers (P.10) ¤ VOLUME + - (P.8) # TAPE (KX-E100) (P.20) ‹ MD (MDX-E100) (P.20) $ AUX (The equipment connected to the AUX terminal) (P.5) › CD (CDX-E100) (P.16) % TUNER (RX-E100) (P.10) fi PRESET / (P.10) Note • #~fi are operation buttons and input selectors for each component. MODE...

Owner's Manual
Page 12
...standby mode. • The STANDBY indicator lights up. E-8 4 Play the source. (Refer to the owner's manual supplied with each selected component.) 5 Adjust the volume level by the speaker location or listening room conditions • These controls are only effective for 30 minutes. • TUNER or AUX is not selected as an input source. RX-E100 BASIC OPERATIONS Listening to a source PHONES TREBLE VOLUME NATURAL SOUND STEREO RECEIVER RX-E100 VOLUME TIMER STANTBY DISPLAY MEMORY AUTO/MAN'L PRESET/BAND PRESET/TUNING STANDBY/ON PHONES TIME ADJ TIMER BASS HOUR TREBLE MIN BALANCE...
...standby mode. • The STANDBY indicator lights up. E-8 4 Play the source. (Refer to the owner's manual supplied with each selected component.) 5 Adjust the volume level by the speaker location or listening room conditions • These controls are only effective for 30 minutes. • TUNER or AUX is not selected as an input source. RX-E100 BASIC OPERATIONS Listening to a source PHONES TREBLE VOLUME NATURAL SOUND STEREO RECEIVER RX-E100 VOLUME TIMER STANTBY DISPLAY MEMORY AUTO/MAN'L PRESET/BAND PRESET/TUNING STANDBY/ON PHONES TIME ADJ TIMER BASS HOUR TREBLE MIN BALANCE...
Owner's Manual
Page 13
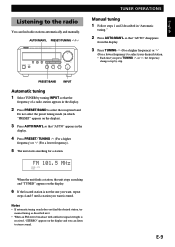
... 5 until a station you press TUNING or , the frequency changes step by turning INPUT so that "AUTO" appears in the display. 2 Press PRESET/BAND to stereo sound. PRESET/BAND INPUT Automatic tuning 1 Select TUNER by step. Notes • If automatic tuning search does not find radio stations automatically and manually. AUTO/MAN'L PRESET/TUNING / NATURAL SOUND STEREO RECEIVER RX-E100 VOLUME DISPLAY MEMORY AUTO/MAN'L PRESET/BAND PRESET/TUNING STANDBY/ON PHONES TIME ADJ TIMER BASS HOUR TREBLE MIN BALANCE MIN MAX INPUT -+ -+ LR TUNER OPERATIONS Manual tuning 1 Follow steps...
... 5 until a station you press TUNING or , the frequency changes step by turning INPUT so that "AUTO" appears in the display. 2 Press PRESET/BAND to stereo sound. PRESET/BAND INPUT Automatic tuning 1 Select TUNER by step. Notes • If automatic tuning search does not find radio stations automatically and manually. AUTO/MAN'L PRESET/TUNING / NATURAL SOUND STEREO RECEIVER RX-E100 VOLUME DISPLAY MEMORY AUTO/MAN'L PRESET/BAND PRESET/TUNING STANDBY/ON PHONES TIME ADJ TIMER BASS HOUR TREBLE MIN BALANCE MIN MAX INPUT -+ -+ LR TUNER OPERATIONS Manual tuning 1 Follow steps...
Owner's Manual
Page 14
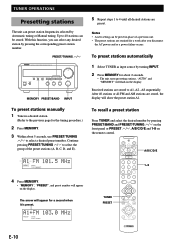
... MEMORY. • "MEMORY", "PRESET", and preset number will show the preset station A1. PRESET STEREO TUNED MEMORY TUNER PRESET VOLUME TAPE MD AUX CD TUNER PRESET MD REC TAPE REC TAPE MODE DUBBING START E-10 PRESET/TUNING / NATURAL SOUND STEREO RECEIVER RX-E100 VOLUME DISPLAY MEMORY AUTO/MAN'L PRESET/BAND PRESET/TUNING STANDBY/ON PHONES TIME ADJ TIMER BASS HOUR TREBLE MIN BALANCE MIN MAX INPUT -+ -+ LR MEMORY PRESET/BAND INPUT To preset stations manually 1 Tune in place of the preset stations (A, B, C, D, and E). 5 Repeat steps 1 to select the group of...
... MEMORY. • "MEMORY", "PRESET", and preset number will show the preset station A1. PRESET STEREO TUNED MEMORY TUNER PRESET VOLUME TAPE MD AUX CD TUNER PRESET MD REC TAPE REC TAPE MODE DUBBING START E-10 PRESET/TUNING / NATURAL SOUND STEREO RECEIVER RX-E100 VOLUME DISPLAY MEMORY AUTO/MAN'L PRESET/BAND PRESET/TUNING STANDBY/ON PHONES TIME ADJ TIMER BASS HOUR TREBLE MIN BALANCE MIN MAX INPUT -+ -+ LR MEMORY PRESET/BAND INPUT To preset stations manually 1 Tune in place of the preset stations (A, B, C, D, and E). 5 Repeat steps 1 to select the group of...

Owner's Manual
Page 15
... DISPLAY, turn INPUT clockwise to increase or counterclockwise to that "Dimmer ±0" appears on a 24-hour system for Australia and General models, and 12-hour system for about 8 seconds, then the normal display returns. DISPLAY HOUR MIN NATURAL SOUND STEREO RECEIVER RX-E100 VOLUME DISPLAY MEMORY AUTO/MAN'L PRESET/BAND PRESET/TUNING STANDBY/ON PHONES TIME ADJ TIMER BASS HOUR TREBLE MIN BALANCE MIN MAX INPUT -+ -+ LR TIME ADJ PRESET/BAND 1 While the power is automatically adjusted...
... DISPLAY, turn INPUT clockwise to increase or counterclockwise to that "Dimmer ±0" appears on a 24-hour system for Australia and General models, and 12-hour system for about 8 seconds, then the normal display returns. DISPLAY HOUR MIN NATURAL SOUND STEREO RECEIVER RX-E100 VOLUME DISPLAY MEMORY AUTO/MAN'L PRESET/BAND PRESET/TUNING STANDBY/ON PHONES TIME ADJ TIMER BASS HOUR TREBLE MIN BALANCE MIN MAX INPUT -+ -+ LR TIME ADJ PRESET/BAND 1 While the power is automatically adjusted...

Owner's Manual
Page 16
... have the unit turn on at a specified time and begin playing or recording automatically. For details, refer to the instructions supplied with TUNER or AUX, select "REC Mode OFF". (Example) Timer play with the MDX-E100 or KX-E100. 3. DISPLAY MIN NATURAL SOUND STEREO RECEIVER RX-E100 VOLUME DISPLAY MEMORY AUTO/MAN'L PRESET/BAND PRESET/TUNING STANDBY/ON PHONES TIME ADJ TIMER BASS HOUR TREBLE MIN BALANCE MIN MAX INPUT -+ -+ LR TIMER HOUR INPUT 1 Press DISPLAY. OFF Time Set the time the same way...
... have the unit turn on at a specified time and begin playing or recording automatically. For details, refer to the instructions supplied with TUNER or AUX, select "REC Mode OFF". (Example) Timer play with the MDX-E100 or KX-E100. 3. DISPLAY MIN NATURAL SOUND STEREO RECEIVER RX-E100 VOLUME DISPLAY MEMORY AUTO/MAN'L PRESET/BAND PRESET/TUNING STANDBY/ON PHONES TIME ADJ TIMER BASS HOUR TREBLE MIN BALANCE MIN MAX INPUT -+ -+ LR TIMER HOUR INPUT 1 Press DISPLAY. OFF Time Set the time the same way...
Owner's Manual
Page 19
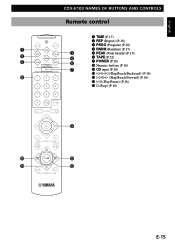
English CDX-E100 NAMES OF BUTTONS AND CONTROLS Remote control SLEEP A REP D PEAK TIME B RNDM DISP C PROG E TAPE ~ TIME (P.17) Ÿ REP (Repeat) (P.18) ! PROG (Program) (P.18) ⁄ RNDM (Random) (P.17) @ PEAK (Peak Search) (P.19) ¤ TAPE (P.22) # POWER (P.16) ‹ Numeric buttons (P.16) $ CD input (P.16) › $/! (Skip/Seach Backward) (P.16 Skip/Seach Forward) (P.16) fi ^ (Play/Pause) (P.16) ^ & (Stop) (P.16) VOLUME TAPE MD AUX CD TUNER PRESET MD REC TAPE REC TAPE MODE DUBBING START E-15
English CDX-E100 NAMES OF BUTTONS AND CONTROLS Remote control SLEEP A REP D PEAK TIME B RNDM DISP C PROG E TAPE ~ TIME (P.17) Ÿ REP (Repeat) (P.18) ! PROG (Program) (P.18) ⁄ RNDM (Random) (P.17) @ PEAK (Peak Search) (P.19) ¤ TAPE (P.22) # POWER (P.16) ‹ Numeric buttons (P.16) $ CD input (P.16) › $/! (Skip/Seach Backward) (P.16 Skip/Seach Forward) (P.16) fi ^ (Play/Pause) (P.16) ^ & (Stop) (P.16) VOLUME TAPE MD AUX CD TUNER PRESET MD REC TAPE REC TAPE MODE DUBBING START E-15

Owner's Manual
Page 20
.... &^ NATURAL SOUND COMPACT DISC PLAYER CDX-E100 STANDBY/ON STANDBY/ON $/! ⁄/› SLEEP A REP D PEAK TIME B RNDM DISP C PROG E TAPE POWER Numeric buttons $/!/›/⁄ VOLUME TAPE MD AUX CD TUNER PRESET MD REC TAPE REC TAPE MODE DUBBING START CD ^ & To play CDs 1 Press STANDBY/ON to turn on this unit and also RX-E100. 2 Press CD on the remote control in the display, then press 5.) Skip play , press ^ again. To play a specific track on the disc. • These operations can...
.... &^ NATURAL SOUND COMPACT DISC PLAYER CDX-E100 STANDBY/ON STANDBY/ON $/! ⁄/› SLEEP A REP D PEAK TIME B RNDM DISP C PROG E TAPE POWER Numeric buttons $/!/›/⁄ VOLUME TAPE MD AUX CD TUNER PRESET MD REC TAPE REC TAPE MODE DUBBING START CD ^ & To play CDs 1 Press STANDBY/ON to turn on this unit and also RX-E100. 2 Press CD on the remote control in the display, then press 5.) Skip play , press ^ again. To play a specific track on the disc. • These operations can...

Owner's Manual
Page 23
... of the program. Press the numeric button of the recording volume level. Press PEAK while the player is stopped or the tray is stopped, press &. When found, the unit plays the peak level for optimum adjustment of the desired track. Note • › or $ can find the peak sound level on the CD for 4 seconds repeatedly. English COMPACT DISC PLAYER OPERATIONS To stop program play. 2. Press...
... of the program. Press the numeric button of the recording volume level. Press PEAK while the player is stopped or the tray is stopped, press &. When found, the unit plays the peak level for optimum adjustment of the desired track. Note • › or $ can find the peak sound level on the CD for 4 seconds repeatedly. English COMPACT DISC PLAYER OPERATIONS To stop program play. 2. Press...
Owner's Manual
Page 26
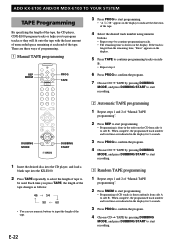
... the tape, the CD player, CDX-E100 programs tracks or helps you press TAPE, the length of the tape changes as follows: 46 54 90 60 • You can use numeric buttons to input the length of the tape. 2 Automatic TAPE programming 1 Repeat steps 1 and 2 of "Manual TAPE programming". 2 Press REP to start programming. • Programming is done in the order on the CD from side A to side B. Each time you...
... the tape, the CD player, CDX-E100 programs tracks or helps you press TAPE, the length of the tape changes as follows: 46 54 90 60 • You can use numeric buttons to input the length of the tape. 2 Automatic TAPE programming 1 Repeat steps 1 and 2 of "Manual TAPE programming". 2 Press REP to start programming. • Programming is done in the order on the CD from side A to side B. Each time you...
Owner's Manual
Page 27
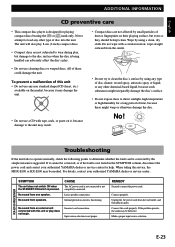
... YAMAHA dealer or service center. Loose speaker connections. CAUSE The AC power cord is pressed. Make a proper input source selection. For details, contact your authorized YAMAHA dealer or service center for playing compact discs bearing the or mark only. Wipe by using a clean, dry cloth. Unplug the AC power cord from one speaker. Do not wipe with this unit • Do not use cleaning discs or warped discs. Troubleshooting If the unit fails to operate...
... YAMAHA dealer or service center. Loose speaker connections. CAUSE The AC power cord is pressed. Make a proper input source selection. For details, contact your authorized YAMAHA dealer or service center for playing compact discs bearing the or mark only. Wipe by using a clean, dry cloth. Unplug the AC power cord from one speaker. Do not wipe with this unit • Do not use cleaning discs or warped discs. Troubleshooting If the unit fails to operate...

Owner's Manual
Page 28
.... The disc may be warped. Improper cable connections. Direct sunlight or lighting (of an inverter type of the unit. Replace the disc. CDX-E100 CD PLAYER REMOTE CONTROL E-24 Cannot set with low voltage. Play is not connected securely. Noise from the thermostat of the unit. The remote control does not work . Interference from inside of a nearby electrical appliance. Reprogram memory presets. Properly connect the AM loop antenna. The system cable is delayed, or...
.... The disc may be warped. Improper cable connections. Direct sunlight or lighting (of an inverter type of the unit. Replace the disc. CDX-E100 CD PLAYER REMOTE CONTROL E-24 Cannot set with low voltage. Play is not connected securely. Noise from the thermostat of the unit. The remote control does not work . Interference from inside of a nearby electrical appliance. Reprogram memory presets. Properly connect the AM loop antenna. The system cable is delayed, or...
Owner's Manual
Page 29
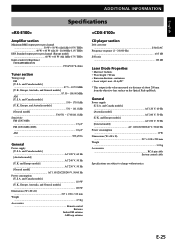
... Optical Pick-up Block. and Canada models AC 120 V, 60 Hz [Australia model AC 240 V, 50 Hz [U.K. English ADDITIONAL INFORMATION Specifications Amplifier section Minimum RMS output power per channel 50 W + 50 W (6Ω 1kHz 0.07% THD 40 W + 40 W (6Ω 20 - 20,000Hz 0.1% THD) DIN Standard output power per channel (Europe model 60 W + 60 W (4Ω 1kHz 0.7% THD) Input sensitivity/Impedance CD/TAPE/MD/AUX 150 mV/47 k-ohms Tuner section Tuning range...
... Optical Pick-up Block. and Canada models AC 120 V, 60 Hz [Australia model AC 240 V, 50 Hz [U.K. English ADDITIONAL INFORMATION Specifications Amplifier section Minimum RMS output power per channel 50 W + 50 W (6Ω 1kHz 0.07% THD 40 W + 40 W (6Ω 20 - 20,000Hz 0.1% THD) DIN Standard output power per channel (Europe model 60 W + 60 W (4Ω 1kHz 0.7% THD) Input sensitivity/Impedance CD/TAPE/MD/AUX 150 mV/47 k-ohms Tuner section Tuning range...


