

Owner's Manual
Page 4
CONTENTS CAUTION 1 NOTES ABOUT DISCS 2 FEATURES 3 UNPACKING 3 NOTES ABOUT THE REMOTE CONTROL 4 CONNECTIONS 5 IDENTIFICATION OF COMPONENTS 6 BASIC OPERATION 8 To pause play 9 To stop play 9 To turn off the power 9 To play directly from the desired track 9 ...
CONTENTS CAUTION 1 NOTES ABOUT DISCS 2 FEATURES 3 UNPACKING 3 NOTES ABOUT THE REMOTE CONTROL 4 CONNECTIONS 5 IDENTIFICATION OF COMPONENTS 6 BASIC OPERATION 8 To pause play 9 To stop play 9 To turn off the power 9 To play directly from the desired track 9 ...
Owner's Manual
Page 7
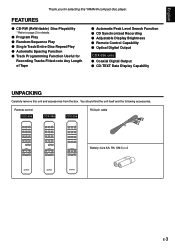
...Disc Repeat Play ⅷ Automatic Spacing Function ⅷ Track Programming Function Useful for selecting this unit and accessories from the box. Remote control CDX-596 CDX-496 CDX-396 RCA pin cable OPEN/ SYNCHRO DIMMER CLOSE SPACE TEXT/ TIME PEAK TAPE CLEAR PROG 1 2 3 4 5 6 7 8... Recording ⅷ Adjustable Display Brightness ⅷ Remote Control Capability ⅷ Optical Digital Output CDX-596 only ⅷ Coaxial Digital Output ⅷ CD-TEXT Data Display Capability UNPACKING Carefully remove this YAMAHA compact disc player. OUTPUT LEVEL + REPEAT RANDOM...
...Disc Repeat Play ⅷ Automatic Spacing Function ⅷ Track Programming Function Useful for selecting this unit and accessories from the box. Remote control CDX-596 CDX-496 CDX-396 RCA pin cable OPEN/ SYNCHRO DIMMER CLOSE SPACE TEXT/ TIME PEAK TAPE CLEAR PROG 1 2 3 4 5 6 7 8... Recording ⅷ Adjustable Display Brightness ⅷ Remote Control Capability ⅷ Optical Digital Output CDX-596 only ⅷ Coaxial Digital Output ⅷ CD-TEXT Data Display Capability UNPACKING Carefully remove this YAMAHA compact disc player. OUTPUT LEVEL + REPEAT RANDOM...
Owner's Manual
Page 8
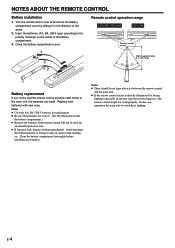
... sliding it come in the direction of them immediately. Close the battery compartment cover. 1 3 2 Remote control operation range CDX-596, CDX-496 CDX-396 Remote control sensor Within approximately 6 m (19.7 feet) 30° 30° Battery replacement If you notice that the remote control must be used for an extended period of time. ● If batteries leak...
... sliding it come in the direction of them immediately. Close the battery compartment cover. 1 3 2 Remote control operation range CDX-596, CDX-496 CDX-396 Remote control sensor Within approximately 6 m (19.7 feet) 30° 30° Battery replacement If you notice that the remote control must be used for an extended period of time. ● If batteries leak...
Owner's Manual
Page 10
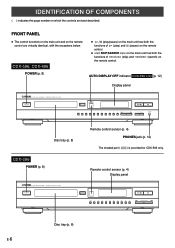
... NATURAL SOUND COMPACT DISC PLAYER POWER OPEN/CLOSE AUTO DISPLAY OFF 10 1 2 3 4 5 6 7 8 9 0 SKIP/SEARCH OUTPUT LEVEL PHONES Disc tray (p. 8) CDX-396 POWER (p. 8) Remote control sensor (p. 4) PHONES jack (p. 12) The shaded part ( ) is provided for CDX-596 only. IDENTIFICATION OF COMPONENTS ( ) indicates the page number on which the controls are virtually identical, with the exceptions...
... NATURAL SOUND COMPACT DISC PLAYER POWER OPEN/CLOSE AUTO DISPLAY OFF 10 1 2 3 4 5 6 7 8 9 0 SKIP/SEARCH OUTPUT LEVEL PHONES Disc tray (p. 8) CDX-396 POWER (p. 8) Remote control sensor (p. 4) PHONES jack (p. 12) The shaded part ( ) is provided for CDX-596 only. IDENTIFICATION OF COMPONENTS ( ) indicates the page number on which the controls are virtually identical, with the exceptions...
Owner's Manual
Page 11
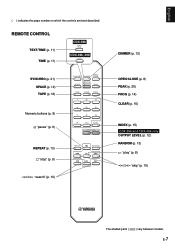
English ( ) indicates the page number on which the controls are best described. REMOTE CONTROL TEXT/TIME (p. 11) TIME (p. 11) CDX-596 TEXT/ TIME CDX-496, 396 TIME SYNCHRO (p. 21) SPACE (p. 12) TAPE (p. 16) Numeric buttons (p. 9) "pause" (p. 9) OPEN/ SYNCHRO DIMMER CLOSE SPACE PEAK TAPE CLEAR PROG 1 2 3 4 5 6 7 8 9 0 +I0 INDEX - E-7 OUTPUT LEVEL + REPEAT (p. 13) "...
English ( ) indicates the page number on which the controls are best described. REMOTE CONTROL TEXT/TIME (p. 11) TIME (p. 11) CDX-596 TEXT/ TIME CDX-496, 396 TIME SYNCHRO (p. 21) SPACE (p. 12) TAPE (p. 16) Numeric buttons (p. 9) "pause" (p. 9) OPEN/ SYNCHRO DIMMER CLOSE SPACE PEAK TAPE CLEAR PROG 1 2 3 4 5 6 7 8 9 0 +I0 INDEX - E-7 OUTPUT LEVEL + REPEAT (p. 13) "...
Owner's Manual
Page 12
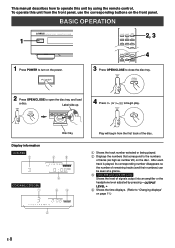
... 3 4 1 Press POWER to turn on the front panel. POWER 3 Press OPEN/CLOSE to close the disc tray. Disc tray Display information CDX-596 1 2 3 3 4 5 6 7 8 9 10 11 12 CDX-496, CDX-396 1 4 43 2 Play will begin play. OUTPUT LEVEL +. 4 Shows the time displays. (Refer to "Changing displays" on the disc. This... Displays the numbers that correspond to the numbers of signals output into an amplifier or the headphone level adjusted by using the remote control. After each track is played, its corresponding number disappears so the number of remaining tracks (and their numbers) can be ...
... 3 4 1 Press POWER to turn on the front panel. POWER 3 Press OPEN/CLOSE to close the disc tray. Disc tray Display information CDX-596 1 2 3 3 4 5 6 7 8 9 10 11 12 CDX-496, CDX-396 1 4 43 2 Play will begin play. OUTPUT LEVEL +. 4 Shows the time displays. (Refer to "Changing displays" on the disc. This... Displays the numbers that correspond to the numbers of signals output into an amplifier or the headphone level adjusted by using the remote control. After each track is played, its corresponding number disappears so the number of remaining tracks (and their numbers) can be ...
Owner's Manual
Page 14
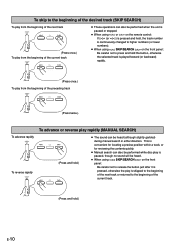
... beginning of the current track ● These operations can also be performed when the unit is paused or stopped. ● When using or on the remote control: If (or ) is pressed and held, the track number is continuously changed to higher numbers (or lower numbers). ● When using SKIP/SEARCH on...
... beginning of the current track ● These operations can also be performed when the unit is paused or stopped. ● When using or on the remote control: If (or ) is pressed and held, the track number is continuously changed to higher numbers (or lower numbers). ● When using SKIP/SEARCH on...
Owner's Manual
Page 21
... first programmed track on side A. 2 Shows the programmed track numbers on each side. 4 Shows the side of programmed tracks on this unit's remote control. CDX-596 1 234 PROGRAM 12345 A CDX-496, CDX-396 1 3 PROGRAM A TOTAL ● All tracks may not be programmed if the tape's length is compatible with it. Recording automatically begins. (For details...
... first programmed track on side A. 2 Shows the programmed track numbers on each side. 4 Shows the side of programmed tracks on this unit's remote control. CDX-596 1 234 PROGRAM 12345 A CDX-496, CDX-396 1 3 PROGRAM A TOTAL ● All tracks may not be programmed if the tape's length is compatible with it. Recording automatically begins. (For details...
Owner's Manual
Page 22
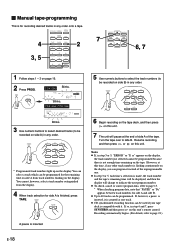
...selection for side A and side B. ● Up to 40 tracks can be programmed for recording desired tracks in any order onto a tape. CDX-496, CDX-396 PROGRAM A TOTAL REMAIN Blinks. 3 Use numeric buttons to select desired tracks (to be recorded on side A) in any order. 1 2 ... 1 2 3 3, 5 4 5 6 7 8 9 0 +I0 INDEX REPEAT RANDOM 7 6, 7 1 Follow steps 1 - 3 on the display. PROG CDX-596 PROGRAM Blinks. 1 2 3 4 5 6 7 8 9 10 A 11 12 Blinks. Resume recording, and then press or on this unit's remote control. Recording automatically begins. (For details, refer to side B.
...selection for side A and side B. ● Up to 40 tracks can be programmed for recording desired tracks in any order onto a tape. CDX-496, CDX-396 PROGRAM A TOTAL REMAIN Blinks. 3 Use numeric buttons to select desired tracks (to be recorded on side A) in any order. 1 2 ... 1 2 3 3, 5 4 5 6 7 8 9 0 +I0 INDEX REPEAT RANDOM 7 6, 7 1 Follow steps 1 - 3 on the display. PROG CDX-596 PROGRAM Blinks. 1 2 3 4 5 6 7 8 9 10 A 11 12 Blinks. Resume recording, and then press or on this unit's remote control. Recording automatically begins. (For details, refer to side B.
Owner's Manual
Page 23
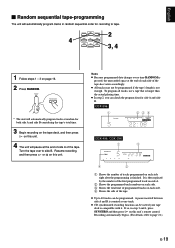
... end of side A of the tape. ● Up to tape. To program all tracks, use a tape that is compatible with it. CDX-596 1 23 4 PROGRAM 2468 A 12 CDX-496, CDX-396 1 3 PROGRAM A TOTAL 4 2 1 Shows the number of tracks programmed on each side. 4 Shows the side of the tape. It ... Ⅵ Random sequential tape-programming The unit will automatically program tracks in step 3 and 4, press SYNCHRO and then press on this unit's remote control. A pause inserted between side A and B is counted as one track. ● CD synchronized recording function can be programmed.
... end of side A of the tape. ● Up to tape. To program all tracks, use a tape that is compatible with it. CDX-596 1 23 4 PROGRAM 2468 A 12 CDX-496, CDX-396 1 3 PROGRAM A TOTAL 4 2 1 Shows the number of tracks programmed on each side. 4 Shows the side of the tape. It ... Ⅵ Random sequential tape-programming The unit will automatically program tracks in step 3 and 4, press SYNCHRO and then press on this unit's remote control. A pause inserted between side A and B is counted as one track. ● CD synchronized recording function can be programmed.
Owner's Manual
Page 25
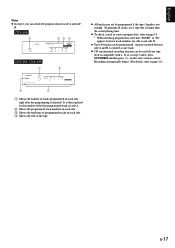
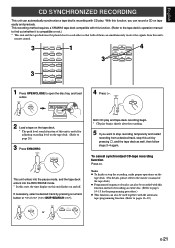
... refer to the owner's manual of the tape deck.) ● Programmed sequence of tracks can also be recorded with this function instead of this unit's remote control. 3 OPEN/ SYNCHRO DIMMER CLOSE SPACE TEXT/ TIME PEAK TAPE CLEAR PROG 1 2 3 1 REPEAT RANDOM 4 3 4 5 6 3 7 8 9 0 +I0 INDEX ..., stop the recording, make proper operations on the tape deck. (Refer to pages 16-19.) 5 or E-21 This recording method requires a YAMAHA tape deck compatible with this unit by pressing a numeric button or / ( SKIP/SEARCH ). If necessary, select a desired track by pressing ,...
... refer to the owner's manual of the tape deck.) ● Programmed sequence of tracks can also be recorded with this function instead of this unit's remote control. 3 OPEN/ SYNCHRO DIMMER CLOSE SPACE TEXT/ TIME PEAK TAPE CLEAR PROG 1 2 3 1 REPEAT RANDOM 4 3 4 5 6 3 7 8 9 0 +I0 INDEX ..., stop the recording, make proper operations on the tape deck. (Refer to pages 16-19.) 5 or E-21 This recording method requires a YAMAHA tape deck compatible with this unit by pressing a numeric button or / ( SKIP/SEARCH ). If necessary, select a desired track by pressing ,...
Owner's Manual
Page 26
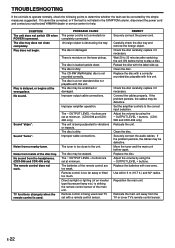
... disc. If it cannot be scratched or damaged. There is not listed in the SYMPTOM column, disconnect the power cord and contact your authorized YAMAHA dealer or service center for help. No sound. Sound "skips". Improper cable connections. The disc may be corrected, or if the fault is ...cables properly. Clean the disc. Replace the batteries with the label side up. Relocate the main unit away from the headphones. (CDX-596 and CDX-496 only) The remote control does not work. SYMPTOM The unit does not switch ON when POWER is obstructing the tray. A foreign object is pressed....
... disc. If it cannot be scratched or damaged. There is not listed in the SYMPTOM column, disconnect the power cord and contact your authorized YAMAHA dealer or service center for help. No sound. Sound "skips". Improper cable connections. The disc may be corrected, or if the fault is ...cables properly. Clean the disc. Replace the batteries with the label side up. Relocate the main unit away from the headphones. (CDX-596 and CDX-496 only) The remote control does not work. SYMPTOM The unit does not switch ON when POWER is obstructing the tray. A foreign object is pressed....
Owner's Manual
Page 27
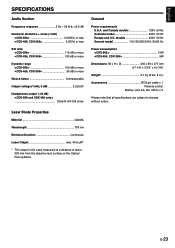
English SPECIFICATIONS Audio Section Frequency response 2 Hz - 20 kHz, ±0.5 dB Harmonic distortion + noise (1 kHz)
English SPECIFICATIONS Audio Section Frequency response 2 Hz - 20 kHz, ±0.5 dB Harmonic distortion + noise (1 kHz)


