

Owner's Manual
Page 2
Model: Serial No.: The serial number is not defeated. The safety and operating instructions should be taken so that the grounding or polarization is located on the rear of time. 14 Object and Liquid Entry - or C. The unit has been dropped, or the cabinet damaged. 16 Servicing - Precautions should be unplugged from heat sources such as a bookcase or cabinet...
Model: Serial No.: The serial number is not defeated. The safety and operating instructions should be taken so that the grounding or polarization is located on the rear of time. 14 Object and Liquid Entry - or C. The unit has been dropped, or the cabinet damaged. 16 Servicing - Precautions should be unplugged from heat sources such as a bookcase or cabinet...
Owner's Manual
Page 3
... a safe level. and, most out of product. Since hearing damage from loud sounds is 300 ohm ribbon lead, change the lead-in this manual, meets FCC requirements. If this product is too late, YAMAHA and the Electronic Industries Association's Consumer Electronics Group recommend you can be used according to coaxial type cable. This equipment generates/uses radio frequencies and, if not installed and used...
... a safe level. and, most out of product. Since hearing damage from loud sounds is 300 ohm ribbon lead, change the lead-in this manual, meets FCC requirements. If this product is too late, YAMAHA and the Electronic Industries Association's Consumer Electronics Group recommend you can be used according to coaxial type cable. This equipment generates/uses radio frequencies and, if not installed and used...

Owner's Manual
Page 4
... THE REMOTE CONTROL 4 CONNECTIONS 5 IDENTIFICATION OF COMPONENTS 6 BASIC OPERATION 8 To pause play 9 To stop play 9 To turn off the power 9 To play directly from the desired track 9 To skip to the beginning of the desired track (SKIP SEARCH 10 To advance or reverse play rapidly (MANUAL SEARCH 10 Other useful functions 11 RANDOM-SEQUENCE PLAY ......... 13 REPEAT PLAY 13 PROGRAM PLAY 14 INDEX SEARCH 15 TRACK PROGRAMMING FOR RECORDING TO TAPE...
... THE REMOTE CONTROL 4 CONNECTIONS 5 IDENTIFICATION OF COMPONENTS 6 BASIC OPERATION 8 To pause play 9 To stop play 9 To turn off the power 9 To play directly from the desired track 9 To skip to the beginning of the desired track (SKIP SEARCH 10 To advance or reverse play rapidly (MANUAL SEARCH 10 Other useful functions 11 RANDOM-SEQUENCE PLAY ......... 13 REPEAT PLAY 13 PROGRAM PLAY 14 INDEX SEARCH 15 TRACK PROGRAMMING FOR RECORDING TO TAPE...

Owner's Manual
Page 5
... the cabinet. If something drops into the set, contact your dealer. ● Do not use force on common operating errors before operating your unit in this compact disc player is faulty. ● Do not place another component on top of this unit, as that specified on left, right, and back sides of plug to wide slot and fully insert. CAUTION...
... the cabinet. If something drops into the set, contact your dealer. ● Do not use force on common operating errors before operating your unit in this compact disc player is faulty. ● Do not place another component on top of this unit, as that specified on left, right, and back sides of plug to wide slot and fully insert. CAUTION...
Owner's Manual
Page 7
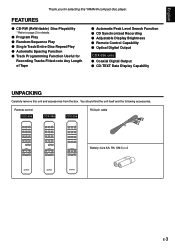
... Peak Level Search Function ⅷ CD Synchronized Recording ⅷ Adjustable Display Brightness ⅷ Remote Control Capability ⅷ Optical Digital Output CDX-596 only ⅷ Coaxial Digital Output ⅷ CD-TEXT Data Display Capability UNPACKING Carefully remove this YAMAHA compact disc player. FEATURES ⅷ CD-RW (ReWritable) Disc Playability * Refer to page 2 for details. ⅷ Program Play ⅷ Random-Sequence Play ⅷ Single Track/Entire Disc Repeat Play ⅷ Automatic Spacing Function ⅷ Track Programming Function Useful for selecting this...
... Peak Level Search Function ⅷ CD Synchronized Recording ⅷ Adjustable Display Brightness ⅷ Remote Control Capability ⅷ Optical Digital Output CDX-596 only ⅷ Coaxial Digital Output ⅷ CD-TEXT Data Display Capability UNPACKING Carefully remove this YAMAHA compact disc player. FEATURES ⅷ CD-RW (ReWritable) Disc Playability * Refer to page 2 for details. ⅷ Program Play ⅷ Random-Sequence Play ⅷ Single Track/Entire Disc Repeat Play ⅷ Automatic Spacing Function ⅷ Track Programming Function Useful for selecting this...
Owner's Manual
Page 8
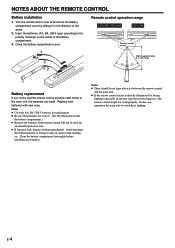
... it in contact with new ones. Close the battery compartment cover. 1 3 2 Remote control operation range CDX-596, CDX-496 CDX-396 Remote control sensor Within approximately 6 m (19.7 feet) 30° 30° Battery replacement If you notice that the remote control must be used closer to avoid direct lighting. Clean the battery compartment thoroughly before installing new batteries. Notes ● There should be no large obstacles between...
... it in contact with new ones. Close the battery compartment cover. 1 3 2 Remote control operation range CDX-596, CDX-496 CDX-396 Remote control sensor Within approximately 6 m (19.7 feet) 30° 30° Battery replacement If you notice that the remote control must be used closer to avoid direct lighting. Clean the battery compartment thoroughly before installing new batteries. Notes ● There should be no large obstacles between...
Owner's Manual
Page 9
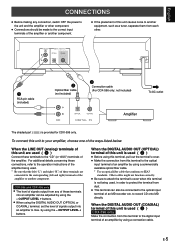
... 1 DIGITAL AUDIO OUT OPTICAL COAXIAL 1 RCA pin cable (included) 2 Optical fiber cable (not included) 3 Connection cable (For CDX-596 only; When the LINE OUT (analog) terminals of this unit are connected to the corresponding (left and right) terminals of the amplifier or another equipment, such as a tuner, separate them from this terminal to the optical input terminal of an amplifier by using the - OUTPUT LEVEL + buttons. ● When using the - When the DIGITAL AUDIO...
... 1 DIGITAL AUDIO OUT OPTICAL COAXIAL 1 RCA pin cable (included) 2 Optical fiber cable (not included) 3 Connection cable (For CDX-596 only; When the LINE OUT (analog) terminals of this unit are connected to the corresponding (left and right) terminals of the amplifier or another equipment, such as a tuner, separate them from this terminal to the optical input terminal of an amplifier by using the - OUTPUT LEVEL + buttons. ● When using the - When the DIGITAL AUDIO...
Owner's Manual
Page 10
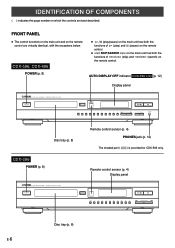
... page number on which the controls are virtually identical, with the exceptions below. AUTO DISPLAY OFF indicator CDX-596 only (p. 12) Display panel NATURAL SOUND COMPACT DISC PLAYER POWER OPEN/CLOSE AUTO DISPLAY OFF 10 1 2 3 4 5 6 7 8 9 0 SKIP/SEARCH OUTPUT LEVEL PHONES Disc tray (p. 8) CDX-396 POWER (p. 8) Remote control sensor (p. 4) PHONES jack (p. 12) The shaded part ( ) is provided for CDX-596 only. CDX-596, CDX-496 POWER (p. 8) ● / (play/pause) on the main unit has both the functions of (play) and (pause) on the remote control...
... page number on which the controls are virtually identical, with the exceptions below. AUTO DISPLAY OFF indicator CDX-596 only (p. 12) Display panel NATURAL SOUND COMPACT DISC PLAYER POWER OPEN/CLOSE AUTO DISPLAY OFF 10 1 2 3 4 5 6 7 8 9 0 SKIP/SEARCH OUTPUT LEVEL PHONES Disc tray (p. 8) CDX-396 POWER (p. 8) Remote control sensor (p. 4) PHONES jack (p. 12) The shaded part ( ) is provided for CDX-596 only. CDX-596, CDX-496 POWER (p. 8) ● / (play/pause) on the main unit has both the functions of (play) and (pause) on the remote control...
Owner's Manual
Page 12
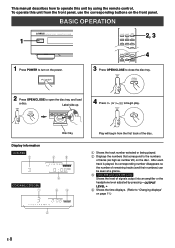
... track of the disc. 1 Shows the track number selected or being played. 2 Displays the numbers that correspond to the numbers of signals output into an amplifier or the headphone level adjusted by using the remote control. To operate this unit by pressing - OPEN/ CLOSE 4 Press (or ) to begin from the front panel, use the corresponding buttons on the disc. OUTPUT LEVEL +. 4 Shows the time displays. (Refer to turn on page 11.) E-8 BASIC OPERATION 1 NATURAL SOUND COMPACT DISC PLAYER POWER OPEN/ SYNCHRO DIMMER...
... track of the disc. 1 Shows the track number selected or being played. 2 Displays the numbers that correspond to the numbers of signals output into an amplifier or the headphone level adjusted by using the remote control. To operate this unit by pressing - OPEN/ CLOSE 4 Press (or ) to begin from the front panel, use the corresponding buttons on the disc. OUTPUT LEVEL +. 4 Shows the time displays. (Refer to turn on page 11.) E-8 BASIC OPERATION 1 NATURAL SOUND COMPACT DISC PLAYER POWER OPEN/ SYNCHRO DIMMER...
Owner's Manual
Page 13
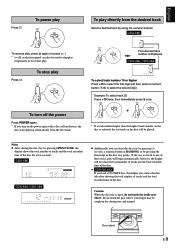
... recorded time of the disc tray gently. Notes ● After closing tray and injured. Press . If the tray is displayed CDX-496, CDX-396 To select track number 10 or higher Press +10 to select the first digit and then press a numeric button (1-0) to stop play To turn off the power Press POWER again. * If you turn on the power again with a disc still on the front panel can...
... recorded time of the disc tray gently. Notes ● After closing tray and injured. Press . If the tray is displayed CDX-496, CDX-396 To select track number 10 or higher Press +10 to select the first digit and then press a numeric button (1-0) to stop play To turn off the power Press POWER again. * If you turn on the power again with a disc still on the front panel can...
Owner's Manual
Page 16
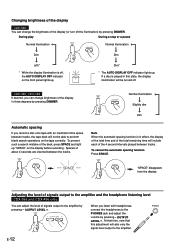
... , the AUTO DISPLAY OFF indicator on the front panel lights up. PHONES PHONES E-12 If a disc is in effect, the display of the total time and of the total remaining time will not be turned off. Adjusting the level of signals output to the amplifier and the headphone listening level CDX-596 and CDX-496 only You can adjust the level of signals output to the PHONES jack and adjust the volume by pressing - OUTPUT LEVEL...
... , the AUTO DISPLAY OFF indicator on the front panel lights up. PHONES PHONES E-12 If a disc is in effect, the display of the total time and of the total remaining time will not be turned off. Adjusting the level of signals output to the amplifier and the headphone listening level CDX-596 and CDX-496 only You can adjust the level of signals output to the PHONES jack and adjust the volume by pressing - OUTPUT LEVEL...
Owner's Manual
Page 17
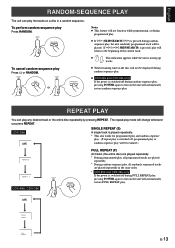
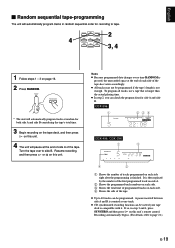
... ) is switched off ) SINGLE REPEAT FULL REPEAT E-13 sequence play, the next randomly programmed track will be displayed during random-sequence play, pressing POWER again to turn on the disc will not function while programming, or during random- RANDOM To cancel random-sequence play the tracks on the unit will change whenever you press REPEAT. CDX-496, CDX-396 (off during FULL REPEAT play, pressing POWER again...
... ) is switched off ) SINGLE REPEAT FULL REPEAT E-13 sequence play, the next randomly programmed track will be displayed during random-sequence play, pressing POWER again to turn on the disc will not function while programming, or during random- RANDOM To cancel random-sequence play the tracks on the unit will change whenever you press REPEAT. CDX-496, CDX-396 (off during FULL REPEAT play, pressing POWER again...
Owner's Manual
Page 18
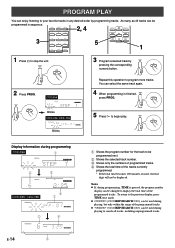
... to begin play. You can select the same track again. 4 When programming is pressed, the program number display can be programmed in any desired order by pressing the corresponding 6 numeric button. 2 Press PROG. As many as 40 tracks can be used during programming CDX-596 1 PROGRAM 6 2 PROGRAM 3 6 CDX-496, CDX-396 PROGRAM TOTAL 4 1 2 4 PROGRAM TOTAL E-14 3 1 Shows the program number for the track to be changed to display the total time of the...
... to begin play. You can select the same track again. 4 When programming is pressed, the program number display can be programmed in any desired order by pressing the corresponding 6 numeric button. 2 Press PROG. As many as 40 tracks can be used during programming CDX-596 1 PROGRAM 6 2 PROGRAM 3 6 CDX-496, CDX-396 PROGRAM TOTAL 4 1 2 4 PROGRAM TOTAL E-14 3 1 Shows the program number for the track to be changed to display the total time of the...
Owner's Manual
Page 19
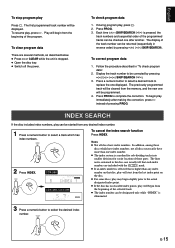
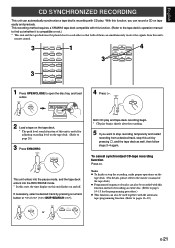
... the disc includes index numbers, play will be corrected by pressing ( SKIP/SEARCH). The display of pressing PROG. The liner notes contained in "To check program data". 2. To resume play immediately after another. Each time (SKIP/SEARCH ) is illuminated. 3 Press a numeric button to replace the one will begin play , press . To correct program data 1. INDEX CDX-596 11 12 5 6 7 8 9 10 CDX-496, CDX-396 INDEX...
... the disc includes index numbers, play will be corrected by pressing ( SKIP/SEARCH). The display of pressing PROG. The liner notes contained in "To check program data". 2. To resume play immediately after another. Each time (SKIP/SEARCH ) is illuminated. 3 Press a numeric button to replace the one will begin play , press . To correct program data 1. INDEX CDX-596 11 12 5 6 7 8 9 10 CDX-496, CDX-396 INDEX...
Owner's Manual
Page 20
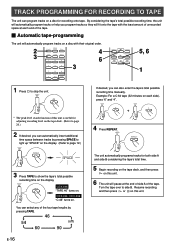
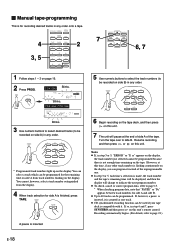
... time, the unit will automatically program tracks or help you can program tracks on a disc with the least amount of the tape. TRACK PROGRAMMING FOR RECORDING TO TAPE The unit can also enter the tape's total possible recording time manually. CDX-496, CDX-396 "C-46" turns on . REPEAT The unit automatically programs tracks for adjusting recording level on this unit. By considering the tape's total time. 5 Begin recording on the tape deck...
... time, the unit will automatically program tracks or help you can program tracks on a disc with the least amount of the tape. TRACK PROGRAMMING FOR RECORDING TO TAPE The unit can also enter the tape's total possible recording time manually. CDX-496, CDX-396 "C-46" turns on . REPEAT The unit automatically programs tracks for adjusting recording level on this unit. By considering the tape's total time. 5 Begin recording on the tape deck...
Owner's Manual
Page 22
... the display, the track number just selected cannot be programmed because there is not enough time remaining on the display. Resume recording, and then press or on this time, if any order onto a tape. Recording automatically begins. (For details, refer to side B. You cannot, however, select a track number extinguished from track numbers flashing on this unit's remote control. CDX-496, CDX-396 PROGRAM A TOTAL REMAIN Blinks. 3 Use numeric buttons to select desired...
... the display, the track number just selected cannot be programmed because there is not enough time remaining on the display. Resume recording, and then press or on this time, if any order onto a tape. Recording automatically begins. (For details, refer to side B. You cannot, however, select a track number extinguished from track numbers flashing on this unit's remote control. CDX-496, CDX-396 PROGRAM A TOTAL REMAIN Blinks. 3 Use numeric buttons to select desired...
Owner's Manual
Page 23
... function can be programmed. A pause inserted between side A and B is finished. CDX-596 1 23 4 PROGRAM 2468 A 12 CDX-496, CDX-396 1 3 PROGRAM A TOTAL 4 2 1 Shows the number of tracks programmed on this unit. Recording automatically begins. (For details, refer to 40 tracks can check the program ... of the tape. Notes ● Because programmed data changes every time RANDOM is longer than the actual playing time. ● In step 2, you can be used if your tape deck is not enough. Turn the tape over to tape. To program all tracks, use a tape that is pressed...
... function can be programmed. A pause inserted between side A and B is finished. CDX-596 1 23 4 PROGRAM 2468 A 12 CDX-496, CDX-396 1 3 PROGRAM A TOTAL 4 2 1 Shows the number of tracks programmed on this unit. Recording automatically begins. (For details, refer to 40 tracks can check the program ... of the tape. Notes ● Because programmed data changes every time RANDOM is longer than the actual playing time. ● In step 2, you can be used if your tape deck is not enough. Turn the tape over to tape. To program all tracks, use a tape that is pressed...
Owner's Manual
Page 24
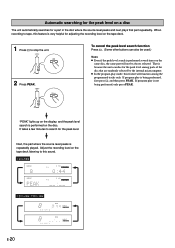
... program play is being performed, only press PEAK. Next, the part where the source level peaks is performed on the tape deck. 1 Press to stop the unit. 2 Press PEAK. CDX-596 REPEAT 11 12 8 9 10 REPEAT 11 12 8 9 10 CDX-496, CDX-396 PEAK REPEAT PEAK REPEAT E-20 PEAK To cancel the peak level search function Press . (Some other buttons can also be always selected. Adjust...
... program play is being performed, only press PEAK. Next, the part where the source level peaks is performed on the tape deck. 1 Press to stop the unit. 2 Press PEAK. CDX-596 REPEAT 11 12 8 9 10 REPEAT 11 12 8 9 10 CDX-496, CDX-396 PEAK REPEAT PEAK REPEAT E-20 PEAK To cancel the peak level search function Press . (Some other buttons can also be always selected. Adjust...
Owner's Manual
Page 25
... the pause mode, and the tape deck enters into the REC/PAUSE mode. * In this state, the time display on and off. With this unit flashes on this function, you want to page 20.) 3 Press SYNCHRO. Notes ● To finish or stop the recording, make proper operations on the tape deck. (For details, please refer to the owner's manual of the tape deck.) ● Programmed sequence...
... the pause mode, and the tape deck enters into the REC/PAUSE mode. * In this state, the time display on and off. With this unit flashes on this function, you want to page 20.) 3 Press SYNCHRO. Notes ● To finish or stop the recording, make proper operations on the tape deck. (For details, please refer to the owner's manual of the tape deck.) ● Programmed sequence...
Owner's Manual
Page 26
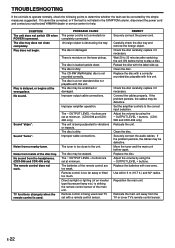
... the correct input selection. Check the disc carefully; Replace the disc. If it cannot be corrected by the simple measures suggested. PROBABLE CAUSE The power cord is striking the remote control sensor of an inverter type flourescent lamp etc.) is not connected nor completely connected. Improper output cable connections. Noise from the headphones. (CDX-596 and CDX-496 only) The remote control does not work. Direct sunlight or lighting (of the...
... the correct input selection. Check the disc carefully; Replace the disc. If it cannot be corrected by the simple measures suggested. PROBABLE CAUSE The power cord is striking the remote control sensor of an inverter type flourescent lamp etc.) is not connected nor completely connected. Improper output cable connections. Noise from the headphones. (CDX-596 and CDX-496 only) The remote control does not work. Direct sunlight or lighting (of the...


