
MCXSP10 Manual
Page 2
... excessive volume levels. The wide blade or the third prong are provided for replacement of time. 14 Refer all servicing to rain or moisture, does not operate normally, or has been dropped. One that produce heat. 9 Do not defeat the safety purpose of important operating and maintenance (servicing) instructions in any heat sources such as power-supply cord or plug is used, use this...
... excessive volume levels. The wide blade or the third prong are provided for replacement of time. 14 Refer all servicing to rain or moisture, does not operate normally, or has been dropped. One that produce heat. 9 Do not defeat the safety purpose of important operating and maintenance (servicing) instructions in any heat sources such as power-supply cord or plug is used, use this...
MCXSP10 Manual
Page 3
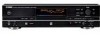
... Yamaha Corporation of the FCC Rules. Operation is 300 ohm ribbon lead, change the lead-in all installation instructions. ii COMPLIANCE INFORMATION STATEMENT (DECLARATION OF CONFORMITY PROCEDURE) Responsible Party: Address: Telephone: Fax: Type of Equipment: Model Name: Yamaha Electronics Corporation, U.S.A. 6660 Orangethorpe Avenue Buena Park, CA 90620 714-522-9105 714-670-0108 HDD/CD Recorder CDR-HD1500 This device complies with Part...
... Yamaha Corporation of the FCC Rules. Operation is 300 ohm ribbon lead, change the lead-in all installation instructions. ii COMPLIANCE INFORMATION STATEMENT (DECLARATION OF CONFORMITY PROCEDURE) Responsible Party: Address: Telephone: Fax: Type of Equipment: Model Name: Yamaha Electronics Corporation, U.S.A. 6660 Orangethorpe Avenue Buena Park, CA 90620 714-522-9105 714-670-0108 HDD/CD Recorder CDR-HD1500 This device complies with Part...

MCXSP10 Manual
Page 4
... YELLOW. Finally, press POWER to turn off and an appropriate 3 pin plug fitted. SPECIAL INSTRUCTIONS FOR U.K. customers If the socket outlets in this product is marked with the letter N or coloured BLACK. This Class B digital apparatus complies with high humidity (i.e. away from the wall outlet. Laser component in the home are complete. • Do not operate this unit upside...
... YELLOW. Finally, press POWER to turn off and an appropriate 3 pin plug fitted. SPECIAL INSTRUCTIONS FOR U.K. customers If the socket outlets in this product is marked with the letter N or coloured BLACK. This Class B digital apparatus complies with high humidity (i.e. away from the wall outlet. Laser component in the home are complete. • Do not operate this unit upside...
MCXSP10 Manual
Page 7
... this manual 2 SUPPLIED ACCESSORIES 3 NAMES OF BUTTONS AND CONTROLS 4 Front panel 4 Remote control 6 Display 8 Rear panel 9 CONNECTIONS 10 PREPARING THE REMOTE CONTROL 11 Installing batteries 11 Remote control operation range 11 2. Version 73 Initializing settings (Initialize 73 Setting the display brightness (Dimmer Setup 74 Setting the video output (VIDEO Output 74 Starting playback automatically (Auto Play 75 Updating the firmware version (Firm. APPENDIX TROUBLESHOOTING 76 DISPLAY MESSAGES 78 GLOSSARY 80 LIST OF SYSTEM MENU 81 RULES OF DIGITAL RECORDING AND NOTES...
... this manual 2 SUPPLIED ACCESSORIES 3 NAMES OF BUTTONS AND CONTROLS 4 Front panel 4 Remote control 6 Display 8 Rear panel 9 CONNECTIONS 10 PREPARING THE REMOTE CONTROL 11 Installing batteries 11 Remote control operation range 11 2. Version 73 Initializing settings (Initialize 73 Setting the display brightness (Dimmer Setup 74 Setting the video output (VIDEO Output 74 Starting playback automatically (Auto Play 75 Updating the firmware version (Firm. APPENDIX TROUBLESHOOTING 76 DISPLAY MESSAGES 78 GLOSSARY 80 LIST OF SYSTEM MENU 81 RULES OF DIGITAL RECORDING AND NOTES...
MCXSP10 Manual
Page 8
... record external playback sources onto the HDD. 4. Design and specifications are subject to change the system settings. 7. HDD RECORDING This section explains how to copy data from CDs to "LIST OF EDIT MENU" (P.50). 6. APPENDIX This section provides you with Audio Master Quality Recording (when copying onto CD-R discs) ♦ Bookmark feature for easy accesses to favorite tracks ♦ Timer playback (Auto Play) and timer recording features using this manual...
... record external playback sources onto the HDD. 4. Design and specifications are subject to change the system settings. 7. HDD RECORDING This section explains how to copy data from CDs to "LIST OF EDIT MENU" (P.50). 6. APPENDIX This section provides you with Audio Master Quality Recording (when copying onto CD-R discs) ♦ Bookmark feature for easy accesses to favorite tracks ♦ Timer playback (Auto Play) and timer recording features using this manual...
MCXSP10 Manual
Page 10
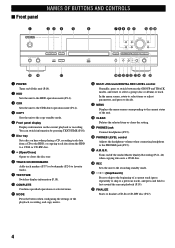
... INPUT OPTICAL COAXIAL ANALOG ANALOG REC LEVEL MIN MAX ty u 1 POWER Turns on the current playback or recording. iopas df g h w MULTI JOG knob/DIGITAL REC LEVEL control Normally, press to switch between the GROUP and TRACK modes, and rotate to the copy standby mode. 5 Front panel display Displays information on /off the Audio Master Quality Recording (P.41, 46) when copying data onto a CD-R disc. y PHONES LEVEL control Adjusts the headphone volume when connecting headphone to the PHONES jack...
... INPUT OPTICAL COAXIAL ANALOG ANALOG REC LEVEL MIN MAX ty u 1 POWER Turns on the current playback or recording. iopas df g h w MULTI JOG knob/DIGITAL REC LEVEL control Normally, press to switch between the GROUP and TRACK modes, and rotate to the copy standby mode. 5 Front panel display Displays information on /off the Audio Master Quality Recording (P.41, 46) when copying data onto a CD-R disc. y PHONES LEVEL control Adjusts the headphone volume when connecting headphone to the PHONES jack...

MCXSP10 Manual
Page 17
... fluid. Connecting the power cable [U.S.A. Press the hook (h) of the battery cover to the wall outlet. [Europe, U.K. TEXT/TIME MODE MULTI JOG PUSH ENTER MENU TRACK NO. COMPLETE CLEAR BOOKMARK DIGITAL REC LEVEL REC FINALIZE ERASE INPUT OPTICAL COAXIAL ANALOG ANALOG REC LEVEL MIN MAX Remote control sensor Within 6m (20') 30° 30° Battery replacement If you find that the remote control must be played, copying/recording settings or...
... fluid. Connecting the power cable [U.S.A. Press the hook (h) of the battery cover to the wall outlet. [Europe, U.K. TEXT/TIME MODE MULTI JOG PUSH ENTER MENU TRACK NO. COMPLETE CLEAR BOOKMARK DIGITAL REC LEVEL REC FINALIZE ERASE INPUT OPTICAL COAXIAL ANALOG ANALOG REC LEVEL MIN MAX Remote control sensor Within 6m (20') 30° 30° Battery replacement If you find that the remote control must be played, copying/recording settings or...

MCXSP10 Manual
Page 20
... operation mode. HDD CDR TEXT/TIME MODE MULTI JOG PUSH ENTER MENU TRACK NO. When operating the unit, you set a disc in the disc tray. When the disc information is set in the disc tray, the unit automatically switches to "SPECIFICATIONS" (P.83). To operate the CDR drive, press CDR. The unit starts to the "HDD Installation Manual" and check the connection. Notes • Do not turn off the unit during playback or recording. POWER NATURAL SOUND HDD/CD RECORDER POWER PHONES LEVEL...
... operation mode. HDD CDR TEXT/TIME MODE MULTI JOG PUSH ENTER MENU TRACK NO. When operating the unit, you set a disc in the disc tray. When the disc information is set in the disc tray, the unit automatically switches to "SPECIFICATIONS" (P.83). To operate the CDR drive, press CDR. The unit starts to the "HDD Installation Manual" and check the connection. Notes • Do not turn off the unit during playback or recording. POWER NATURAL SOUND HDD/CD RECORDER POWER PHONES LEVEL...

MCXSP10 Manual
Page 24
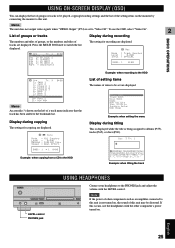
... pressed, the display changes according to the operation. Display while playing the data on a disc TOTAL 1 - 2 2 1 REC L dB -30 -10 -6 -2 0 R GROUP CDR W 18 Display while recording onto the HDD Disc number, track number and elapsed time of the track being recorded D001 1 004 L dB -30 -10 -6 -2 0 R REC Disc number and total recorded time on the disc D001 TOTAL 1543 L dB -30 -10 -6 -2 0 R REC Display while playing a CD Track number and elapsed time...
... pressed, the display changes according to the operation. Display while playing the data on a disc TOTAL 1 - 2 2 1 REC L dB -30 -10 -6 -2 0 R GROUP CDR W 18 Display while recording onto the HDD Disc number, track number and elapsed time of the track being recorded D001 1 004 L dB -30 -10 -6 -2 0 R REC Disc number and total recorded time on the disc D001 TOTAL 1543 L dB -30 -10 -6 -2 0 R REC Display while playing a CD Track number and elapsed time...
MCXSP10 Manual
Page 31
... BEST 2 Mark : [Bookmark] 0:00 The setting for copying are displayed. Classic 1 4- Classic 3 6- Rock 3 9- Pops 1 10- Album Edit Track Edit Disc Edit Undo HDD Utility Sys. LEVEL control PHONES jack USING HEADPHONES Connect your headphones to the PHONES jack and adjust the volume with the other components such as an amplifier connected to REC this unit is not turned on, the sound of this unit may be played, copying/recording settings and...
... BEST 2 Mark : [Bookmark] 0:00 The setting for copying are displayed. Classic 1 4- Classic 3 6- Rock 3 9- Pops 1 10- Album Edit Track Edit Disc Edit Undo HDD Utility Sys. LEVEL control PHONES jack USING HEADPHONES Connect your headphones to the PHONES jack and adjust the volume with the other components such as an amplifier connected to REC this unit is not turned on, the sound of this unit may be played, copying/recording settings and...
MCXSP10 Manual
Page 32
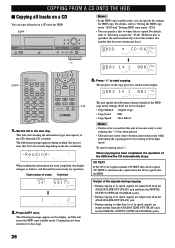
... ALL SYNC L dB -30 -10 -6 -2 0 R TOC GROUP CD w/d COPY OPEN/CLOSE COPY A. WRITE HDD CDR GROUP SKIP W/D 1. The following settings (default) if the HDD copy menu settings (P.29) are never changed. • Copy Method: "Digital Copy" • Copy Level: 0dB • Copy Speed: "Best Effort" Memo • It takes a few seconds for this unit becomes ready for HDD copy. For details, refer to "Setting the HDD copy mode...
... ALL SYNC L dB -30 -10 -6 -2 0 R TOC GROUP CD w/d COPY OPEN/CLOSE COPY A. WRITE HDD CDR GROUP SKIP W/D 1. The following settings (default) if the HDD copy menu settings (P.29) are never changed. • Copy Method: "Digital Copy" • Copy Level: 0dB • Copy Speed: "Best Effort" Memo • It takes a few seconds for this unit becomes ready for HDD copy. For details, refer to "Setting the HDD copy mode...
MCXSP10 Manual
Page 33
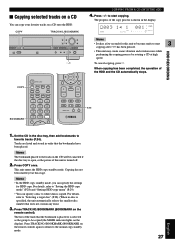
... NO. Set the CD in the disc tray, then add bookmarks to the normal copy standby mode. 27 English This unit enters the HDD copy standby mode. ■ Copying selected tracks on a CD You can copy your favorite tracks on the CD will be copied (the MARK indicator lights on the remote control). TEXT/TIME MODE MULTI JOG PUSH ENTER MENU TRACK NO. COPY BOOKMARK OPEN/CLOSE COPY...
... NO. Set the CD in the disc tray, then add bookmarks to the normal copy standby mode. 27 English This unit enters the HDD copy standby mode. ■ Copying selected tracks on a CD You can copy your favorite tracks on the CD will be copied (the MARK indicator lights on the remote control). TEXT/TIME MODE MULTI JOG PUSH ENTER MENU TRACK NO. COPY BOOKMARK OPEN/CLOSE COPY...
MCXSP10 Manual
Page 37
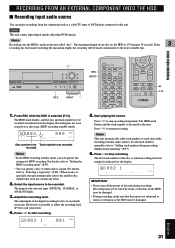
... The lamp for HDD recording. Adjust the recording level. RECORDING FROM AN EXTERNAL COMPONENT ONTO THE HDD ■ Recording input audio source You can specify the settings for the selected input (OPTICAL, COAXIAL, or ANALOG) lights. 3. Press REC while the HDD is not subjected to shock or vibration as a cable TV tuner or DVD player connected to the next available disc. For details, refer to be recorded recorded Memo • In the HDD recording standby mode, you can make sure that...
... The lamp for HDD recording. Adjust the recording level. RECORDING FROM AN EXTERNAL COMPONENT ONTO THE HDD ■ Recording input audio source You can specify the settings for the selected input (OPTICAL, COAXIAL, or ANALOG) lights. 3. Press REC while the HDD is not subjected to shock or vibration as a cable TV tuner or DVD player connected to the next available disc. For details, refer to be recorded recorded Memo • In the HDD recording standby mode, you can make sure that...

MCXSP10 Manual
Page 38
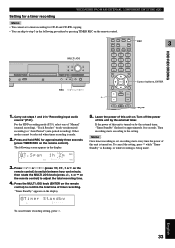
... turns on recording time setting • This unit is stopped, no information to control audio data as well as the play style (P.20). 32 RECORDING FROM AN EXTERNAL COMPONENT ONTO THE HDD ■ Using an external timer to be stopped if copy protected digital signals are stored. Therefore set the total recording time over 179 minutes 59 seconds, recording will be turned off CDR-HD1500 finishes recording Example: To record the program...
... turns on recording time setting • This unit is stopped, no information to control audio data as well as the play style (P.20). 32 RECORDING FROM AN EXTERNAL COMPONENT ONTO THE HDD ■ Using an external timer to be stopped if copy protected digital signals are stored. Therefore set the total recording time over 179 minutes 59 seconds, recording will be turned off CDR-HD1500 finishes recording Example: To record the program...
MCXSP10 Manual
Page 39
... SOUND HDD/CD RECORDER L MAX HDD CDR COPY A.M.Q.R. Press t/e or r/y (press E, R, Q or W on the remote control) to switch between hour and minute, then rotate the MULTI JOG knob (press +/-, H or G on by the external timer, "Timer Standby" flashes for CD-R and CD-RW copying. • You can skip to step 3 in the following screen appears in "Recording input audio source" (P.31). COMPLETE CLEAR BOOKMARK DIGITAL REC LEVEL REC FINALIZE ERASE INPUT OPTICAL COAXIAL...
... SOUND HDD/CD RECORDER L MAX HDD CDR COPY A.M.Q.R. Press t/e or r/y (press E, R, Q or W on the remote control) to switch between hour and minute, then rotate the MULTI JOG knob (press +/-, H or G on by the external timer, "Timer Standby" flashes for CD-R and CD-RW copying. • You can skip to step 3 in the following screen appears in "Recording input audio source" (P.31). COMPLETE CLEAR BOOKMARK DIGITAL REC LEVEL REC FINALIZE ERASE INPUT OPTICAL COAXIAL...

MCXSP10 Manual
Page 41
... needs. Press the MULTI JOG knob (ENTER on the remote control) to confirm the setting. Manual (Manual recording mode) All the recording operations including starting, stopping and track marking are automatically placed between track markers. P e r i o d ? 3 0 0 REC AUTO PRD L dB -30 -10 -6 -2 0 R TIME (When Multi Synchro is confirmed, this unit is selected" procedure below . Track markers are performed manually. RECORDING FROM AN EXTERNAL COMPONENT ONTO THE HDD ■ Setting the HDD recording mode...
... needs. Press the MULTI JOG knob (ENTER on the remote control) to confirm the setting. Manual (Manual recording mode) All the recording operations including starting, stopping and track marking are automatically placed between track markers. P e r i o d ? 3 0 0 REC AUTO PRD L dB -30 -10 -6 -2 0 R TIME (When Multi Synchro is confirmed, this unit is selected" procedure below . Track markers are performed manually. RECORDING FROM AN EXTERNAL COMPONENT ONTO THE HDD ■ Setting the HDD recording mode...

MCXSP10 Manual
Page 47
... 9 BOOKMARK MENU COMPLETE ENTER CLEAR TRACK NO. Press A.M.Q.R. REC A.M.Q.R. HDD/CD RECORDER HDD CDR COPY A.M.Q.R. A.M.Q.R. 2. OPEN/CLOSE COPY A. AMQR 1 % REC A.M.Q.R. Notes • When total time of the HDD and the CD automatically stops. In this case, Audio Master Quality Recording cannot be used . indicator lights up on the display. In this unit or unplug the AC power cord during copying. Q. AUTO DIG M L SYNC dB -30 -10 -6 -2 0 R GROUP CDR The copying...
... 9 BOOKMARK MENU COMPLETE ENTER CLEAR TRACK NO. Press A.M.Q.R. REC A.M.Q.R. HDD/CD RECORDER HDD CDR COPY A.M.Q.R. A.M.Q.R. 2. OPEN/CLOSE COPY A. AMQR 1 % REC A.M.Q.R. Notes • When total time of the HDD and the CD automatically stops. In this case, Audio Master Quality Recording cannot be used . indicator lights up on the display. In this unit or unplug the AC power cord during copying. Q. AUTO DIG M L SYNC dB -30 -10 -6 -2 0 R GROUP CDR The copying...
MCXSP10 Manual
Page 51
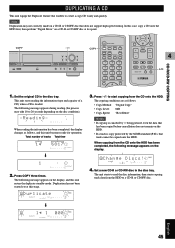
... HDD/CD RECORDER HDD CDR COPY A.M.Q.R. REC DUPLCT DIG ALL SYNC L dB -30 -10 -6 -2 0 R TOC CD 4. The copying conditions are as follows, and this unit enters the duplicate standby mode. w/d TEXT/TIME MODE MULTI JOG PUSH ENTER MENU TRACK NO. WRITE HDD CDR 4 GROUP SKIP W/D CD-R/CD-RW COPYING 1. M. DUPLICATING A CD This unit equips the Duplicate feature that does not support high speed writing. Set the original CD in the disc...
... HDD/CD RECORDER HDD CDR COPY A.M.Q.R. REC DUPLCT DIG ALL SYNC L dB -30 -10 -6 -2 0 R TOC CD 4. The copying conditions are as follows, and this unit enters the duplicate standby mode. w/d TEXT/TIME MODE MULTI JOG PUSH ENTER MENU TRACK NO. WRITE HDD CDR 4 GROUP SKIP W/D CD-R/CD-RW COPYING 1. M. DUPLICATING A CD This unit equips the Duplicate feature that does not support high speed writing. Set the original CD in the disc...
MCXSP10 Manual
Page 82
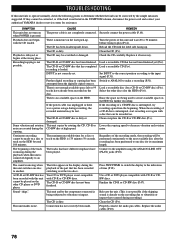
... recording over the two discs. Properly connect the audio pin cables. Some vibration and rotation noise are created during the copying. This unit copies by the simple measures suggested. Turn the power of the part that has been recorded stretching over again with CD-R or CD-RW discs. Load a recordable CD (P.iv). Switch to ANALOG to the input signal (P.31). Select the other CD player or DVD player. When the recording of a CD-RW disc...
... recording over the two discs. Properly connect the audio pin cables. Some vibration and rotation noise are created during the copying. This unit copies by the simple measures suggested. Turn the power of the part that has been recorded stretching over again with CD-R or CD-RW discs. Load a recordable CD (P.iv). Switch to ANALOG to the input signal (P.31). Select the other CD player or DVD player. When the recording of a CD-RW disc...
MCXSP10 Manual
Page 84
... "Pack" is performed. 78 Invalid Mode The recording mode that a CD needs to be changed to a disc to the total recordable time. No Data There are no input signals when attempting the recording from a CD onto the HDD has been completed. No Source There is displayed when a prohibited editing operation has been attempted. However, this automatic adjustment. Reformat by the CDR-HD1500 on the HDD. This message informs that cannot...
... "Pack" is performed. 78 Invalid Mode The recording mode that a CD needs to be changed to a disc to the total recordable time. No Data There are no input signals when attempting the recording from a CD onto the HDD has been completed. No Source There is displayed when a prohibited editing operation has been attempted. However, this automatic adjustment. Reformat by the CDR-HD1500 on the HDD. This message informs that cannot...


