
Owner's Manual
Page 2
... Power-Cord Protection - NO USER-SERVICEABLE PARTS INSIDE. or D. or E. An outdoor antenna should be adhered to rain; REFER SERVICING TO QUALIFIED SERVICE PERSONNEL. Model: Serial No.: The serial number is recommended by the manufacturer. 6A A unit and cart combination should be located away from the unit. 12 Cleaning - Quick stops, excessive force, and uneven surfaces may impede the flow of time. 14...
... Power-Cord Protection - NO USER-SERVICEABLE PARTS INSIDE. or D. or E. An outdoor antenna should be adhered to rain; REFER SERVICING TO QUALIFIED SERVICE PERSONNEL. Model: Serial No.: The serial number is recommended by the manufacturer. 6A A unit and cart combination should be located away from the unit. 12 Cleaning - Quick stops, excessive force, and uneven surfaces may impede the flow of time. 14...

Owner's Manual
Page 3
... ohm ribbon lead, change the lead-in all installation instructions. If the antenna lead-in is too late, YAMAHA and the Electronic Industries Association's Consumer Electronics Group recommend you can be used. Refer servicing to coaxial type cable. This equipment generates/uses radio frequencies and, if not installed and used in this product to the operation of the following measures: Relocate either this product in the users manual...
... ohm ribbon lead, change the lead-in all installation instructions. If the antenna lead-in is too late, YAMAHA and the Electronic Industries Association's Consumer Electronics Group recommend you can be used. Refer servicing to coaxial type cable. This equipment generates/uses radio frequencies and, if not installed and used in this product to the operation of the following measures: Relocate either this product in the users manual...
Owner's Manual
Page 4
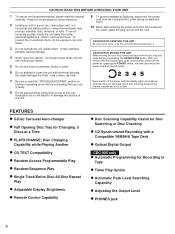
... Track/Entire Disc/All Disc Repeat Play q Adjustable Display Brightness q Remote Control Capability q Disc Scanning Capability Useful for Recording to Tape q Timer Play Option q Automatic Peak Level Searching Capability q Adjusting the Output Level q PHONES jack 4 CAUTION: READ THIS BEFORE OPERATING YOUR UNIT 1 To ensure the finest performance, please read the "TROUBLESHOOTING" section on common operating errors before concluding that the display lights up as shown below, switch off the power untill the display lights up as...
... Track/Entire Disc/All Disc Repeat Play q Adjustable Display Brightness q Remote Control Capability q Disc Scanning Capability Useful for Recording to Tape q Timer Play Option q Automatic Peak Level Searching Capability q Adjusting the Output Level q PHONES jack 4 CAUTION: READ THIS BEFORE OPERATING YOUR UNIT 1 To ensure the finest performance, please read the "TROUBLESHOOTING" section on common operating errors before concluding that the display lights up as shown below, switch off the power untill the display lights up as...
Owner's Manual
Page 5
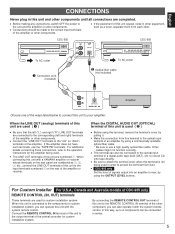
... amplifier. by using this unit with a YAMAHA amplifier or receiver whose terminals on the rear of the other components. When connecting this terminal is connected to the REMOTE CONTROL IN terminal of the amplifier or receiver. When the LINE unit are used . q Before making any connections, switch OFF the power to your amplifier. WterhmenintahleoDf tIhGiIsTAunLitAiUsDuIsOedOU(T—(O) PTICAL) q Before using a commercially available optical fiber cable. * Be sure to the input terminals numbered 1 on the rear panel...
... amplifier. by using this unit with a YAMAHA amplifier or receiver whose terminals on the rear of the other components. When connecting this terminal is connected to the REMOTE CONTROL IN terminal of the amplifier or receiver. When the LINE unit are used . q Before making any connections, switch OFF the power to your amplifier. WterhmenintahleoDf tIhGiIsTAunLitAiUsDuIsOedOU(T—(O) PTICAL) q Before using a commercially available optical fiber cable. * Be sure to the input terminals numbered 1 on the rear panel...
Owner's Manual
Page 6
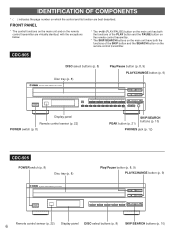
...8 5 9 0 PEAK SKIP/SEARCH OUTPUT LEVEL PHONES - + Display panel Remote control sensor (p. 22) POWER switch (p. 8) SKIP/SEARCH buttons (p. 10) PEAK button (p. 21) PHONES jack (p. 12) CDC-505 POWER switch (p. 8) Disc tray (p. 8) NATURAL SOUND COMPACT DISC PLAYER POWER Play/Pause button (p. 8, 9) PLAYXCHANGE button (p. 9) DISC 1 2 3 4 5 / OPEN/CLOSE PLAYXCHANGE SKIP/SEARCH Remote control sensor (p. 22) Display panel DISC-select buttons (p. 8) SKIP/SEARCH buttons (p. 10) 6 IDENTIFICATION OF COMPONENTS * ( ) indicates the page number on the remote control transmitter.
...8 5 9 0 PEAK SKIP/SEARCH OUTPUT LEVEL PHONES - + Display panel Remote control sensor (p. 22) POWER switch (p. 8) SKIP/SEARCH buttons (p. 10) PEAK button (p. 21) PHONES jack (p. 12) CDC-505 POWER switch (p. 8) Disc tray (p. 8) NATURAL SOUND COMPACT DISC PLAYER POWER Play/Pause button (p. 8, 9) PLAYXCHANGE button (p. 9) DISC 1 2 3 4 5 / OPEN/CLOSE PLAYXCHANGE SKIP/SEARCH Remote control sensor (p. 22) Display panel DISC-select buttons (p. 8) SKIP/SEARCH buttons (p. 10) 6 IDENTIFICATION OF COMPONENTS * ( ) indicates the page number on the remote control transmitter.
Owner's Manual
Page 8
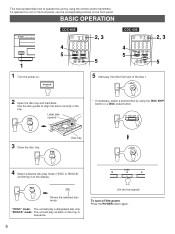
... selected disc mode. POWER CDC-905 4 5 SYNCHRO 1 4 TEXT/ OPEN/ DIMMER TIME CLOSE TAPE CLEAR PROG 2 3 INDEX 5 6 +I0 7 8 9 0 DISC SCAN MODE REPEAT RANDOM DISC SKIP SEARCH - PLAY 2 Open the disc tray and load discs. Use the disc guides to operate this unit on the front panel, use the corresponding buttons on . OPEN/ CLOSE Label side upward * If necessary, select a desired disc by using the DISC SKIP button or a DISC-select button. DISC SKIP Disc tray 3 Close the disc tray. OUTPUT LEVEL + SKIP STOP PAUSE PLAY 2, 3 5 CDC-505...
... selected disc mode. POWER CDC-905 4 5 SYNCHRO 1 4 TEXT/ OPEN/ DIMMER TIME CLOSE TAPE CLEAR PROG 2 3 INDEX 5 6 +I0 7 8 9 0 DISC SCAN MODE REPEAT RANDOM DISC SKIP SEARCH - PLAY 2 Open the disc tray and load discs. Use the disc guides to operate this unit on the front panel, use the corresponding buttons on . OPEN/ CLOSE Label side upward * If necessary, select a desired disc by using the DISC SKIP button or a DISC-select button. DISC SKIP Disc tray 3 Close the disc tray. OUTPUT LEVEL + SKIP STOP PAUSE PLAY 2, 3 5 CDC-505...

Owner's Manual
Page 9
... the PLAYXCHANGE button on the selected disc. The CD TEXT disc has information, such as number 20) on the front panel without interrupting disc play will begin automatically, however, the display will not show the total number of tracks and the total recorded time of signals output into an amplifier or the headphones level adjusted by using the DISC SKIP button when this case, pressing the DISC SKIP button has no...
... the PLAYXCHANGE button on the selected disc. The CD TEXT disc has information, such as number 20) on the front panel without interrupting disc play will begin automatically, however, the display will not show the total number of tracks and the total recorded time of signals output into an amplifier or the headphones level adjusted by using the DISC SKIP button when this case, pressing the DISC SKIP button has no...
Owner's Manual
Page 10
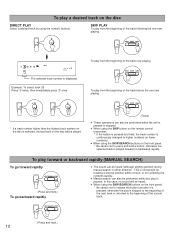
... is displayed. q When using the SKIP button on the front panel: * Be careful not to press and hold .) 10 To play forward or backward rapidly (MANUAL SEARCH) To go forward rapidly SEARCH (Press and hold.) To go backward rapidly q The sound can be heard (although slightly garbled) during manual search in either direction. q When using the SKIP/SEARCH buttons on the remote control...
... is displayed. q When using the SKIP button on the front panel: * Be careful not to press and hold .) 10 To play forward or backward rapidly (MANUAL SEARCH) To go forward rapidly SEARCH (Press and hold.) To go backward rapidly q The sound can be heard (although slightly garbled) during manual search in either direction. q When using the SKIP/SEARCH buttons on the remote control...

Owner's Manual
Page 11
.../TIME display mode-select button. q The disc title, artist names, or track names may not be displayed if the track number is changed from flashing to cancel this play a CD with some CD TEXT discs. DISC SCAN Notes q During this function. q If the disc being played has a long blank space between tracks, you will enter into the normal play , you find a disc that you play , the disc tray numbers blink in the display...
.../TIME display mode-select button. q The disc title, artist names, or track names may not be displayed if the track number is changed from flashing to cancel this play a CD with some CD TEXT discs. DISC SCAN Notes q During this function. q If the disc being played has a long blank space between tracks, you will enter into the normal play , you find a disc that you play , the disc tray numbers blink in the display...

Owner's Manual
Page 12
PHONES or OUTPUT LEVEL - + (On the front panel) For optimum sound quality * When the DIGITAL AUDIO OUT (OPTICAL) terminal is used for the connection, set the level of output signals to an amplifier, etc. You can change brightness of the display in the display. 12 DIMMER Normal illumination Slightly dim Dim CDC-905 only Adjusting the level of output signals can be checked in three degrees by pressing the DIMMER button. OUTPUT LEVEL + CDC-905 only When...
PHONES or OUTPUT LEVEL - + (On the front panel) For optimum sound quality * When the DIGITAL AUDIO OUT (OPTICAL) terminal is used for the connection, set the level of output signals to an amplifier, etc. You can change brightness of the display in the display. 12 DIMMER Normal illumination Slightly dim Dim CDC-905 only Adjusting the level of output signals can be checked in three degrees by pressing the DIMMER button. OUTPUT LEVEL + CDC-905 only When...
Owner's Manual
Page 13
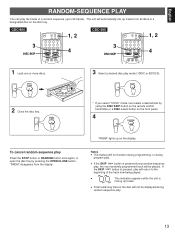
... * If you select "1DISC" mode, next select a desired disc by pressing the OPEN/CLOSE button. q Total remaining time on the front panel. 4 RANDOM To cancel random-sequence play mode (1DISC or 5DISCS). MODE 2 Close the disc tray. "RNDM" lights up on the disc tray. q If the SKIP button is pressed during random-sequence play. 13 OUTPUT LEVEL + SKIP STOP PAUSE PLAY 1, 2 4 CDC-505 3 DISC SKIP SYNCHRO 1 4 TEXT/ DIMMER TIME OPEN/ CLOSE CLEAR...
... * If you select "1DISC" mode, next select a desired disc by pressing the OPEN/CLOSE button. q Total remaining time on the front panel. 4 RANDOM To cancel random-sequence play mode (1DISC or 5DISCS). MODE 2 Close the disc tray. "RNDM" lights up on the disc tray. q If the SKIP button is pressed during random-sequence play. 13 OUTPUT LEVEL + SKIP STOP PAUSE PLAY 1, 2 4 CDC-505 3 DISC SKIP SYNCHRO 1 4 TEXT/ DIMMER TIME OPEN/ CLOSE CLEAR...
Owner's Manual
Page 14
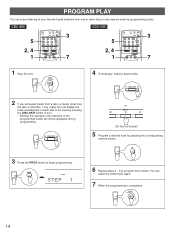
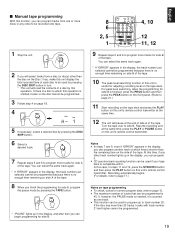
...; PLAY 14 OUTPUT LEVEL + SKIP STOP PAUSE PLAY 3 7 CDC-505 5 2, 4 1 SYNCHRO 1 4 TEXT/ OPEN/ DIMMER TIME CLOSE CLEAR PROG 2 3 INDEX 5 6 +I0 7 8 9 0 DISC SCAN MODE REPEAT RANDOM DISC SKIP SEARCH SKIP STOP PAUSE PLAY 3 7 1 Stop the unit. DISC SKIP or DISC 2 3 4 (On the front panel) 5 Program a desired track by pressing the corresponding numeric button. 5 3 Press the PROG button to program more discs in any desired order by pressing the DISC SKIP button in turn...
...; PLAY 14 OUTPUT LEVEL + SKIP STOP PAUSE PLAY 3 7 CDC-505 5 2, 4 1 SYNCHRO 1 4 TEXT/ OPEN/ DIMMER TIME CLOSE CLEAR PROG 2 3 INDEX 5 6 +I0 7 8 9 0 DISC SCAN MODE REPEAT RANDOM DISC SKIP SEARCH SKIP STOP PAUSE PLAY 3 7 1 Stop the unit. DISC SKIP or DISC 2 3 4 (On the front panel) 5 Program a desired track by pressing the corresponding numeric button. 5 3 Press the PROG button to program more discs in any desired order by pressing the DISC SKIP button in turn...

Owner's Manual
Page 15
... button to select a track to replace the one time. q Switch off the power. Notes q You can be used during playing, but only within the range of the programmed tracks. q If, during programming, the TEXT/TIME display mode-select button is pressed, the track numbers and sequential order of the programmed tracks can program as many as described below. To resume play , press the STOP button. 2. Each time the SKIP button is pressed, the program number display...
... button to select a track to replace the one time. q Switch off the power. Notes q You can be used during playing, but only within the range of the programmed tracks. q If, during programming, the TEXT/TIME display mode-select button is pressed, the track numbers and sequential order of the programmed tracks can program as many as described below. To resume play , press the STOP button. 2. Each time the SKIP button is pressed, the program number display...

Owner's Manual
Page 16
... tell if such index numbers are repeatedly played in the program play mode and the random-sequence play mode. (If the repeat play mode is switched off, the program play mode or the randomsequence play mode will begin from the start from any desired index number. 1 Select a track which has index numbers. 3 Select the desired index number. 5 3 2 INDEX To cancel the index search function Press the INDEX button. 5 6 7 8 9 10 11 12 Notes...
... tell if such index numbers are repeatedly played in the program play mode and the random-sequence play mode. (If the repeat play mode is switched off, the program play mode or the randomsequence play mode will begin from the start from any desired index number. 1 Select a track which has index numbers. 3 Select the desired index number. 5 3 2 INDEX To cancel the index search function Press the INDEX button. 5 6 7 8 9 10 11 12 Notes...
Owner's Manual
Page 17
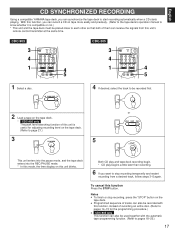
..." button on the tape deck. OUTPUT LEVEL + SKIP STOP PAUSE PLAY 4 5 CDC-505 3 4 1 SYNCHRO 1 4 TEXT/ DIMMER TIME OPEN/ CLOSE CLEAR PROG 2 3 INDEX 5 6 +I0 7 8 9 0 DISC SCAN MODE REPEAT RANDOM DISC SKIP SEARCH SKIP STOP PAUSE PLAY 4 5 1 Select a disc. English CD SYNCHRONIZED RECORDING Using a compatible YAMAHA tape deck, you can record a CD on tape more easily and precisely. (Refer to the tape deck's operation manual to know whether it is useful for the programming procedure.) q CDC-905 only This function...
..." button on the tape deck. OUTPUT LEVEL + SKIP STOP PAUSE PLAY 4 5 CDC-505 3 4 1 SYNCHRO 1 4 TEXT/ DIMMER TIME OPEN/ CLOSE CLEAR PROG 2 3 INDEX 5 6 +I0 7 8 9 0 DISC SCAN MODE REPEAT RANDOM DISC SKIP SEARCH SKIP STOP PAUSE PLAY 4 5 1 Select a disc. English CD SYNCHRONIZED RECORDING Using a compatible YAMAHA tape deck, you can record a CD on tape more easily and precisely. (Refer to the tape deck's operation manual to know whether it is useful for the programming procedure.) q CDC-905 only This function...

Owner's Manual
Page 18
... 5 6 +I0 7 8 9 0 DISC SCAN MODE REPEAT RANDOM DISC SKIP SEARCH - TAPE You can select any of the tape. Resume recording and, at the same time, press the PLAY or PAUSE button on this unit's remote control transmitter. TRACK PROGRAMMING FOR RECORDING TO TAPE ffoorr CCDDCC--960555 oonnllyy This convenient feature can be used to program tracks for a short time. 6 Begin recording on the tape deck and press the PLAY button on...
... 5 6 +I0 7 8 9 0 DISC SCAN MODE REPEAT RANDOM DISC SKIP SEARCH - TAPE You can select any of the tape. Resume recording and, at the same time, press the PLAY or PAUSE button on this unit's remote control transmitter. TRACK PROGRAMMING FOR RECORDING TO TAPE ffoorr CCDDCC--960555 oonnllyy This convenient feature can be used to program tracks for a short time. 6 Begin recording on the tape deck and press the PLAY button on...
Owner's Manual
Page 19
.... TAPE * "PAUSE" lights up in turn. * This unit will pause at the same time, press the PLAY or PAUSE button on this unit's remote control transmitter. q This function can select the same track again. * If "ERROR" appears in steps 11 and 12, press the SYNCHRO button and then press the PLAY button on this unit's remote control transmitter. If the disc has more discs in the display, you can program...
.... TAPE * "PAUSE" lights up in turn. * This unit will pause at the same time, press the PLAY or PAUSE button on this unit's remote control transmitter. q This function can select the same track again. * If "ERROR" appears in steps 11 and 12, press the SYNCHRO button and then press the PLAY button on this unit's remote control transmitter. If the disc has more discs in the display, you can program...

Owner's Manual
Page 20
... your tape deck is pressed, the program number display can be programmed next. Shows the selected disc and track number. Ž Shows the total remaining time on the side of the tape. Programmed track numbers light up and programmable track numbers among the unprogrammed ones blink. * If "A-1" does not appear in turn just after the PROG button is pressed, press the TEXT/TIME display mode-select button. * If, during programming, the TEXT/TIME display mode-select button...
... your tape deck is pressed, the program number display can be programmed next. Shows the selected disc and track number. Ž Shows the total remaining time on the side of the tape. Programmed track numbers light up and programmable track numbers among the unprogrammed ones blink. * If "A-1" does not appear in turn just after the PROG button is pressed, press the TEXT/TIME display mode-select button. * If, during programming, the TEXT/TIME display mode-select button...
Owner's Manual
Page 21
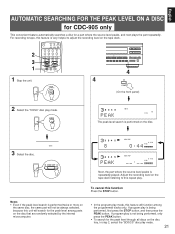
... performed, only press the PEAK button. • To search for the peak level through all discs on the tape deck listening to this feature will search for a part where the source level peaks, and next plays the part repeatedly. If program play mode. 21 STOP 4 / OPEN/CLOSE PLAYXCHANGE DISC 2 3 4 4 5 6 7 8 5 9 0 PEAK SKIP/SEARCH OUTPUT LEVEL PHONES - + 4 0 PEAK (On the front panel) 2 Select the "1DISC" disc play . Notes • Even if the...
... performed, only press the PEAK button. • To search for the peak level through all discs on the tape deck listening to this feature will search for a part where the source level peaks, and next plays the part repeatedly. If program play mode. 21 STOP 4 / OPEN/CLOSE PLAYXCHANGE DISC 2 3 4 4 5 6 7 8 5 9 0 PEAK SKIP/SEARCH OUTPUT LEVEL PHONES - + 4 0 PEAK (On the front panel) 2 Select the "1DISC" disc play . Notes • Even if the...
Owner's Manual
Page 22
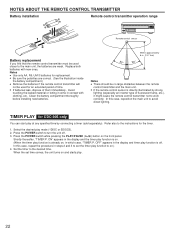
... the POWER switch to turn the unit off . Refer also to the instructions for an extended period of them immediately. NOTES ABOUT THE REMOTE CONTROL TRANSMITTER Battery installation Remote control transmitter operation range 2 1 3 Battery replacement If you find that the remote control transmitter must be used for the timer. 1. In this case, repeat the procedure in the display and the timer play function is already on the front panel...
... the POWER switch to turn the unit off . Refer also to the instructions for an extended period of them immediately. NOTES ABOUT THE REMOTE CONTROL TRANSMITTER Battery installation Remote control transmitter operation range 2 1 3 Battery replacement If you find that the remote control transmitter must be used for the timer. 1. In this case, repeat the procedure in the display and the timer play function is already on the front panel...


