
Owners Manual
Page 6
...distortion by compressing excessive peaks in your computer via the supplied USB cable. No Driver Installation Required (page 8) The AUDIOGRAM system uses the standard drivers included in the signals from the interface to the computer, and vice-versa-via the ...AUDIOGRAM interface connects to your computer's operating system, so there's no need to install any extra driver software. Cubase AI DAW Software Supplied (page 8) Cubase AI software, included in both directions-from microphones and guitars. 48V Phantom Power (page 16) A PHANTOM switch supplies +48V phantom power to the channel...
...distortion by compressing excessive peaks in your computer via the supplied USB cable. No Driver Installation Required (page 8) The AUDIOGRAM system uses the standard drivers included in the signals from the interface to the computer, and vice-versa-via the ...AUDIOGRAM interface connects to your computer's operating system, so there's no need to install any extra driver software. Cubase AI DAW Software Supplied (page 8) Cubase AI software, included in both directions-from microphones and guitars. 48V Phantom Power (page 16) A PHANTOM switch supplies +48V phantom power to the channel...

Owners Manual
Page 8
...control and DAW control to their minimum settings. 4 To use of time expires. • To install on : 2 Step Connecting to the AUDIOGRAM interface 1 Turn all required fields for recording and mixdown. Click the "Register Now" button shown when the software is connected to the...setup and operation guide covers everything from installing the Cubase AI software to using a phantompowered condenser microphone. You are only permitted to use channels 1 and 2 as the pdf manual supplied with the Cubase AI software. 1 Step Installing Cubase AI Important! DAW control LEVEL controls ...
...control and DAW control to their minimum settings. 4 To use of time expires. • To install on : 2 Step Connecting to the AUDIOGRAM interface 1 Turn all required fields for recording and mixdown. Click the "Register Now" button shown when the software is connected to the...setup and operation guide covers everything from installing the Cubase AI software to using a phantompowered condenser microphone. You are only permitted to use channels 1 and 2 as the pdf manual supplied with the Cubase AI software. 1 Step Installing Cubase AI Important! DAW control LEVEL controls ...

Owners Manual
Page 9
...USB connector. • Always quit all instruments that are using a condenser microphone for the channel 1, turn on , be sure that could cause hearing loss or device damage. 3 Connect the AUDIOGRAM interface to your ears, or both. 2 Adjust the volume on all applications running on occasional... (powered speakers). 1 Turn on the instruments and microphones. 2 If you are connected to the AUDIOGRAM interface. 3 Adjust the channel GAIN controls so that power is being applied to the AUDIOGRAM interface. CAUTION • Make sure that the PHANTOM +48V switch is off . We also recommend...
...USB connector. • Always quit all instruments that are using a condenser microphone for the channel 1, turn on , be sure that could cause hearing loss or device damage. 3 Connect the AUDIOGRAM interface to your ears, or both. 2 Adjust the volume on all applications running on occasional... (powered speakers). 1 Turn on the instruments and microphones. 2 If you are connected to the AUDIOGRAM interface. 3 Adjust the channel GAIN controls so that power is being applied to the AUDIOGRAM interface. CAUTION • Make sure that the PHANTOM +48V switch is off . We also recommend...

Owners Manual
Page 13
...panel [Start] button. Level meter Bus level meter 5 To save the project select [Save] from the [Devices] menu to open the Mixer window. AUDIOGRAM 6 Owner's Manual 13 Quick Guide Recording and Playback 1 Click the Transport panel [Record] button to begin moving to the right and a box that ...approximately match the recording level when the DAW control is set to about 1 o'clock. Adjust the channel LEVEL controls so that displays the recording results will be displayed via the channel strip level meter. Save your project frequently to insure against losing large amounts of the track you ...
...panel [Start] button. Level meter Bus level meter 5 To save the project select [Save] from the [Devices] menu to open the Mixer window. AUDIOGRAM 6 Owner's Manual 13 Quick Guide Recording and Playback 1 Click the Transport panel [Record] button to begin moving to the right and a box that ...approximately match the recording level when the DAW control is set to about 1 o'clock. Adjust the channel LEVEL controls so that displays the recording results will be displayed via the channel strip level meter. Save your project frequently to insure against losing large amounts of the track you ...

Owners Manual
Page 14
... progress window closes the mixdown is complete. As an example let's try mixing down to audio CDs. 1 Launch Cubase AI and open the VST audio channel settings window. It's a good idea to stereo, and creating an audio file. Bar 5 At this section we'll try adding reverb. Click the [Edit... a bit before adding an effect, since the effect CAUTION can be shown in the overall channel level. 14 AUDIOGRAM 6 Owner's Manual NOTE For further details refer to the pdf manual provided with Cubase AI In this point you intend to use EQ to set ...
... progress window closes the mixdown is complete. As an example let's try mixing down to audio CDs. 1 Launch Cubase AI and open the VST audio channel settings window. It's a good idea to stereo, and creating an audio file. Bar 5 At this section we'll try adding reverb. Click the [Edit... a bit before adding an effect, since the effect CAUTION can be shown in the overall channel level. 14 AUDIOGRAM 6 Owner's Manual NOTE For further details refer to the pdf manual provided with Cubase AI In this point you intend to use EQ to set ...

Owners Manual
Page 15
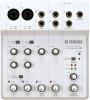
...XLR or phone jack cables. Phone-type 3 STEREO OUT Jacks These output the mixed signal from channels 1 to the type of device connected. Otherwise noise may occur. 6 GAIN Control Adjusts the input signal level. AUDIOGRAM 6 Owner's Manual 15 Select MIC ( ) if a microphone is connected, or INST ( )... to this switch to MIC ( ). To achieve the best balance between S/N ratio and dynamic range, adjust the level so that the input channel PEAK indicator 9 lights only occasionally and briefly on the highest input transients. Set the MIC/INST switch 5 to MIC or INST according...
...XLR or phone jack cables. Phone-type 3 STEREO OUT Jacks These output the mixed signal from channels 1 to the type of device connected. Otherwise noise may occur. 6 GAIN Control Adjusts the input signal level. AUDIOGRAM 6 Owner's Manual 15 Select MIC ( ) if a microphone is connected, or INST ( )... to this switch to MIC ( ). To achieve the best balance between S/N ratio and dynamic range, adjust the level so that the input channel PEAK indicator 9 lights only occasionally and briefly on the highest input transients. Set the MIC/INST switch 5 to MIC or INST according...

Owners Manual
Page 16
...LEVEL controls Record D DAW control Playback Compress the signal for channel 1) This switch toggles phantom power on ( ), the AUDIOGRAM supplies phantom power to MONO ( ), channels 1 and 2 function as a stereo pair: the channel 1 signal feeds the L STEREO OUT jack and the channel 2 signal feeds the R STEREO OUT jack. 9 PEAK... position. NOTE Yamaha recommends that the PEAK LEDs flash only briefly on your ears, or both the L and R STE- Input 6 GAIN controls Adjust for maximum level with the phone jack, however, as the balance between the AUDIOGRAM interface and the...
...LEVEL controls Record D DAW control Playback Compress the signal for channel 1) This switch toggles phantom power on ( ), the AUDIOGRAM supplies phantom power to MONO ( ), channels 1 and 2 function as a stereo pair: the channel 1 signal feeds the L STEREO OUT jack and the channel 2 signal feeds the R STEREO OUT jack. 9 PEAK... position. NOTE Yamaha recommends that the PEAK LEDs flash only briefly on your ears, or both the L and R STE- Input 6 GAIN controls Adjust for maximum level with the phone jack, however, as the balance between the AUDIOGRAM interface and the...

Owners Manual
Page 17
...channel, 16 bit, 48000 Hz (DVD Quality)" in the "Sound scheme." Mac: 1. Close the "Properties" dialog window. 4. Set "Device volume" to a USB port on . ❑ Is the included USB cable properly plugged into the interface and a computer? USB hubs can interfere with proper operation, so try connecting the AUDIOGRAM... set the computer output to quit all necessary audio cables properly connected? ❑ Are you using other device(s) and connecting only the Yamaha USB device. Click the "Sounds" tab in the "Sound" dialog window, then select "No sounds" in level. ❑ Is...
...channel, 16 bit, 48000 Hz (DVD Quality)" in the "Sound scheme." Mac: 1. Close the "Properties" dialog window. 4. Set "Device volume" to a USB port on . ❑ Is the included USB cable properly plugged into the interface and a computer? USB hubs can interfere with proper operation, so try connecting the AUDIOGRAM... set the computer output to quit all necessary audio cables properly connected? ❑ Are you using other device(s) and connecting only the Yamaha USB device. Click the "Sounds" tab in the "Sound" dialog window, then select "No sounds" in level. ❑ Is...

Owners Manual
Page 19
... x 1 Green USB bus-powered 170 x 59 x 192 mm 760 g Cubase AI DVD-ROM USB cable Owner's Manual ■ Dimensional Diagrams W: 170 56 51 D: 192 104 AUDIOGRAM 6 Owner's Manual 38 3 H: 59 Unit: mm x 4 Gain for CH 1-5/6 x 2 Compressor for CH 1, 2 x 1 MONO: CH 1, 2 signals fuction as a stereo pair. STEREO: CH 1, 2 signals fuction as independent...
... x 1 Green USB bus-powered 170 x 59 x 192 mm 760 g Cubase AI DVD-ROM USB cable Owner's Manual ■ Dimensional Diagrams W: 170 56 51 D: 192 104 AUDIOGRAM 6 Owner's Manual 38 3 H: 59 Unit: mm x 4 Gain for CH 1-5/6 x 2 Compressor for CH 1, 2 x 1 MONO: CH 1, 2 signals fuction as a stereo pair. STEREO: CH 1, 2 signals fuction as independent...

