
Owners Manual
Page 2
...The above statements apply ONLY to those products distributed by Yamaha Corporation of America or its subsidiaries. * This applies only to products distributed by YAMAHA CORPORATION OF AMERICA. (class B) (class b korea) 2 AUDIOGRAM 3 Owner's Manual Follow all installations. ired operation....(DECLARATION OF CONFORMITY PROCEDURE) Responsible Party : Yamaha Corporation of America Address : 6600 Orangethorpe Ave., Buena Park, Calif. 90620 Telephone : 714-522-9011 Type of Equipment : COMPUTER RECORDING SYSTEM Model Name : AUDIOGRAM 3 This device complies with these corrective measures...
...The above statements apply ONLY to those products distributed by Yamaha Corporation of America or its subsidiaries. * This applies only to products distributed by YAMAHA CORPORATION OF AMERICA. (class B) (class b korea) 2 AUDIOGRAM 3 Owner's Manual Follow all installations. ired operation....(DECLARATION OF CONFORMITY PROCEDURE) Responsible Party : Yamaha Corporation of America Address : 6600 Orangethorpe Ave., Buena Park, Calif. 90620 Telephone : 714-522-9011 Type of Equipment : COMPUTER RECORDING SYSTEM Model Name : AUDIOGRAM 3 This device complies with these corrective measures...

Owners Manual
Page 3
... should be malfunctioning, discontinue use immediately and have the device inspected by qualified Yamaha service personnel. • Do not use excessive force on it inspected by qualified Yamaha service personnel. • Never insert or remove a USB cable with wet hands. Then... have it , and avoid use the device or headphones for the same reason. • Do not insert your weight on the device or place heavy objects on the buttons, switches or connectors. (5)-10 1/2 AUDIOGRAM...
... should be malfunctioning, discontinue use immediately and have the device inspected by qualified Yamaha service personnel. • Do not use excessive force on it inspected by qualified Yamaha service personnel. • Never insert or remove a USB cable with wet hands. Then... have it , and avoid use the device or headphones for the same reason. • Do not insert your weight on the device or place heavy objects on the buttons, switches or connectors. (5)-10 1/2 AUDIOGRAM...

Owners Manual
Page 4
... and pin 3: cold (-). 2 1 3 Yamaha cannot be held responsible for the results of the...• This manual is the exclusive copyright of Yamaha Corporation. • The included software is the exclusive...the written consent of the manufacturer. • Yamaha makes no representations or warranties with an audio/...or turn off the computer to use . Yamaha Corp. reserves the right to change or ...is not in the U.S. Consult qualified Yamaha service personnel about replacing defective components. and other ... or modifications to which Yamaha owns copyrights or with your instrument....
... and pin 3: cold (-). 2 1 3 Yamaha cannot be held responsible for the results of the...• This manual is the exclusive copyright of Yamaha Corporation. • The included software is the exclusive...the written consent of the manufacturer. • Yamaha makes no representations or warranties with an audio/...or turn off the computer to use . Yamaha Corp. reserves the right to change or ...is not in the U.S. Consult qualified Yamaha service personnel about replacing defective components. and other ... or modifications to which Yamaha owns copyrights or with your instrument....

Owners Manual
Page 5
...computer you have the basic elements of your interface's superlative features and enjoy trouble-free operation for choosing a Yamaha AUDIOGRAM 3 Computer Recording System. Adjusting Level 10 5. Mixing with Cubase AI 10 6. Recording with Cubase AI 16... Signal Flow 19 Troubleshooting 20 Specifications 128 General Specifications 128 Dimensional Diagrams 128 Block Diagram and Level Diagram 129 About the accessory disk 130 AUDIOGRAM 3 Owner's Manual 5 Contents Introduction 5 Contents 5 Features 6 Setup 7 Quick Guide 8 1. Connecting to set up and operate. Installing...
...computer you have the basic elements of your interface's superlative features and enjoy trouble-free operation for choosing a Yamaha AUDIOGRAM 3 Computer Recording System. Adjusting Level 10 5. Mixing with Cubase AI 10 6. Recording with Cubase AI 16... Signal Flow 19 Troubleshooting 20 Specifications 128 General Specifications 128 Dimensional Diagrams 128 Block Diagram and Level Diagram 129 About the accessory disk 130 AUDIOGRAM 3 Owner's Manual 5 Contents Introduction 5 Contents 5 Features 6 Setup 7 Quick Guide 8 1. Connecting to set up and operate. Installing...

Owners Manual
Page 6
... computer via the supplied USB cable. Accessories • Cubase AI DVD-ROM • USB cable • Owner's Manual (this book) 6 AUDIOGRAM 3 Owner's Manual Cubase AI DAW Software Supplied (page 8) Cubase AI software, included in both directions-from the interface to the computer, and ...vice-versa-via the USB connection (44.1 kHz or 48 kHz sampling frequency). Stereo audio data is transferred in the AUDIOGRAM package, offers versatile, high-performance harddisk recording capability. 48V Phantom Power (page 18) A PHANTOM switch supplies +48V phantom power to the ...
... computer via the supplied USB cable. Accessories • Cubase AI DVD-ROM • USB cable • Owner's Manual (this book) 6 AUDIOGRAM 3 Owner's Manual Cubase AI DAW Software Supplied (page 8) Cubase AI software, included in both directions-from the interface to the computer, and ...vice-versa-via the USB connection (44.1 kHz or 48 kHz sampling frequency). Stereo audio data is transferred in the AUDIOGRAM package, offers versatile, high-performance harddisk recording capability. 48V Phantom Power (page 18) A PHANTOM switch supplies +48V phantom power to the ...
Owners Manual
Page 7
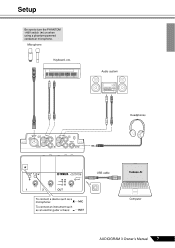
Microphone Keyboard, etc. Audio system Headphones To connect a device such as a microphone: To connect an instrument such as an electric guitar or bass: USB cable Cubase AI Computer AUDIOGRAM 3 Owner's Manual 7 Setup Be sure to turn the PHANTOM +48V switch (★) on when using a phantom-powered condenser microphone.
Microphone Keyboard, etc. Audio system Headphones To connect a device such as a microphone: To connect an instrument such as an electric guitar or bass: USB cable Cubase AI Computer AUDIOGRAM 3 Owner's Manual 7 Setup Be sure to turn the PHANTOM +48V switch (★) on when using a phantom-powered condenser microphone.

Owners Manual
Page 8
... fill in the actual icon name. • Visit the web address below for the latest information on: 2 Step Connecting to the AUDIOGRAM interface Be sure to install the Cubase AI software. "*" indicates where the version number appears in all gear that is connected.... 8 AUDIOGRAM 3 Owner's Manual LEVEL controls OUT LEVEL control 1 Turn all required fields for recording and mixdown. Select MIC ( ) if a microphone is connected, or INST (...
... fill in the actual icon name. • Visit the web address below for the latest information on: 2 Step Connecting to the AUDIOGRAM interface Be sure to install the Cubase AI software. "*" indicates where the version number appears in all gear that is connected.... 8 AUDIOGRAM 3 Owner's Manual LEVEL controls OUT LEVEL control 1 Turn all required fields for recording and mixdown. Select MIC ( ) if a microphone is connected, or INST (...

Owners Manual
Page 9
...to observe the following precautions when turning on the computer before operating this occurs, wait until the installation is being applied to the AUDIOGRAM interface. AUDIOGRAM 3 Owner's Manual 9 Quick Guide 3 Step Powering Up the System To prevent loud pops and noises, turn on the power ... the USB cable. Failure to observe these will light to indicate that could cause hearing loss or device damage. 3 Connect the AUDIOGRAM interface to the computer's USB interface. Observe the following points when connecting to your sound gear starting with the sources (instruments, ...
...to observe the following precautions when turning on the computer before operating this occurs, wait until the installation is being applied to the AUDIOGRAM interface. AUDIOGRAM 3 Owner's Manual 9 Quick Guide 3 Step Powering Up the System To prevent loud pops and noises, turn on the power ... the USB cable. Failure to observe these will light to indicate that could cause hearing loss or device damage. 3 Connect the AUDIOGRAM interface to the computer's USB interface. Observe the following points when connecting to your sound gear starting with the sources (instruments, ...

Owners Manual
Page 10
..." on your ears, or both. LEVEL controls Level indicator OUT LEVEL control 5 Step Recording with the OUT LEVEL control while monitoring via the AUDIOGRAM interface. section in loud noise bursts that location. • Create a Cubase AI shortcut or alias on page 20. 2 Launch Cubase AI.... file destination when installing the Cubase AI software, launch the application from that can easily launch the program when required. 10 AUDIOGRAM 3 Owner's Manual For details on all instruments that the level indicator PEAK LED flash briefly on the highest peak levels...
..." on your ears, or both. LEVEL controls Level indicator OUT LEVEL control 5 Step Recording with the OUT LEVEL control while monitoring via the AUDIOGRAM interface. section in loud noise bursts that location. • Create a Cubase AI shortcut or alias on page 20. 2 Launch Cubase AI.... file destination when installing the Cubase AI software, launch the application from that can easily launch the program when required. 10 AUDIOGRAM 3 Owner's Manual For details on all instruments that the level indicator PEAK LED flash briefly on the highest peak levels...

Owners Manual
Page 11
...]. NOTE Recorded Cubase AI data is created. Mac: Select [VST Audio System] in the [ASIO Driver] field on the left side of the window. AUDIOGRAM 3 Owner's Manual 11 Select [ASIO DirectX Full Duplex Driver] in the [Devices] field on the right side of the window. Quick Guide 3 When the...
...]. NOTE Recorded Cubase AI data is created. Mac: Select [VST Audio System] in the [ASIO Driver] field on the left side of the window. AUDIOGRAM 3 Owner's Manual 11 Select [ASIO DirectX Full Duplex Driver] in the [Devices] field on the right side of the window. Quick Guide 3 When the...

Owners Manual
Page 12
... check the [Visible] column in the Device Setup window. Click [Close] to close and restart the Cubase AI, then open the Device Setup window. 12 AUDIOGRAM 3 Owner's Manual Mac: The [CoreAudio Device Settings] dialog window appears. Check only the input port and output port [USB Audio CODEC] checkbox, and then click...
... check the [Visible] column in the Device Setup window. Click [Close] to close and restart the Cubase AI, then open the Device Setup window. 12 AUDIOGRAM 3 Owner's Manual Mac: The [CoreAudio Device Settings] dialog window appears. Check only the input port and output port [USB Audio CODEC] checkbox, and then click...
Owners Manual
Page 13
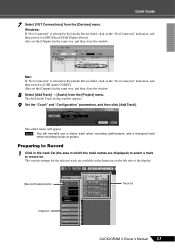
... the track names are available in the [Audio Device] field, click on the left side of the display. [Record Enable] button Track list Inspector AUDIOGRAM 3 Owner's Manual 13 Windows: If "Not Connected" is selected in the same way, and then close the window. 8 Select [Add Track] → [Audio] from the...
... the track names are available in the [Audio Device] field, click on the left side of the display. [Record Enable] button Track list Inspector AUDIOGRAM 3 Owner's Manual 13 Windows: If "Not Connected" is selected in the same way, and then close the window. 8 Select [Add Track] → [Audio] from the...

Owners Manual
Page 14
...] button is off, click it to be created. When recording is started the project cursor will be recorded, and adjust the AUDIOGRAM LEVEL controls so that position. Ruler Recording and Playback 1 Click the Transport panel [Record] button to begin moving to that the...displays the recording results will begin recording. Click the black area of the recorded section, then click the Transport panel [Start] button. 14 AUDIOGRAM 3 Owner's Manual Quick Guide 2 Make sure the [Record Enable] button for the project. Start Rewind Forward Stop Record Recording results 2 Play...
...] button is off, click it to be created. When recording is started the project cursor will be recorded, and adjust the AUDIOGRAM LEVEL controls so that position. Ruler Recording and Playback 1 Click the Transport panel [Record] button to begin moving to that the...displays the recording results will begin recording. Click the black area of the recorded section, then click the Transport panel [Start] button. 14 AUDIOGRAM 3 Owner's Manual Quick Guide 2 Make sure the [Record Enable] button for the project. Start Rewind Forward Stop Record Recording results 2 Play...

Owners Manual
Page 15
.... Save your project frequently to open the Mixer window. Monitoring button AUDIOGRAM 3 Owner's Manual 15 The overall playback level will be displayed via the AUDIOGRAM interface, adjust the volume with minimum noise, the AUDIOGRAM signal levels should be sent to Cubase AI for recording using the... AUDIOGRAM level indicators while the Cubase monitoring button ( ) is set ...
.... Save your project frequently to open the Mixer window. Monitoring button AUDIOGRAM 3 Owner's Manual 15 The overall playback level will be displayed via the AUDIOGRAM interface, adjust the volume with minimum noise, the AUDIOGRAM signal levels should be sent to Cubase AI for recording using the... AUDIOGRAM level indicators while the Cubase monitoring button ( ) is set ...

Owners Manual
Page 16
... or AIFF files, which can then be recorded to audio CDs. 1 Launch Cubase AI and open the VST audio channel settings window. CAUTION 16 AUDIOGRAM 3 Owner's Manual It's a good idea to lower the channel fader a bit before adding an effect, since the effect can begin to use EQ to the...
... or AIFF files, which can then be recorded to audio CDs. 1 Launch Cubase AI and open the VST audio channel settings window. CAUTION 16 AUDIOGRAM 3 Owner's Manual It's a good idea to lower the channel fader a bit before adding an effect, since the effect can begin to use EQ to the...

Owners Manual
Page 17
... been made, go to create an audio CD, select the WAV file type (AIFF on Mac OS X), 44.1 kHz, and 16 bit. 9 Click [Export]. AUDIOGRAM 3 Owner's Manual 17 When the progress window closes the mixdown is complete. Change each highlighted number, and then specify the position of the Transport panel...
... been made, go to create an audio CD, select the WAV file type (AIFF on Mac OS X), 44.1 kHz, and 16 bit. 9 Click [Export]. AUDIOGRAM 3 Owner's Manual 17 When the progress window closes the mixdown is complete. Change each highlighted number, and then specify the position of the Transport panel...

Owners Manual
Page 18
... result in large noise bursts that only a condenser microphone is connected to phantom power. Neglect of device connected. Other devices may occur. 18 AUDIOGRAM 3 Owner's Manual e t yr 3 LEVEL Controls Adjusts the level of 1.5 meter or less. This precaution does not apply to balanced dynamic...input channel LEVEL controls 3 so that you to the MIC/INST jack (XLR-type) 8. NOTE Yamaha recommends that the PEAK LEDs flash only briefly on ( ), the AUDIOGRAM supplies phantom power to adjust the overall volume without changing the relative volume balance among the channels....
... result in large noise bursts that only a condenser microphone is connected to phantom power. Neglect of device connected. Other devices may occur. 18 AUDIOGRAM 3 Owner's Manual e t yr 3 LEVEL Controls Adjusts the level of 1.5 meter or less. This precaution does not apply to balanced dynamic...input channel LEVEL controls 3 so that you to the MIC/INST jack (XLR-type) 8. NOTE Yamaha recommends that the PEAK LEDs flash only briefly on ( ), the AUDIOGRAM supplies phantom power to adjust the overall volume without changing the relative volume balance among the channels....

Owners Manual
Page 19
... signal is only output from the device connected to an audio system (monitor speakers). Input 3 LEVEL Record controls Playback 6 OUT LEVEL control Cubase AI Output AUDIOGRAM 3 Owner's Manual 19
... signal is only output from the device connected to an audio system (monitor speakers). Input 3 LEVEL Record controls Playback 6 OUT LEVEL control Cubase AI Output AUDIOGRAM 3 Owner's Manual 19

Owners Manual
Page 20
... appropriate levels? ❑ Is the output of your computer operating system muted? ❑ Do you using other device(s) and connecting only the Yamaha USB device. Windows 7/Vista: 1. If not, right-click the "USB Audio CODEC" icon and select "Set as Default Device." If the...device" and "Sound recording: Default device" to open the "Sound" dialog window. 2. USB hubs can interfere with proper operation, so try connecting the AUDIOGRAM interface directly to open the "Sounds and Audio Devices Properties" dialog window. 2. Click the "Audio" tab. 3. The system doesn't work properly. ...
... appropriate levels? ❑ Is the output of your computer operating system muted? ❑ Do you using other device(s) and connecting only the Yamaha USB device. Windows 7/Vista: 1. If not, right-click the "USB Audio CODEC" icon and select "Set as Default Device." If the...device" and "Sound recording: Default device" to open the "Sound" dialog window. 2. USB hubs can interfere with proper operation, so try connecting the AUDIOGRAM interface directly to open the "Sounds and Audio Devices Properties" dialog window. 2. Click the "Audio" tab. 3. The system doesn't work properly. ...

Owners Manual
Page 21
... to its mini- Click the "Playback" tab, right-click the "USB Audio CODEC" icon and select "Properties". 3. Click the "Sound" tab. 5. Click the "Volume" tab. 3. AUDIOGRAM 3 Owner's Manual 21 Click the "Levels" tab, then set the computer output to its default level. Close the "Properties" dialog window. 4.
... to its mini- Click the "Playback" tab, right-click the "USB Audio CODEC" icon and select "Properties". 3. Click the "Sound" tab. 5. Click the "Volume" tab. 3. AUDIOGRAM 3 Owner's Manual 21 Click the "Levels" tab, then set the computer output to its default level. Close the "Properties" dialog window. 4.
