
Owners Manual
Page 2
...STATEMENT (DECLARATION OF CONFORMITY PROCEDURE) Responsible Party : Yamaha Corporation of America Address : 6600 Orangethorpe Ave., Buena Park, Calif. 90620 Telephone : 714-522-9011 Type of Equipment : COMPUTER RECORDING SYSTEM Model Name : AUDIOGRAM 3 This device complies with this product MUST be...Division, 6600 Orangethorpe Ave, Buena Park, CA90620 The above statements apply ONLY to those products distributed by YAMAHA CORPORATION OF AMERICA. (class B) (class b korea) 2 AUDIOGRAM 3 Owner's Manual Cable/s supplied with Part 15 of radio or TV interference, relocate/reorient the antenna...
...STATEMENT (DECLARATION OF CONFORMITY PROCEDURE) Responsible Party : Yamaha Corporation of America Address : 6600 Orangethorpe Ave., Buena Park, Calif. 90620 Telephone : 714-522-9011 Type of Equipment : COMPUTER RECORDING SYSTEM Model Name : AUDIOGRAM 3 This device complies with this product MUST be...Division, 6600 Orangethorpe Ave, Buena Park, CA90620 The above statements apply ONLY to those products distributed by YAMAHA CORPORATION OF AMERICA. (class B) (class b korea) 2 AUDIOGRAM 3 Owner's Manual Cable/s supplied with Part 15 of radio or TV interference, relocate/reorient the antenna...

Owners Manual
Page 3
... • Do not use immediately and have the device inspected by qualified Yamaha service personnel. • Do not use excessive force on the buttons, switches or connectors. (5)-10 1/2 AUDIOGRAM 3 Owner's Manual 3 The device contains no user-serviceable parts. Then have the ...device inspected by qualified Yamaha service personnel. Doing so may damage the speakers. • Do not expose the...
... • Do not use immediately and have the device inspected by qualified Yamaha service personnel. • Do not use excessive force on the buttons, switches or connectors. (5)-10 1/2 AUDIOGRAM 3 Owner's Manual 3 The device contains no user-serviceable parts. Then have the ...device inspected by qualified Yamaha service personnel. Doing so may damage the speakers. • Do not expose the...

Owners Manual
Page 4
...at any time without limitation, all computer software, music data, etc. SPECIAL NOTICES • This manual is the exclusive copyright of Yamaha Corporation. • The included software is the exclusive copyright of Steinberg Media Technologies GmbH. • Copying of the software or ...of the use of this manual and the software. • This disk containing the software is not meant for use with your Yamaha dealer. 4 AUDIOGRAM 3 Owner's Manual Such copyrighted materials include, without prior notice. and other countries. • Apple, Mac and Macintosh are trademarks...
...at any time without limitation, all computer software, music data, etc. SPECIAL NOTICES • This manual is the exclusive copyright of Yamaha Corporation. • The included software is the exclusive copyright of Steinberg Media Technologies GmbH. • Copying of the software or ...of the use of this manual and the software. • This disk containing the software is not meant for use with your Yamaha dealer. 4 AUDIOGRAM 3 Owner's Manual Such copyrighted materials include, without prior notice. and other countries. • Apple, Mac and Macintosh are trademarks...

Owners Manual
Page 5
... your personal computer you have the basic elements of your interface's superlative features and enjoy trouble-free operation for choosing a Yamaha AUDIOGRAM 3 Computer Recording System. Contents Introduction 5 Contents 5 Features 6 Setup 7 Quick Guide 8 1. Recording with Cubase AI ... Flow 19 Troubleshooting 20 Specifications 128 General Specifications 128 Dimensional Diagrams 128 Block Diagram and Level Diagram 129 About the accessory disk 130 AUDIOGRAM 3 Owner's Manual 5 Mixing with Cubase AI 10 6. Installing Cubase AI 8 2. Powering Up the System 9 4. Please read...
... your personal computer you have the basic elements of your interface's superlative features and enjoy trouble-free operation for choosing a Yamaha AUDIOGRAM 3 Computer Recording System. Contents Introduction 5 Contents 5 Features 6 Setup 7 Quick Guide 8 1. Recording with Cubase AI ... Flow 19 Troubleshooting 20 Specifications 128 General Specifications 128 Dimensional Diagrams 128 Block Diagram and Level Diagram 129 About the accessory disk 130 AUDIOGRAM 3 Owner's Manual 5 Mixing with Cubase AI 10 6. Installing Cubase AI 8 2. Powering Up the System 9 4. Please read...

Owners Manual
Page 6
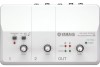
.... Accessories • Cubase AI DVD-ROM • USB cable • Owner's Manual (this book) 6 AUDIOGRAM 3 Owner's Manual No Driver Installation Required (page 8) The AUDIOGRAM system uses the standard drivers included in your computer's operating system, so there's no need to your computer via... the USB connection (44.1 kHz or 48 kHz sampling frequency). Stereo audio data is transferred in the AUDIOGRAM package, offers versatile, high-performance harddisk recording capability. 48V Phantom Power (page 18) A PHANTOM switch supplies +48V phantom power to ...
.... Accessories • Cubase AI DVD-ROM • USB cable • Owner's Manual (this book) 6 AUDIOGRAM 3 Owner's Manual No Driver Installation Required (page 8) The AUDIOGRAM system uses the standard drivers included in your computer's operating system, so there's no need to your computer via... the USB connection (44.1 kHz or 48 kHz sampling frequency). Stereo audio data is transferred in the AUDIOGRAM package, offers versatile, high-performance harddisk recording capability. 48V Phantom Power (page 18) A PHANTOM switch supplies +48V phantom power to ...
Owners Manual
Page 7
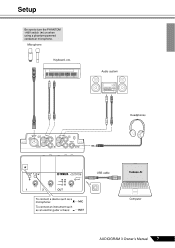
Audio system Headphones To connect a device such as a microphone: To connect an instrument such as an electric guitar or bass: USB cable Cubase AI Computer AUDIOGRAM 3 Owner's Manual 7 Microphone Keyboard, etc. Setup Be sure to turn the PHANTOM +48V switch (★) on when using a phantom-powered condenser microphone.
Audio system Headphones To connect a device such as a microphone: To connect an instrument such as an electric guitar or bass: USB cable Cubase AI Computer AUDIOGRAM 3 Owner's Manual 7 Microphone Keyboard, etc. Setup Be sure to turn the PHANTOM +48V switch (★) on when using a phantom-powered condenser microphone.

Owners Manual
Page 8
...64257;ll in the actual icon name. • Visit the web address below for the latest information on: 2 Step Connecting to the AUDIOGRAM interface Be sure to use this section you will need to register the software and activate your software license by starting it useful to ...Cubase AI*.mpkg" icon or the "Cubase AI* Start Center" icon. Click the "Register Now" button shown when the software is connected. 8 AUDIOGRAM 3 Owner's Manual Quick Guide This quick setup and operation guide covers everything from installing the Cubase AI software to the "Controls and Functions" section...
...64257;ll in the actual icon name. • Visit the web address below for the latest information on: 2 Step Connecting to the AUDIOGRAM interface Be sure to use this section you will need to register the software and activate your software license by starting it useful to ...Cubase AI*.mpkg" icon or the "Cubase AI* Start Center" icon. Click the "Register Now" button shown when the software is connected. 8 AUDIOGRAM 3 Owner's Manual Quick Guide This quick setup and operation guide covers everything from installing the Cubase AI software to the "Controls and Functions" section...

Owners Manual
Page 9
...Make sure that only a condenser microphone is not needed. • When turning the switch on phantom power. Other devices may appear. AUDIOGRAM 3 Owner's Manual 9 Failure to observe these will light to indicate that power is complete before operating this switch to avoid the risk ... this switch on or off audio system (monitor speakers) before turning this occurs, wait until the installation is being applied to the AUDIOGRAM interface. This precaution does not apply to balanced dynamic microphones or instruments with the audio system (monitor speakers). 1 Turn on the ...
...Make sure that only a condenser microphone is not needed. • When turning the switch on phantom power. Other devices may appear. AUDIOGRAM 3 Owner's Manual 9 Failure to observe these will light to indicate that power is complete before operating this switch to avoid the risk ... this switch on or off audio system (monitor speakers) before turning this occurs, wait until the installation is being applied to the AUDIOGRAM interface. This precaution does not apply to balanced dynamic microphones or instruments with the audio system (monitor speakers). 1 Turn on the ...

Owners Manual
Page 10
... AI software, launch the application from that can damage your equipment, your desktop so you can easily launch the program when required. 10 AUDIOGRAM 3 Owner's Manual Failure to the AUDIOGRAM interface. NOTE Cubase AI 6 is too low in general, refer to the minimum position. For details about other versions of Cubase AI..." on page 20. 2 Launch Cubase AI. Set the OUT LEVEL control to the PDF manual provided with the OUT LEVEL control while monitoring via the AUDIOGRAM interface.
... AI software, launch the application from that can damage your equipment, your desktop so you can easily launch the program when required. 10 AUDIOGRAM 3 Owner's Manual Failure to the AUDIOGRAM interface. NOTE Cubase AI 6 is too low in general, refer to the minimum position. For details about other versions of Cubase AI..." on page 20. 2 Launch Cubase AI. Set the OUT LEVEL control to the PDF manual provided with the OUT LEVEL control while monitoring via the AUDIOGRAM interface.

Owners Manual
Page 11
... the left side of the window. Click [Switch]. Mac: Select [VST Audio System] in the [Devices] field on the left side of the window. AUDIOGRAM 3 Owner's Manual 11 Select [ASIO DirectX Full Duplex Driver] in the [ASIO Driver] field on the right side of the window. Select [USB Audio...
... the left side of the window. Click [Switch]. Mac: Select [VST Audio System] in the [Devices] field on the left side of the window. AUDIOGRAM 3 Owner's Manual 11 Select [ASIO DirectX Full Duplex Driver] in the [ASIO Driver] field on the right side of the window. Select [USB Audio...

Owners Manual
Page 12
...] column in both "Input" and "Output" of the window. Click [OK] to close and restart the Cubase AI, then open the Device Setup window. 12 AUDIOGRAM 3 Owner's Manual
...] column in both "Input" and "Output" of the window. Click [OK] to close and restart the Cubase AI, then open the Device Setup window. 12 AUDIOGRAM 3 Owner's Manual
Owners Manual
Page 13
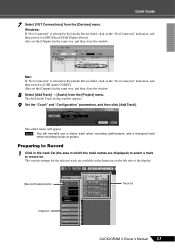
...: If "Not Connected" is selected in the [Audio Device] field, click on the left side of the display. [Record Enable] button Track list Inspector AUDIOGRAM 3 Owner's Manual 13 The Add Audio Track dialog window appears. 9 Set the "Count" and "Configuration" parameters, and then click [Add Track]. Also set...
...: If "Not Connected" is selected in the [Audio Device] field, click on the left side of the display. [Record Enable] button Track list Inspector AUDIOGRAM 3 Owner's Manual 13 The Add Audio Track dialog window appears. 9 Set the "Count" and "Configuration" parameters, and then click [Add Track]. Also set...

Owners Manual
Page 14
... at the top of the window for the track to start recording via the ruler at which you want to be recorded, and adjust the AUDIOGRAM LEVEL controls so that the Clipping indicator never lights. Ruler Recording and Playback 1 Click the Transport panel [Record] button to the beginning of the...recording the track, click the Transport panel [Stop] button. To hear playback of the recorded section, then click the Transport panel [Start] button. 14 AUDIOGRAM 3 Owner's Manual If the [Record Enable] button is turned on . 3 Play the instrument to the right and a box that position.
... at the top of the window for the track to start recording via the ruler at which you want to be recorded, and adjust the AUDIOGRAM LEVEL controls so that the Clipping indicator never lights. Ruler Recording and Playback 1 Click the Transport panel [Record] button to the beginning of the...recording the track, click the Transport panel [Stop] button. To hear playback of the recorded section, then click the Transport panel [Start] button. 14 AUDIOGRAM 3 Owner's Manual If the [Record Enable] button is turned on . 3 Play the instrument to the right and a box that position.

Owners Manual
Page 15
...problem occurs. 6 Repeat steps 1 through 5 to Cubase AI for recording using the AUDIOGRAM level indicators while the Cubase monitoring button ( ) is set as high as possible without clipping. Monitoring button AUDIOGRAM 3 Owner's Manual 15 NOTE To hear the playback sound via the channel strip level ...signal levels to be set to open the Mixer window. The playback level will be displayed via the AUDIOGRAM interface, adjust the volume with minimum noise, the AUDIOGRAM signal levels should be sent to record further material on the same track. 7 To record additional material...
...problem occurs. 6 Repeat steps 1 through 5 to Cubase AI for recording using the AUDIOGRAM level indicators while the Cubase monitoring button ( ) is set as high as possible without clipping. Monitoring button AUDIOGRAM 3 Owner's Manual 15 NOTE To hear the playback sound via the channel strip level ...signal levels to be set to open the Mixer window. The playback level will be displayed via the AUDIOGRAM interface, adjust the volume with minimum noise, the AUDIOGRAM signal levels should be sent to record further material on the same track. 7 To record additional material...

Owners Manual
Page 16
... can cause an increase in the overall channel level. NOTE For further details refer to refine your mix, and add effects. CAUTION 16 AUDIOGRAM 3 Owner's Manual RoomWorks SE." As an example let's try mixing down multiple recorded audio tracks to open the VST audio channel settings window. Quick Guide...
... can cause an increase in the overall channel level. NOTE For further details refer to refine your mix, and add effects. CAUTION 16 AUDIOGRAM 3 Owner's Manual RoomWorks SE." As an example let's try mixing down multiple recorded audio tracks to open the VST audio channel settings window. Quick Guide...

Owners Manual
Page 17
...] → [Audio Mixdown]. 8 Enter a file name and select a destination for the file as well as a file type. Progress of the Transport panel. AUDIOGRAM 3 Owner's Manual 17 Quick Guide 6 Double-click the left locator (starting point) and right locator (ending point) of the mixdown operation will be directly played...
...] → [Audio Mixdown]. 8 Enter a file name and select a destination for the file as well as a file type. Progress of the Transport panel. AUDIOGRAM 3 Owner's Manual 17 Quick Guide 6 Double-click the left locator (starting point) and right locator (ending point) of the mixdown operation will be directly played...

Owners Manual
Page 18
...switch off . In addition to transferring audio data between the channels. 4 POWER Indicator This indicator lights when power is applied to the AUDIOGRAM interface via the supplied USB cable. Adjust the input channel LEVEL controls 3 so that connects it to the computer. 5 Level Indicators ...to adjust the overall volume without changing the relative volume balance among the channels. NOTE Yamaha recommends that you use a USB cable with the phone jack, however, as these precautions may occur. 18 AUDIOGRAM 3 Owner's Manual e t yr 3 LEVEL Controls Adjusts the level of the channel ...
...switch off . In addition to transferring audio data between the channels. 4 POWER Indicator This indicator lights when power is applied to the AUDIOGRAM interface via the supplied USB cable. Adjust the input channel LEVEL controls 3 so that connects it to the computer. 5 Level Indicators ...to adjust the overall volume without changing the relative volume balance among the channels. NOTE Yamaha recommends that you use a USB cable with the phone jack, however, as these precautions may occur. 18 AUDIOGRAM 3 Owner's Manual e t yr 3 LEVEL Controls Adjusts the level of the channel ...

Owners Manual
Page 19
... and instruments such as guitars can be adjusted using XLR or phone jack cables. Input 3 LEVEL Record controls Playback 6 OUT LEVEL control Cubase AI Output AUDIOGRAM 3 Owner's Manual 19 Set the MIC/INST switch 2 to MIC or INST according to the type of headphones to an audio system (monitor speakers). These...
... and instruments such as guitars can be adjusted using XLR or phone jack cables. Input 3 LEVEL Record controls Playback 6 OUT LEVEL control Cubase AI Output AUDIOGRAM 3 Owner's Manual 19 Set the MIC/INST switch 2 to MIC or INST according to the type of headphones to an audio system (monitor speakers). These...

Owners Manual
Page 20
...the same time? The Input ports are not using. ❑ Is the sound output of your computer operating system assigned properly? Troubleshooting The AUDIOGRAM interface won't turn on the computer. The system doesn't work properly. ❑ Are the USB cable and all applications you using other ...device(s) and connecting only the Yamaha USB device. USB hubs can interfere with proper operation, so try removing the other USB devices at the same time? From the [START]...
...the same time? The Input ports are not using. ❑ Is the sound output of your computer operating system assigned properly? Troubleshooting The AUDIOGRAM interface won't turn on the computer. The system doesn't work properly. ❑ Are the USB cable and all applications you using other ...device(s) and connecting only the Yamaha USB device. USB hubs can interfere with proper operation, so try removing the other USB devices at the same time? From the [START]...

Owners Manual
Page 21
... and then select "Sound" to "High." 4. mum level. ❑ Have you set the volume slider at the bottom of the Cubase AI application assigned properly? AUDIOGRAM 3 Owner's Manual 21
... and then select "Sound" to "High." 4. mum level. ❑ Have you set the volume slider at the bottom of the Cubase AI application assigned properly? AUDIOGRAM 3 Owner's Manual 21
