
Owners Manual
Page 2
... power outlets that your use this product MUST be used according to the instructions found to be determined by turning the unit "OFF" and "ON", please try to eliminate the problem by using one of the following measures: Relocate either this product or the device that is subject to products distributed by Yamaha Corporation of the FCC Rules. Cable/s supplied...
... power outlets that your use this product MUST be used according to the instructions found to be determined by turning the unit "OFF" and "ON", please try to eliminate the problem by using one of the following measures: Relocate either this product or the device that is subject to products distributed by Yamaha Corporation of the FCC Rules. Cable/s supplied...

Owners Manual
Page 3
... device or place heavy objects on it, and avoid use excessive force on the buttons, switches or connectors. (5)-10 1/2 AUDIOGRAM 3 Owner's Manual 3 These precautions include, but are not limited to, the following : Location • Before moving the device, remove all connected cables. • Avoid setting all volume controls to it. Depending on monitor speakers LAST, to minimum. If this happens, unplug the...
... device or place heavy objects on it, and avoid use excessive force on the buttons, switches or connectors. (5)-10 1/2 AUDIOGRAM 3 Owner's Manual 3 These precautions include, but are not limited to, the following : Location • Before moving the device, remove all connected cables. • Avoid setting all volume controls to it. Depending on monitor speakers LAST, to minimum. If this happens, unplug the...

Owners Manual
Page 4
.... • Copying of the software or reproduction of this manual in whole or in part by improper use or modifications to the device, or data that is not in use. The illustrations and LCD screens as shown in this manual are the trademarks or registered trademarks of application and system software and any time without limitation, all computer software, music data, etc...
.... • Copying of the software or reproduction of this manual in whole or in part by improper use or modifications to the device, or data that is not in use. The illustrations and LCD screens as shown in this manual are the trademarks or registered trademarks of application and system software and any time without limitation, all computer software, music data, etc...

Owners Manual
Page 5
... features and enjoy trouble-free operation for years to the AUDIOGRAM interface 8 3. The AUDIOGRAM 3 includes a USB audio interface for digital audio data transfer, and Cubase AI DAW (Digital Audio Workstation) software for choosing a Yamaha AUDIOGRAM 3 Computer Recording System. Recording with Cubase AI 16 Controls and Functions 18 Input Signal Flow 19 Troubleshooting 20 Specifications 128 General Specifications 128 Dimensional Diagrams 128 Block Diagram and Level Diagram 129 About the accessory disk 130 AUDIOGRAM 3 Owner's Manual 5 Adjusting Level 10 5. After reading...
... features and enjoy trouble-free operation for years to the AUDIOGRAM interface 8 3. The AUDIOGRAM 3 includes a USB audio interface for digital audio data transfer, and Cubase AI DAW (Digital Audio Workstation) software for choosing a Yamaha AUDIOGRAM 3 Computer Recording System. Recording with Cubase AI 16 Controls and Functions 18 Input Signal Flow 19 Troubleshooting 20 Specifications 128 General Specifications 128 Dimensional Diagrams 128 Block Diagram and Level Diagram 129 About the accessory disk 130 AUDIOGRAM 3 Owner's Manual 5 Adjusting Level 10 5. After reading...

Owners Manual
Page 6
...'s operating system, so there's no need to install any extra driver software. Stereo audio data is transferred in your computer via the USB connection (44.1 kHz or 48 kHz sampling frequency). No Driver Installation Required (page 8) The AUDIOGRAM system uses the standard drivers included in both directions-from the interface to the channel 1 microphone input, so you can use high-quality phantom-powered condenser microphones for superior recording quality. Cubase AI DAW Software Supplied...
...'s operating system, so there's no need to install any extra driver software. Stereo audio data is transferred in your computer via the USB connection (44.1 kHz or 48 kHz sampling frequency). No Driver Installation Required (page 8) The AUDIOGRAM system uses the standard drivers included in both directions-from the interface to the channel 1 microphone input, so you can use high-quality phantom-powered condenser microphones for superior recording quality. Cubase AI DAW Software Supplied...
Owners Manual
Page 7
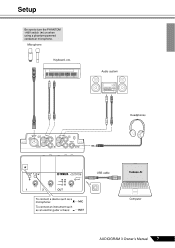
Microphone Keyboard, etc. Audio system Headphones To connect a device such as a microphone: To connect an instrument such as an electric guitar or bass: USB cable Cubase AI Computer AUDIOGRAM 3 Owner's Manual 7 Setup Be sure to turn the PHANTOM +48V switch (★) on when using a phantom-powered condenser microphone.
Microphone Keyboard, etc. Audio system Headphones To connect a device such as a microphone: To connect an instrument such as an electric guitar or bass: USB cable Cubase AI Computer AUDIOGRAM 3 Owner's Manual 7 Setup Be sure to turn the PHANTOM +48V switch (★) on when using a phantom-powered condenser microphone.

Owners Manual
Page 8
... the computer), and set the LEVEL controls and OUT LEVEL control to using a phantom-powered condenser microphone. LEVEL controls OUT LEVEL control 1 Turn all required fields for recording and mixdown. Quick Guide This quick setup and operation guide covers everything from installing the Cubase AI software to their minimum settings. 2 Connect microphones and/or instruments. For details on making connections refer to the "Setup" section on page 7 and the "Controls and Functions" section on when using Cubase AI for registration...
... the computer), and set the LEVEL controls and OUT LEVEL control to using a phantom-powered condenser microphone. LEVEL controls OUT LEVEL control 1 Turn all required fields for recording and mixdown. Quick Guide This quick setup and operation guide covers everything from installing the Cubase AI software to their minimum settings. 2 Connect microphones and/or instruments. For details on making connections refer to the "Setup" section on page 7 and the "Controls and Functions" section on when using Cubase AI for registration...

Owners Manual
Page 9
... you are using the supplied USB cable. Failure to observe these will light to indicate that power is complete before connecting or disconnecting the USB cable. • Wait at least 6 seconds between connecting or disconnecting the USB cable. AUDIOGRAM 3 Owner's Manual 9 This precaution does not apply to balanced dynamic microphones or instruments with the audio system (monitor speakers). 1 Turn on the instruments and microphones. 2 If you set the OUT LEVEL control to the...
... you are using the supplied USB cable. Failure to observe these will light to indicate that power is complete before connecting or disconnecting the USB cable. • Wait at least 6 seconds between connecting or disconnecting the USB cable. AUDIOGRAM 3 Owner's Manual 9 This precaution does not apply to balanced dynamic microphones or instruments with the audio system (monitor speakers). 1 Turn on the instruments and microphones. 2 If you set the OUT LEVEL control to the...

Owners Manual
Page 10
... the program. ("*" indicates where the version number appears in level." NOTE Cubase AI 6 is too low in the actual icon name.) NOTE If the ASIO Direct Sound Full Duplex Driver dialog window appears, click [OK]. Set the OUT LEVEL control to the AUDIOGRAM interface. Quick Guide 4 Step Adjusting Level 1 Adjust the volume on all instruments that are connected to the minimum position. Failure to the "The recorded sound is used for recording...
... the program. ("*" indicates where the version number appears in level." NOTE Cubase AI 6 is too low in the actual icon name.) NOTE If the ASIO Direct Sound Full Duplex Driver dialog window appears, click [OK]. Set the OUT LEVEL control to the AUDIOGRAM interface. Quick Guide 4 Step Adjusting Level 1 Adjust the volume on all instruments that are connected to the minimum position. Failure to the "The recorded sound is used for recording...

Owners Manual
Page 12
... Device Setup window. 12 AUDIOGRAM 3 Owner's Manual Click [OK] to close the dialog window. 6 Make sure that "USB Audio CODEC 1/2"(Windows), "Front Left/Front Right" (Mac) are shown in the [Port System Name] field, and check the [Visible] column in both "Input" and "Output" of the window. NOTE If the [Port System Name] field does not change, close the window. Windows: The ASIO Direct Sound...
... Device Setup window. 12 AUDIOGRAM 3 Owner's Manual Click [OK] to close the dialog window. 6 Make sure that "USB Audio CODEC 1/2"(Windows), "Front Left/Front Right" (Mac) are shown in the [Port System Name] field, and check the [Visible] column in both "Input" and "Output" of the window. NOTE If the [Port System Name] field does not change, close the window. Windows: The ASIO Direct Sound...
Owners Manual
Page 13
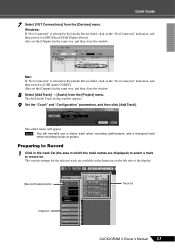
... a track to Record 1 Click in the track list (the area in the Inspector on . Preparing to record on the left side of the display. [Record Enable] button Track list Inspector AUDIOGRAM 3 Owner's Manual 13 Mac: If "Not Connected" is selected in the [Audio Device] field, click on the "Not Connected" indication, and then switch to [USB Audio CODEC]. NOTE You will appear. Quick Guide 7 Select [VST Connections] from the [Project] menu. Windows...
... a track to Record 1 Click in the track list (the area in the Inspector on . Preparing to record on the left side of the display. [Record Enable] button Track list Inspector AUDIOGRAM 3 Owner's Manual 13 Mac: If "Not Connected" is selected in the [Audio Device] field, click on the "Not Connected" indication, and then switch to [USB Audio CODEC]. NOTE You will appear. Quick Guide 7 Select [VST Connections] from the [Project] menu. Windows...

Owners Manual
Page 15
... track, select a new track and repeat the record procedure. Check signal levels to be displayed via the master section bus level meter on the highest input transients. The overall playback level will be sent to open the Mixer window. Adjust the channel LEVEL controls so that the level indicator PEAK LEDs flash only occasionally on the right side of data if a problem occurs. 6 Repeat steps 1 through 5 to the maximum level. Quick Guide 4 Select [Mixer...
... track, select a new track and repeat the record procedure. Check signal levels to be displayed via the master section bus level meter on the highest input transients. The overall playback level will be sent to open the Mixer window. Adjust the channel LEVEL controls so that the level indicator PEAK LEDs flash only occasionally on the right side of data if a problem occurs. 6 Repeat steps 1 through 5 to the maximum level. Quick Guide 4 Select [Mixer...

Owners Manual
Page 16
...'s try mixing down to create the desired initial balance, then adjust the overall volume using the bus volume fader. 4 Drag the pan controls on the left and right to set the stereo position of the channel strip to open a project file. 2 Click the [Start] button on the Transport Panel. 3 While listening to playback, drag the channel strip level faders up and down multiple recorded audio tracks to the pdf manual provided...
...'s try mixing down to create the desired initial balance, then adjust the overall volume using the bus volume fader. 4 Drag the pan controls on the left and right to set the stereo position of the channel strip to open a project file. 2 Click the [Start] button on the Transport Panel. 3 While listening to playback, drag the channel strip level faders up and down multiple recorded audio tracks to the pdf manual provided...

Owners Manual
Page 18
... the MIC/ INST input jack. Neglect of 1.5 meter or less. Adjust the input channel LEVEL controls 3 so that connects it to the computer. 5 Level Indicators These indicators show signal levels prior to a USB port on your ears, or both. 2 MIC/INST Switch Set this switch off . This allows you to the STEREO OUT jacks 0. NOTE Yamaha recommends that you use a USB cable with the phone jack, however, as these precautions may result in large noise bursts...
... the MIC/ INST input jack. Neglect of 1.5 meter or less. Adjust the input channel LEVEL controls 3 so that connects it to the computer. 5 Level Indicators These indicators show signal levels prior to a USB port on your ears, or both. 2 MIC/INST Switch Set this switch off . This allows you to the STEREO OUT jacks 0. NOTE Yamaha recommends that you use a USB cable with the phone jack, however, as these precautions may result in large noise bursts...

Owners Manual
Page 19
... a separate DI (Direct Injection) box or amp simulator. 9 LINE Input Jacks These inputs are intended mainly for use either the phone jacks or pin jacks but not both phone and pin jacks, only the signal from the device connected to an audio system (monitor speakers). XLR-type Phone-type o i If devices are used, the signal is input. Input 3 LEVEL Record controls Playback 6 OUT LEVEL control Cubase AI Output AUDIOGRAM 3 Owner's Manual 19 Set the MIC/INST switch 2 to MIC or INST according...
... a separate DI (Direct Injection) box or amp simulator. 9 LINE Input Jacks These inputs are intended mainly for use either the phone jacks or pin jacks but not both phone and pin jacks, only the signal from the device connected to an audio system (monitor speakers). XLR-type Phone-type o i If devices are used, the signal is input. Input 3 LEVEL Record controls Playback 6 OUT LEVEL control Cubase AI Output AUDIOGRAM 3 Owner's Manual 19 Set the MIC/INST switch 2 to MIC or INST according...

Owners Manual
Page 20
... levels? ❑ Is the output of your computer operating system muted? ❑ Do you have several applications running at the same time? Windows 7/Vista: 1. Set "Sound playback: Default device" and "Sound recording: Default device" to open the "Sounds and Audio Devices Properties" dialog window. 2. Be sure to a USB port on . ❑ Is the included USB cable properly plugged into the interface and a computer? From the [START] menu click [Control Panel...
... levels? ❑ Is the output of your computer operating system muted? ❑ Do you have several applications running at the same time? Windows 7/Vista: 1. Set "Sound playback: Default device" and "Sound recording: Default device" to open the "Sounds and Audio Devices Properties" dialog window. 2. Be sure to a USB port on . ❑ Is the included USB cable properly plugged into the interface and a computer? From the [START] menu click [Control Panel...

Owners Manual
Page 21
... USB cable while Cubase AI is too low in level. ❑ Is the computer's output level setting too low? From the [START] menu click [Control Panel], then double-click the "Sounds and Audio Devices" icon to open the "Sounds and Audio Devices Properties" dialog window. 2. Click the "Sound" tab. 5. Troubleshooting Mac: 1. From the [START] menu click [Control Panel], then double-click the "Sound" icon to open the "Sound" dialog window. 2. Click the "Volume" tab. 3. Click the "Sound Effect...
... USB cable while Cubase AI is too low in level. ❑ Is the computer's output level setting too low? From the [START] menu click [Control Panel], then double-click the "Sounds and Audio Devices" icon to open the "Sounds and Audio Devices Properties" dialog window. 2. Click the "Sound" tab. 5. Troubleshooting Mac: 1. From the [START] menu click [Control Panel], then double-click the "Sound" icon to open the "Sound" dialog window. 2. Click the "Volume" tab. 3. Click the "Sound Effect...

Owners Manual
Page 22
... than 128 megabytes). The audio data processing capabilities of your computer's operating system. If the audio files you are not too large, changing the virtual memory settings can significantly increase your computer's support center or support page on installing and setting up extra memory. There is a delay when playing a software synthesizer via a MIDI keyboard (latency). ❑ Check the URL listed below can play at the same time? sion quality" to...
... than 128 megabytes). The audio data processing capabilities of your computer's operating system. If the audio files you are not too large, changing the virtual memory settings can significantly increase your computer's support center or support page on installing and setting up extra memory. There is a delay when playing a software synthesizer via a MIDI keyboard (latency). ❑ Check the URL listed below can play at the same time? sion quality" to...
Owners Manual
Page 23
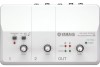
... R) Controls USB Connector MIC/INST Switch LEVEL Control PHANTOM +48V Switch OUT LEVEL Control Indicators Phantom Power Level Indicators Power Power Supply Dimensions (W x H x D) Net Weight Included Accessories x 1 Combo jack (Mic/HiZ) x 1 Phone jacks x 1 RCA pin jacks x 1 Phone jack x 1 Phone jacks x 1 RCA pin jacks x 1 USB 1.1 44.1/48 kHz, 16 bit x 1 MIC: for microphones INST (Hi-Z): for CH1 x 1 Adjusts the overall signal x 1 Red x 1 2 points (green, red) x 1 Green USB bus-powered 180 x 61 x 112 mm 490 g Cubase AI DVD-ROM USB cable Owner's Manual ■ Dimensional Diagrams...
... R) Controls USB Connector MIC/INST Switch LEVEL Control PHANTOM +48V Switch OUT LEVEL Control Indicators Phantom Power Level Indicators Power Power Supply Dimensions (W x H x D) Net Weight Included Accessories x 1 Combo jack (Mic/HiZ) x 1 Phone jacks x 1 RCA pin jacks x 1 Phone jack x 1 Phone jacks x 1 RCA pin jacks x 1 USB 1.1 44.1/48 kHz, 16 bit x 1 MIC: for microphones INST (Hi-Z): for CH1 x 1 Adjusts the overall signal x 1 Red x 1 2 points (green, red) x 1 Green USB bus-powered 180 x 61 x 112 mm 490 g Cubase AI DVD-ROM USB cable Owner's Manual ■ Dimensional Diagrams...
Owners Manual
Page 25
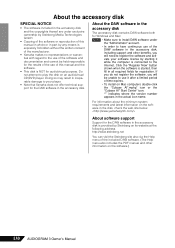
... software license by Steinberg on an audio/visual CD/DVD player. Click the "Register Now" button shown when the software is connected to have continuous use of time expires. • To install on the software.) 130 AUDIOGRAM 3 Owner's Manual NOTE • Make sure to install DAW software under exclusive ownership by Steinberg Media Technologies GmbH. • Copying of the software or reproduction of this manual and the software...
... software license by Steinberg on an audio/visual CD/DVD player. Click the "Register Now" button shown when the software is connected to have continuous use of time expires. • To install on the software.) 130 AUDIOGRAM 3 Owner's Manual NOTE • Make sure to install DAW software under exclusive ownership by Steinberg Media Technologies GmbH. • Copying of the software or reproduction of this manual and the software...


