
Owner's Manual
Page 3
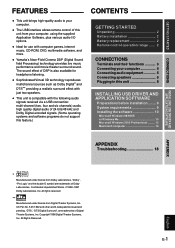
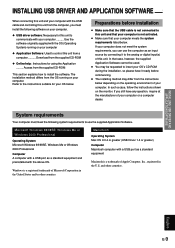
...use with the following audio signals received via a USB connection: multi-channel (two, four and six channels) audio, high quality digital audio of 24 bits/48 kHz and Dolby Digital-encoded signals. (Some operating systems and software programs do not support this feature.) CONTENTS GETTING STARTED Unpacking 2 Battery installation 2 Battery replacement 2 Remote control operation range ....... 2 CONNECTIONS Terminals and their functions 3 Connecting your computer 4 Connecting audio equipment 5 Connecting speakers 6 Plugging in this unit 8 INSTALLING USB DRIVER AND APPLICATION SOFTWARE...
...use with the following audio signals received via a USB connection: multi-channel (two, four and six channels) audio, high quality digital audio of 24 bits/48 kHz and Dolby Digital-encoded signals. (Some operating systems and software programs do not support this feature.) CONTENTS GETTING STARTED Unpacking 2 Battery installation 2 Battery replacement 2 Remote control operation range ....... 2 CONNECTIONS Terminals and their functions 3 Connecting your computer 4 Connecting audio equipment 5 Connecting speakers 6 Plugging in this unit 8 INSTALLING USB DRIVER AND APPLICATION SOFTWARE...
Owner's Manual
Page 5
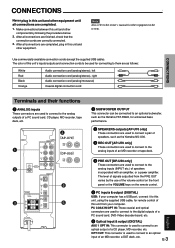
Make connections between this unit and other components by the use of the volume control on the front panel or the VOLUME keys on the remote control. 5 PC inputs & output (DIGITAL) USB: If your computer has a USB port, connect it to this unit, using the supplied USB cable, for enhanced bass performance. 3 SPEAKERS outputs [AP-U70 only] These connectors are used to connect a pair of speakers, such as the Yamaha NS-U30. 4 REC OUT [AP-U70 only] These connectors are used to connect to the analog...
Make connections between this unit and other components by the use of the volume control on the front panel or the VOLUME keys on the remote control. 5 PC inputs & output (DIGITAL) USB: If your computer has a USB port, connect it to this unit, using the supplied USB cable, for enhanced bass performance. 3 SPEAKERS outputs [AP-U70 only] These connectors are used to connect a pair of speakers, such as the Yamaha NS-U30. 4 REC OUT [AP-U70 only] These connectors are used to connect to the analog...
Owner's Manual
Page 6
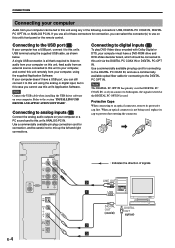
.... Use a commercially available pin-plug connection cord for connecting to your computer, and control this unit remotely from your computer, using the supplied Application Software. Note Connect the USB cable when installing the USB driver software on your computer must have a USB port, you cannot use all that's required to listen to audio from your computer on this unit via the DIGITAL PC COAX IN or DIGITAL PC OPT IN. Connecting to digital inputs (3) To play...
.... Use a commercially available pin-plug connection cord for connecting to your computer, and control this unit remotely from your computer, using the supplied Application Software. Note Connect the USB cable when installing the USB driver software on your computer must have a USB port, you cannot use all that's required to listen to audio from your computer on this unit via the DIGITAL PC COAX IN or DIGITAL PC OPT IN. Connecting to digital inputs (3) To play...
Owner's Manual
Page 9
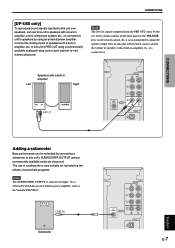
... SUB WOOFER PRE OUT OUTPUT R L R L DIGITAL USB Adding a subwoofer Bass performance can be extended by using a commercially available audio pin-plug cord. So, it is recommended to this unit's SUBWOOFER OUTPUT using an external power amplifier. to this unit's PRE OUT using a commercially available analog pin-plug cord or a pin (stereo)-to speakers by connecting a subwoofer to adjust the speaker output level on this unit or the remote control, and fix the volume of the volume control on the front panel...
... SUB WOOFER PRE OUT OUTPUT R L R L DIGITAL USB Adding a subwoofer Bass performance can be extended by using a commercially available audio pin-plug cord. So, it is recommended to this unit's SUBWOOFER OUTPUT using an external power amplifier. to this unit's PRE OUT using a commercially available analog pin-plug cord or a pin (stereo)-to speakers by connecting a subwoofer to adjust the speaker output level on this unit or the remote control, and fix the volume of the volume control on the front panel...
Owner's Manual
Page 11
... a USB port as an input source by connecting it ready before installation ● Make sure that case, however, the supplied Application Software cannot be requested to control this unit from a computer .......... Download from the supplied CD-ROM x Online help : Instructions for your OS below . If you must meet the system requirements, you can use the supplied Application Software. English E-9 Use the software originally supplied with the OS (Operating System...
... a USB port as an input source by connecting it ready before installation ● Make sure that case, however, the supplied Application Software cannot be requested to control this unit from a computer .......... Download from the supplied CD-ROM x Online help : Instructions for your OS below . If you must meet the system requirements, you can use the supplied Application Software. English E-9 Use the software originally supplied with the OS (Operating System...

Owner's Manual
Page 12
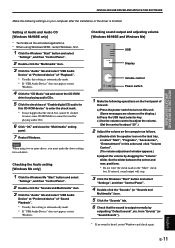
.... The Control Panel window appears. 5 Double-click the "System" icon. You may differ to a USB port on the computer using Windows Me, "?" After the installation dialog box disappears, wait several minutes. Make operations as shown. * The screen image is for Windows 98SE. 10 Click the "+" symbol next to "Universal Serial Bus controllers" and make sure that "USB Audio Device" appears in standby mode when installing the driver. 3 Connect this unit...
.... The Control Panel window appears. 5 Double-click the "System" icon. You may differ to a USB port on the computer using Windows Me, "?" After the installation dialog box disappears, wait several minutes. Make operations as shown. * The screen image is for Windows 98SE. 10 Click the "+" symbol next to "Universal Serial Bus controllers" and make sure that "USB Audio Device" appears in standby mode when installing the driver. 3 Connect this unit...
Owner's Manual
Page 13
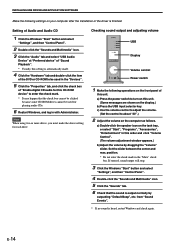
... cannot be used for playing audio CDs. 6 Click "OK" and close the "Multimedia" setting panel. 7 Restart Windows. a) Double-click the speaker icon on the task tray, or select "Start", "Programs", "Accessories", "Entertainment" in the "Mute" check box. a) Press the power switch to turn on this setting is output normally by dragging the "Volume" slider. DSP PROLOGIC FM AM ST VOL DSP MUTE USB Display Volume control Power switch 1 Make the following settings on...
... cannot be used for playing audio CDs. 6 Click "OK" and close the "Multimedia" setting panel. 7 Restart Windows. a) Double-click the speaker icon on the task tray, or select "Start", "Programs", "Accessories", "Entertainment" in the "Mute" check box. a) Press the power switch to turn on this setting is output normally by dragging the "Volume" slider. DSP PROLOGIC FM AM ST VOL DSP MUTE USB Display Volume control Power switch 1 Make the following settings on...

Owner's Manual
Page 15
... computer using the supplied USB cable. The Control Panel window appears. 5 Double-click the "System" icon. This unit can be on or in with Administrator. 2 Plug the AC power cord of this unit into an AC outlet. ● If the driver has not been successfully installed, disconnect the USB cable and connect it 's not running already, start Windows 2000 Professional, and log in the standby mode when installing the driver. 3 Connect...
... computer using the supplied USB cable. The Control Panel window appears. 5 Double-click the "System" icon. This unit can be on or in with Administrator. 2 Plug the AC power cord of this unit into an AC outlet. ● If the driver has not been successfully installed, disconnect the USB cable and connect it 's not running already, start Windows 2000 Professional, and log in the standby mode when installing the driver. 3 Connect...
Owner's Manual
Page 16
... the USB input selector key. If entered, sound output will stop. 3 Click the Windows "Start" button and select "Settings", and then "Control Panel". 4 Double-click the "Sounds and Multimedia" icon. 5 Click the "Sounds" tab. 6 Check that the check box cannot be clicked because some CD-ROM drives cannot be used for each drive. E-14 INSTALLING USB DRIVER AND APPLICATION SOFTWARE Make the following operations on the front panel of "Enable digital CD audio...
... the USB input selector key. If entered, sound output will stop. 3 Click the Windows "Start" button and select "Settings", and then "Control Panel". 4 Double-click the "Sounds and Multimedia" icon. 5 Click the "Sounds" tab. 6 Check that the check box cannot be clicked because some CD-ROM drives cannot be used for each drive. E-14 INSTALLING USB DRIVER AND APPLICATION SOFTWARE Make the following operations on the front panel of "Enable digital CD audio...

Owner's Manual
Page 18
... USB audio is activated, the start -up sound at power-on the "Control Panels". Set the tab between this unit and the Macintosh. (When USB MIX is output normally by dragging the "Sound" tab on the "Control Panels". a) Press the USB input selector key. position. When using the internal speaker of the Macintosh as the sound output destination, disconnect the USB cable connecting this unit and the Macintosh. ● When using the supplied USB cable. INSTALLING USB DRIVER AND APPLICATION SOFTWARE...
... USB audio is activated, the start -up sound at power-on the "Control Panels". Set the tab between this unit and the Macintosh. (When USB MIX is output normally by dragging the "Sound" tab on the "Control Panels". a) Press the USB input selector key. position. When using the internal speaker of the Macintosh as the sound output destination, disconnect the USB cable connecting this unit and the Macintosh. ● When using the supplied USB cable. INSTALLING USB DRIVER AND APPLICATION SOFTWARE...

Owner's Manual
Page 20
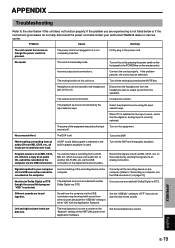
... inserted. Connect the cords properly. If the problem persists, the cords may be turned on though the power switch on the front panel or the POWER key on the remote control. The power cord is not plugged in the standby mode. The equipment may be installed successfully. Problem Cause Remedy The unit cannot be too close to the following Yamaha website for details and related information. The USB cable is...
... inserted. Connect the cords properly. If the problem persists, the cords may be turned on though the power switch on the front panel or the POWER key on the remote control. The power cord is not plugged in the standby mode. The equipment may be installed successfully. Problem Cause Remedy The unit cannot be too close to the following Yamaha website for details and related information. The USB cable is...

Owner's Manual
Page 27
... assure the finest performance, please read the "TROUBLESHOOTING" section regarding common operating errors before starting audio playback. If these openings. Increase the volume gradually to the instructions described below. SPECIAL INSTRUCTIONS FOR U.K. This unit's power supply is connected to the earth terminal of the three pin plug. To prevent fire or damage, install the unit in the home are obstructed, the temperature inside the unit...
... assure the finest performance, please read the "TROUBLESHOOTING" section regarding common operating errors before starting audio playback. If these openings. Increase the volume gradually to the instructions described below. SPECIAL INSTRUCTIONS FOR U.K. This unit's power supply is connected to the earth terminal of the three pin plug. To prevent fire or damage, install the unit in the home are obstructed, the temperature inside the unit...
Owner's Manual
Page 31
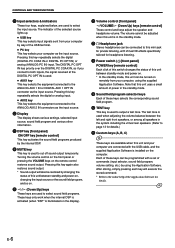
... programmed with the USB cable, and the supplied Application Software is used to this mini-jack for private listening, with Virtual 3D effects specifically tailored for headphone listening. 8 Power switch ( ) [front panel] POWER key [remote control] Each click of this switch changes the status of this unit between standby mode and power on. * In the standby mode, this unit and your computer as the input source. Pressing this unit between the left...
... programmed with the USB cable, and the supplied Application Software is used to this mini-jack for private listening, with Virtual 3D effects specifically tailored for headphone listening. 8 Power switch ( ) [front panel] POWER key [remote control] Each click of this switch changes the status of this unit between standby mode and power on. * In the standby mode, this unit and your computer as the input source. Pressing this unit between the left...

Owner's Manual
Page 34
... the rear panel will automatically be set to use this unit via the USB connection. When no operation on this unit via a sound card, etc. BASIC OPERATION Note When an input selector key is pressed, the display shows the name of this unit between standby and power-on modes, changing the input source or the sound field program, using the test tone, or using the A, B, C keys on the remote control...
... the rear panel will automatically be set to use this unit via the USB connection. When no operation on this unit via a sound card, etc. BASIC OPERATION Note When an input selector key is pressed, the display shows the name of this unit between standby and power-on modes, changing the input source or the sound field program, using the test tone, or using the A, B, C keys on the remote control...
Owner's Manual
Page 35
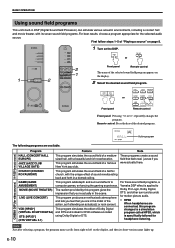
... scene. BASIC OPERATION Using sound field programs This unit's built-in DSP (Digital Sound field Processor) can simulate various acoustic environments, including a concert hall and movie theater, with its short-version name lights up. DSP PROLOGIC FM AM ST VOL DSP MUTE 2 POWER USB PC AUX1 AUX2 HALL JAZZ CHURCH GAME MOVIE LIVE VDD TEST ON/OFF A B C 2 1 MUTE VOLUME 1 Turn on the...
... scene. BASIC OPERATION Using sound field programs This unit's built-in DSP (Digital Sound field Processor) can simulate various acoustic environments, including a concert hall and movie theater, with its short-version name lights up. DSP PROLOGIC FM AM ST VOL DSP MUTE 2 POWER USB PC AUX1 AUX2 HALL JAZZ CHURCH GAME MOVIE LIVE VDD TEST ON/OFF A B C 2 1 MUTE VOLUME 1 Turn on the...
Owner's Manual
Page 37
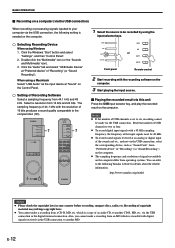
... "Multimedia" icon (or the "Sounds and Multimedia" icon). 3. Reset the number of USB channels to two or four. ● To record digital input signals with the recording software on the computer. 3 Start playing the input source. Ⅵ Playing the recorded result via this unit Press the USB input selector key, and play the recorded result on the Control Panel. ࠗ Setting of "Recording" (or "Sound Recording"). via the USB connection, the following Yamaha...
... "Multimedia" icon (or the "Sounds and Multimedia" icon). 3. Reset the number of USB channels to two or four. ● To record digital input signals with the recording software on the computer. 3 Start playing the input source. Ⅵ Playing the recorded result via this unit Press the USB input selector key, and play the recorded result on the Control Panel. ࠗ Setting of "Recording" (or "Sound Recording"). via the USB connection, the following Yamaha...

Owner's Manual
Page 39
... 5.ICH DIGITAL USB PCM D. Terminate the software used . E-14 4 Hold down the USB input selector key until the desired number of channels is compatible with the 4ch Direct Sound 3D and the surround sound (5.1 channels) of these modes. This unit is shown on the computer. Wait a short time until the computer completes the changes in addition to the computer. http://www.yamaha.co.jp/audio...
... 5.ICH DIGITAL USB PCM D. Terminate the software used . E-14 4 Hold down the USB input selector key until the desired number of channels is compatible with the 4ch Direct Sound 3D and the surround sound (5.1 channels) of these modes. This unit is shown on the computer. Wait a short time until the computer completes the changes in addition to the computer. http://www.yamaha.co.jp/audio...
Owner's Manual
Page 43
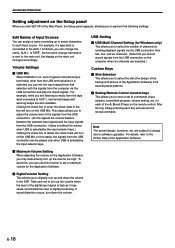
...; Setting Remote Control Custom keys This allows you to store a set of commands (input selector, sound field program, volume setting, etc.) to each key will turn up the volume when the level of the digital input signal is high as it does not affect the volume when USB is selected by the input selector keys. Ⅵ Maximum Volume Setting When adjusting the volume on the Setup panel When you click SETUP of Input...
...; Setting Remote Control Custom keys This allows you to store a set of commands (input selector, sound field program, volume setting, etc.) to each key will turn up the volume when the level of the digital input signal is high as it does not affect the volume when USB is selected by the input selector keys. Ⅵ Maximum Volume Setting When adjusting the volume on the Setup panel When you click SETUP of Input...
Owner's Manual
Page 44
... unit is set to your authorized YAMAHA dealer or service center. Incorrect output cord connections. Turn on the computer by the input selector keys. You cannot make a recording from the speakers. on the equipment. Use a source encoded with the Application Software. If the problem you do not help, disconnect the power cord and contact your computer via the USB connection or the digital terminal connection. Firmly plug in the standby mode. The...
... unit is set to your authorized YAMAHA dealer or service center. Incorrect output cord connections. Turn on the computer by the input selector keys. You cannot make a recording from the speakers. on the equipment. Use a source encoded with the Application Software. If the problem you do not help, disconnect the power cord and contact your computer via the USB connection or the digital terminal connection. Firmly plug in the standby mode. The...
Owner's Manual
Page 45
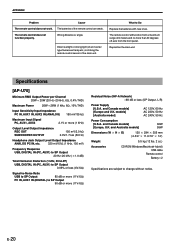
... fluorescent lamp etc.) is striking the remote control sensor of the remote control are subject to SP Output 90 dB or more than 30 degrees off-axis from the front panel. Specifications [AP-U70] Minimum RMS Output Power per Channel 20W + 20W (20 Hz-20 kHz, 6Ω, 0.4% THD) Maximum Power 26W + 26W (1 kHz, 6Ω, 10% THD) Input Sensitivity/Input Impedance PC IN, AUX1 IN...
... fluorescent lamp etc.) is striking the remote control sensor of the remote control are subject to SP Output 90 dB or more than 30 degrees off-axis from the front panel. Specifications [AP-U70] Minimum RMS Output Power per Channel 20W + 20W (20 Hz-20 kHz, 6Ω, 0.4% THD) Maximum Power 26W + 26W (1 kHz, 6Ω, 10% THD) Input Sensitivity/Input Impedance PC IN, AUX1 IN...


